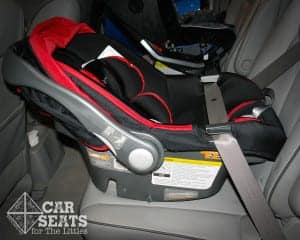
*This seat has been discontinued* Technology is changing everyday in the car seat world. The Summer Infant Prodigy rear facing only seat isn’t lacking in the technology department with its built-in computer for ease of installation. Check out our test drive of this technologically advanced infant seat.
 CSFTL Quick Stats
- Weight range: 4-35 lbs
- Height range: 0-32″ or head 1″ from the top of the shell
- Shell height: 20″
- Lowest harness position: 6″
- Weight (carrier only): 10.4 lbs
- Expiration: 6 years
- Handle position: Any locked position
Features
- Belt tightening system with integrated lock off uses a ratcheting system to tighten the belt without much effort
- Adjustable recline foot
- Push button lower anchor connectors
- No rethread harness with Summer Infant’s 1 adjust harness
- Smart screen technology tells you when it’s level and tight
Child Fit
 The Prodigy is a rear facing only seat, so it is rear facing only and works for 4 lb preemies all the way up to over 1 year olds (depending on the child’s size). It’s one of the taller infant seats on the market with a shell height of 20 inches.
The 1 adjust harness is amazing and I have really enjoyed using it. To operate it, simply push the harness adjuster button by the child’s feet to loosen the straps, strap the kiddo in, then pull on the adjuster strap to tighten. The harness automatically moves to the correct shoulder height position. The only drawback I’ve come across with this system is to remember not to over tighten it. If you pull too much on it, it really pulls the harness down their back and can make them uncomfortable.
The infant insert is required from 4-11 pounds and works nicely to keep infants snug. The carry handle, like most infant seats on the market, can be left in any locked position when traveling with it.
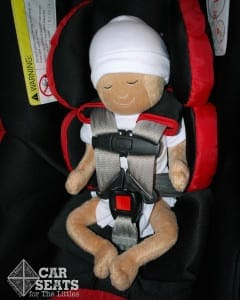
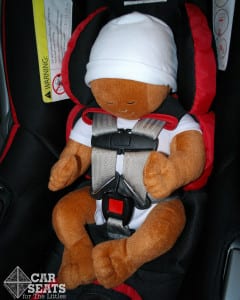
Jo – Preemie Huggable Images doll, 4 lbs, 17″
The harness passed the pinch test at the tightest the harness would adjust and the harness straps were right at her shoulders.
Fiona – Newborn Huggable Images doll, 7 lbs, 17″
We kept the infant insert in to help with slump and she fit perfectly with it.
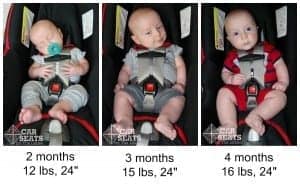 Long term model
This model has fit very well throughout the time we’ve used it. At 2 months you can see that he had a bit of side slump since he was over the weight limit of the infant insert. To solve this we added rolled receiving blankets to either side of him.
 Update – 13 months, 23 lbs, 30″
I’ve been very impressed with the Prodigy for fit of bigger kids. Our model still fits with the most room to grow than I’ve seen in any rear facing only seat I’ve had him in. He has a good 2 inches still before he hits the 1″ from the top of the shell limit. He also had plenty of room side to side and could continue using this seat for several more months.
 18 months, 18.5 lbs, 31″
This model fits with about an inch of growing room still. She outgrew this seat at about 22 months with her head just past the 1″ from the top of the shell requirement. I really liked this seat for her due to the longevity of it. It did start to get a bit heavy, but that is a common problem with higher weight rear facing only seats.
Installation
Smart Screen Technology
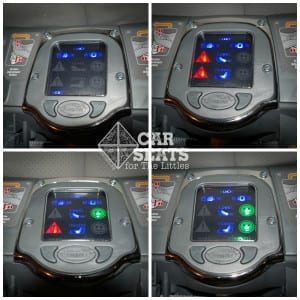
The smart screen technology is nice for parents who are always guessing whether they have their seat installed correctly or not. As soon as you set it on the vehicle seat, just push the power button and the Click pictures light up. Once it is clicked in, the level picture lights up with either the red check mark on the left or the green smiley face on the right.

Adjust the level by pushing the buttons on either side of the display screen to move the foot up and down on the bottom of the base. There are 5 positions on the foot to achieve the proper recline; it’s important for a newborn to have sufficient recline to keep their head from falling forward and constricting their airway. Once the green smiley face appears on the level, the Tighten picture lights up with either a red check mark on the left or a green smiley face on the right.
Using the the ratcheting mechanism below the computer screen, tighten the latch or seat belt until it moves 1″ or less in any direction (more on that feature in just a minute). Once the smiley face appears on the tighten picture, then it will say complete and you’re ready to roll. It is still important to manually check the tightness of the base before and after the green smiley comes up though. I’ve found that mine will have 1″ or less of movement at one ratchet before the smiley shows up, so it’s pretty particular and I would be a bit concerned about over tightening it. You also want to make sure you don’t get 1 inch or more of movement at the belt path after that smiley has shown up because, as we all know, technology isn’t perfect.
Belt Tightening System
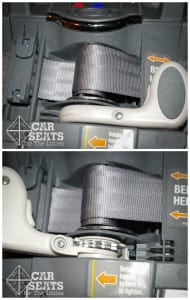
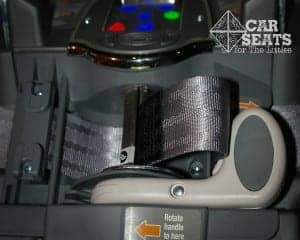 The Prodigy’s Belt Tightening System consists of a ratcheting mechanism that wraps either the lower anchor strap or seat belt around a peg in the base and helps with tightening it. The peg is rigid but rounded, so there’s no worry about the peg cutting into the seat belt. As stated above though, there is always a chance of over tightening it, which is why I suggest watching the smiley face on the display, but also check the tightness along the way. There should be 1″ or less of movement at the belt path (where the lower anchor strap or seat belt threads through the base). To test, use your non dominant hand and give it a slight tug with about the same strength that you’d use to give a firm handshake. I was reassured by the engineer with Summer Infant that this mechanism was tested many times with varying degrees of weight with no damage being shown to the belt.
Lower Anchor Install
 Slide the lower anchor strap onto the peg. Then just push the handle to tighten it down. To loosen, you push the button on the handle and it loosens it.
Seat Belt Install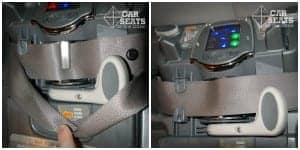
The lap and shoulder belt both need to be threaded through the pressure sensitive guide beside the ratcheting system. Then you slide just the lap belt through the peg and tighten with the handle. This locks the lap belt, but not the shoulder belt. The shoulder belt does not need to be locked when using the base for installation. To loosen, push the button on the handle.
Baseless Install
Like most rear facing only seats, the Prodigy can be installed without the base if needed. When the base is not being used, you miss the technology that’s built into it, but it’s still possible to install without it. The belt guides are easy to get to and there is a bold orange line printed on the side of the seat that needs to be level to ground when installed. As always when installing an infant seat without a base, don’t forget to lock the seat belt.
Overall Thoughts
I am really enjoying this seat! It is a tall seat with high weight and height limits, which makes it a great seat for both big and little kids. It’s fairly lightweight to carry, the handle is easy to move up and down with the integrated buttons on the side of the handle and my Little hasn’t complained at all about it. The base is simple to install and pretty fool proof with the smart screen technology. The 1 adjust harness works really well and takes the guess work out of where the harness should be, and the less guessing a parent has to make – the better! There are labels are ALL over this seat, so if the manual isn’t handy when installing, there are good instructions right in front of you. Overall, I’ve been impressed with this seat.
Contest is now closed, congrats to the winner, Elizabeth!
Interested in one for your Little? Summer Infant is giving the opportunity to one lucky reader to win this seat. Just follow the directions on Rafflecopter to enter. Contest is open to US residents only.
Summer Infant graciously provided the seat used for review, but CSFTL was not otherwise compensated. Opinions, as always, are all our own! Originally written by Angela Tastad. Edits maintained by CSFTL.

