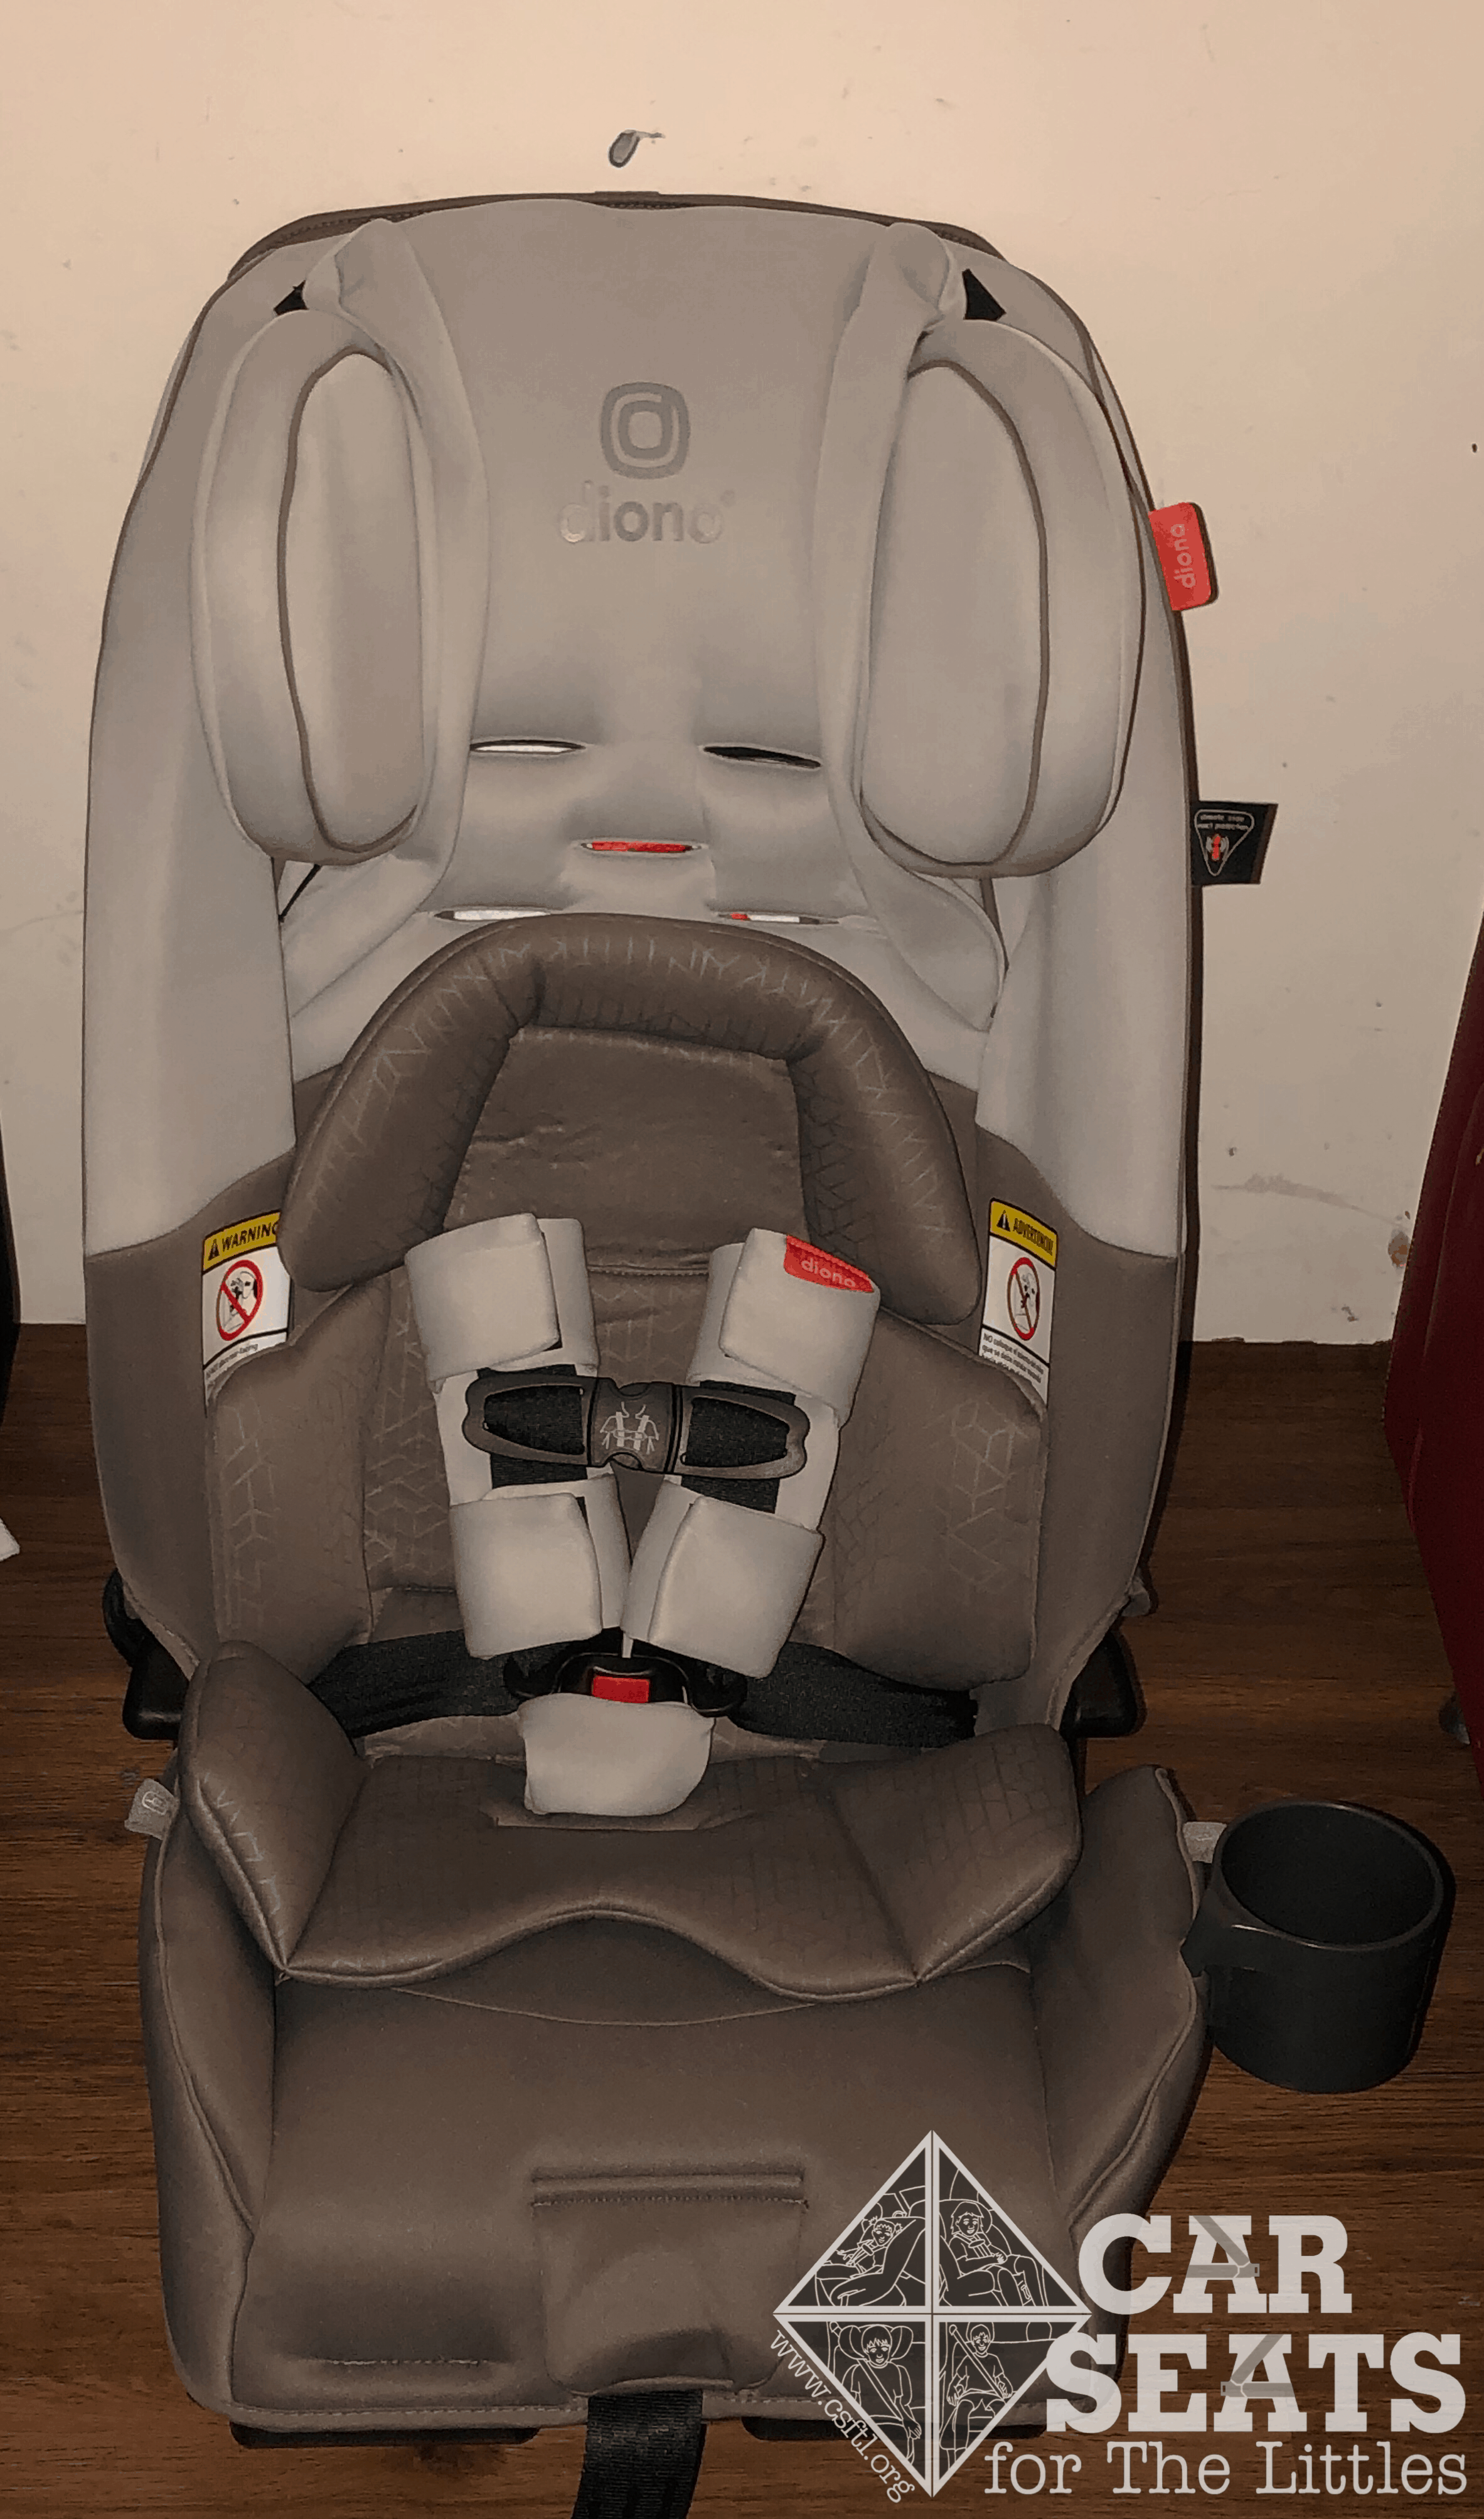
Diono radian 3RXT
Sunshine Kids first released the Radian convertible car seats in November 2005, and some of the oldest CSFTL kiddos rode in those seats! Since that time, Sunshine Kids became Diono, and the Radian has gone through a few sets of changes. Recently, Diono has revamped the Radian family of products once again, introducing a new take on these familiar seats. The updated radian 3RXT multimode car seat loses a capital R in the name and adds some interesting new features.
CSFTL Quick Stats
- Rear facing weight range: 5-45 pounds
- Rear facing height range: 44 inches or less and top of child’s head at least 1.5 inches below the top of the headrest
- Lowest harness height: 8 inches without insert
- Forward facing weight range: 20-65 pounds
- Forward facing height range: 57 inches or less
- Top harness height: 17 inches
- Booster mode weight range: 50-120 pounds
- Booster mode age minimum: None given. CSFTL advocates that children be AT LEAST 5 YEARS OLD before riding in a booster seat
- Booster mode height range: Child’s shoulders must be at or above the 4th harness strap slot
- Top booster mode shoulder belt guide position: 17 inches
- Crotch buckle positions: 2.5, 5, and 7 inches from the back of the seat pan
- Lower anchor weight limit: 35 pounds rear facing, 40 pounds forward facing
- Expiration: 10 years from date of manufacture
Measurements
- Seat pan depth: about 12.5 inches
- Seat pan width: 12 inches at the child’s hips
- Internal seating area width: 12 inches at the child’s shoulders
- Shell height: 24.5 inches
- Width at widest point: 16.5 inches, near the child’s shoulders
- Seat weight: 24 pounds
New vs. Old – We’ll Cover Both!
Many of our longtime readers and families who knew the Radian well may be wondering how the new radian 3RXT compares to the former version of this seat, the Diono Radian RXT. While this review aims to evaluate the new radian 3RXT from top to bottom, we’ll be sure to mention areas where the 3RXT differs from the older Radian RXT as well.
Canada — Coming Soon!
Diono has just released this seat in Canada as well. The Canadian version has a few differences from the model we’re reviewing here, and some are significant. Please stay tuned for a review of the Canadian version of the radian 3RXT!
Unique Features
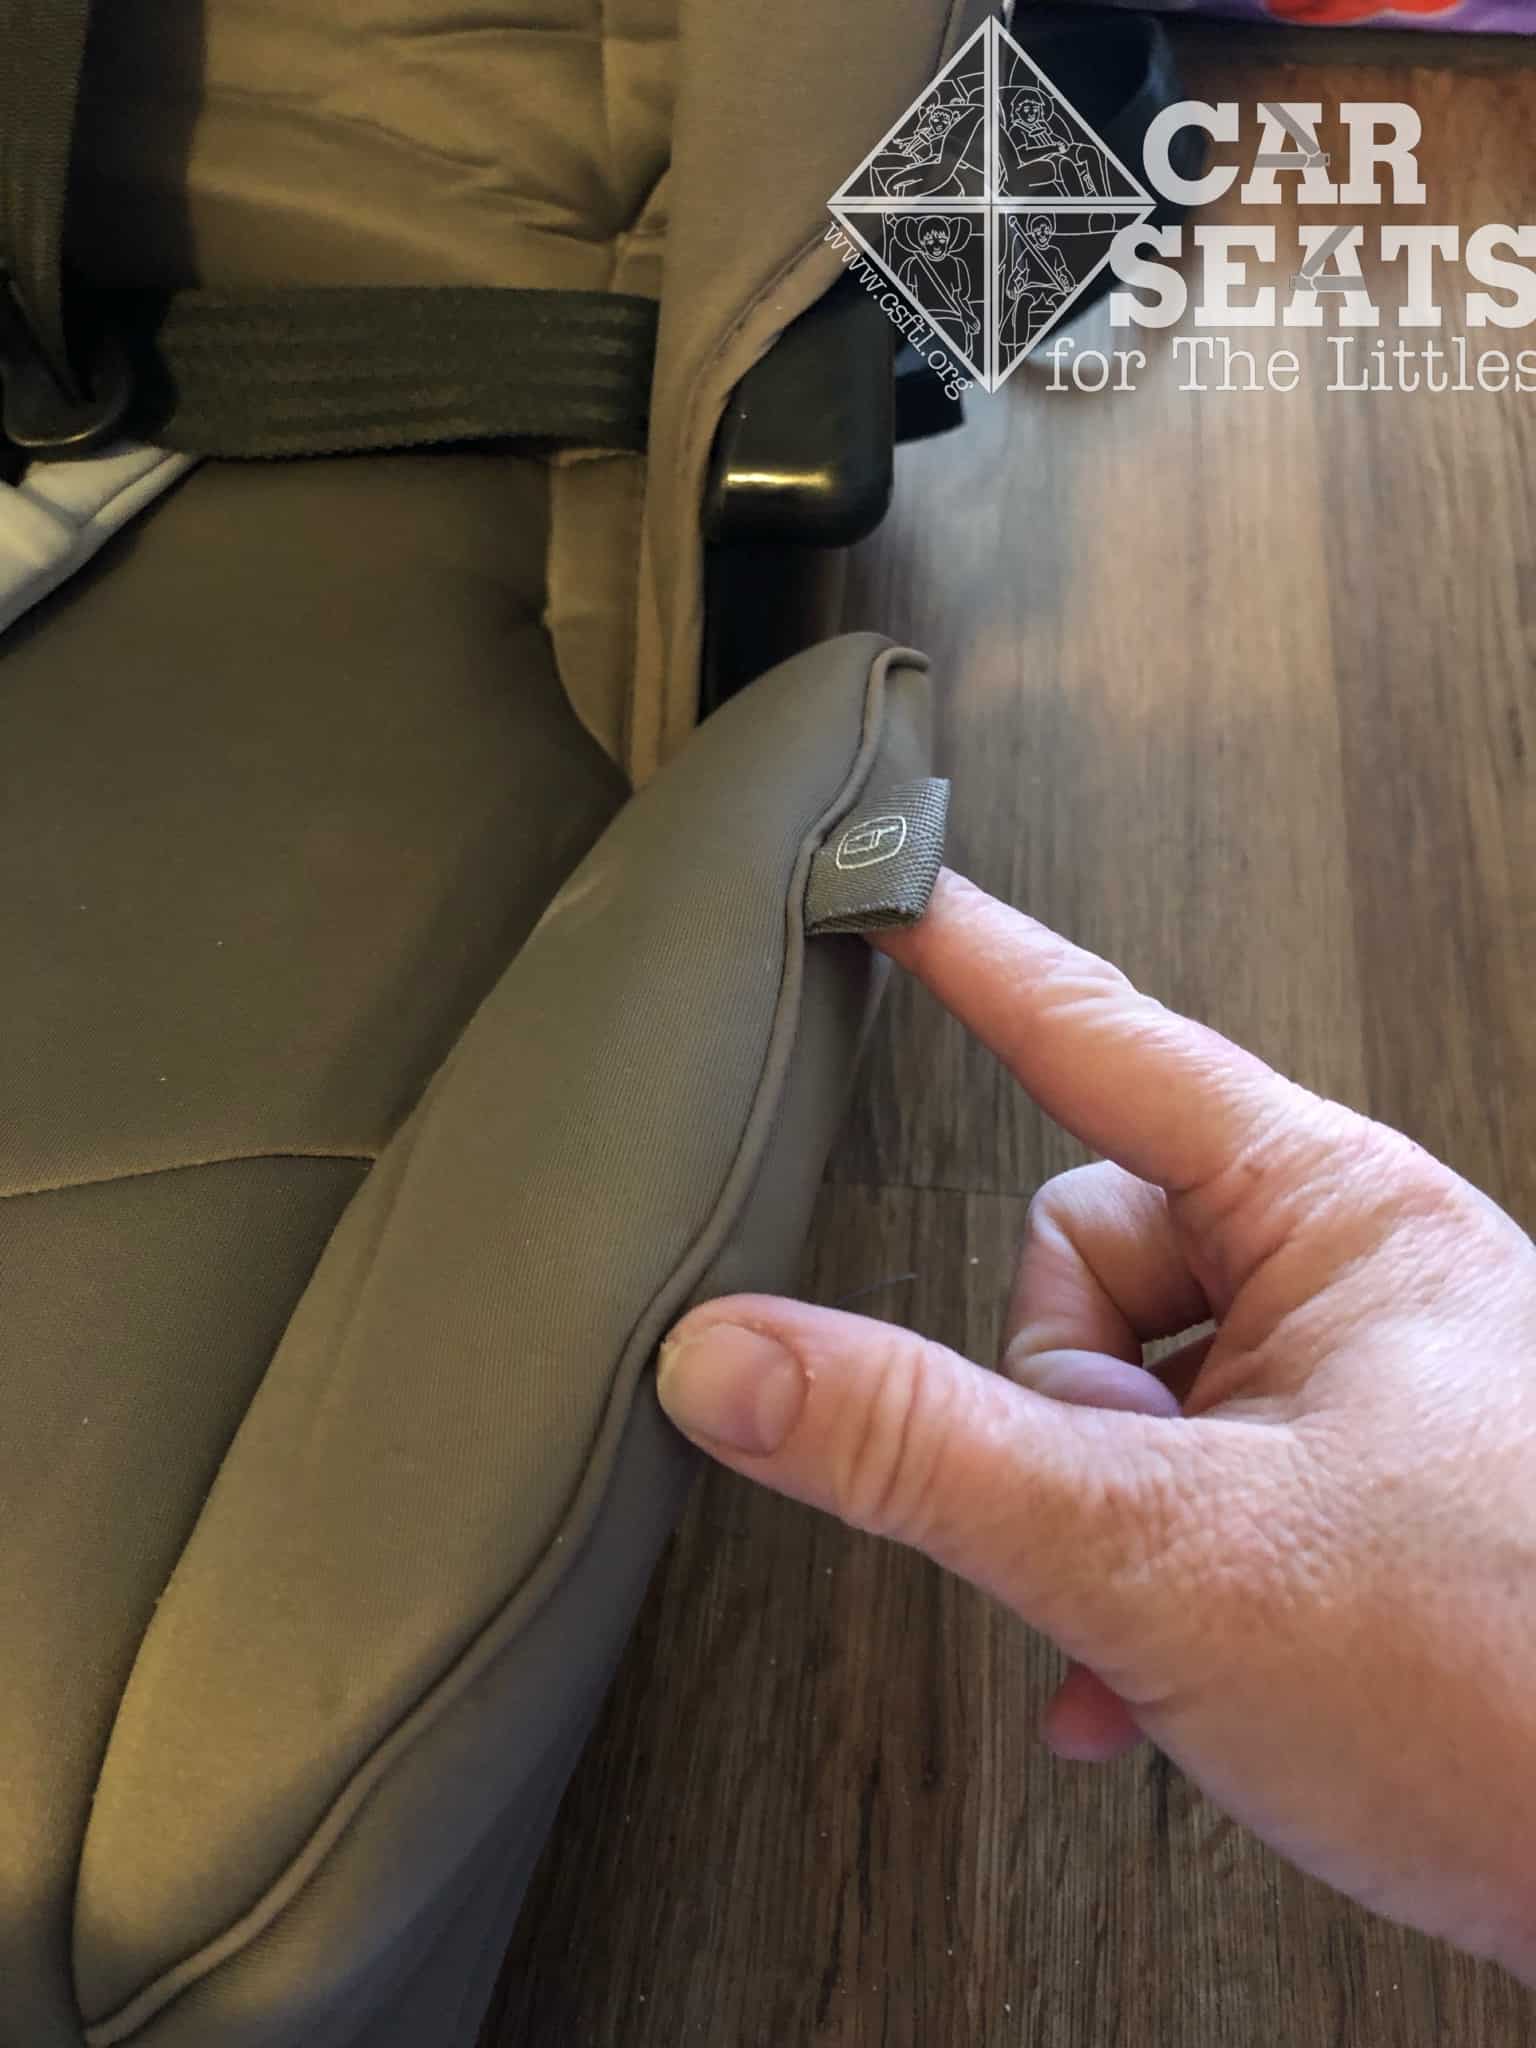
Back Cover
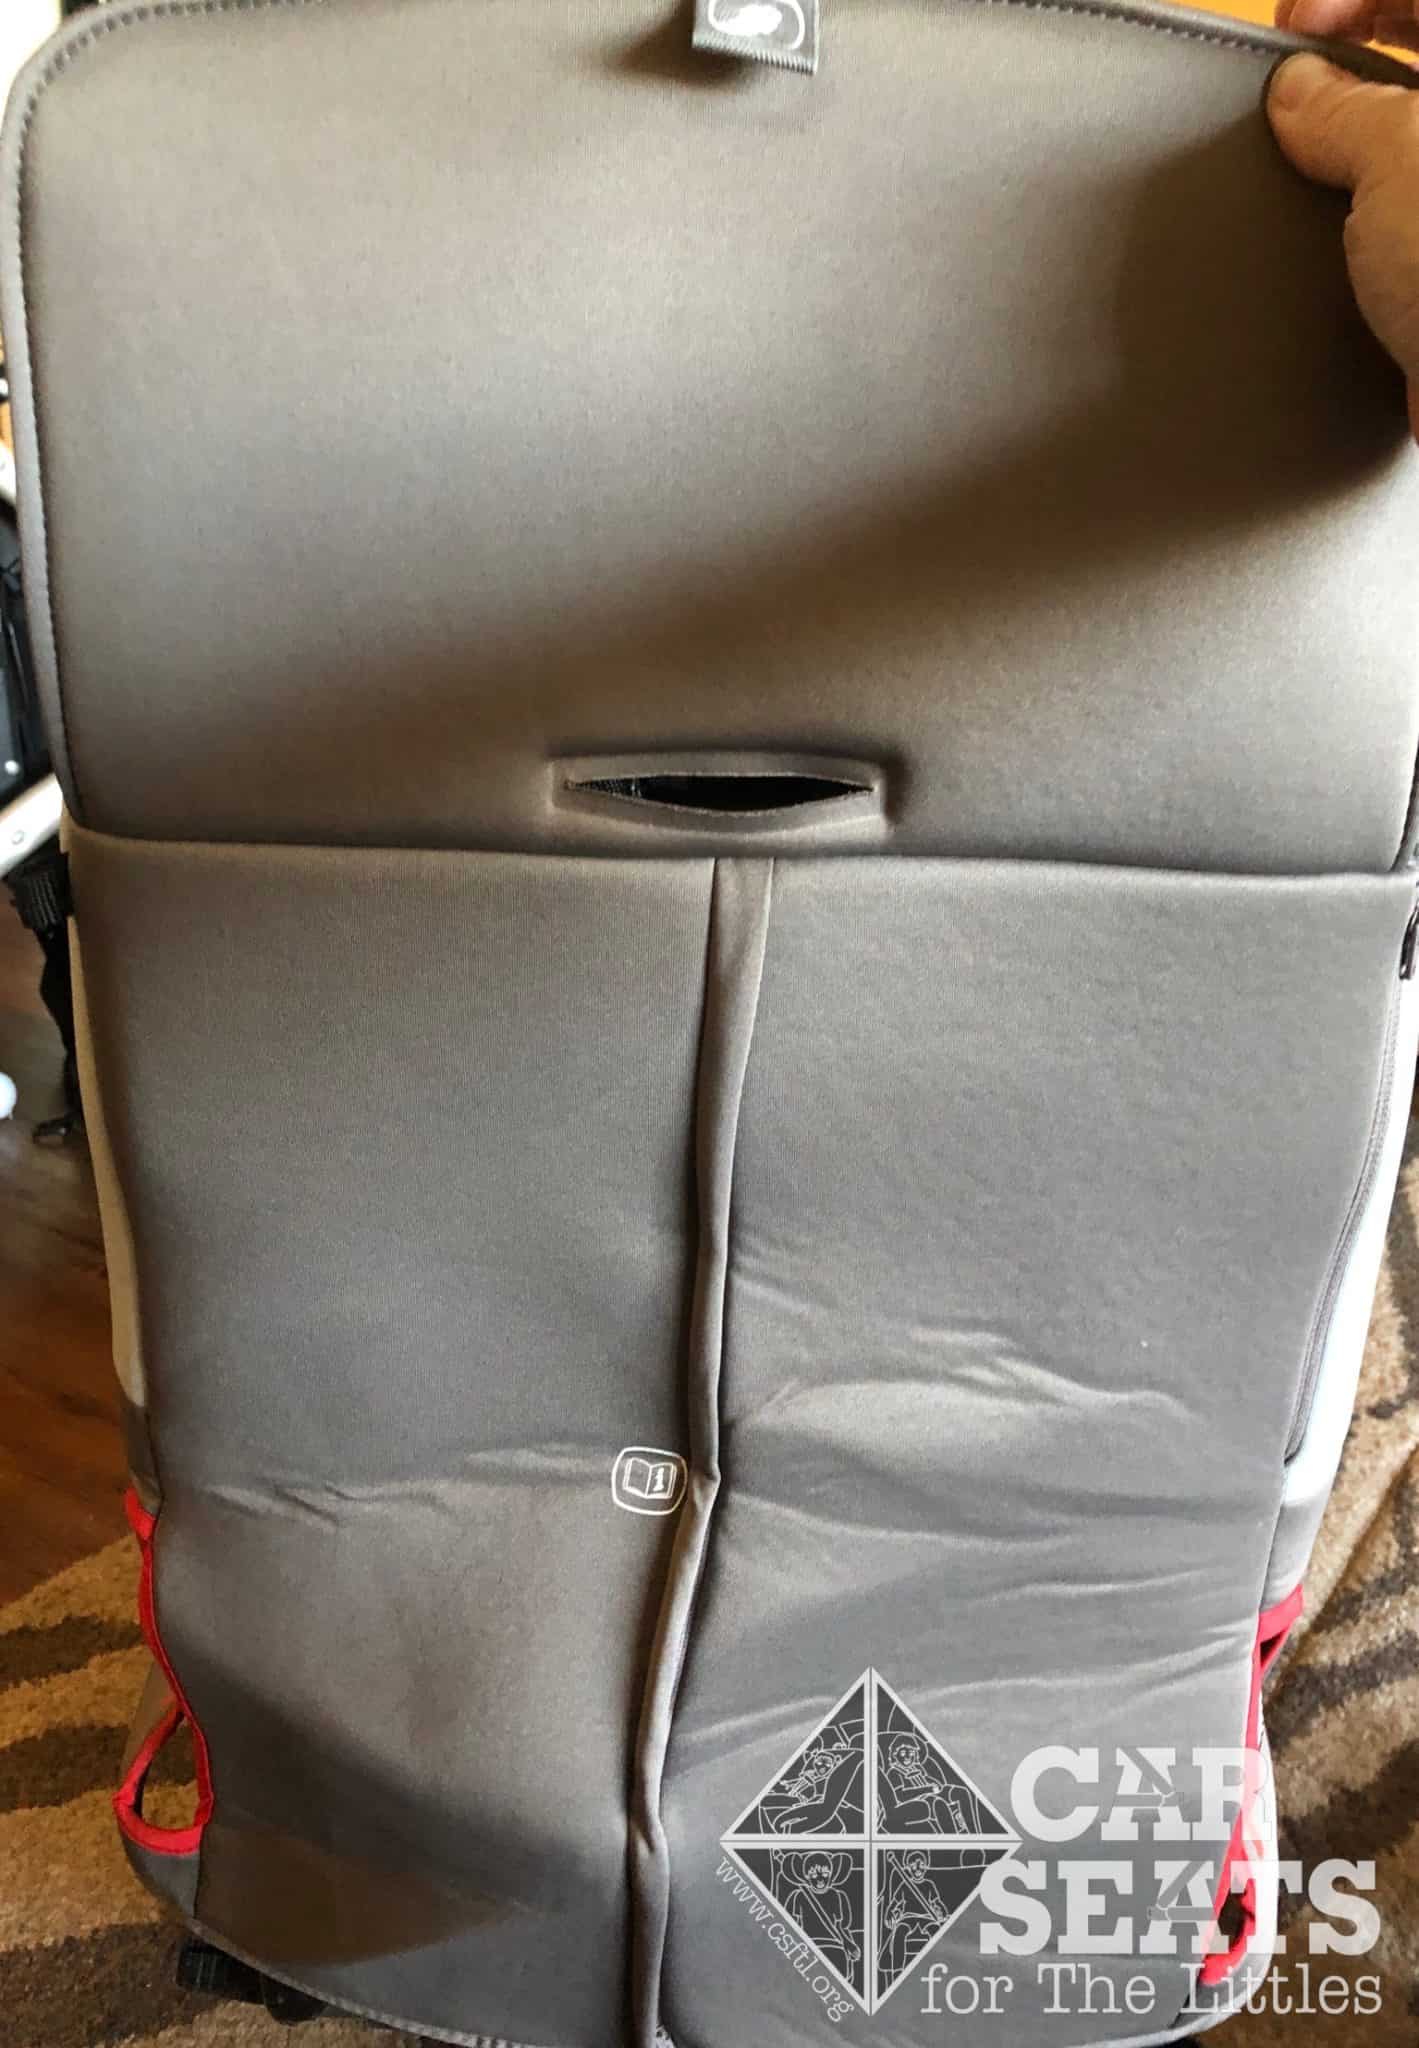
Diono radian 3RXT back cover
The radian 3RXT sports a new fabric cover on the back. Unfortunately, mine came wrinkled — too bad I don’t have a steamer! Diono actually told me I could use one on the back cover. The cover gives the seat a neater, sleeker look in back… when it’s not wrinkled!
Narrow
Like the Radians that came before it, the radian 3RXT is narrow! At only 16.5 inches across, it’s one of the narrowest car seats on the market. This makes it a good candidate for narrow spaces or three car seats across situations.
Installation: Rear Facing
Setup
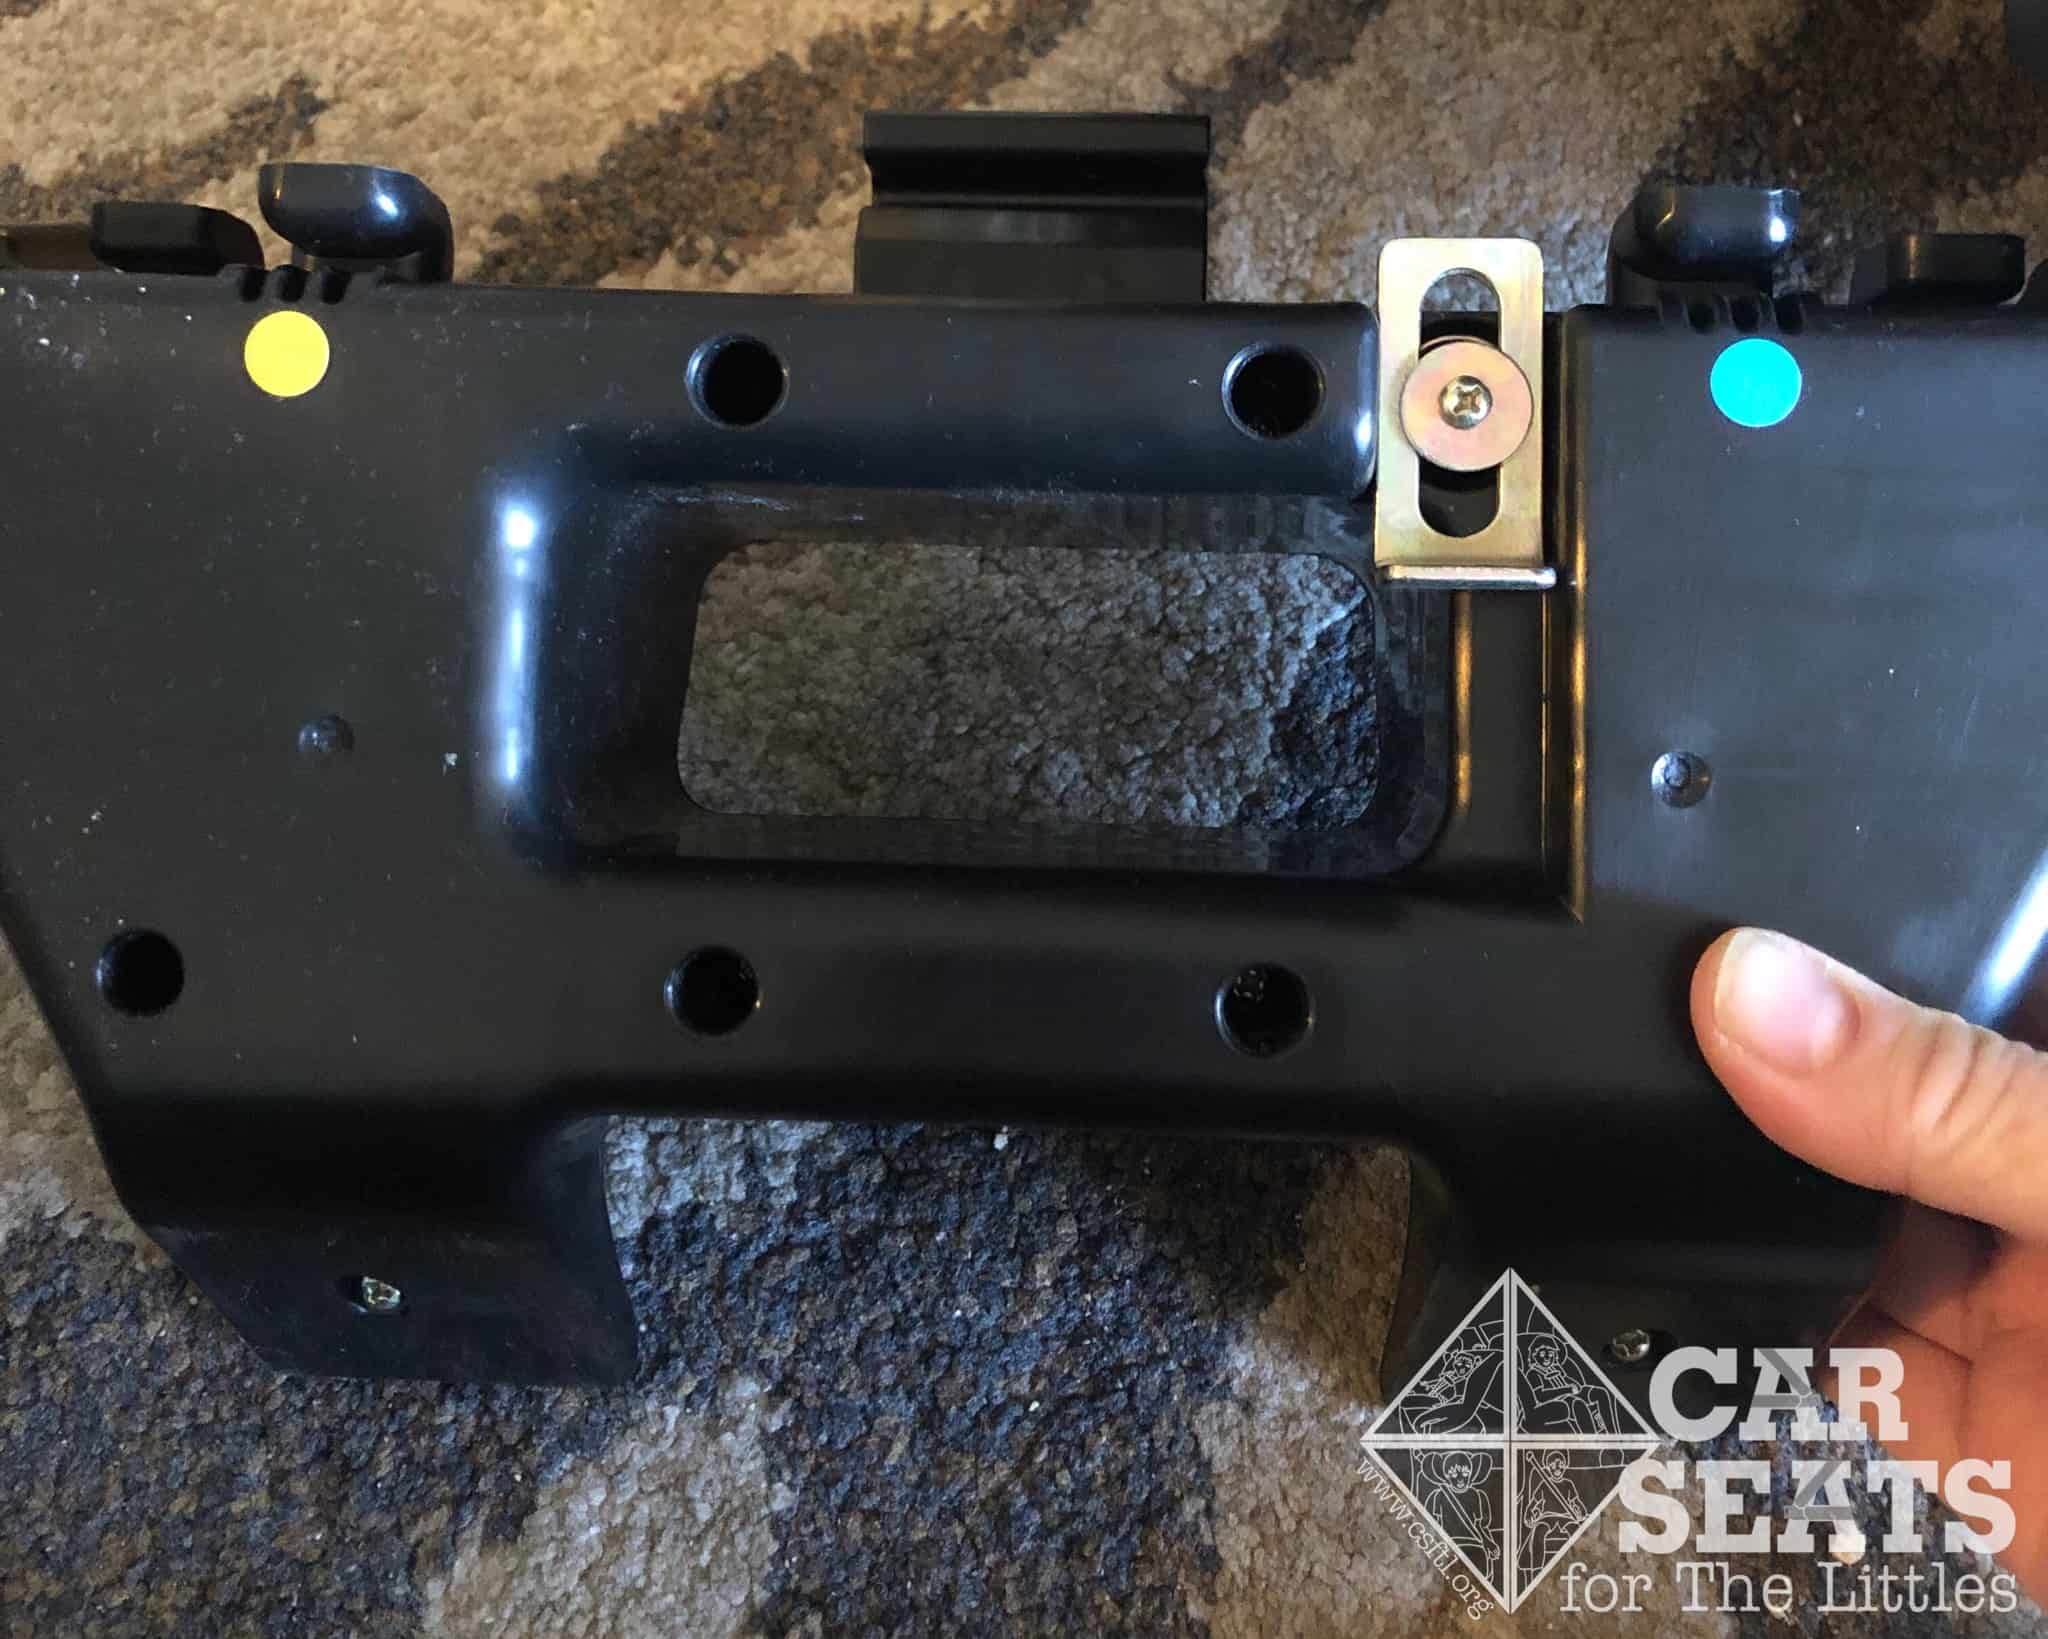
Diono radian 3RXT rear facing base with colored guide dots
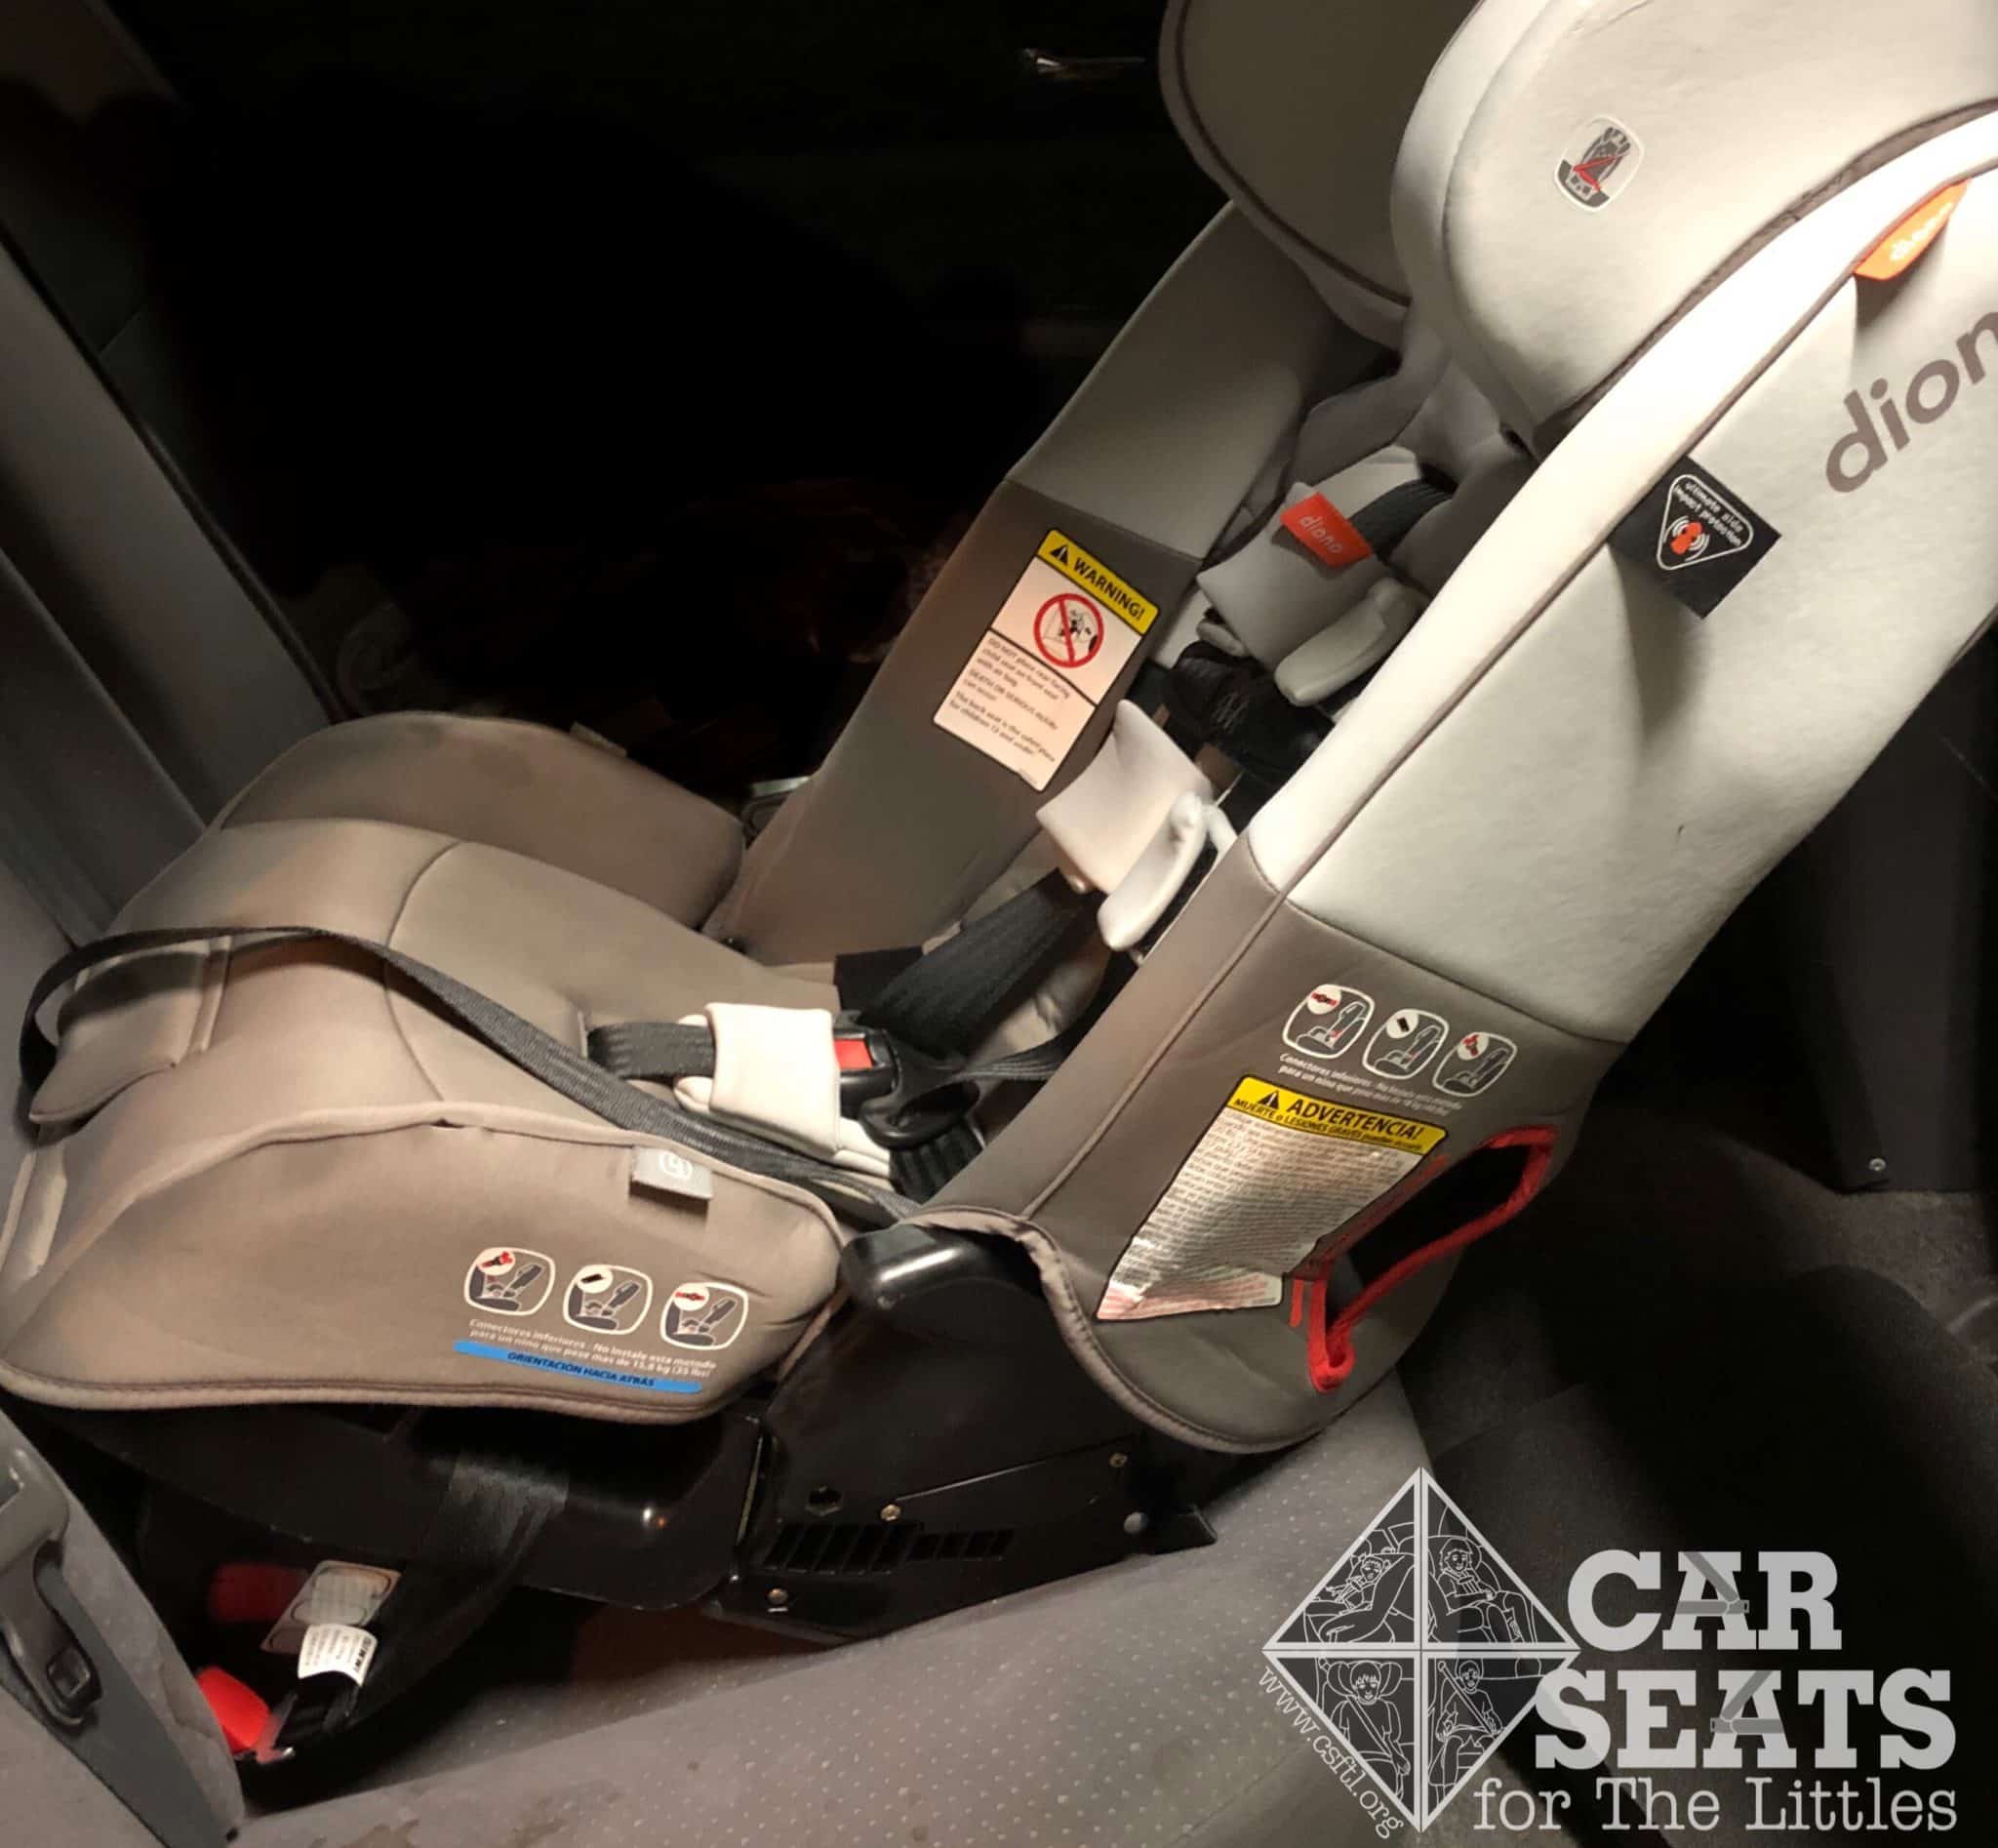
The detachable rear facing base must be attached before rear facing installation. The radian 3RXT features new colored dots on the underside of the car seat that align with colored dots on the rear facing base. The base attaches with a brass tab that extends from the base to the underside of the car seat.
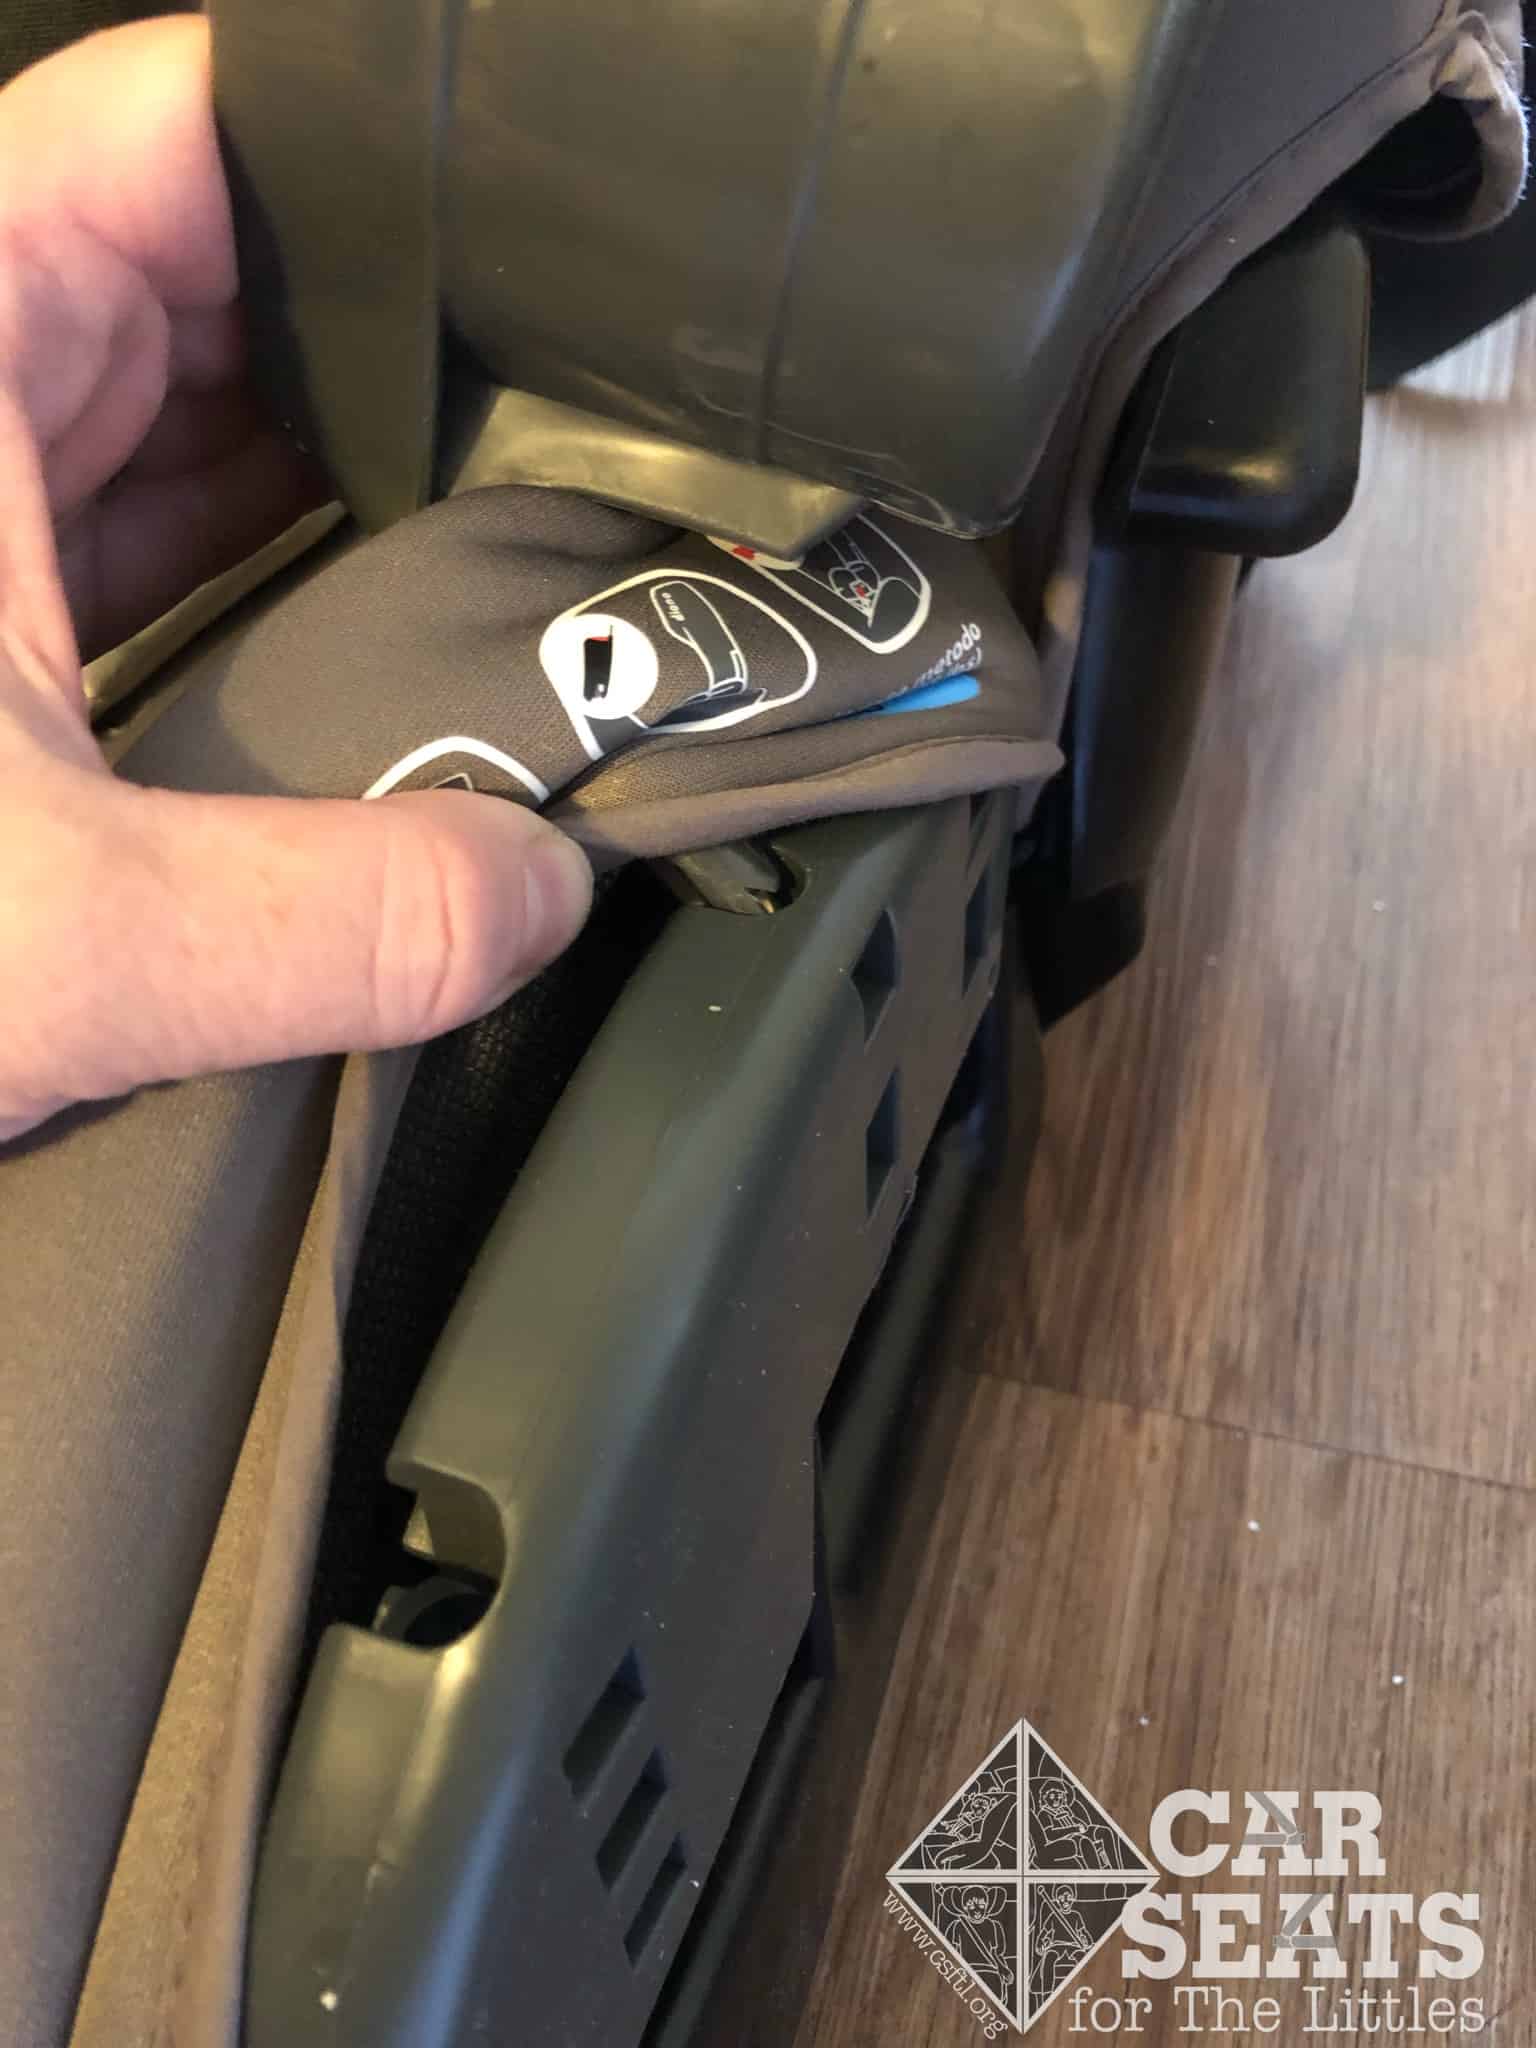
Installation: Lower Anchors
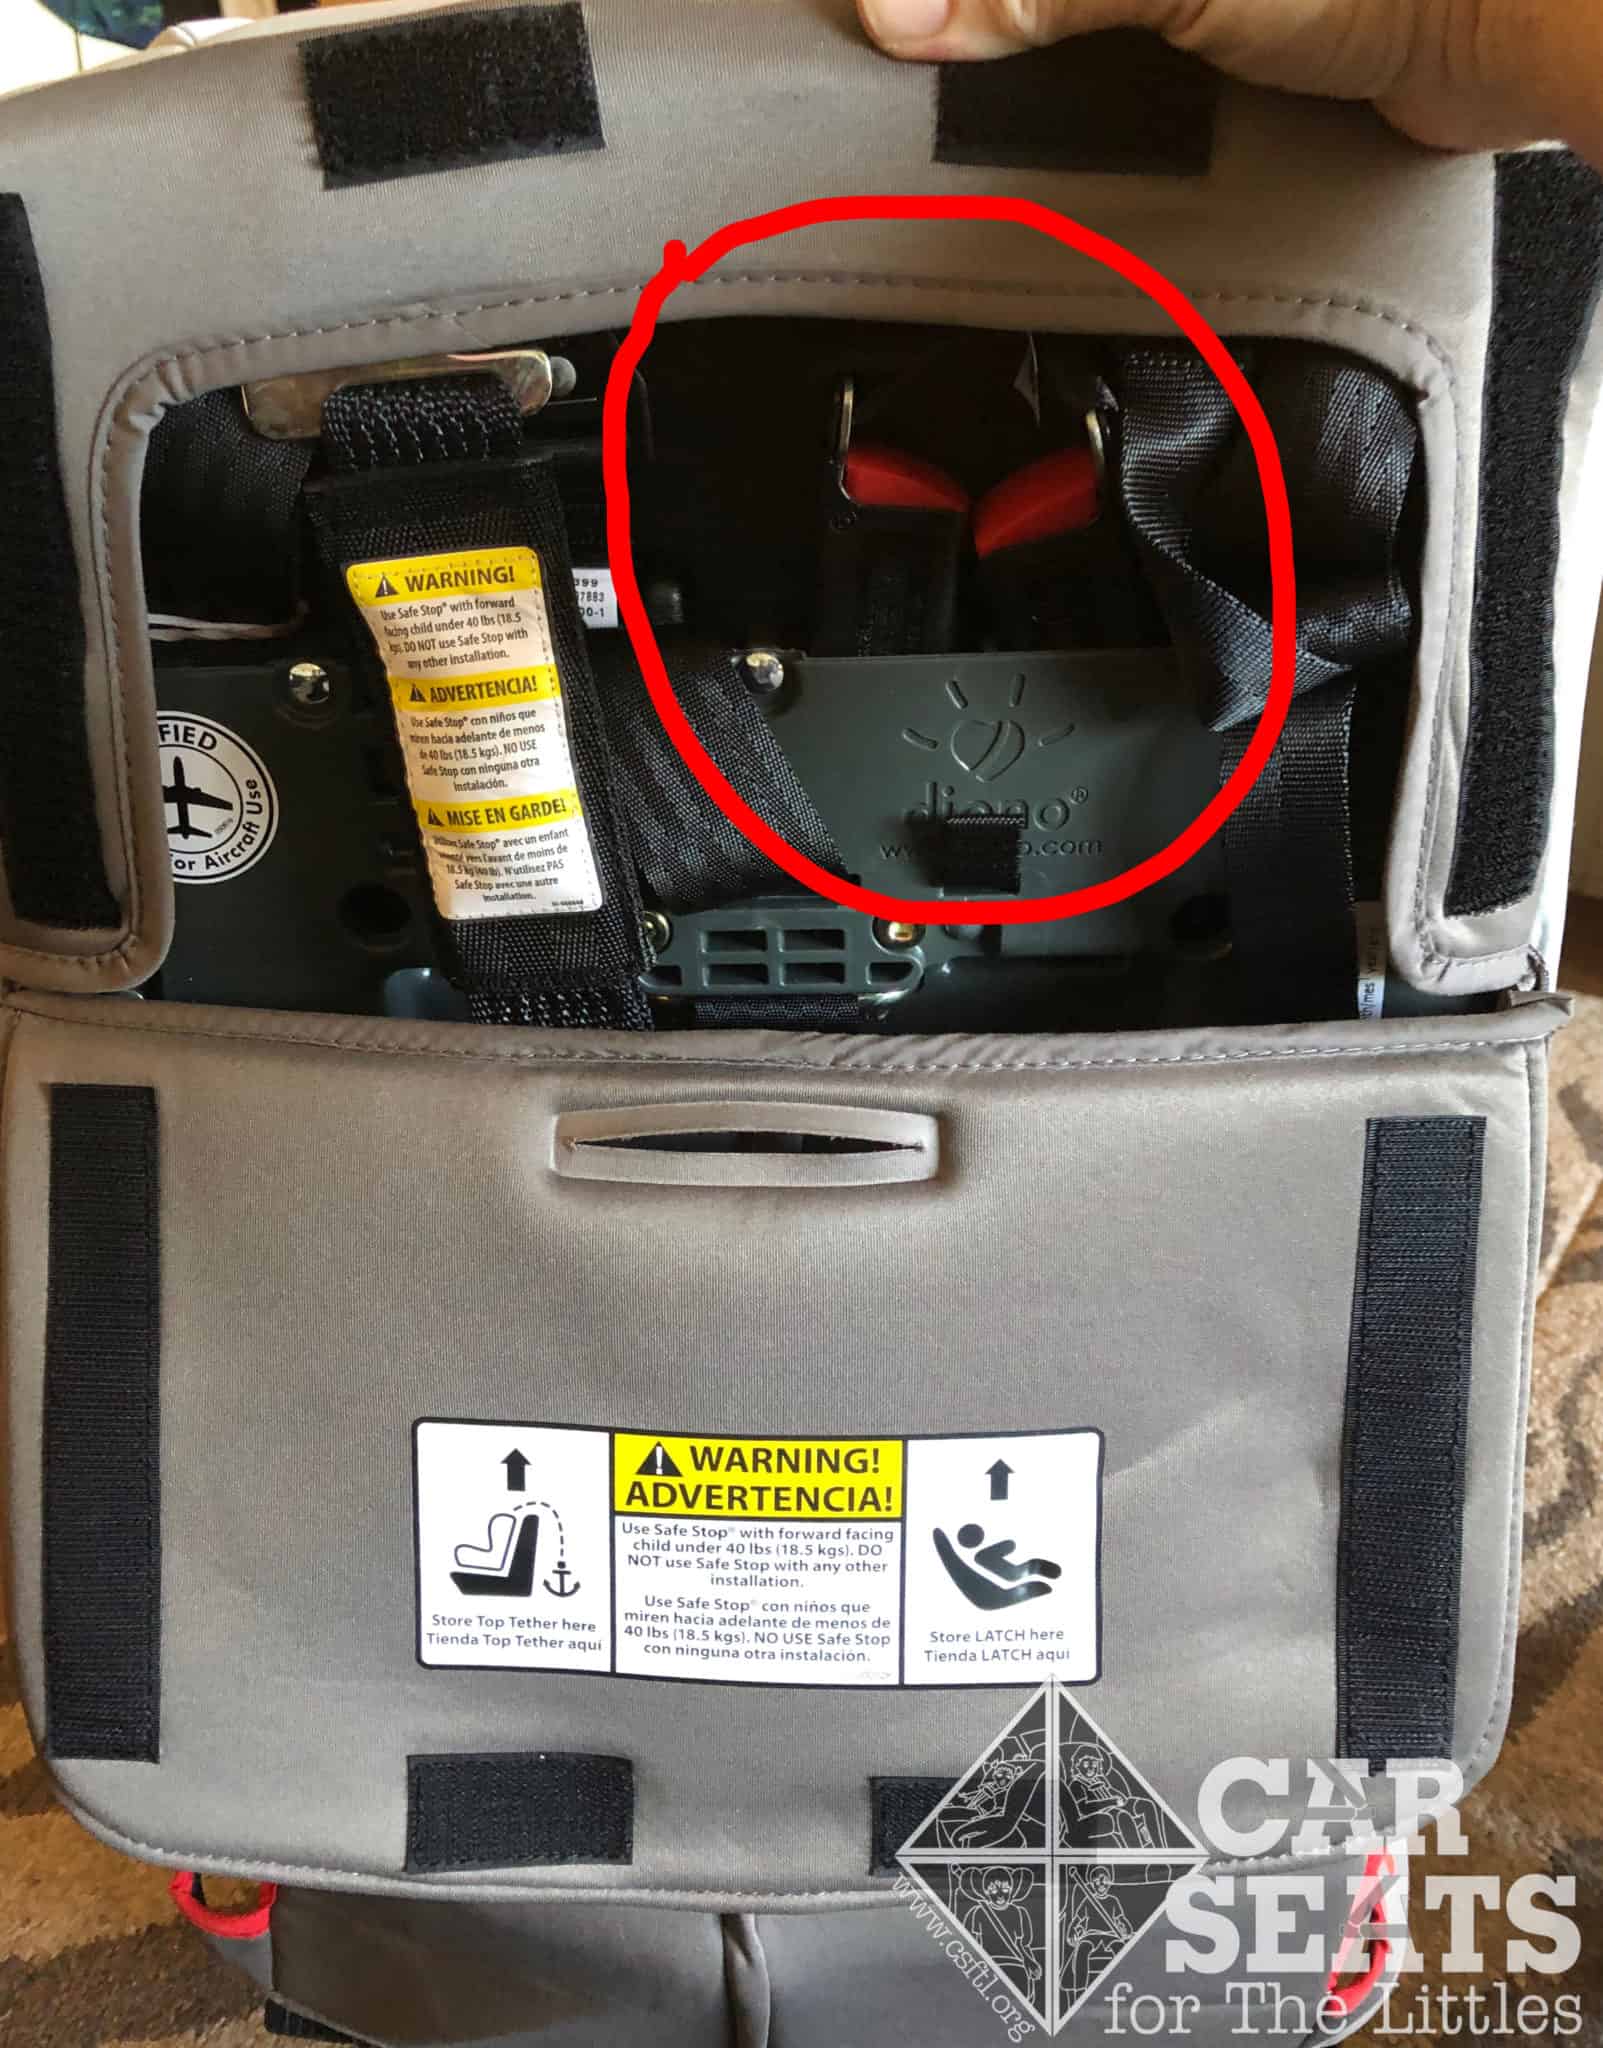
Diono radian 3RXT lower anchor connectors
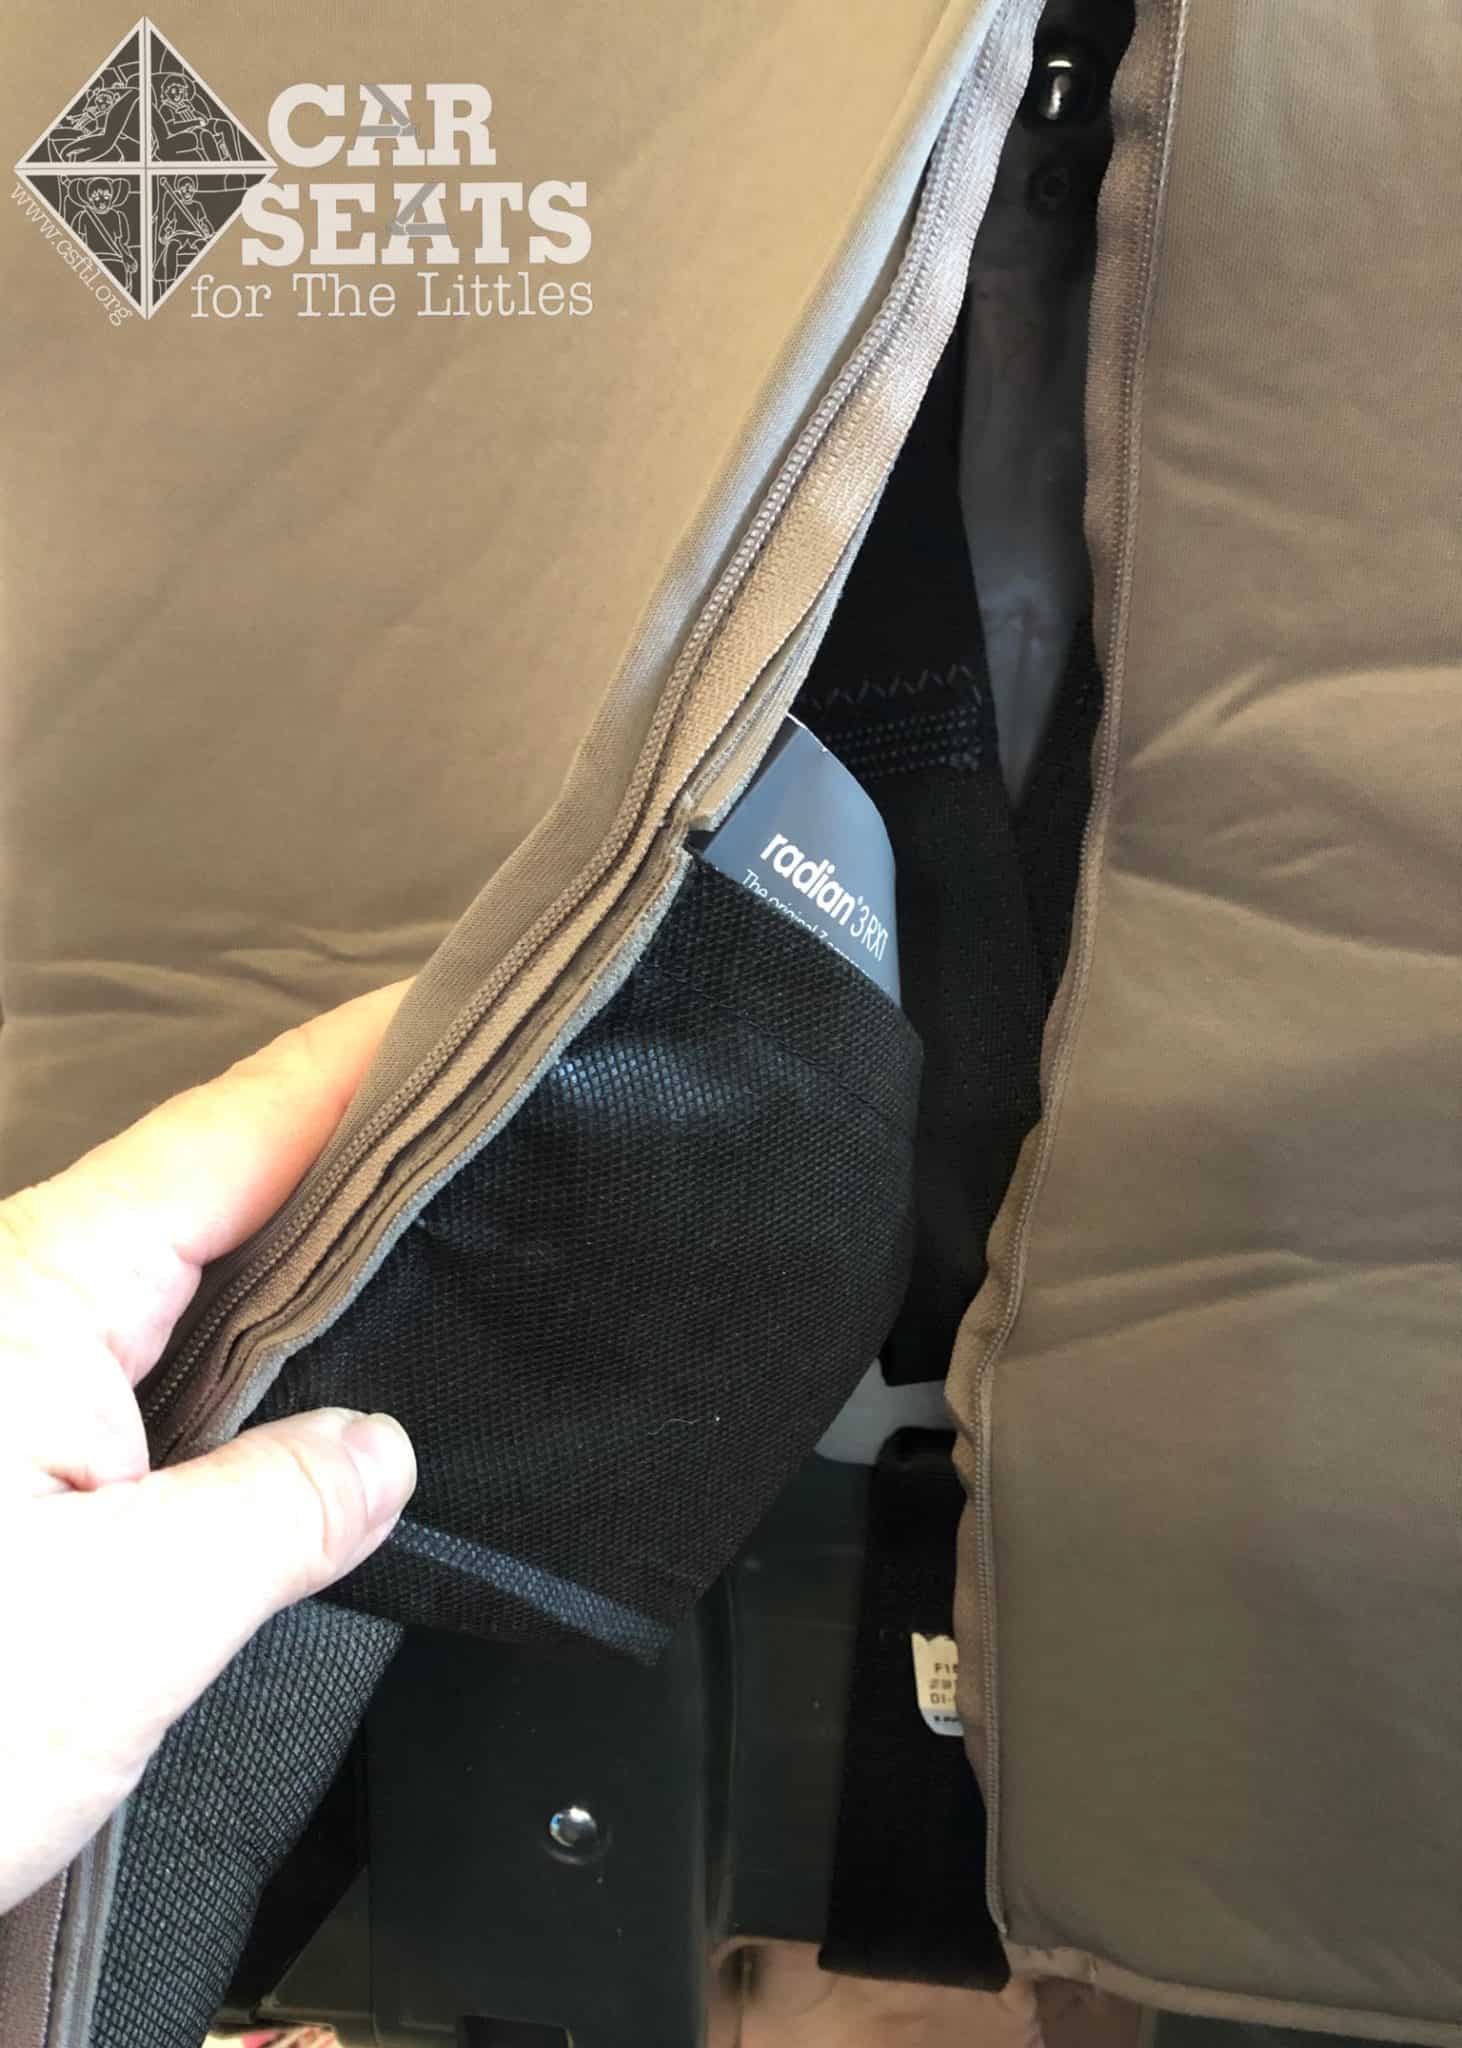
The radian 3RXT arrives with the lower anchors, top tether, and Safe Stop all tucked into their respective storage spots on the seat’s back. That part isn’t new, but now that section of the seat is covered by, well, a cover.
To install the radian 3RXT with lower anchors, remove the lower anchor connectors from the storage area at the top of the seat’s back. Pull down the flap on the back cover and release the lower anchor connectors by pressing the red button on each connector.
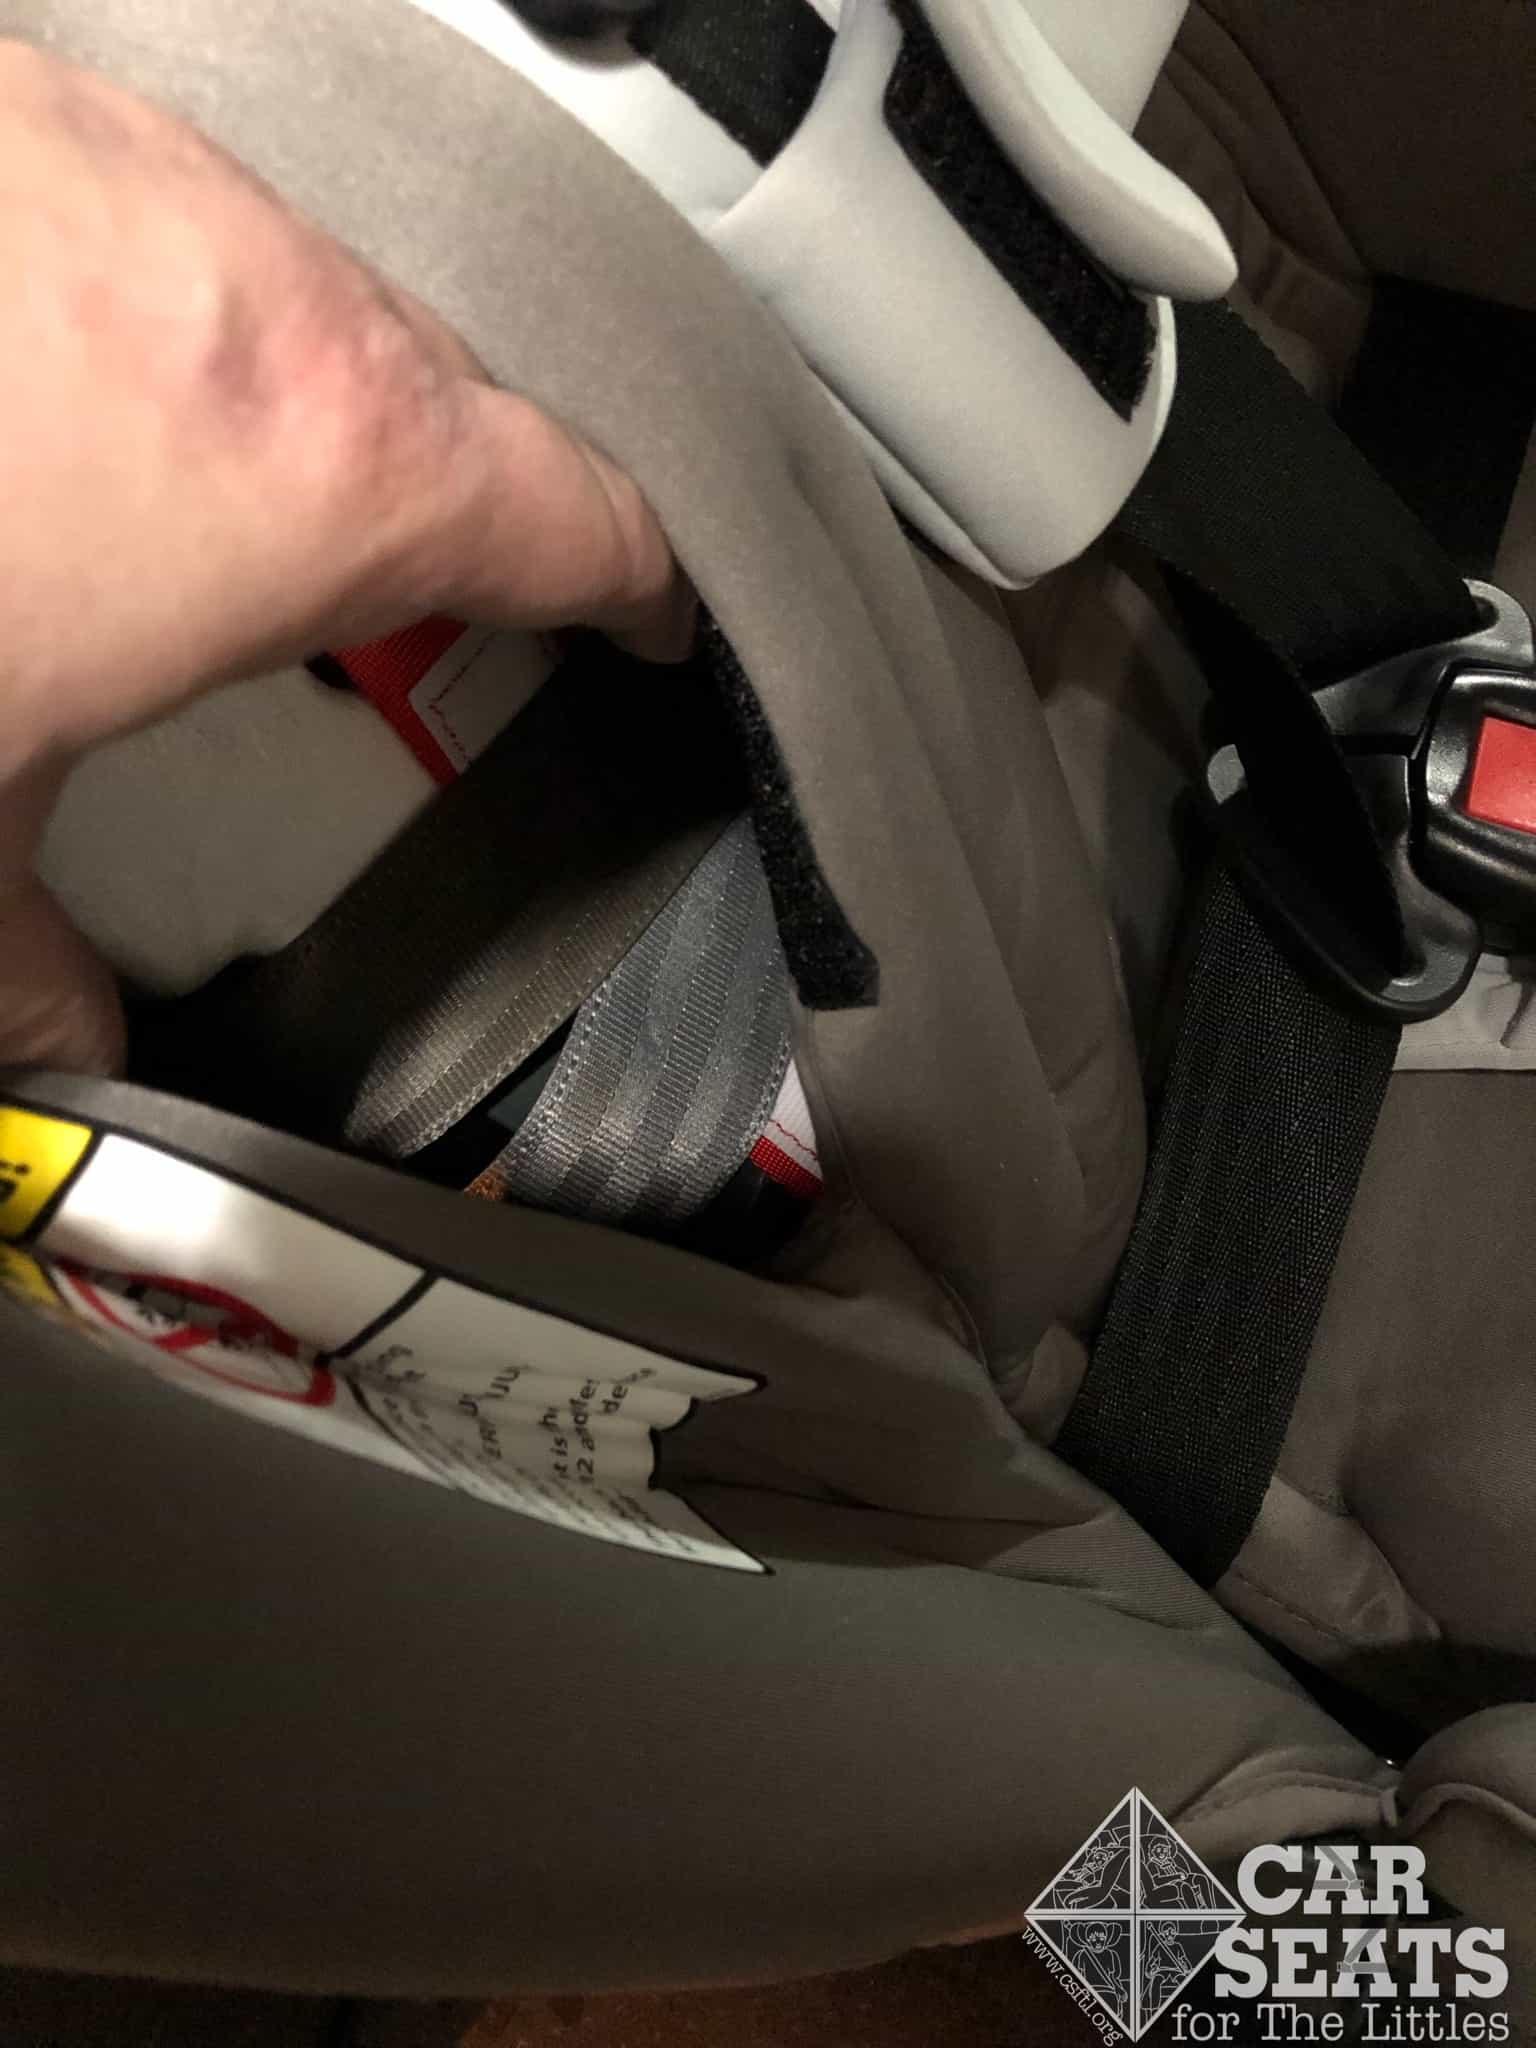
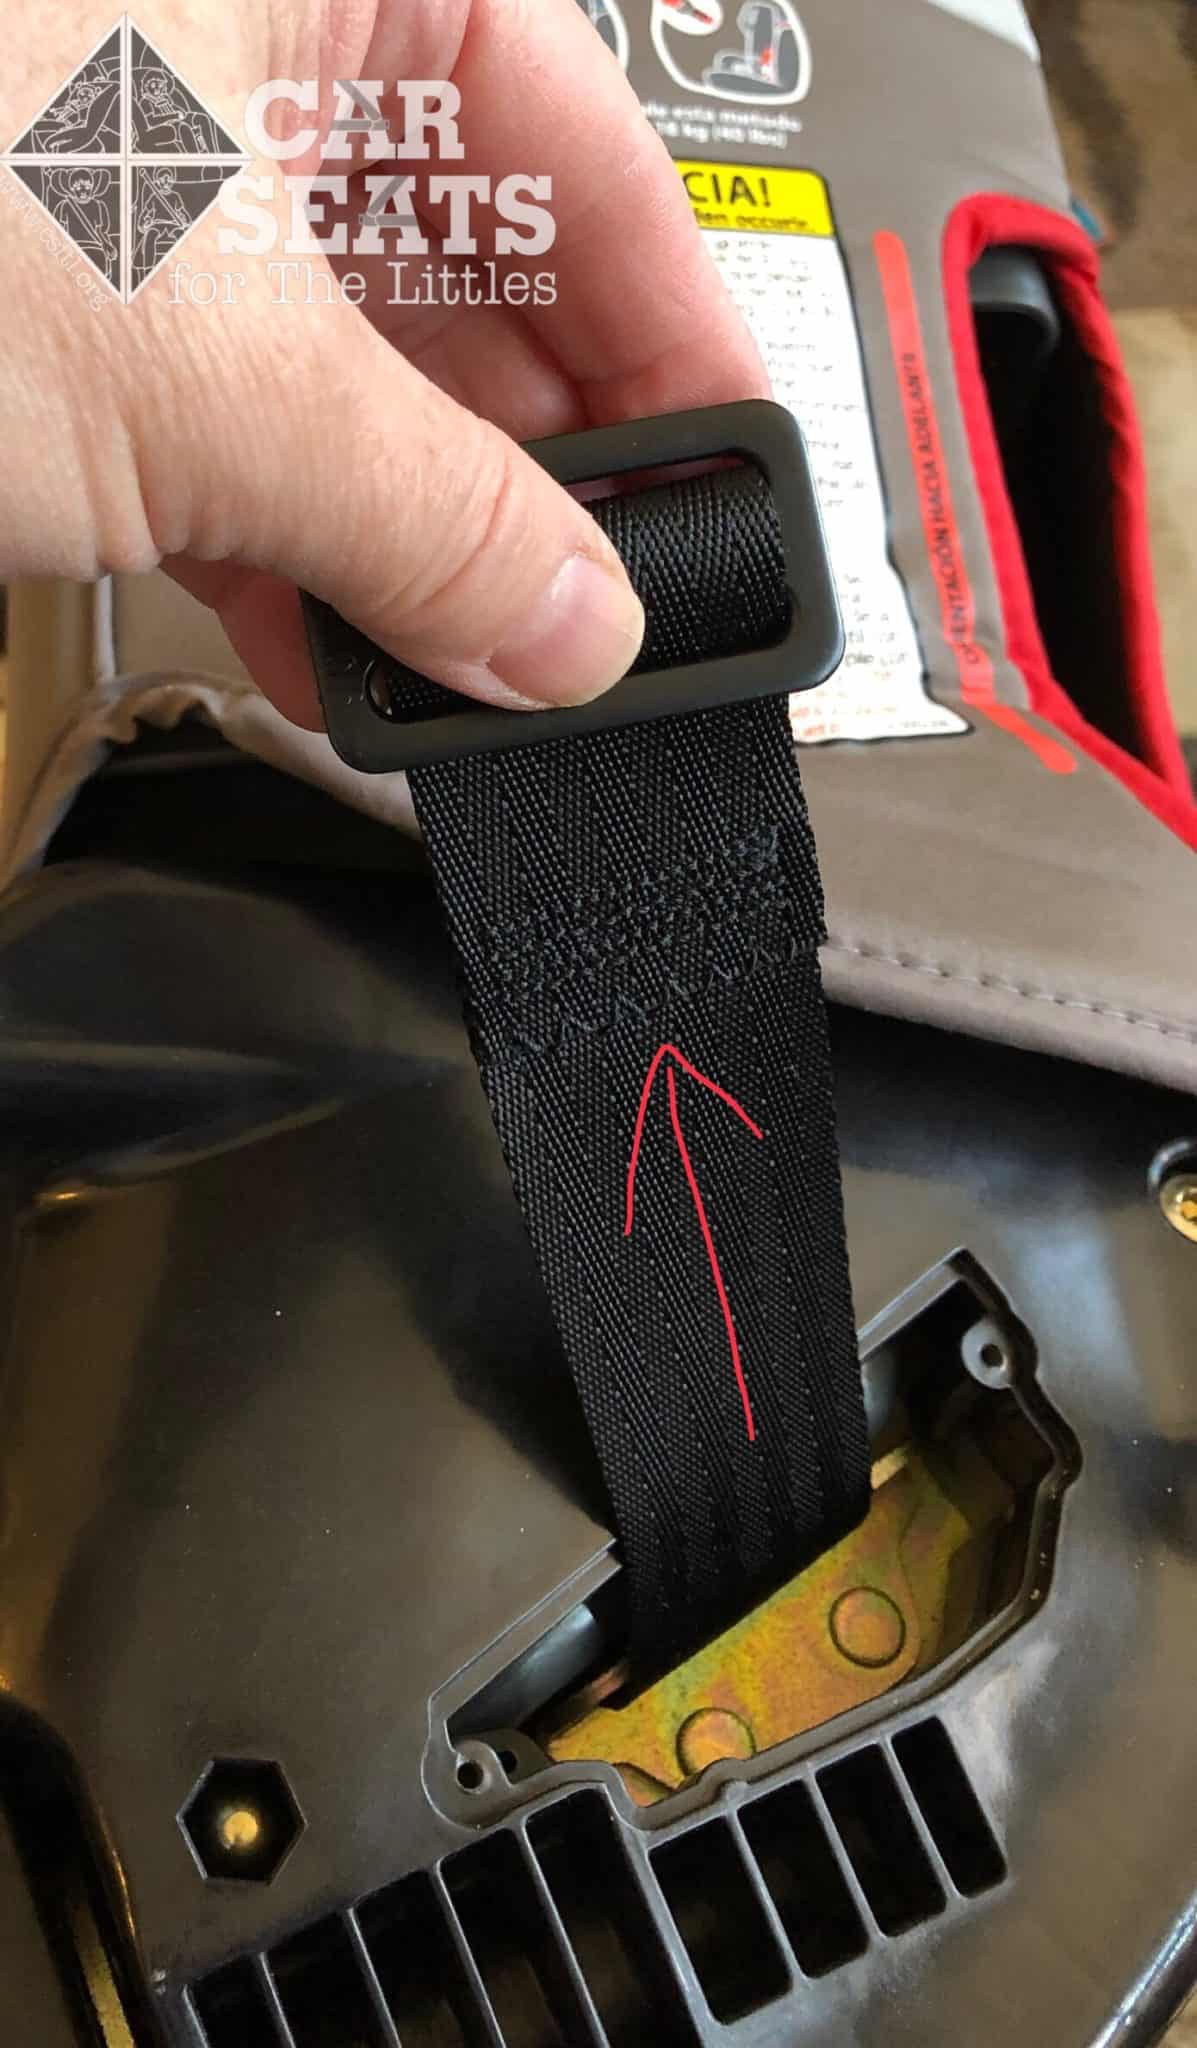
Diono radian 3RXT lower anchor connector webbing exiting the cover
Then, unzip the side of the cover and reach underneath the entire cover to get the lower anchor connectors. After you take the lower anchor connectors down from the cover area, thread them through the rear facing belt path. Diono has confirmed that they may either come out the forward facing belt path hole in the cover (but not through the forward facing belt path!) or out from under the bottom of the cover.

Diono radian 3RXT lower anchor connector
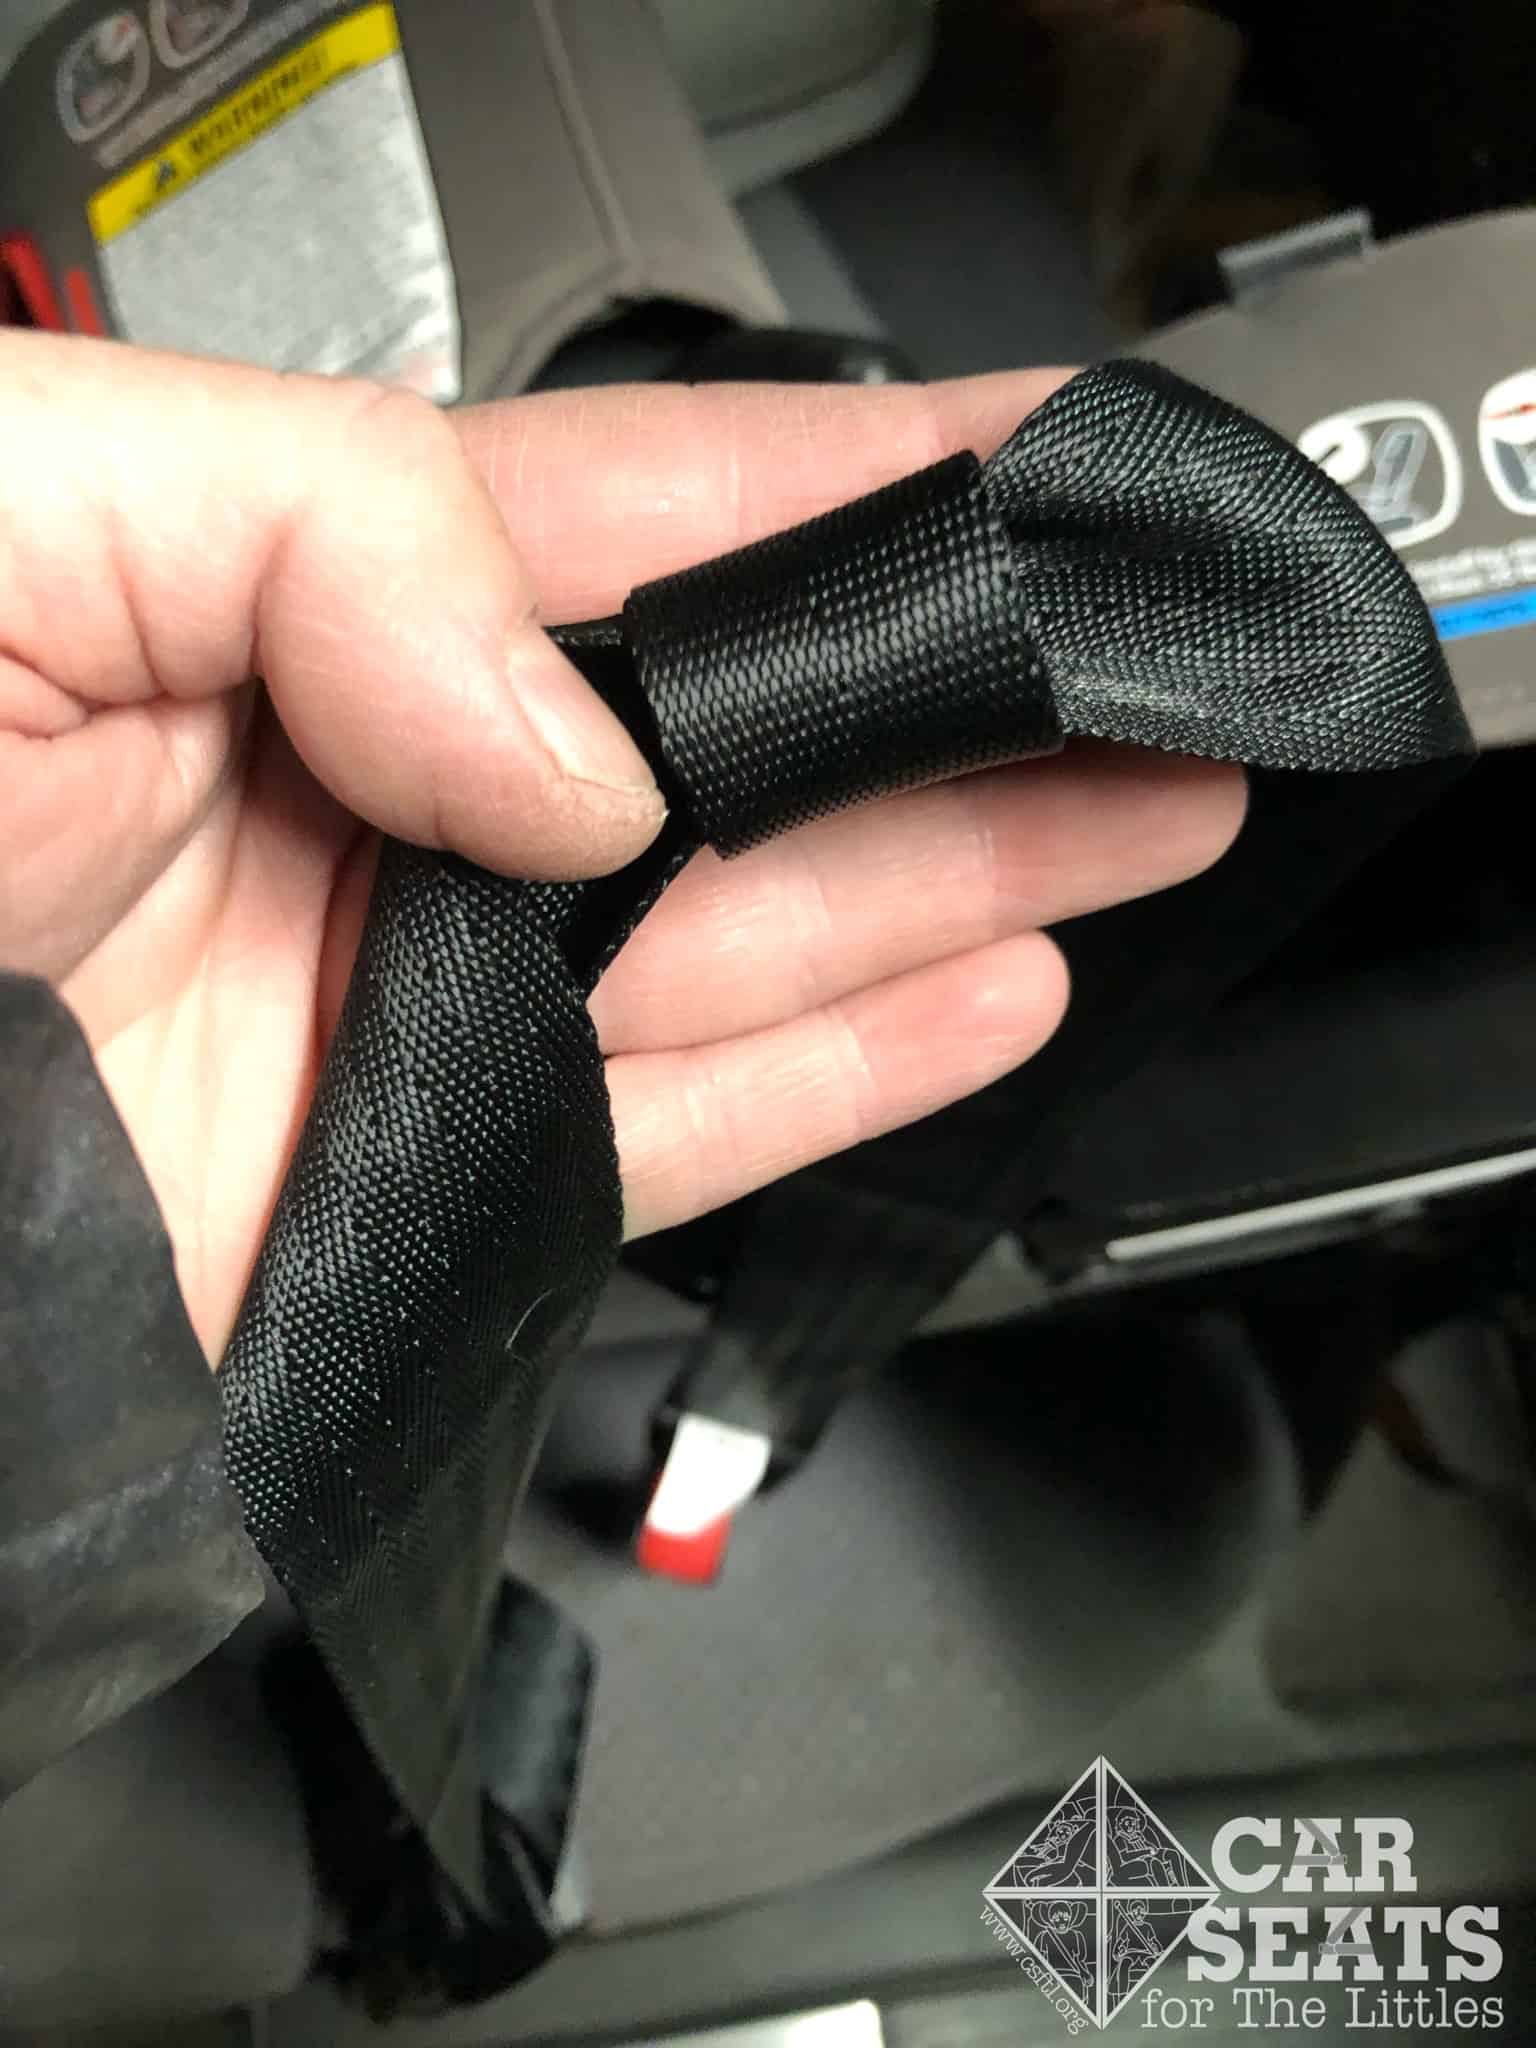
The Diono SuperLATCH lower anchor connectors have a new look and new weight limits. The SuperLATCH connectors of the past boasted some high weight limits. Diono is still calling these connectors SuperLATCH, but they’re now the IMMI lower anchor connectors that are also found on many other car seats. We prefer these connectors, as they give a more audible click! when attached to the lower anchors in the vehicle.
The loop holding the lower anchor strap to the seat is much narrower than the webbing itself, meaning it’s very easy for the strap to get twisted within the belt path. Diono will be making a change to widen this loop. That change should make installation a bit easier.
Back to Installation
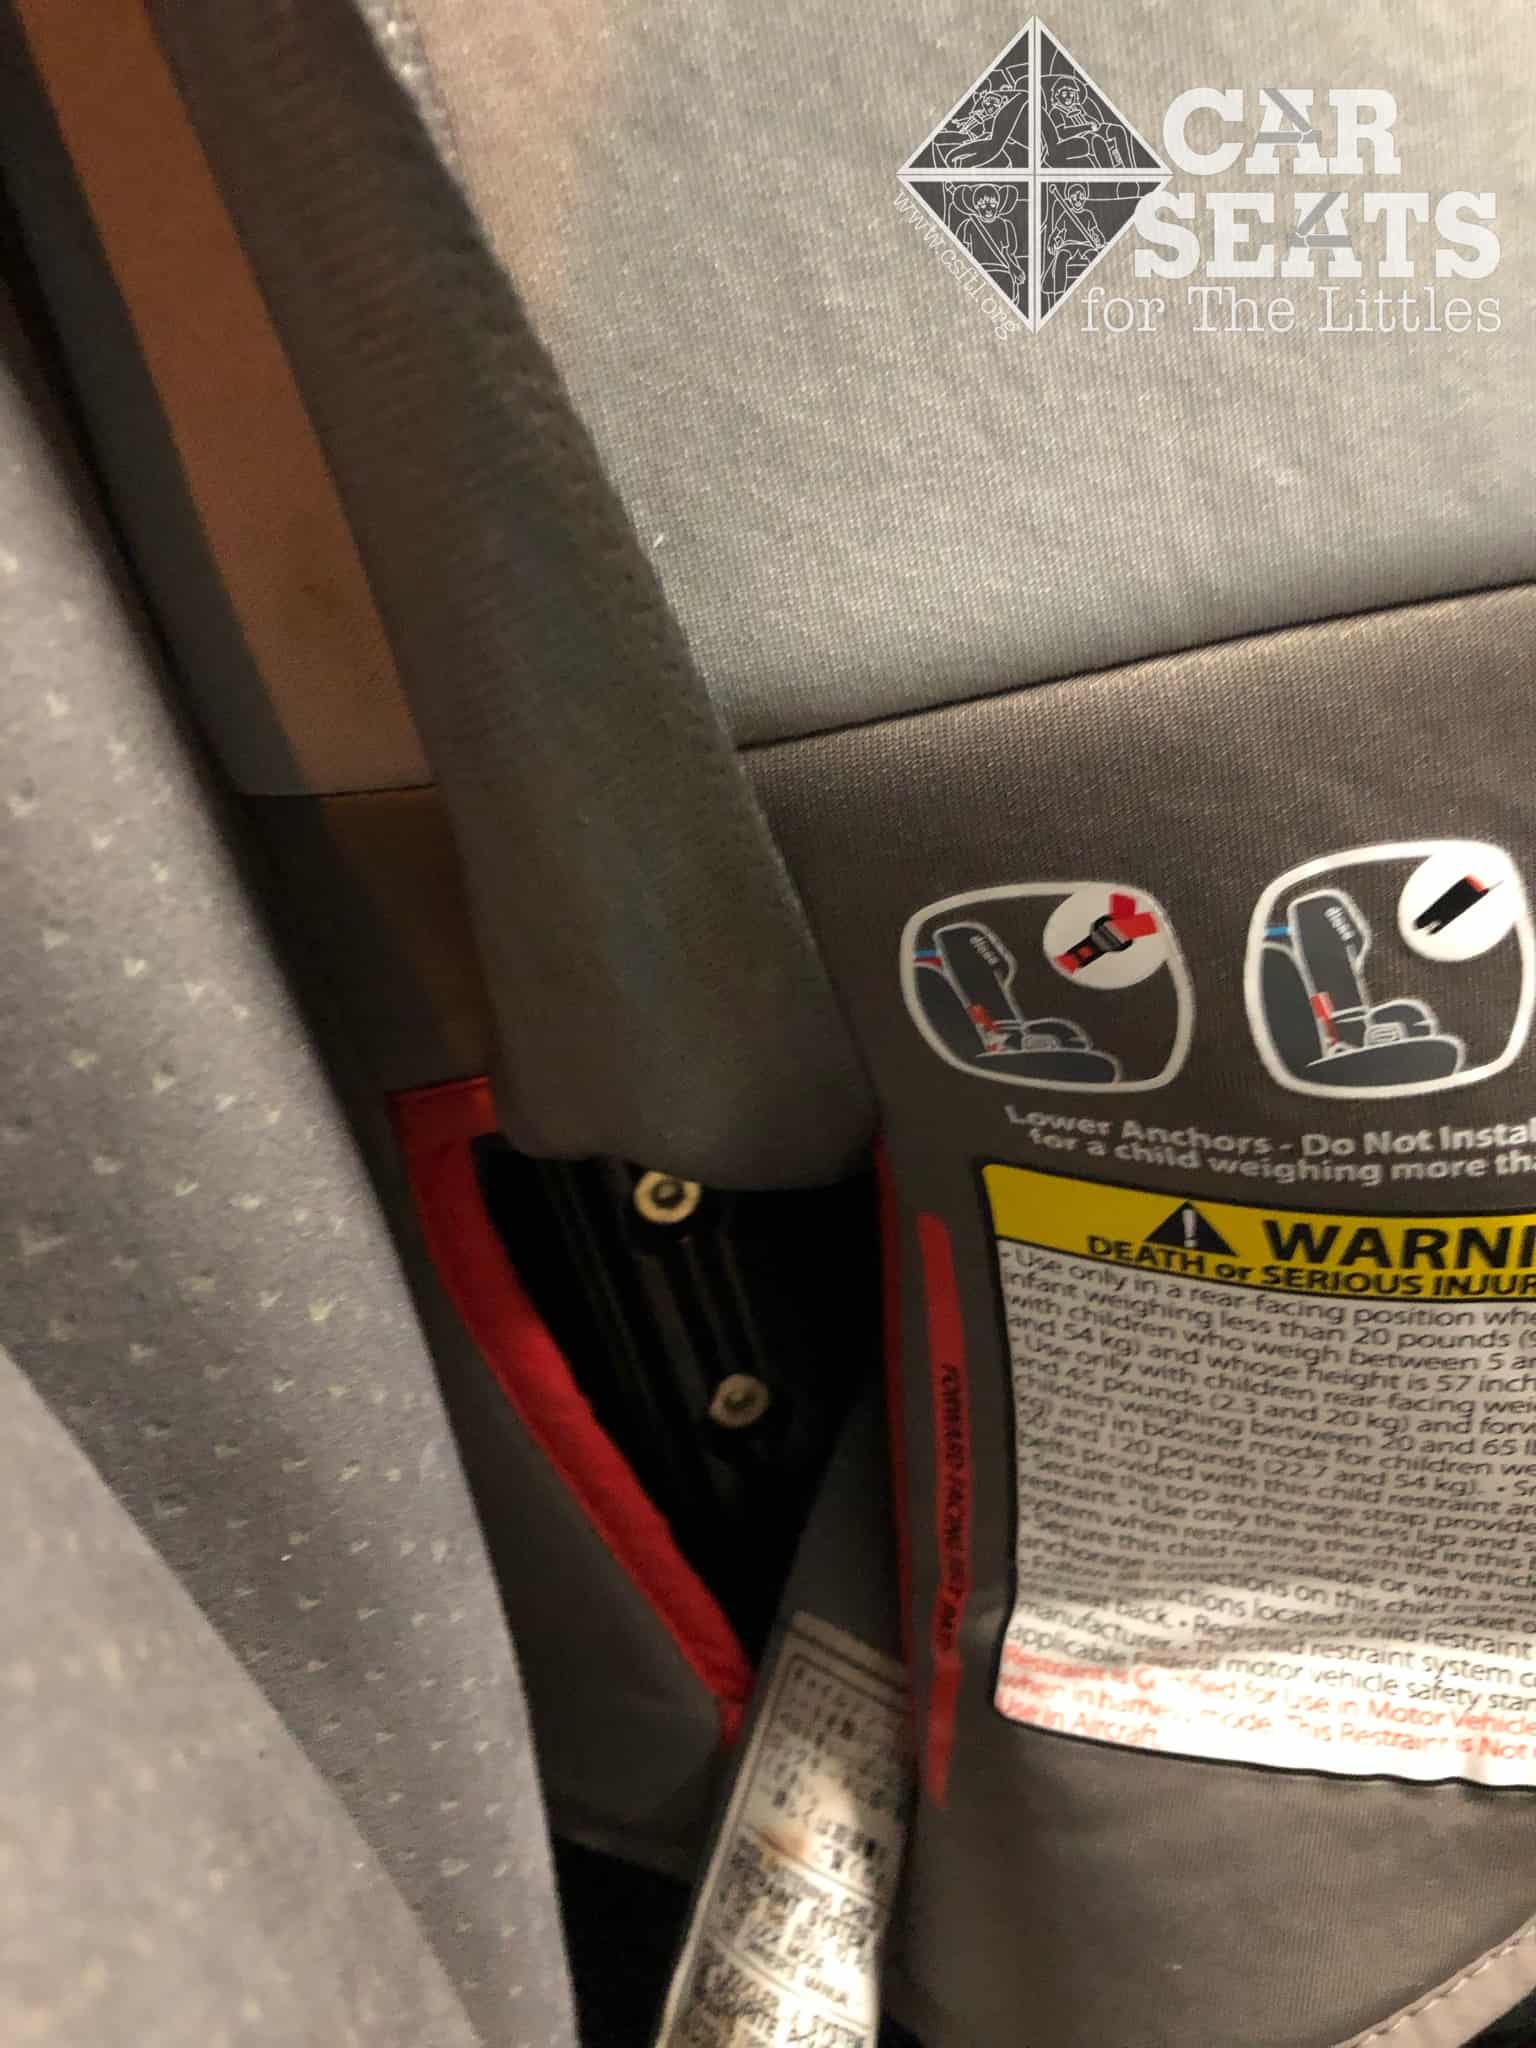
Diono radian 3RXT – rear facing base feet in seat crack
Place the feet of the rear facing base into the seat bight, or seat crack.
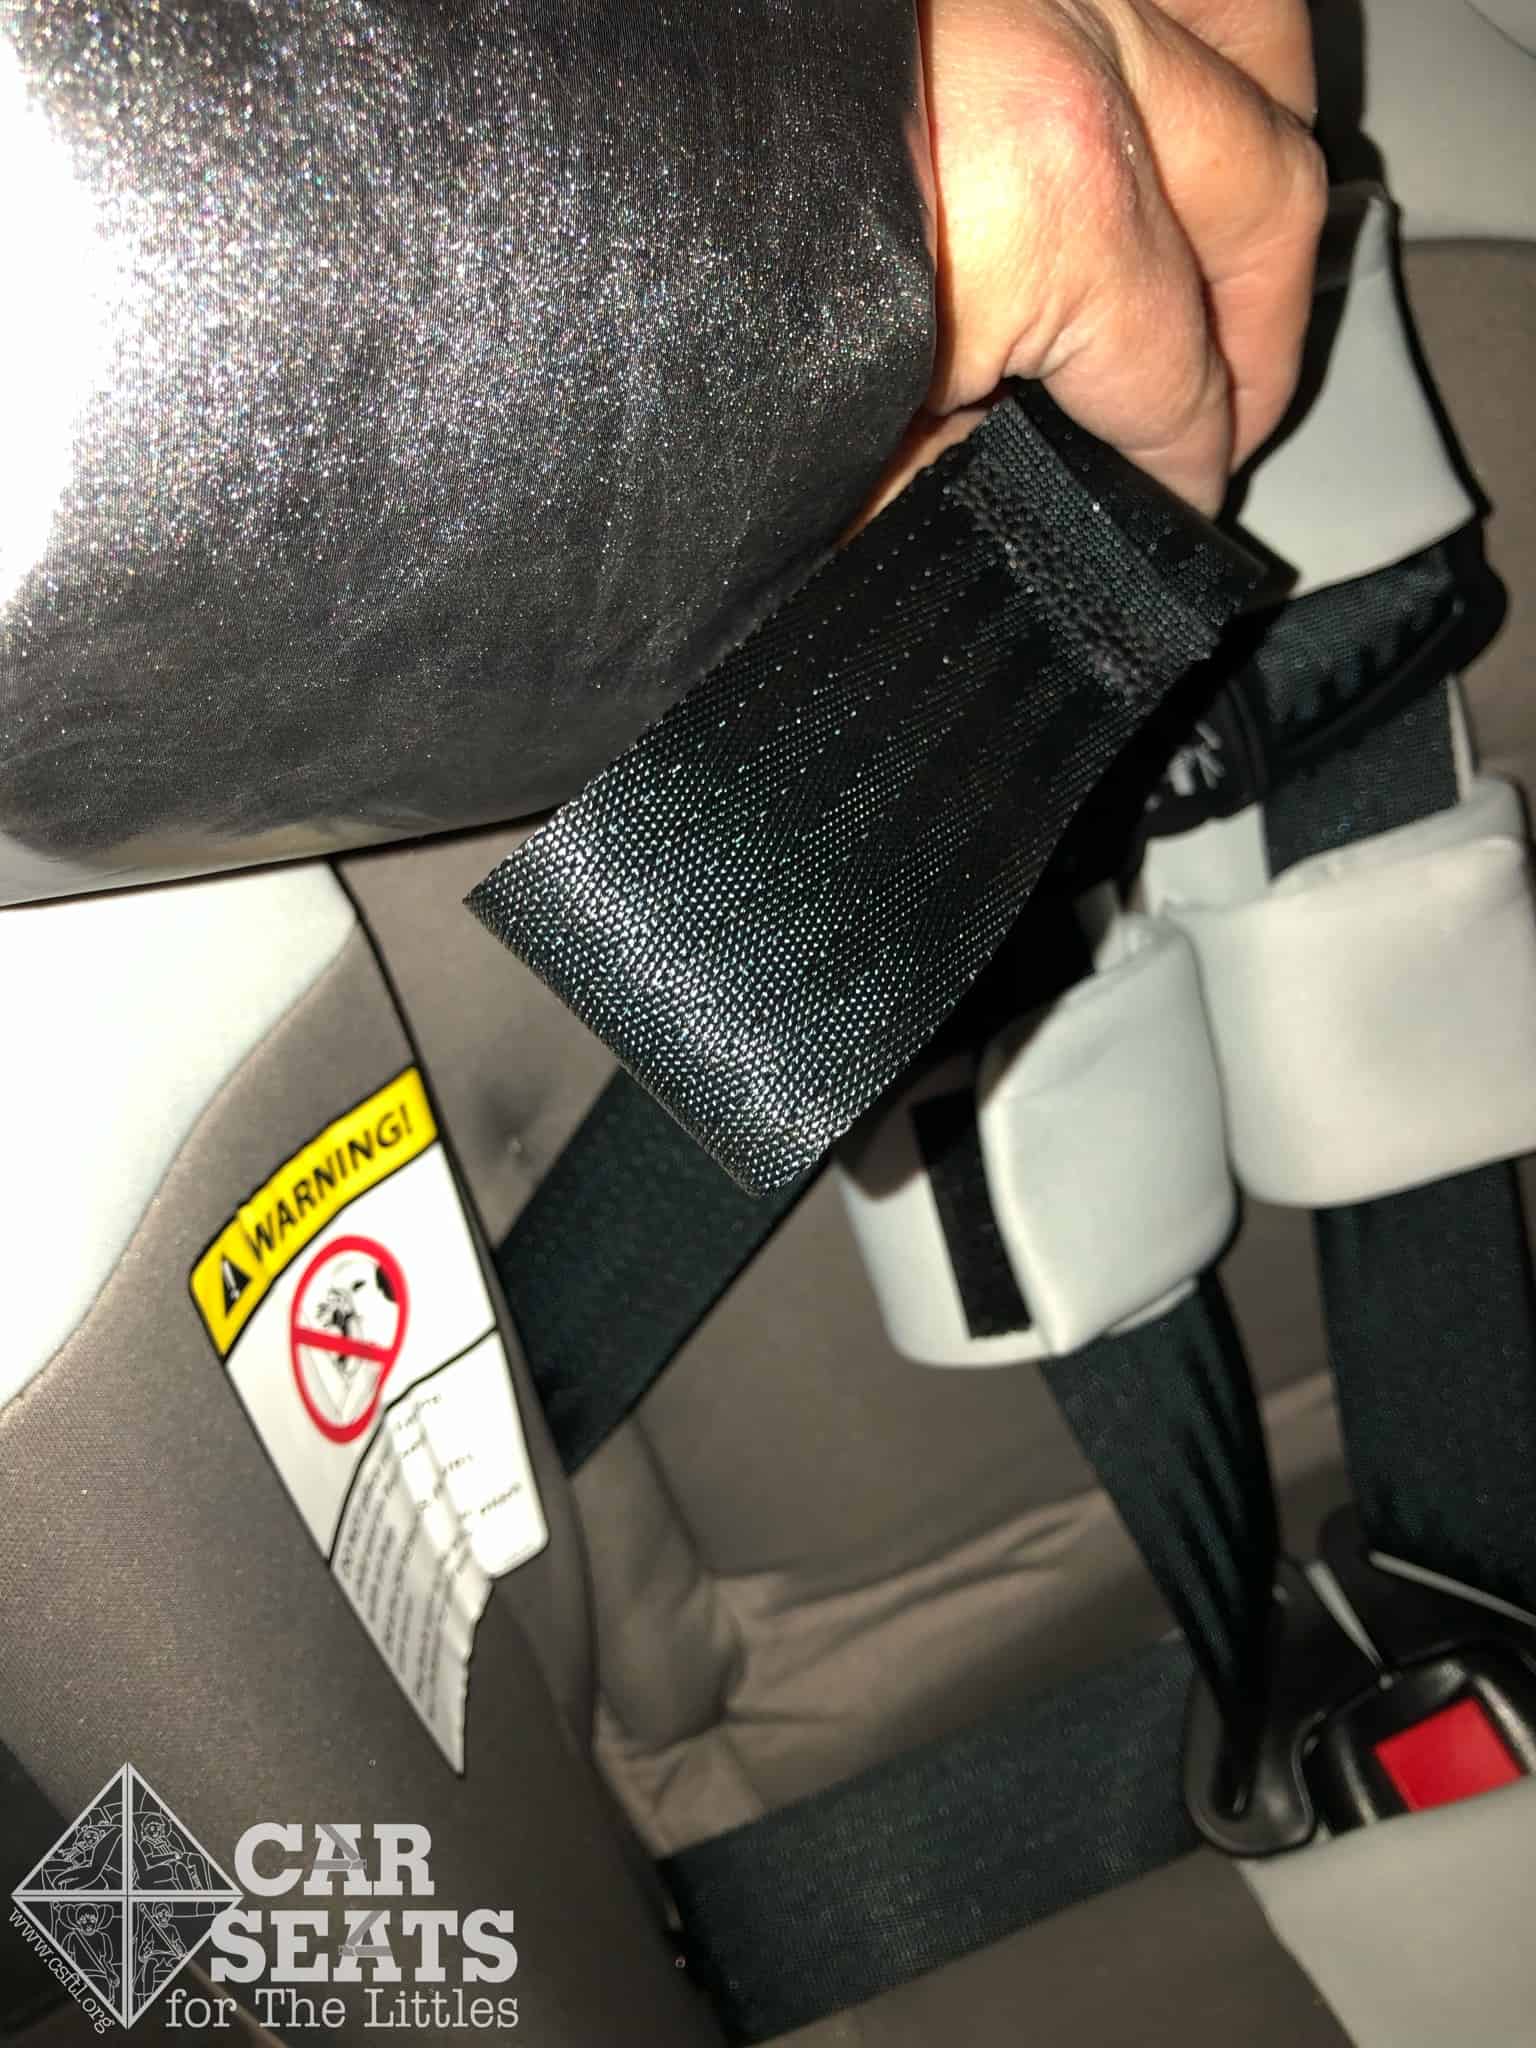
Diono radian 3RXT – small loop holding lower anchor webbing
Attach the lower anchor connectors to the lower anchors in the vehicle. Because the loop around the lower anchor strap is so small, you may have to reach your fingers into the rear facing belt path to ensure the strap isn’t twisted.
Diono radian 3RXT – tightening lower anchor webbing
Then, tighten the lower anchor webbing. I found that grasping the lower anchor webbing very close to the lower anchor connector provided the correct leverage. I also used a trick I originally learned from the Car Seat Lady for another seat: to put my thumb in the rear facing belt path and pull the webbing upwards while pressing down with my thumb.
Diono radian 3RXT lower anchor installation
When checking for movement to confirm a secure installation, make sure the “feet” of the rear facing base are not what’s keeping the seat tightly installed. Sometimes it helps to look for visible slack in the lower anchor webbing. In other words, if the reason the seat is moving less than an inch side to side and front to back is because the feet of the rear facing base are wedged in tightly, but the lower anchor webbing is loose, then the installation is not correct.
Back Cover and its Challenges
Diono radian 3RXT back cover
The cover does give the seat a sleeker look, but I found it extremely difficult to remove and thread the lower anchor connectors, both rear and forward facing, with the cover there. In addition, when it came to adjusting the harness straps to fit our young models, I found it difficult to navigate the harness into the correct slots. Finally, I wasn’t able to easily grasp the straps from the back, a trick I often use to help tighten the harness on a rear facing child before pulling the adjuster strap. If Diono was set on adding a cover, I wish they’d used a removable rigid plastic cover, where the adjustments didn’t have to be done under the cover itself.
Installation: Vehicle Seat Belt
To install rear facing with the vehicle seat belt, thread the vehicle seat belt through the rear facing belt path, buckle, lock the vehicle seat belt, then pull the shoulder portion of the belt to tighten it.
In certain cars, it may be difficult to get the seat belt tight because the buckle stalk is as high as the rear facing belt path. In those cars, twisting the buckle stalk up to three full turns can help lower the buckle enough to tighten it without it hitting the rear facing belt path.
Tilting

Diono radian 3RXT rear facing seat belt installation with angle adjuster
At times, the radian 3RXT may tilt in a seat belt installation because the belt path is tall top to bottom, and the seat itself is narrow. A locking clip may be used instead of locking the vehicle seat belt to remedy this situation. The instructions are in the manual. Diono customer service may also have installation tips, and they have told us they’re ready to help!
Recline Angle and Angle Adjuster
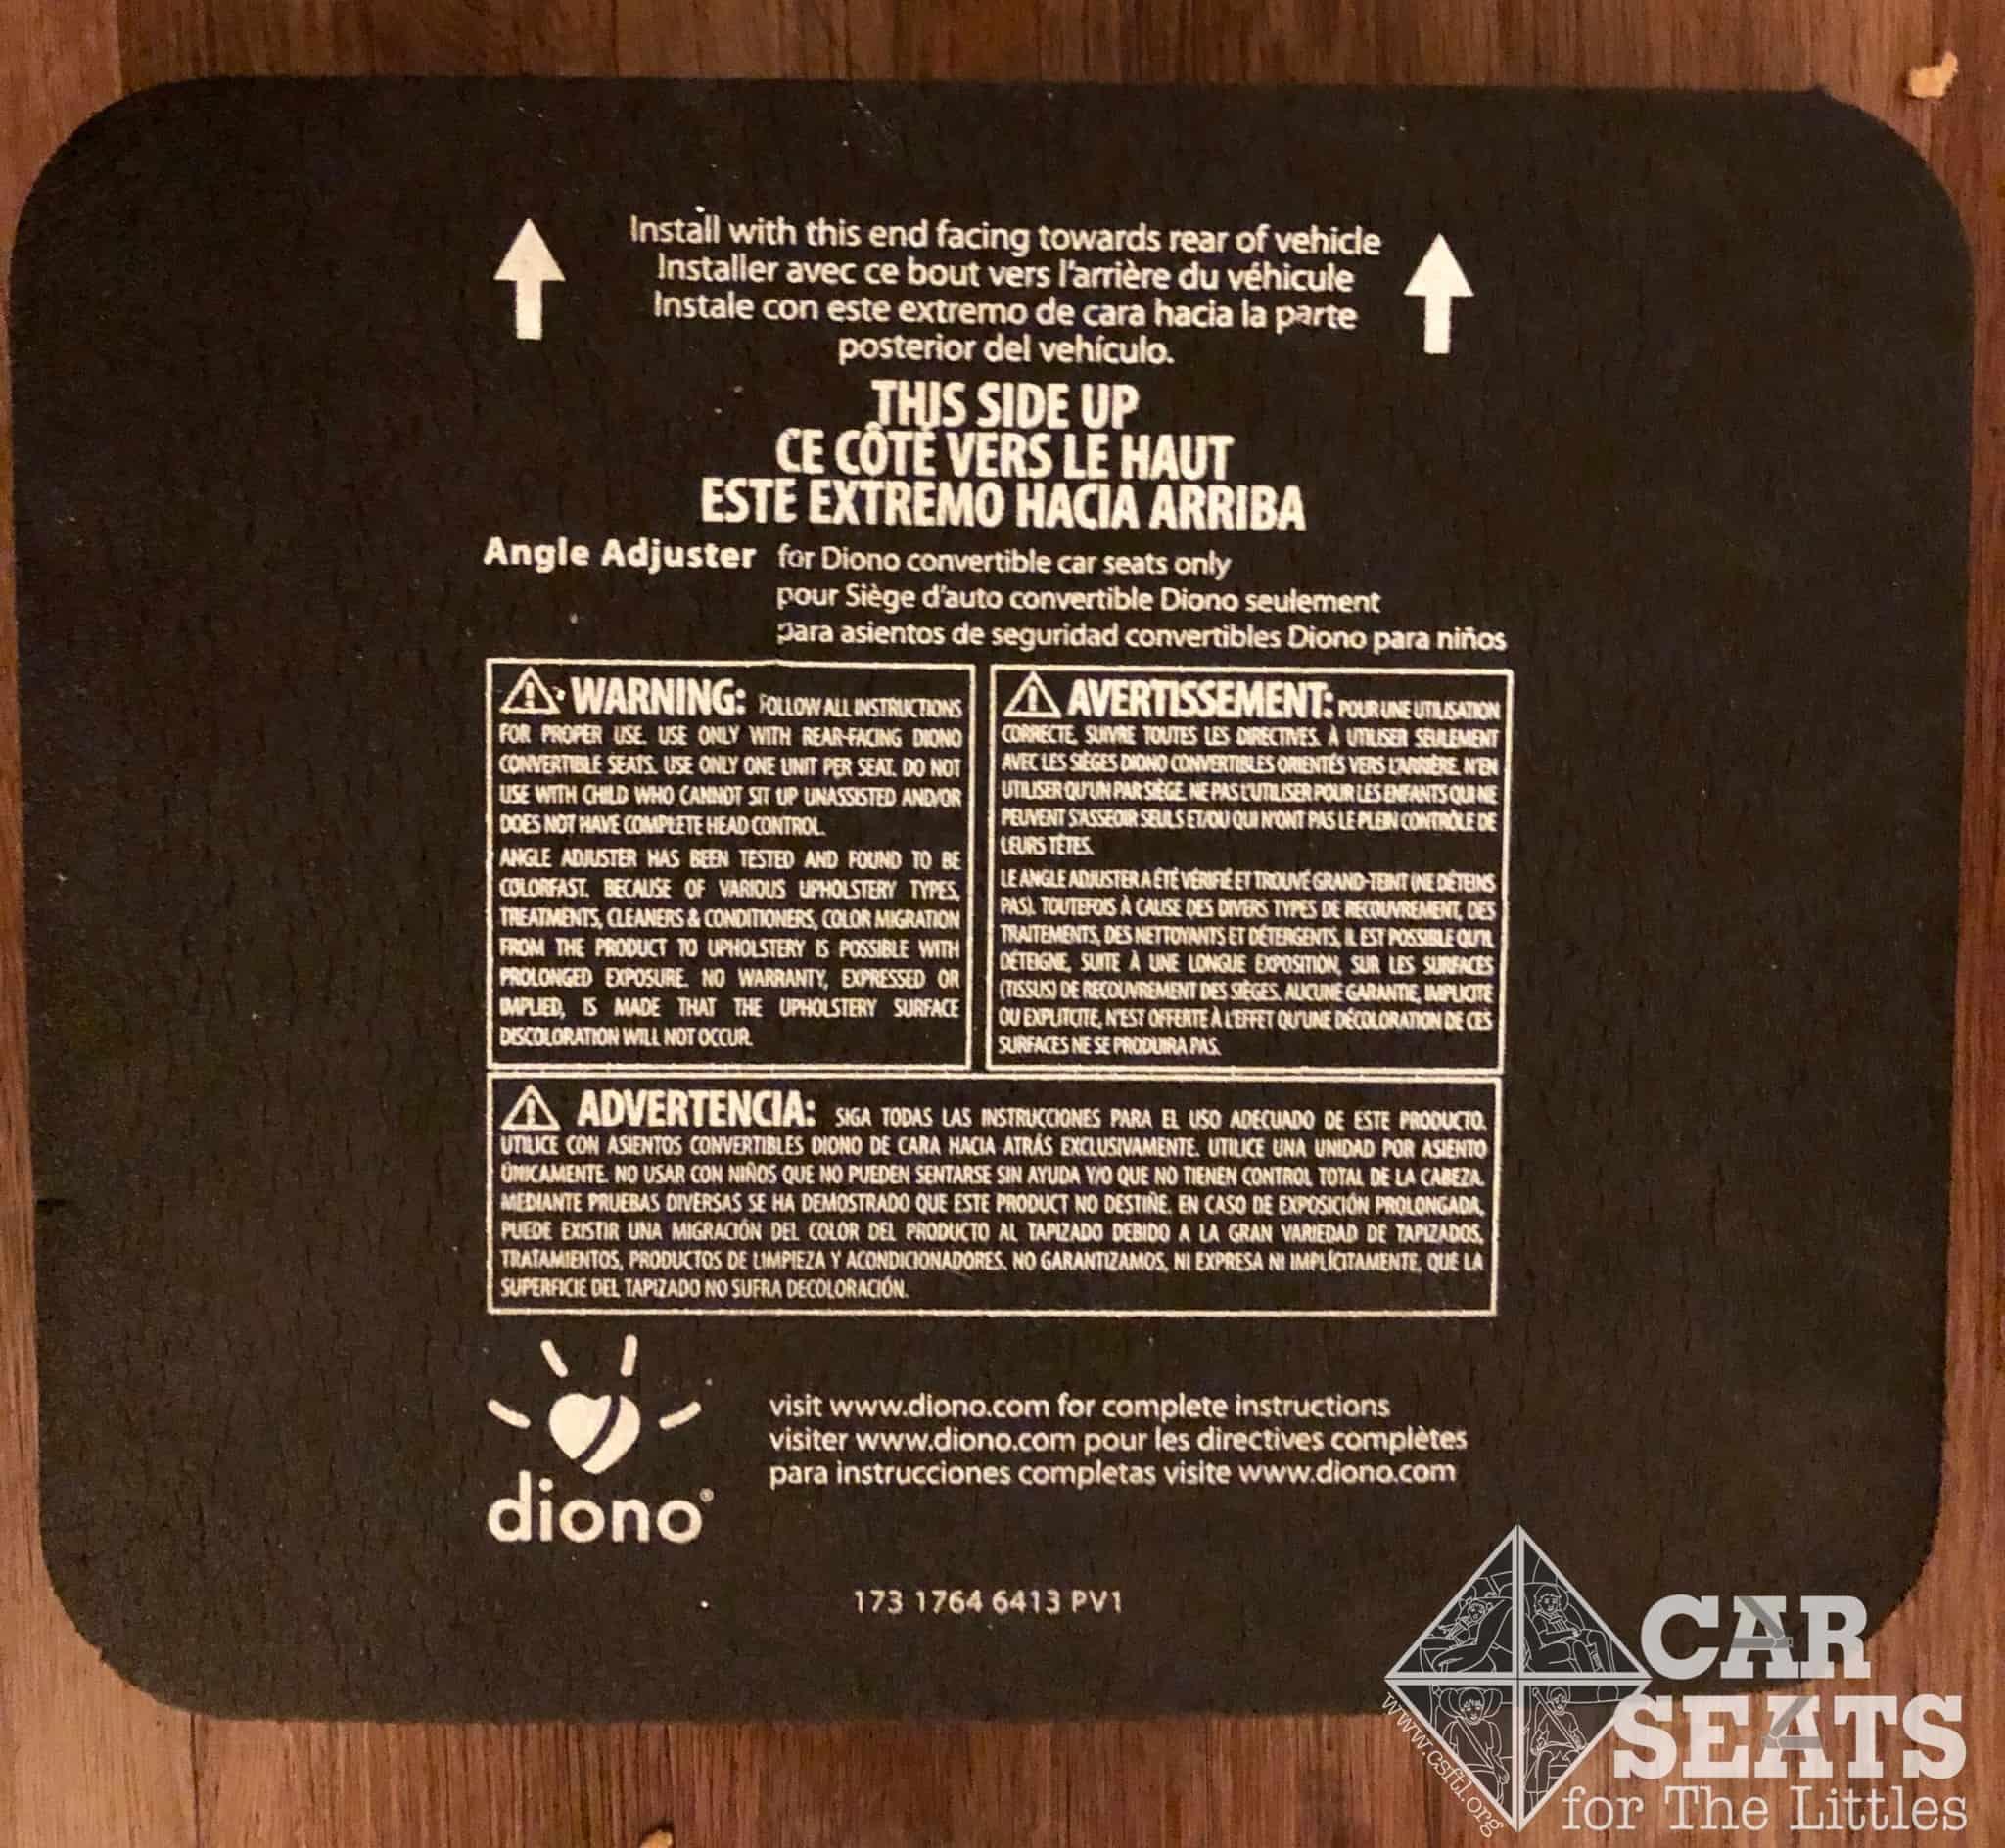
Diono angle adjuster
The radian 3RXT has a fixed internal recline angle. On sloped vehicle seats, where the end near the front of the car is higher than the end near the rear of the car, the radian 3RXT will be more upright.
The seat bight is the crack between the horizontal and vertical parts of the vehicle seat. In some cars, the bight is raised up from the horizontal part of the seat. On vehicle seats with a raised seat bight – and on flatter vehicle seats – the radian 3RXT may be very reclined.
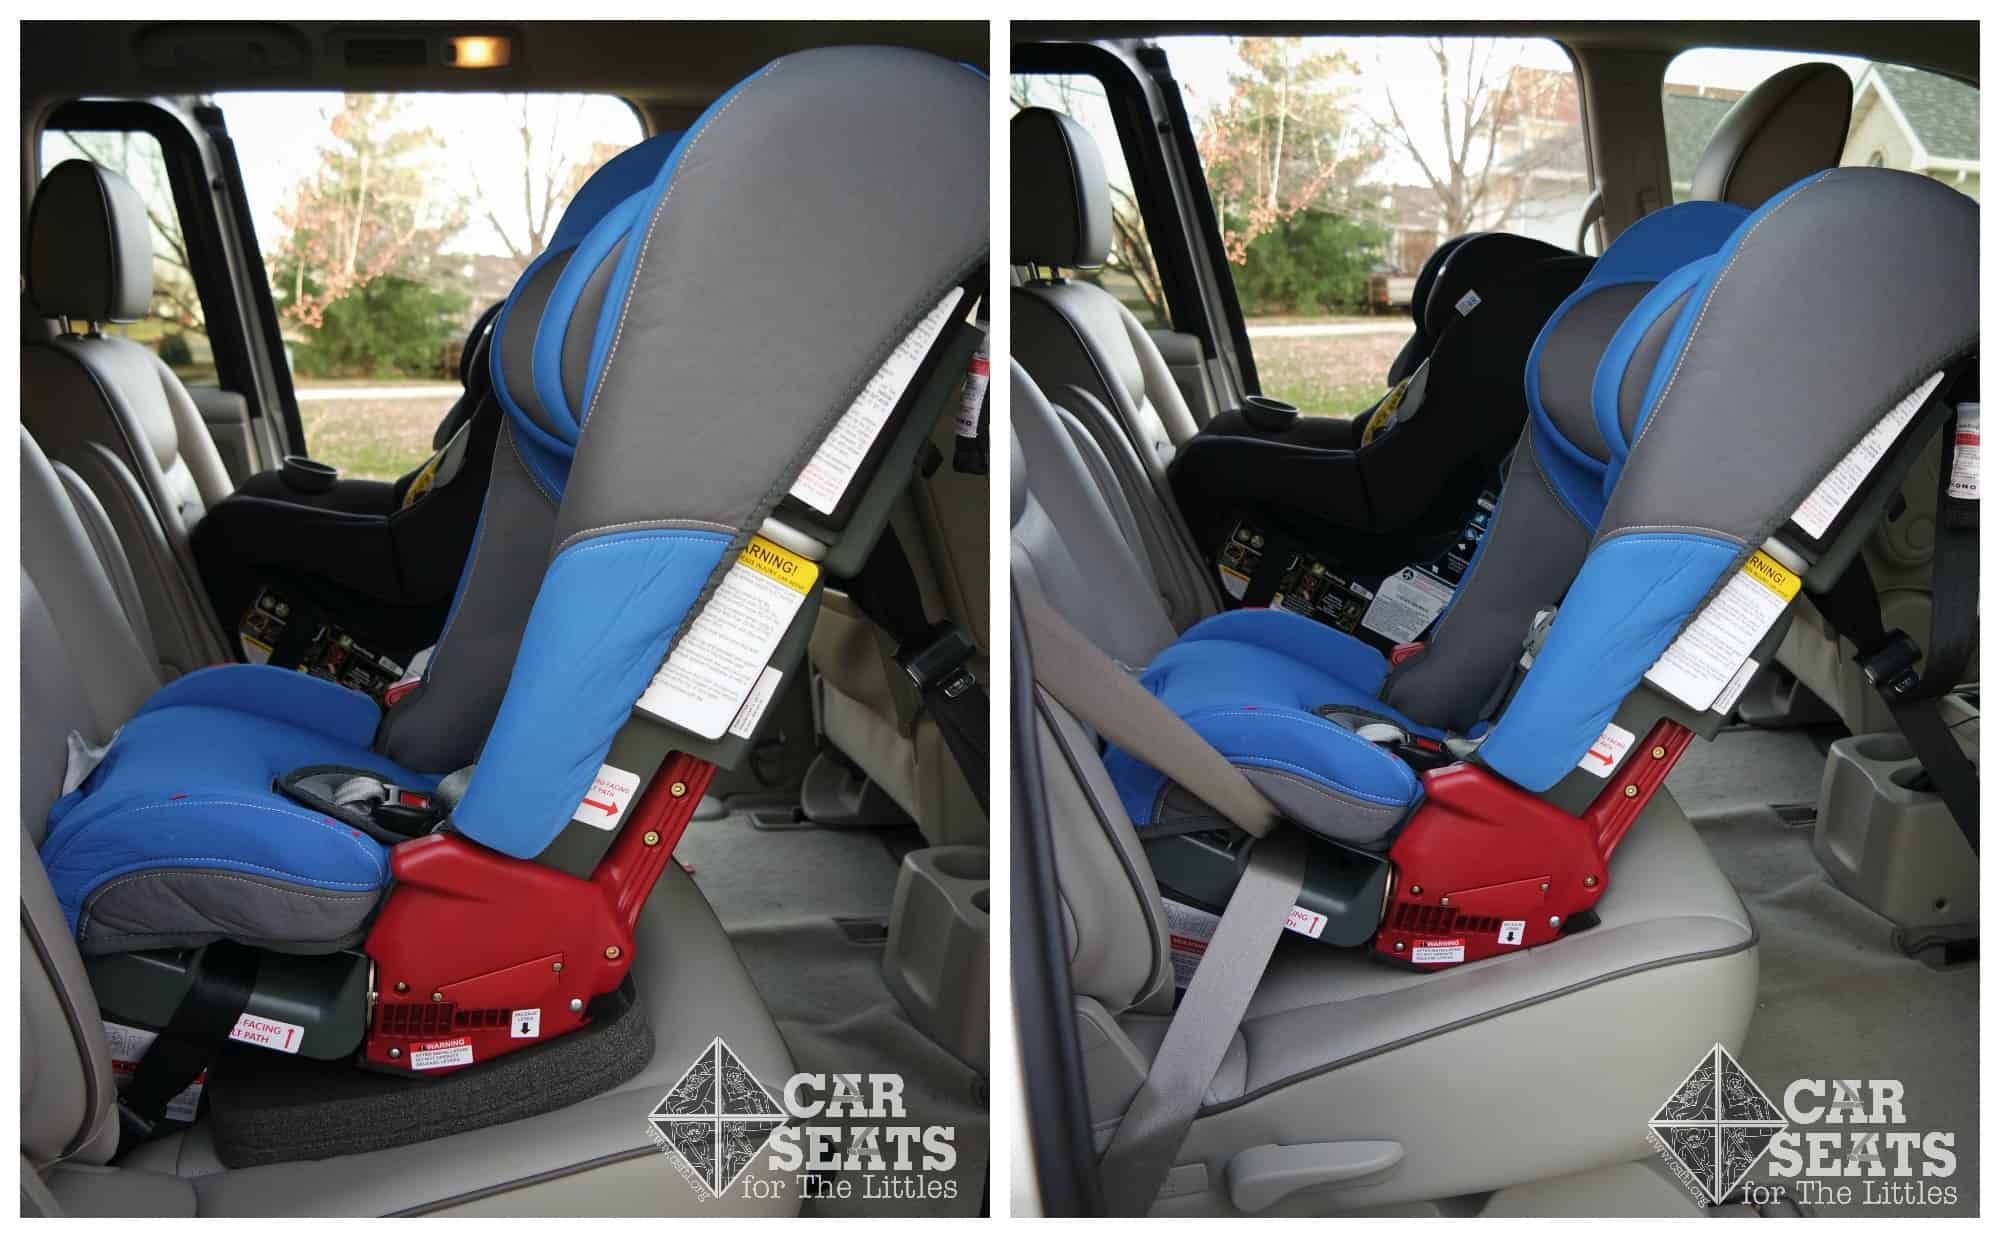
Comparison of another Diono seat with and without the angle adjuster
If you want to make the radian 3RXT more upright, you’re in luck! Diono sells an angle adjuster separately from the car seat. This goes under the seat to make it more upright. You can use only the Diono angle adjuster for this purpose; other materials are not allowed. The angle adjuster can ONLY be used with Diono multimode car seats.
Rear Facing Tether
Diono allows the top tether to be used rear facing. This reduces rebound motion, which is the tendency for a rear facing car seat to move towards the back of the car after the initial impact. The manual would benefit from pictures of this rather than just a description.
It’s necessary to make sure the vehicle manufacturer allows rear tethering. This is usually mentioned in the airbag section of the vehicle owners manual; look for language that forbids items being attached to or wedged under the front seat. Some manufacturers (Chrysler/Jeep/Dodge, for example) do not allow rear tethering in any of their vehicles. When in doubt, call the vehicle manufacturer or ask in our Facebook group.
To attach the tether rear facing, take the D ring webbing and thread it under the seat track of the front seat. Pass the metal end through the loop on the other end, then attach the top tether to the metal loop.

Diono rear facing tether
The tether should be threaded through the slit on the back cover of the radian 3RXT.
Some early models of the radian 3RXT were delivered with top tether webbing attached backwards. Although Diono permits use of the webbing as it’s delivered (backwards), they also provide instructions to remove the tether, turn it around, then reattach it to the seat.
Adjusting the Headrest
Diono radian 3RXT headrest
The Diono headrest is often a source of great confusion. The manual has a significant error: it states that the top of the child’s head must be 1.5 inches below the “ears” of the headrest. Diono has confirmed for us that the top of the child’s head should be 1.5 inches below the top of the headrest.
When the child is using the third harness strap slot, the headrest can be lowered. The radian 3RXT does not have the “jawline” rule that previous Dionos have; the ears of the headrest should just be roughly on either side of the child’s head. If a child using the third harness strap slot is still too short for the headrest to be positioned correctly, then it should be moved up all the way.
I’ve found that the easiest way to lower and raise the headrest is to stand behind the seat and put one hand on each side of the headrest. Move each side up (or down) incrementally. After a few adjustments, the headrest will loosen and be easier to adjust.
Usage: Infant Insert

Diono radian 3RXT infant insert
The radian 3RXT comes with a two section infant insert. The head portion unsnaps from the bottom portion. There are no weight guidelines for these as on other seats. I generally find that the fit is improved with the bottom part of the insert until around 18 months, but of course each child is different!
Tightening the Harness
Diono veterans will be happy to hear this next point: there is no longer a ratcheting system to tighten the harness. Simply pull the adjustment strap to tighten. Phew!
Fit to Child
Newborn
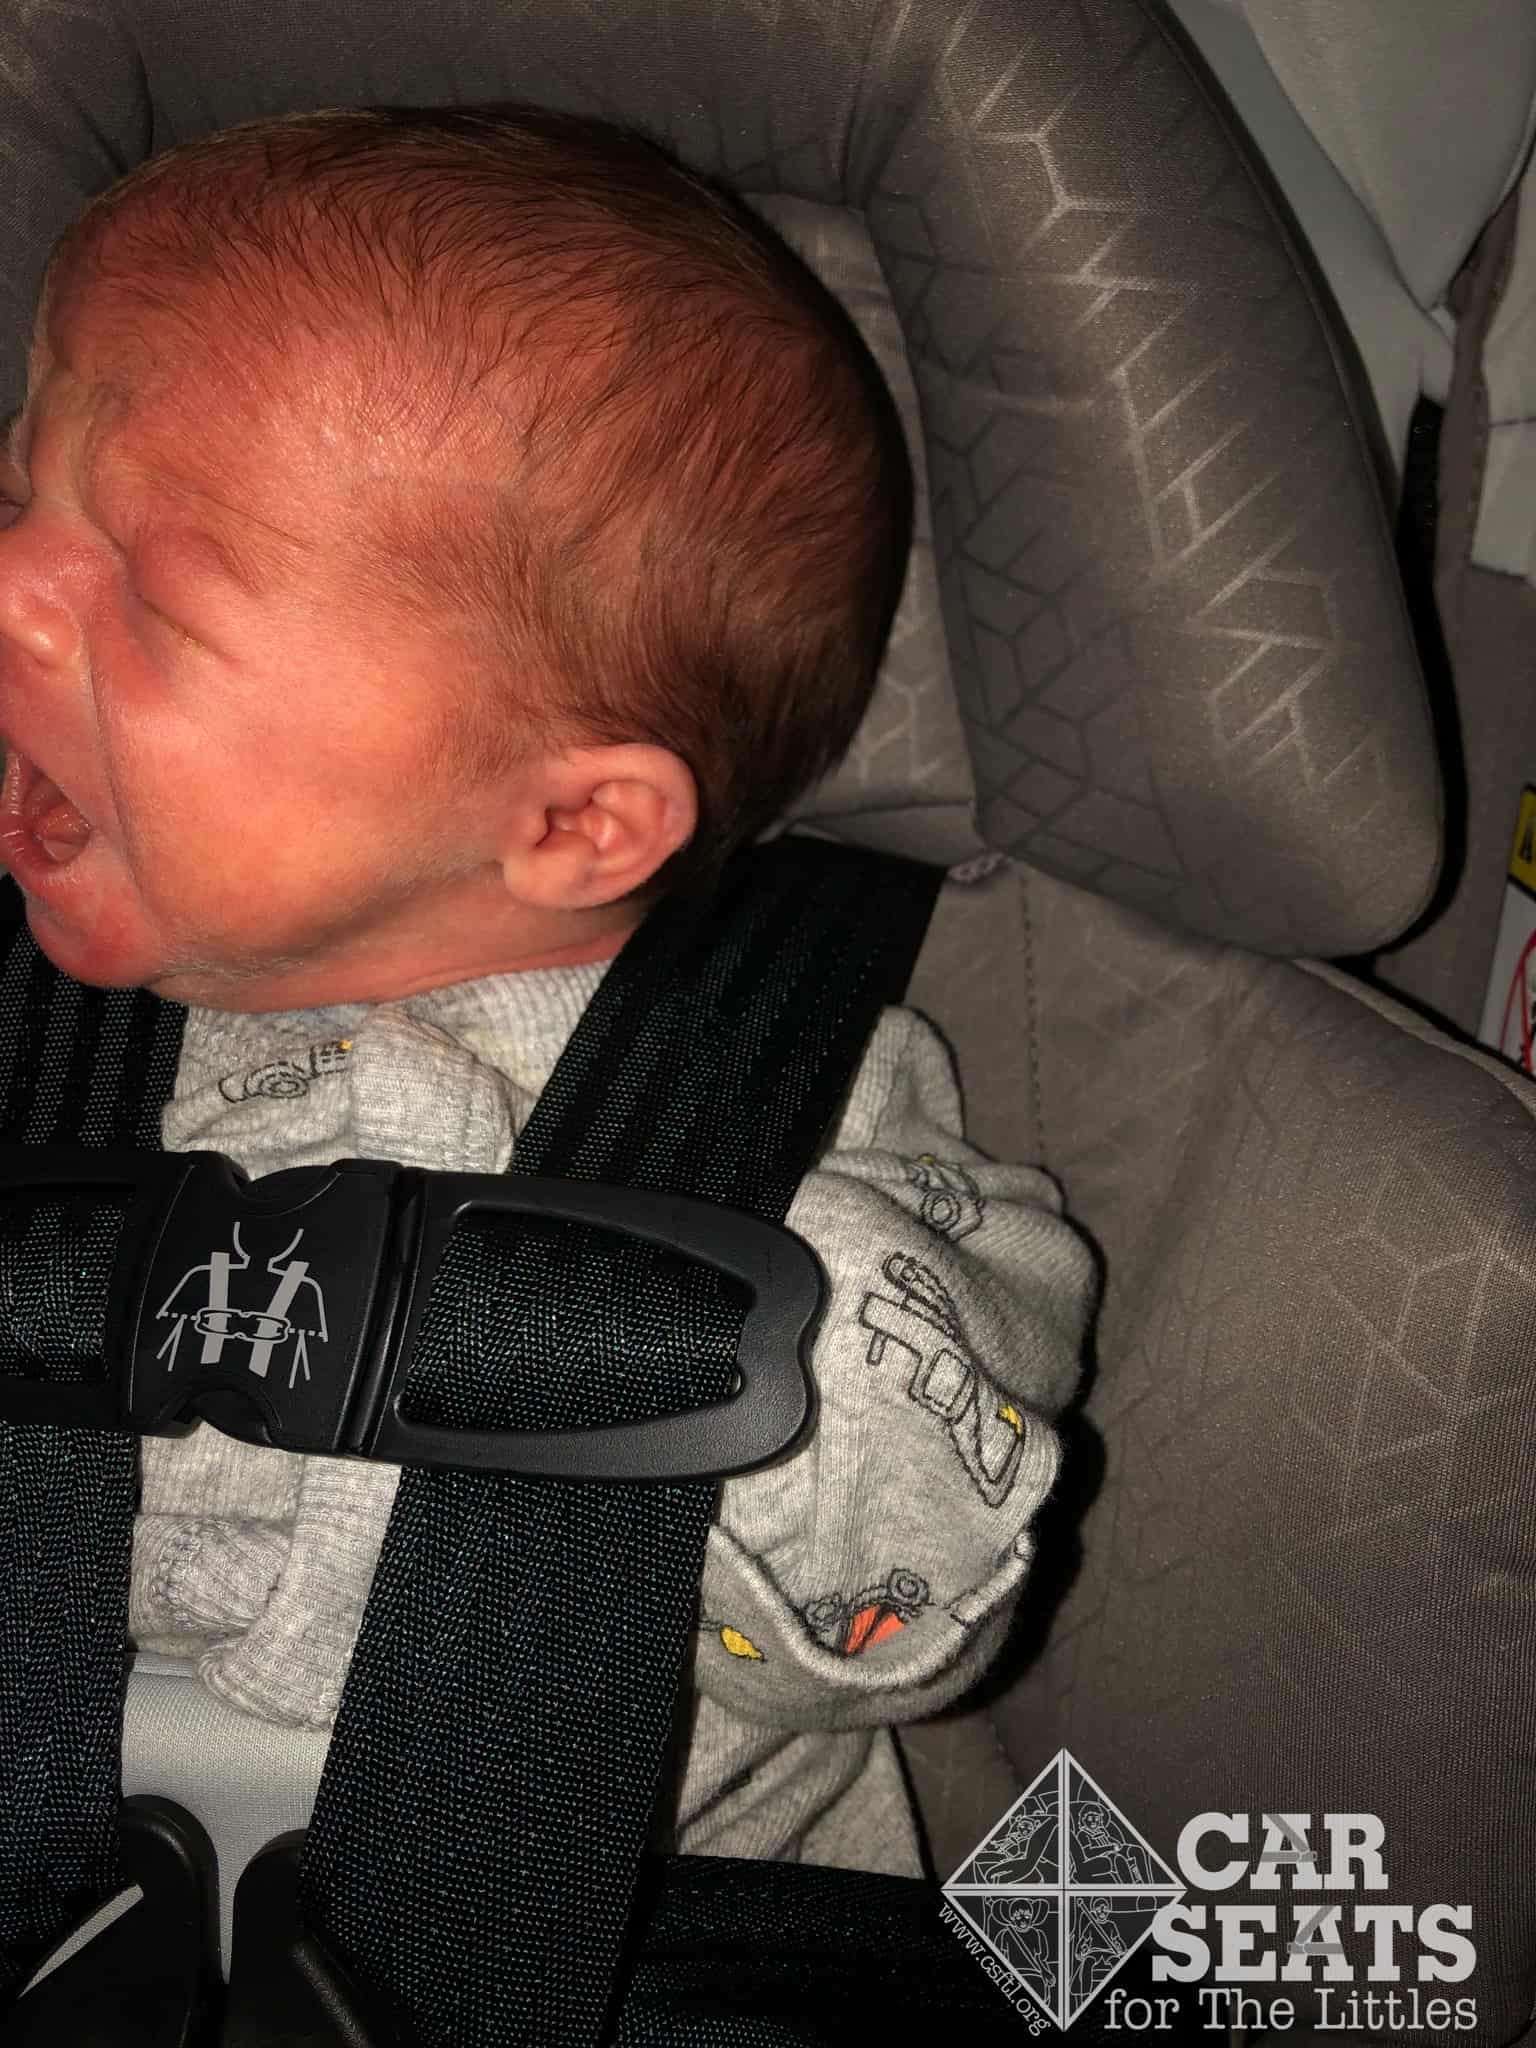
Diono radian 3RXT – unacceptable newborn fit
This little guy weighs 6 pounds 1 oz and is 19 inches long. He was 10 days old in this picture and was born a bit early, along with his twin brother! As we can see, the radian 3RXT does not yet fit him, because the harness straps are coming from above his shoulders.
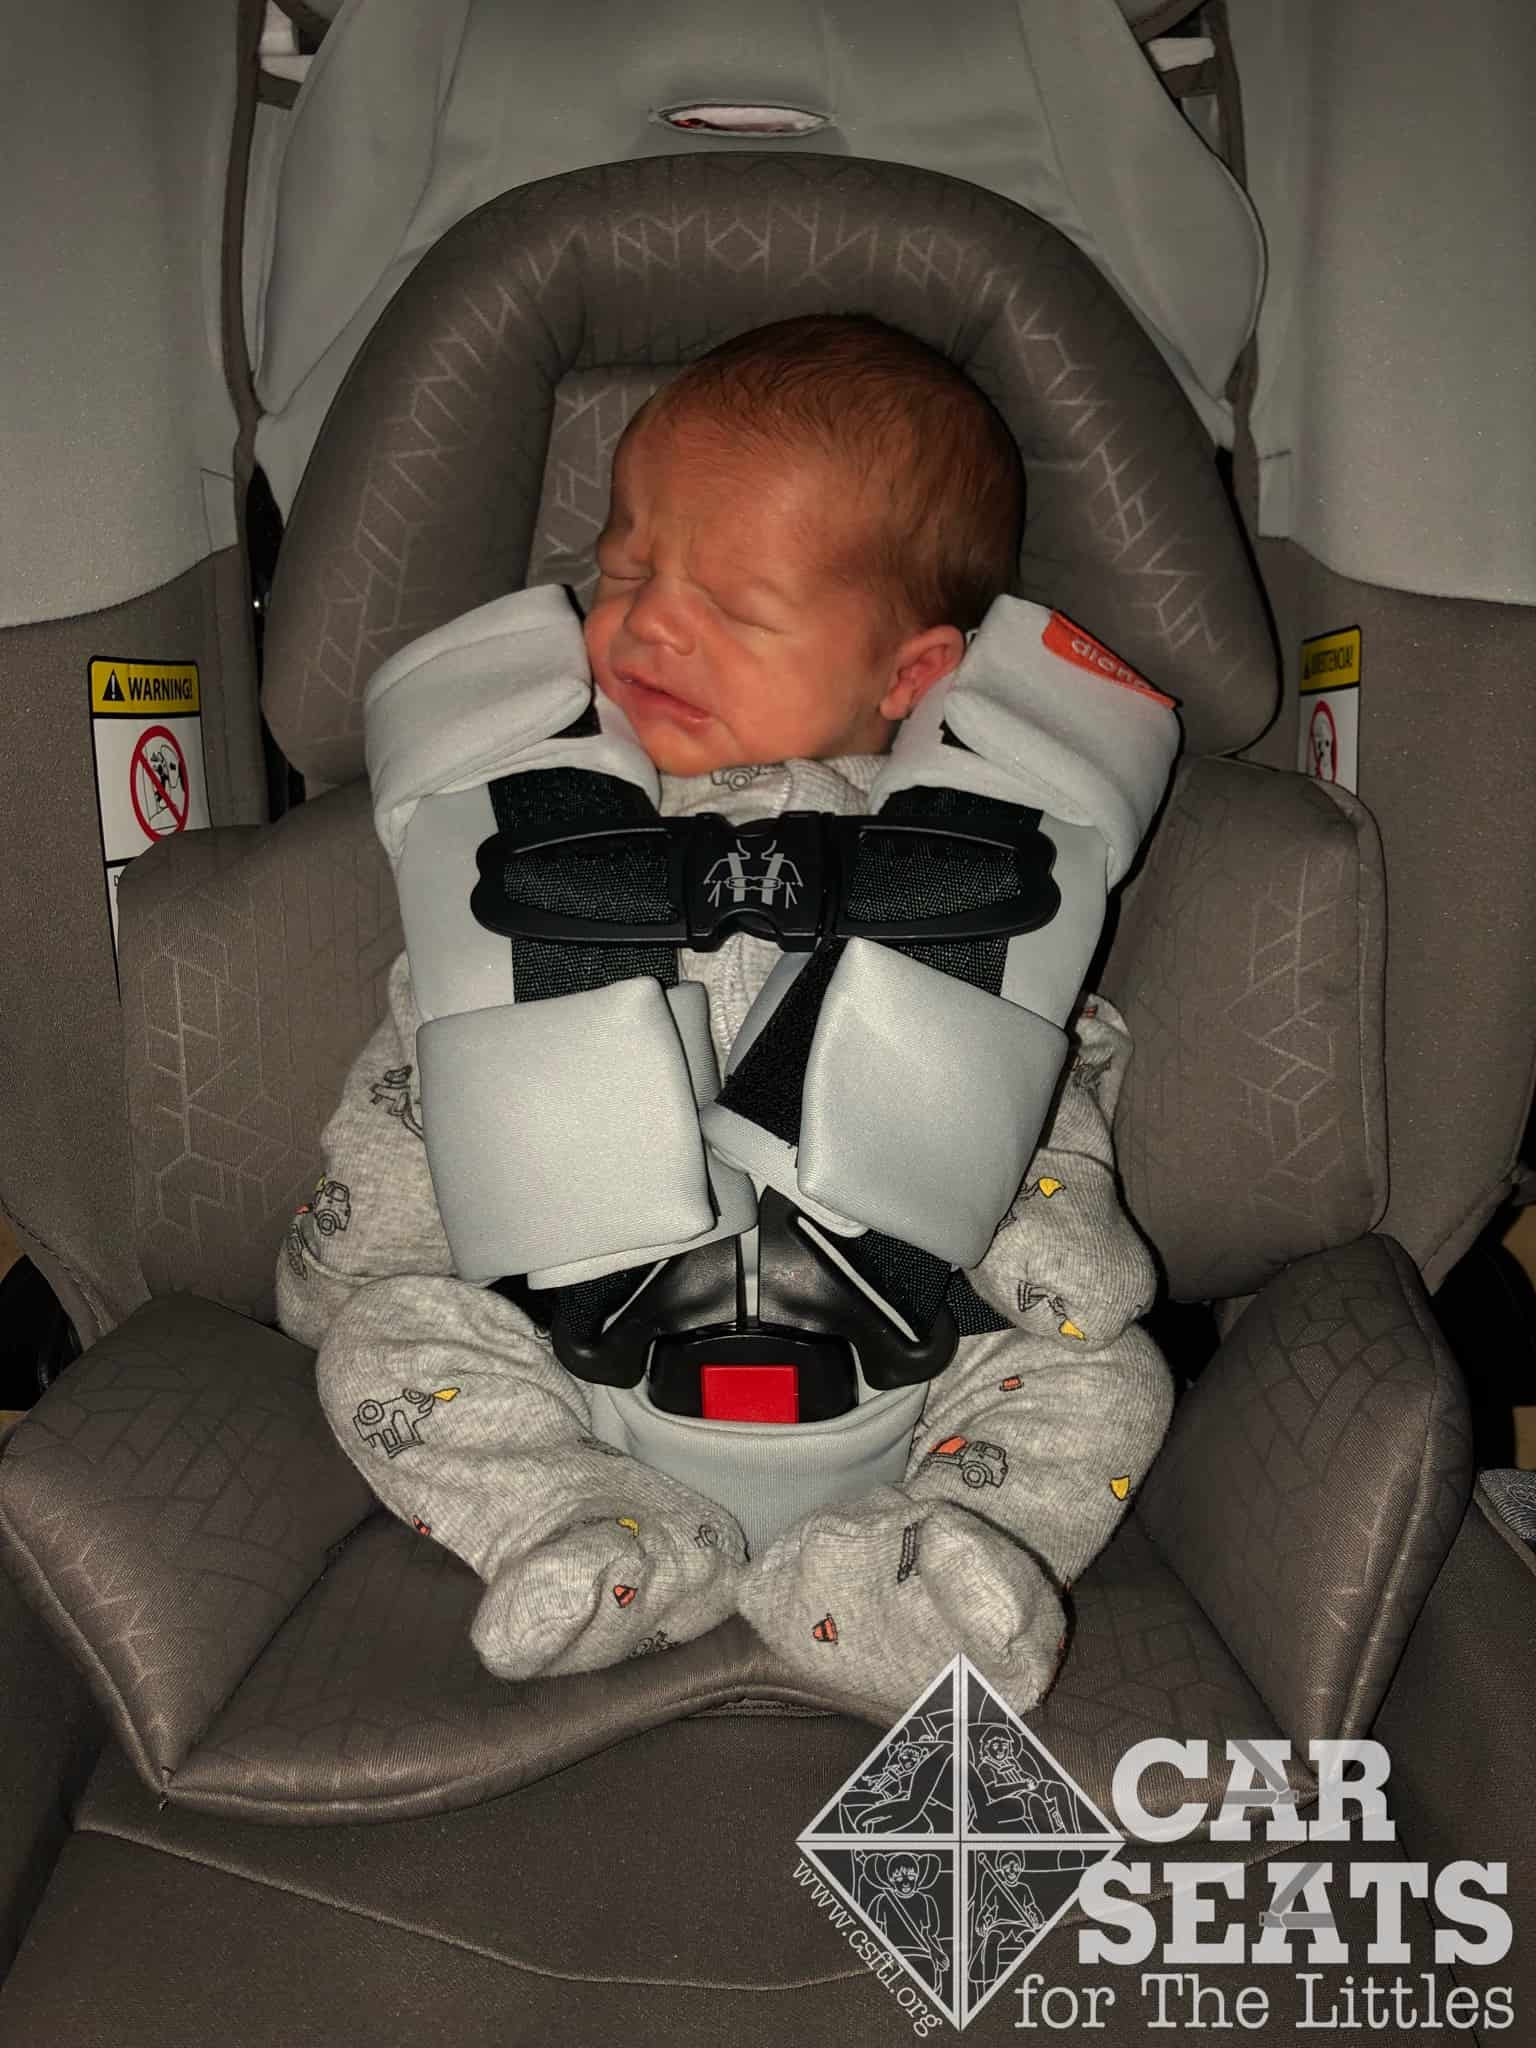
Diono radian 3RXT – unacceptable newborn fit
The harness straps must come from at or below the shoulders for rear facing. We took a picture with and without the strap covers to demonstrate that the strap covers should be removed at this age, as they prevent a tight fit and do not sit correctly on such a small infant. Their purpose is not to support the infant’s head.
However, there is a more important issue that we’d like to mention here. Since the angle of the radian 3RXT cannot be adjusted to be more reclined, in many cars with sloped vehicle seats, the angle will be too upright for babies who cannot yet sit unassisted. This would mean that even if the straps do fit correctly, the seat wouldn’t be a safe option if the child’s head slumps or falls forward due to the recline angle.
4 Weeks Old
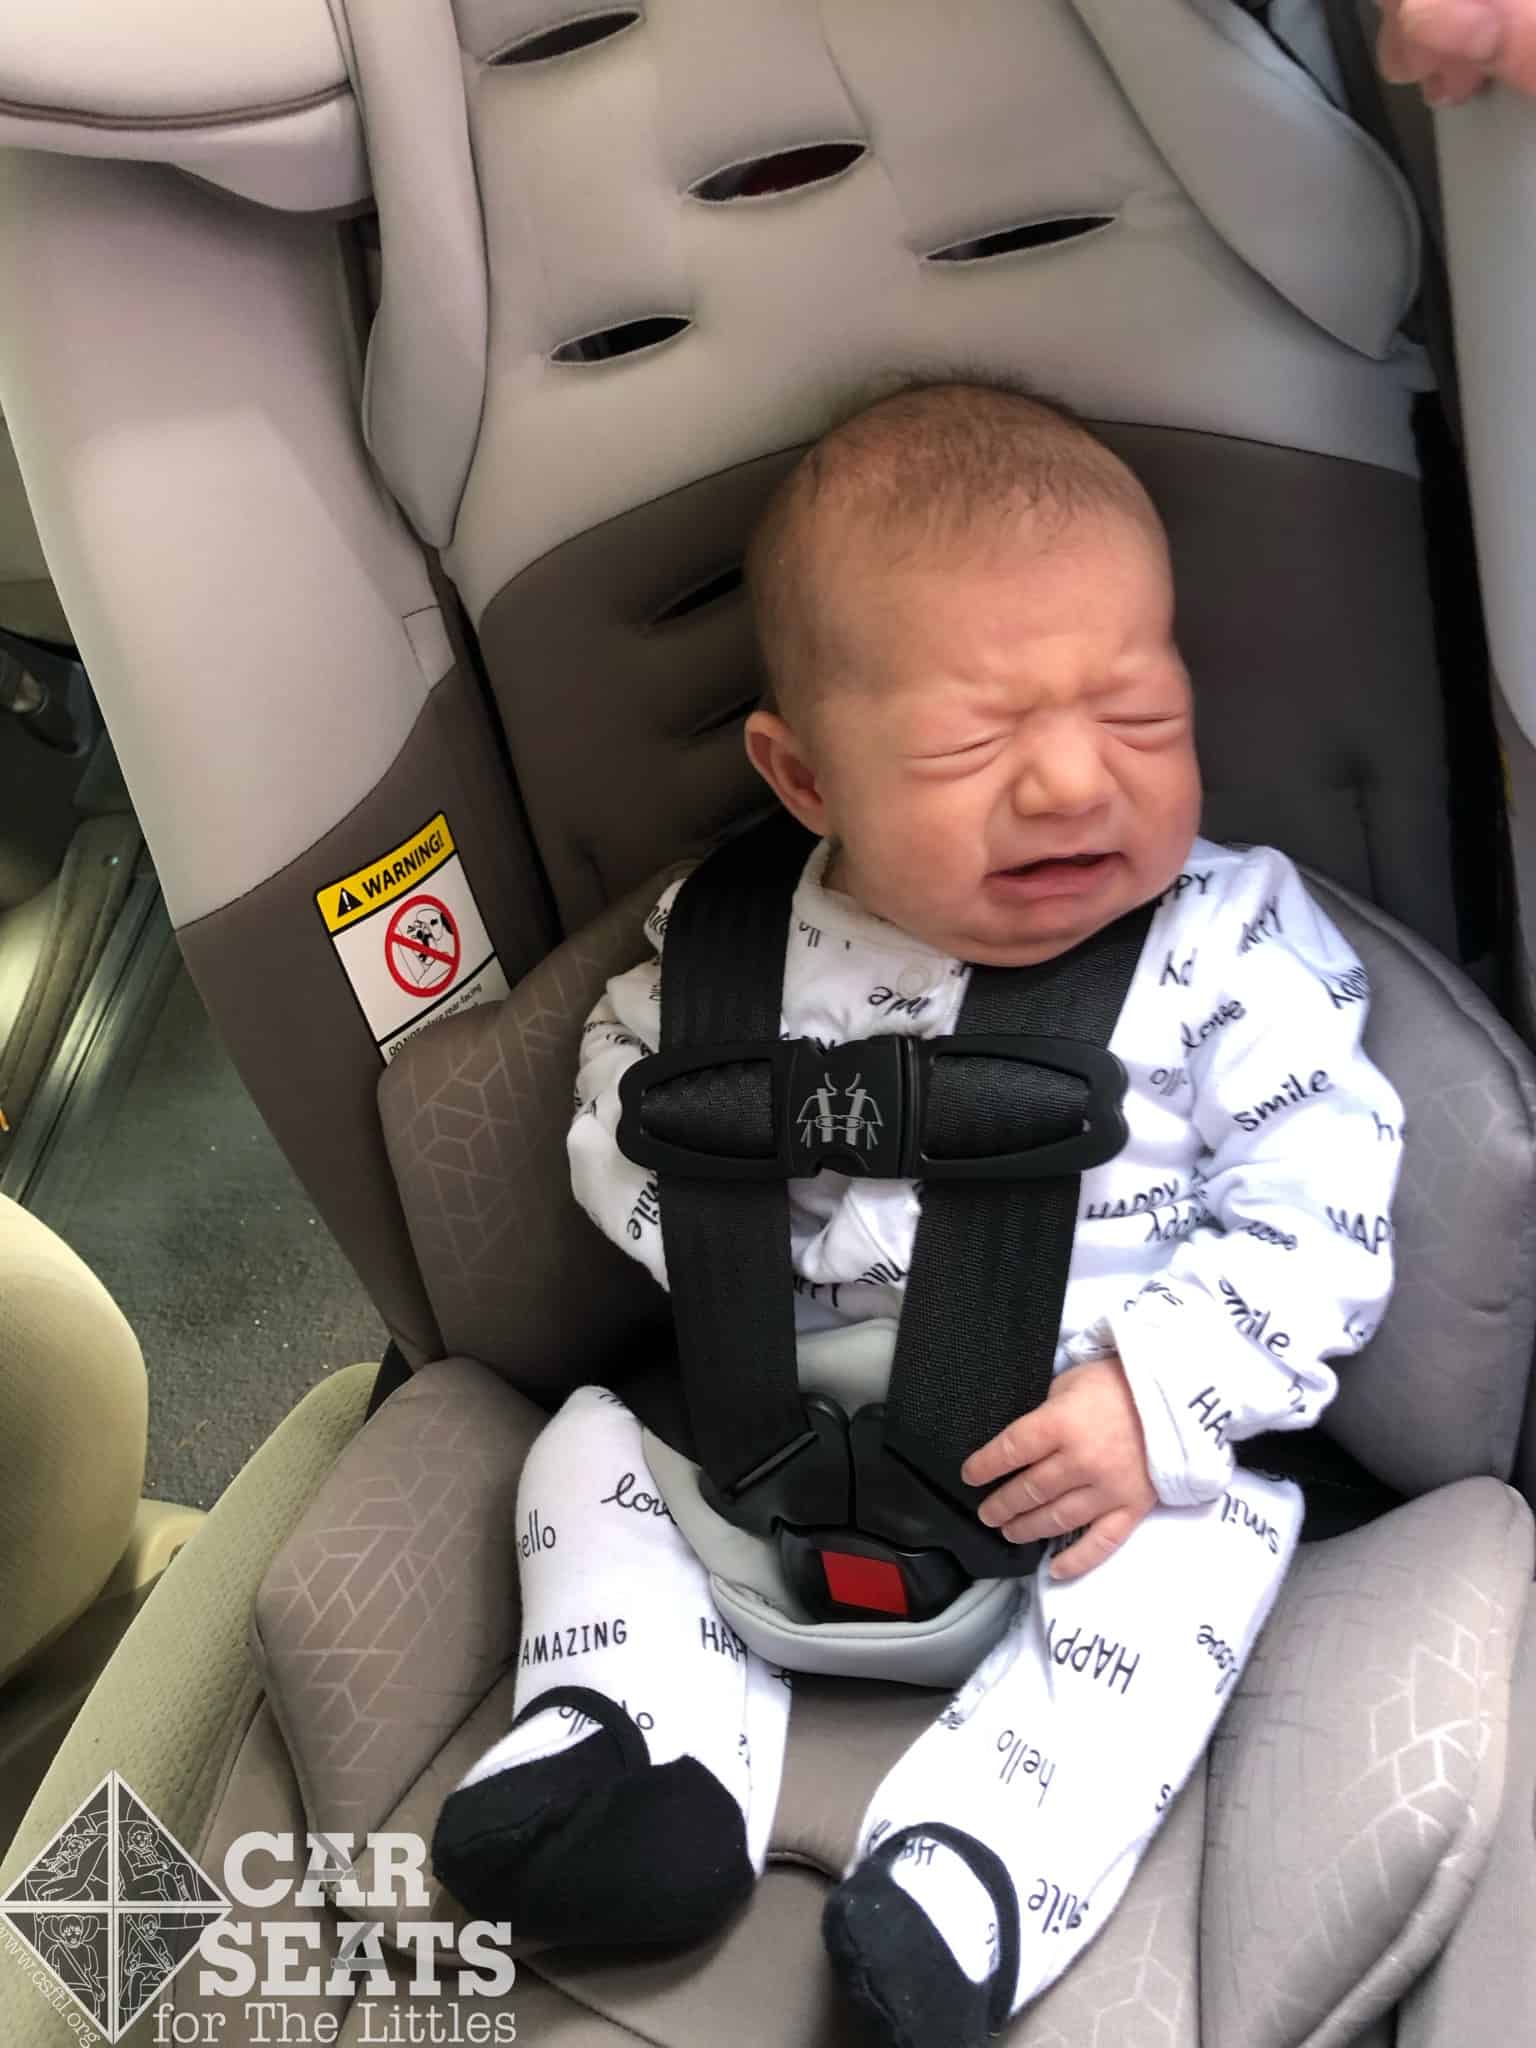
Diono radian 3RXT – unacceptable infant fit
This young lady is 4 weeks old. She weighs just 7 pounds and is 20 inches long. We put the radian 3RXT into her family’s Toyota Sienna. As the Sienna has very sloped seats, the radian 3RXT was much too upright for her. I removed the head portion of the infant insert as it was pushing her head forward even further.
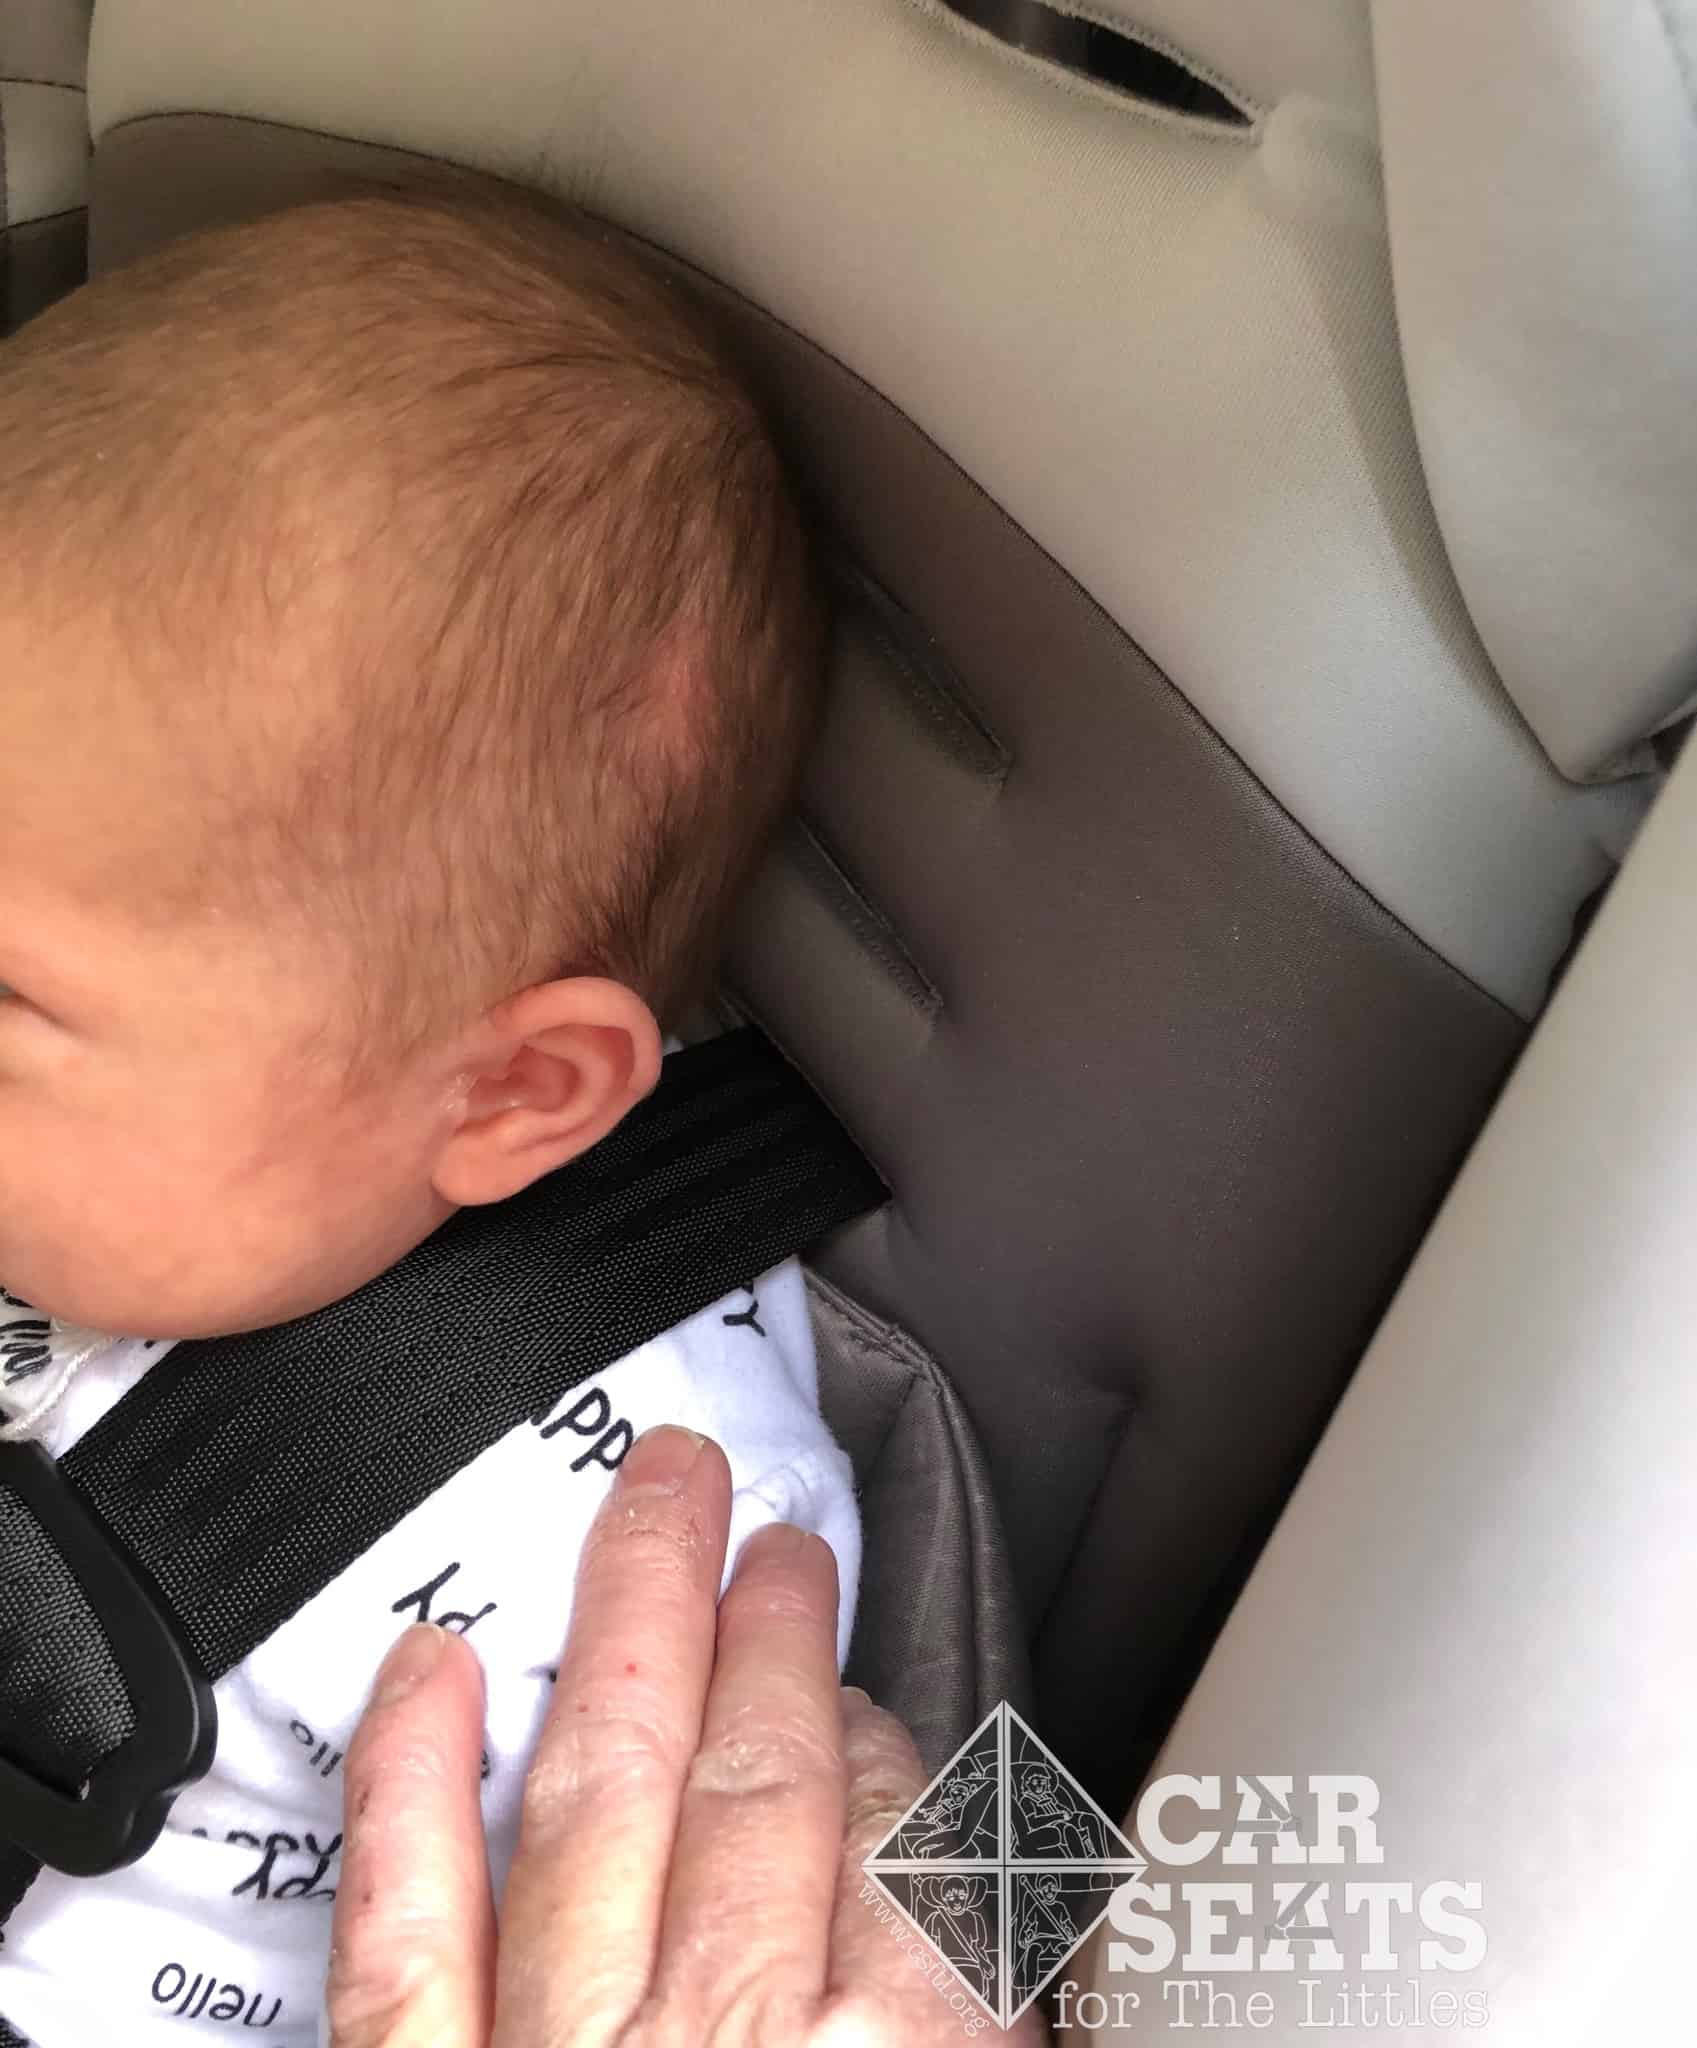
Diono radian 3RXT – unacceptable infant fit
In addition, the straps are above her shoulders. She will not be able to use this seat until she is sitting unassisted and can tolerate the angle.
5 Months Old
Diono radian 3RXT – 5 month old
This little guy is already a veteran of a few of our reviews! He’s 5 months old, weighs 17 pounds and is 26.5 inches long. He fits nicely in the radian 3RXT, but in his family’s car – a Lexus sedan – the angle is still too steep for him to use the seat. He’s large for his age, but he’s only 5 months and is not yet sitting up.
22 Months Old
Diono radian 3RXT – 1 year old
This is my younger son. He’s 22 months old. He’s very small for his age — he’s 21 pounds and 31 inches. He fits nicely in the radian 3RXT, although he still cannot use the headrest.
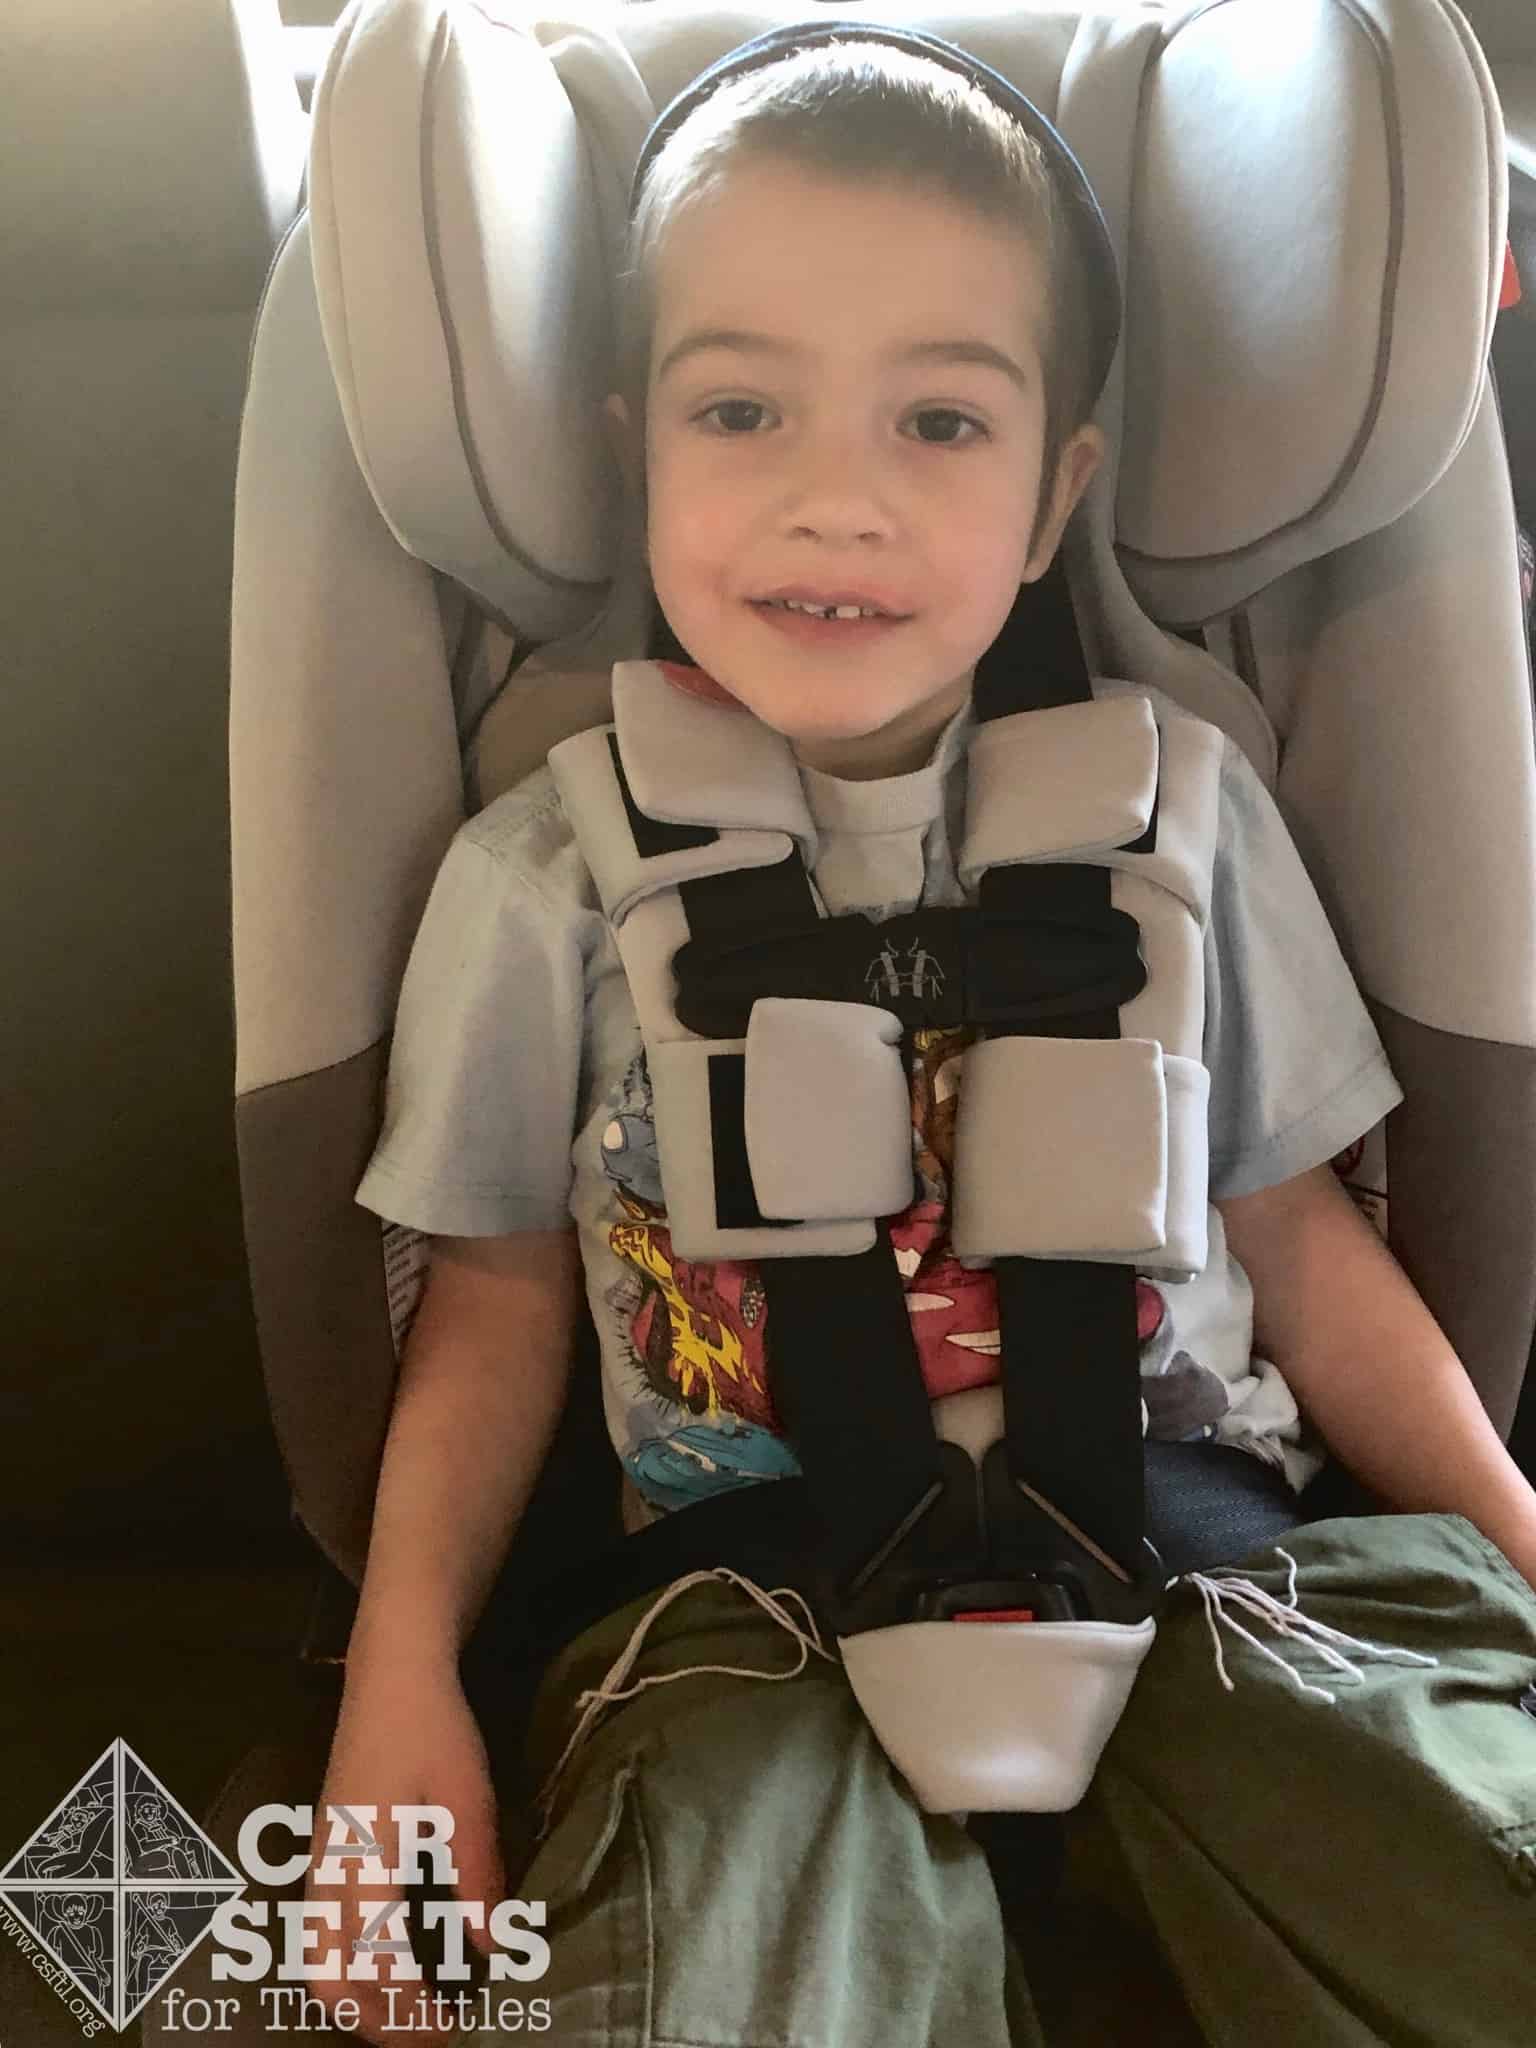
4 Years Old

Diono radian 3RXT 4 year old rear facing
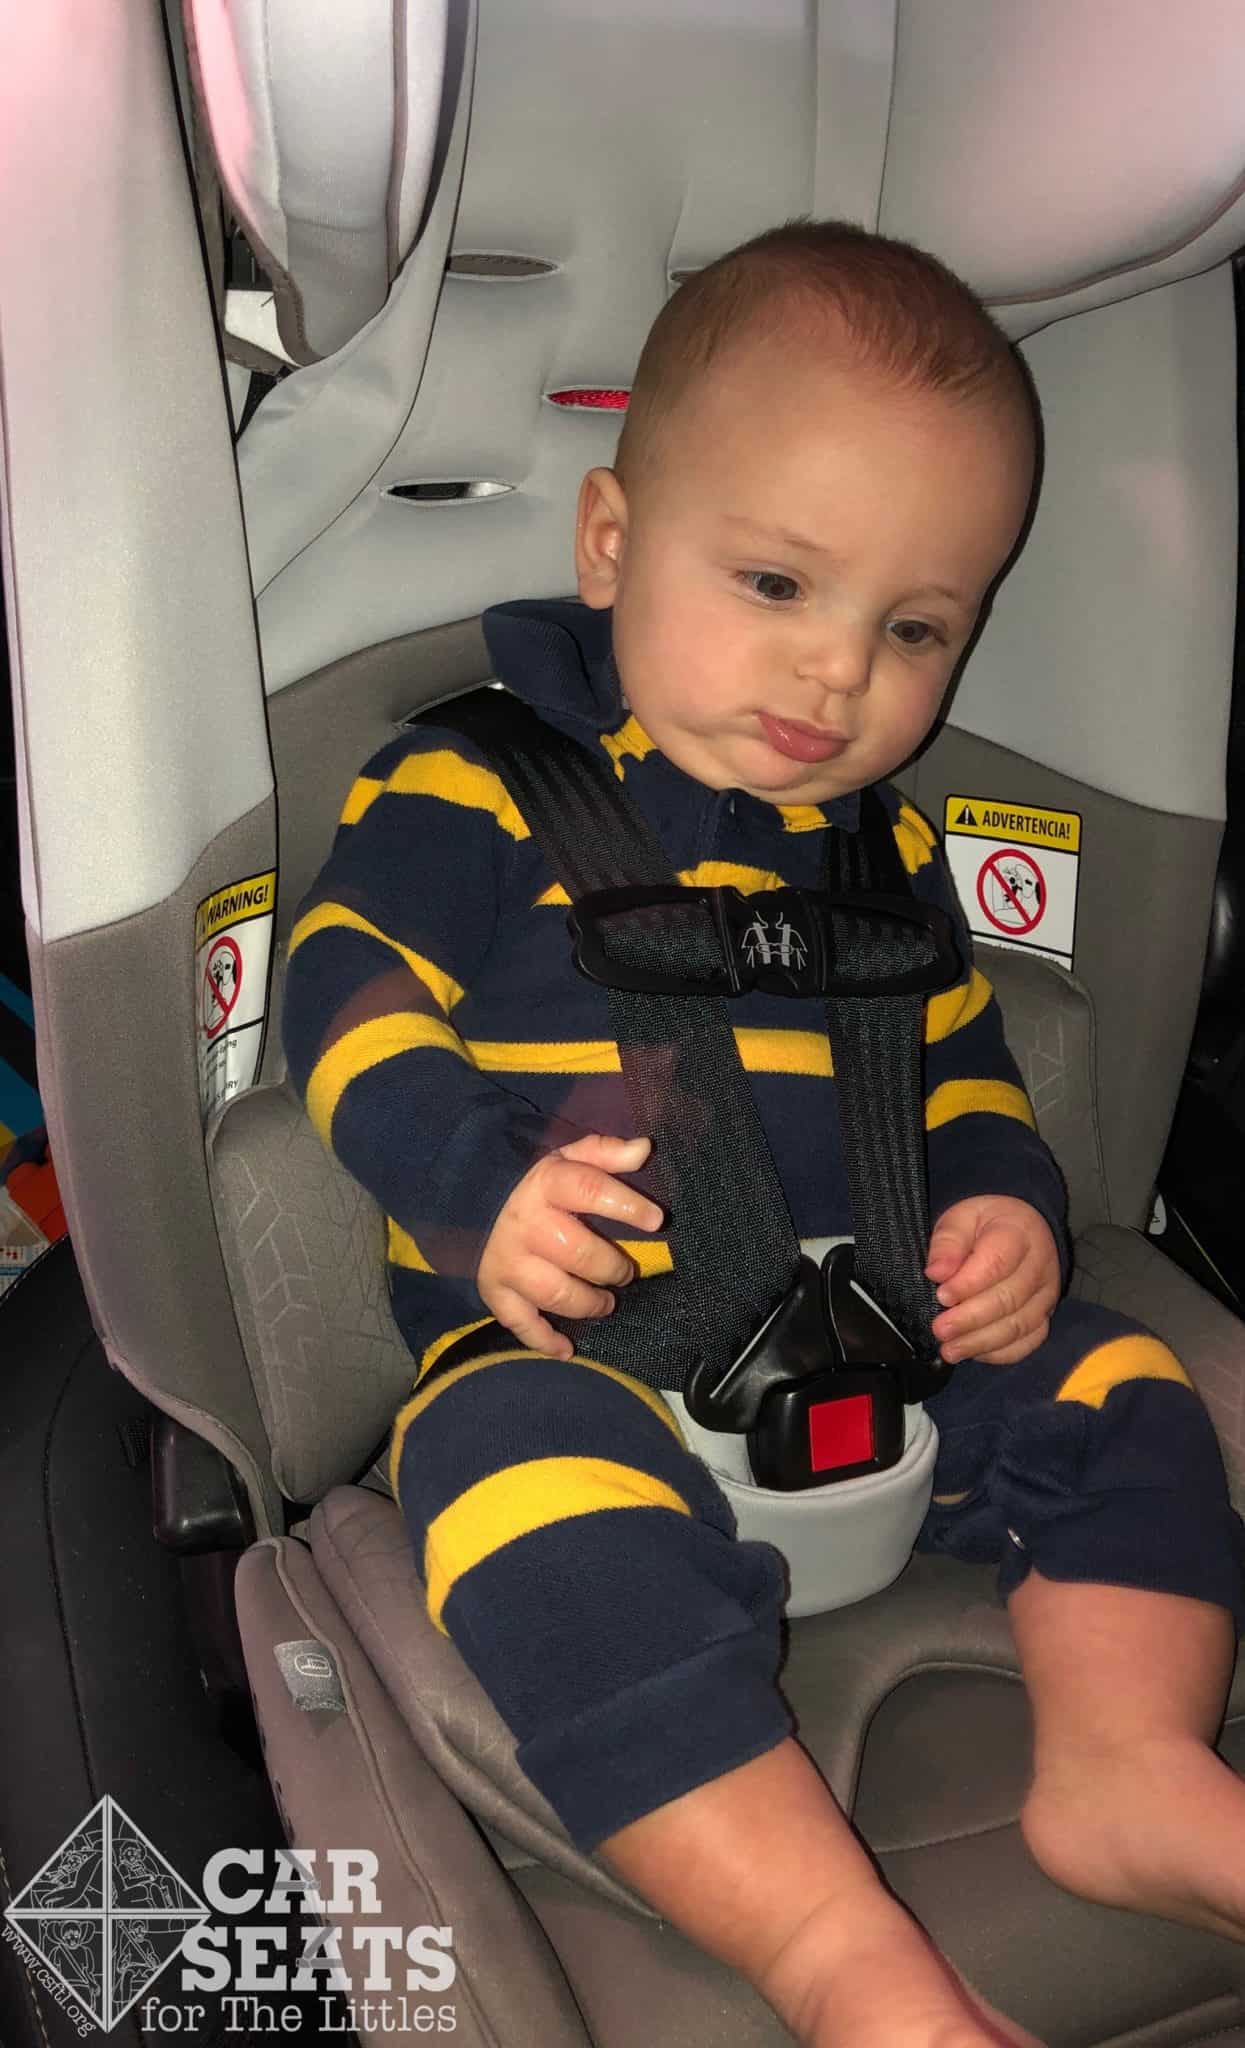
This is my older son, modeling his best Hawaiian Punch mustache. He’s 4 years old, weighs 38 pounds, and is 40 inches tall. He began riding forward facing about a month before he turned 4, but he’s happy to model the radian 3RXT for us in rear facing mode because he’s still within the height and weight limits.
Because he weighs more than the lower anchor weight limit, we’d have to install with the vehicle seat belt for him. His legs are beginning to get cramped rear facing. We know this isn’t a safety issue, but it shows how roomy the radian 3RXT is if a 4 year old’s legs are just beginning to get cramped rear facing.
Rear Facing Installation Challenges
Several popular vehicle setups present an issue with the rear facing radian 3RXT.
Waterfall Seat Bight
First of all, as mentioned above, a raised or “waterfall” seat bight presents problems. Diono allows an installation where the feet of the radian 3RXT are on the seat itself and not on the seat bight. I’ll be honest — I’ve always found the seat exceptionally difficult to install correctly in this manner, although another of our admins very experienced with this seat says she finds it easier!
Another vehicle setup that presents issues with a rear facing Diono – and, to be clear, many other seats – is a middle seat with plastic hinges. Diono does allow the feet of the rear facing base to be wedged into the hinges, but the hinges must be the right width for this to work. In addition, it’s necessary to be certain the seat would be tight even without the feet wedged in. In many cars with middle hinges, the middle seatbelt anchor points are wider than the seat itself. This means the Diono would likely not be tight if it weren’t for the hinges.
Installation: Forward Facing
Introductory Page in Manual
Diono radian 3RXT forward facing summary page
I was happy to see that the radian 3RXT manual has an initial “flow chart” type of page in the forward facing section, as there is a lot to remember!
Setup: Adjustable Bottom
Diono radian 3RXT – lowering the adjustable bottom
The manual instructs that the adjustable bottom (known previously as the forward facing recline) should be lowered for all forward facing riders 25 pounds and up. It should NOT be used rear facing. Though the manual isn’t clear about this, Diono has confirmed for us that it should not be used for forward facing children who weigh less than 25 pounds. To lower the adjustable bottom, squeeze together the two brass bars under the seat and pull down the bar towards the front of the seat.
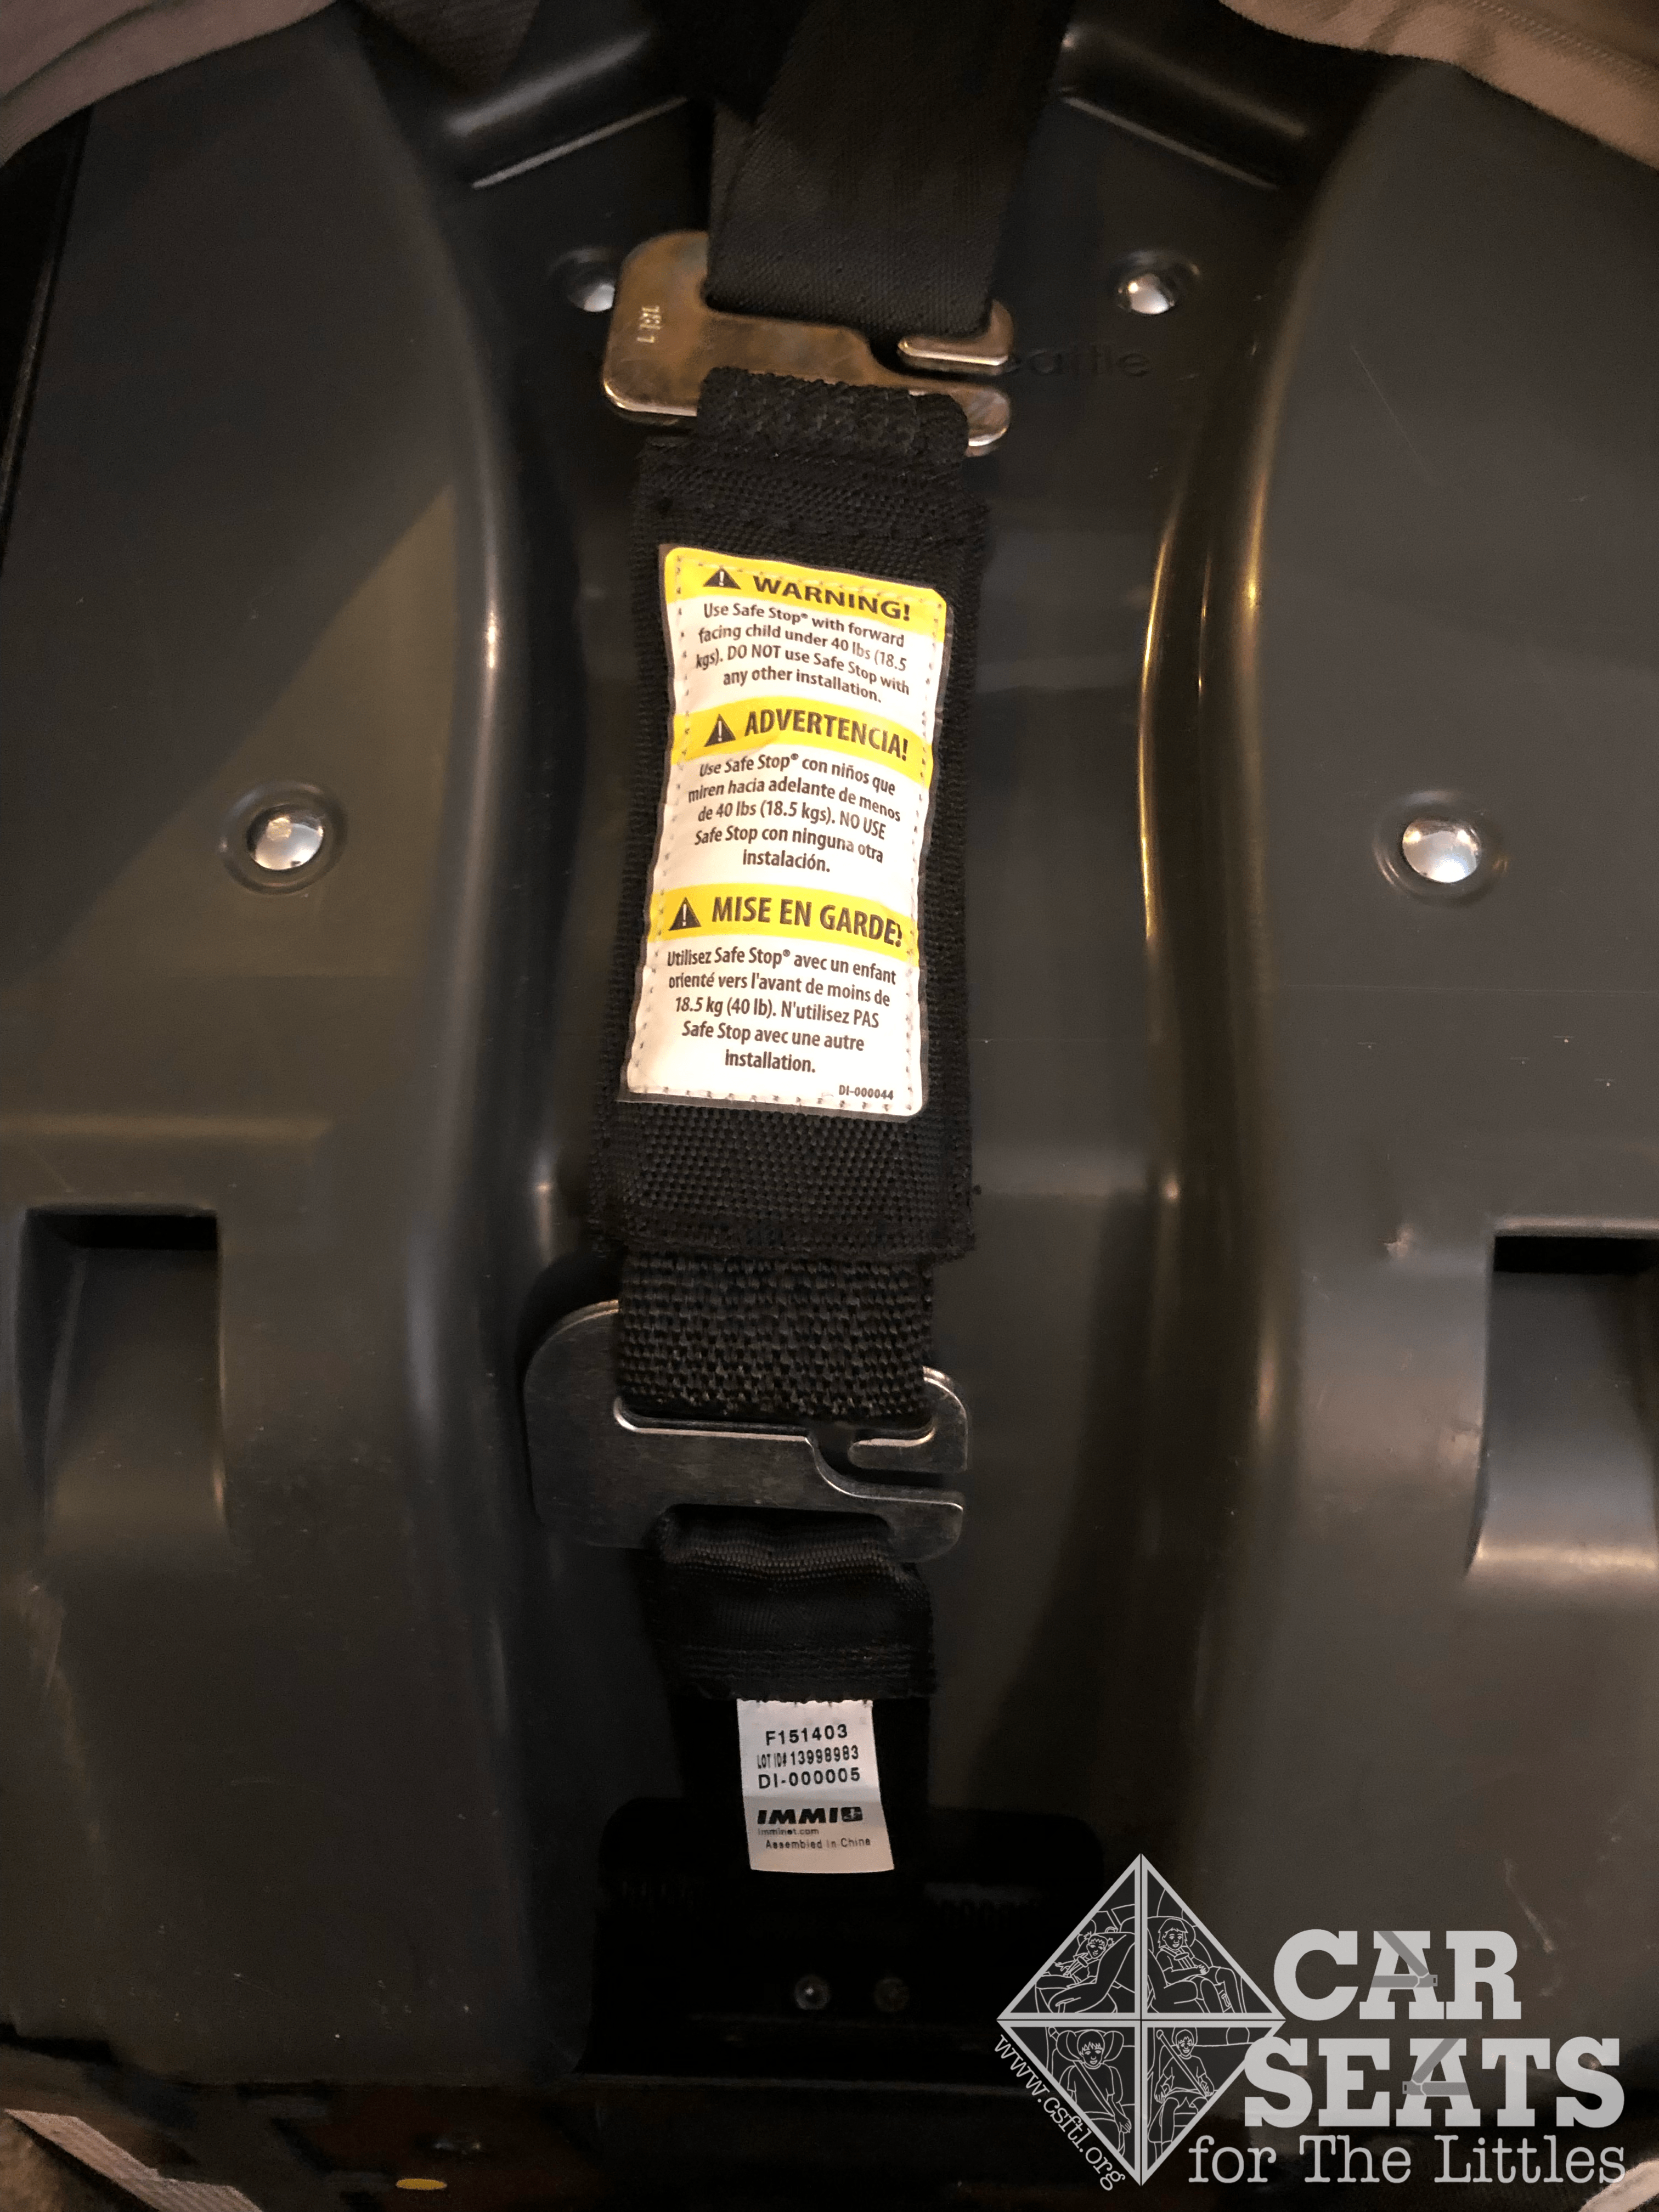
Setup: Safe Stop
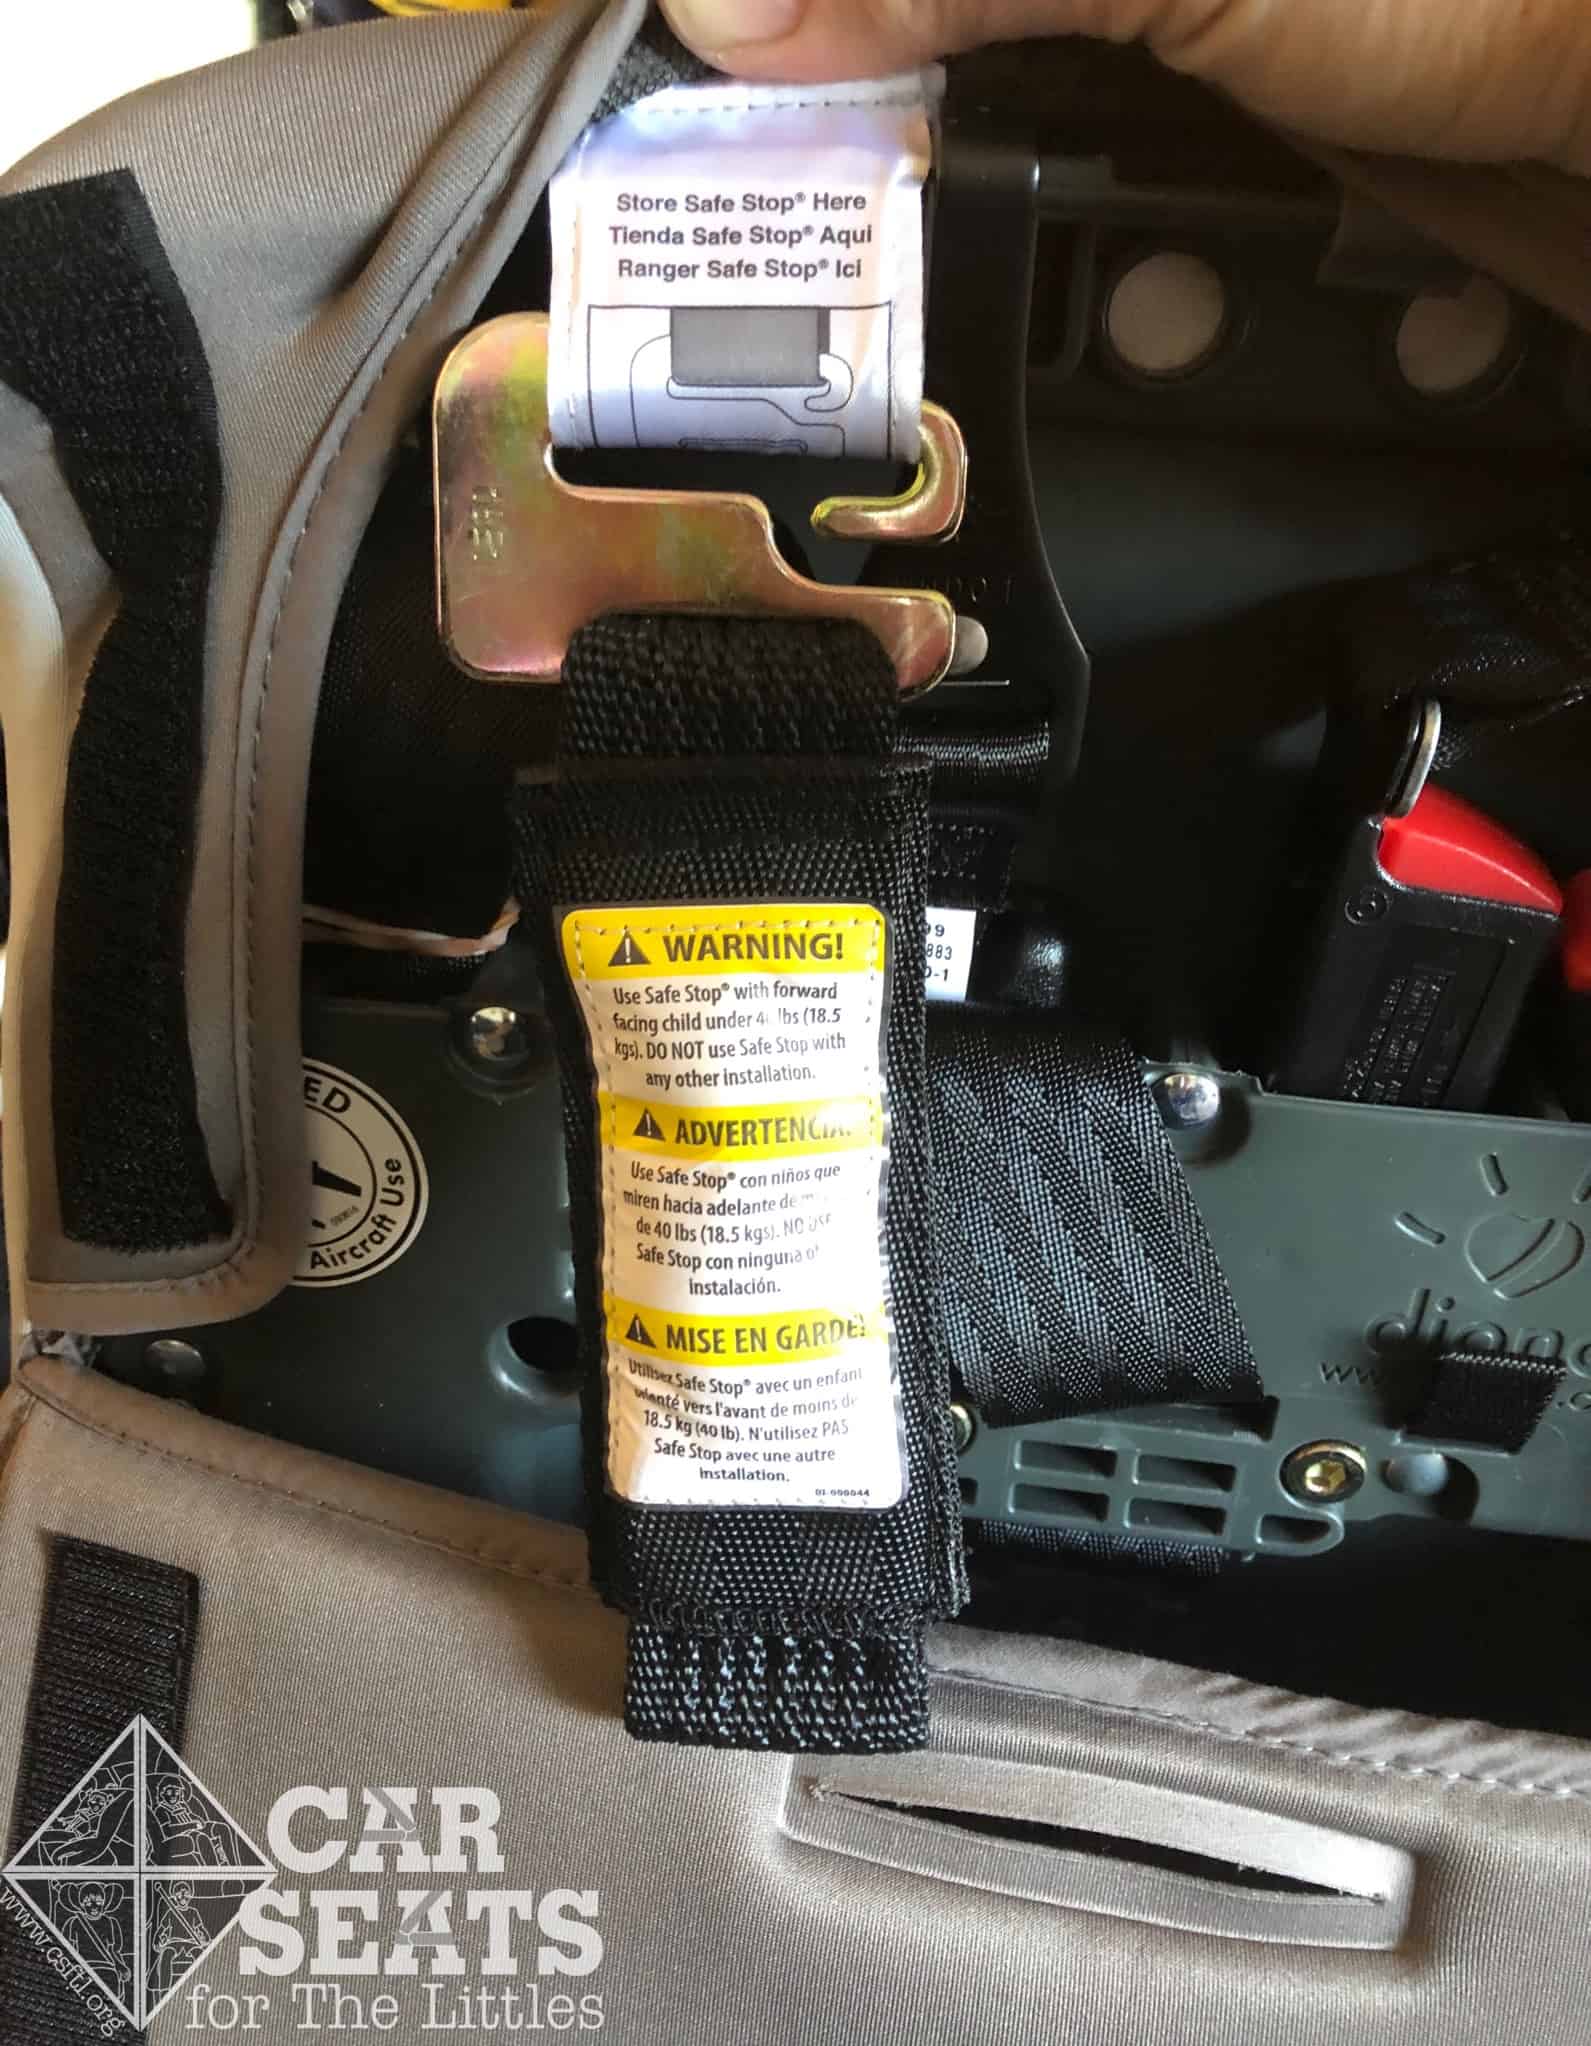
Diono radian 3RXT safe stop
The Safe Stop, or lack of the Safe Stop, is one of the most frequent causes of misuse with the Diono seats. The Safe Stop is required to be attached to the harness for all forward facing children under 40 pounds. (The manual says 40 and under, but Diono has confirmed that it’s under 40.) The Safe Stop should be attached between the harness straps and the splitter plate on the back of the seat.
Diono radian 3RXT Safe Stop attached to harness straps
To be honest, the Safe Stop is probably my least favorite element of the radian 3RXT. So often, I see families who have purchased Diono car seats with the intent to have two forward facing siblings alternate use of the seat, or to use the Diono forward facing as a “friends seat” in the third row of a vehicle. I ask these families whether they’re weighing each child as they enter the car then uninstalling the seat, adding or removing the Safe Stop as needed and reinstalling (the Safe Stop cannot be added or removed when the seat is installed). Unfortunately, I get many blank stares after that question!
In addition, most children begin their forward facing car seat careers sometime between 30 and 40 pounds, but of course the radian 3RXT does not come with the Safe Stop installed since it can’t be used in rear facing mode. Sadly, most parents do not read the instructions and don’t know they need to add it. The new back cover may make the situation worse since they won’t even see it hanging there.
Setup: Crotch Buckle
For rear facing, the crotch buckle should be in the slot that’s closest to but not underneath the child. However, for forward facing, children 20-30 pounds must use the middle slot, while children over 30 pounds must use the farthest slot. We always prefer to see these instructions indicated on the seat itself.
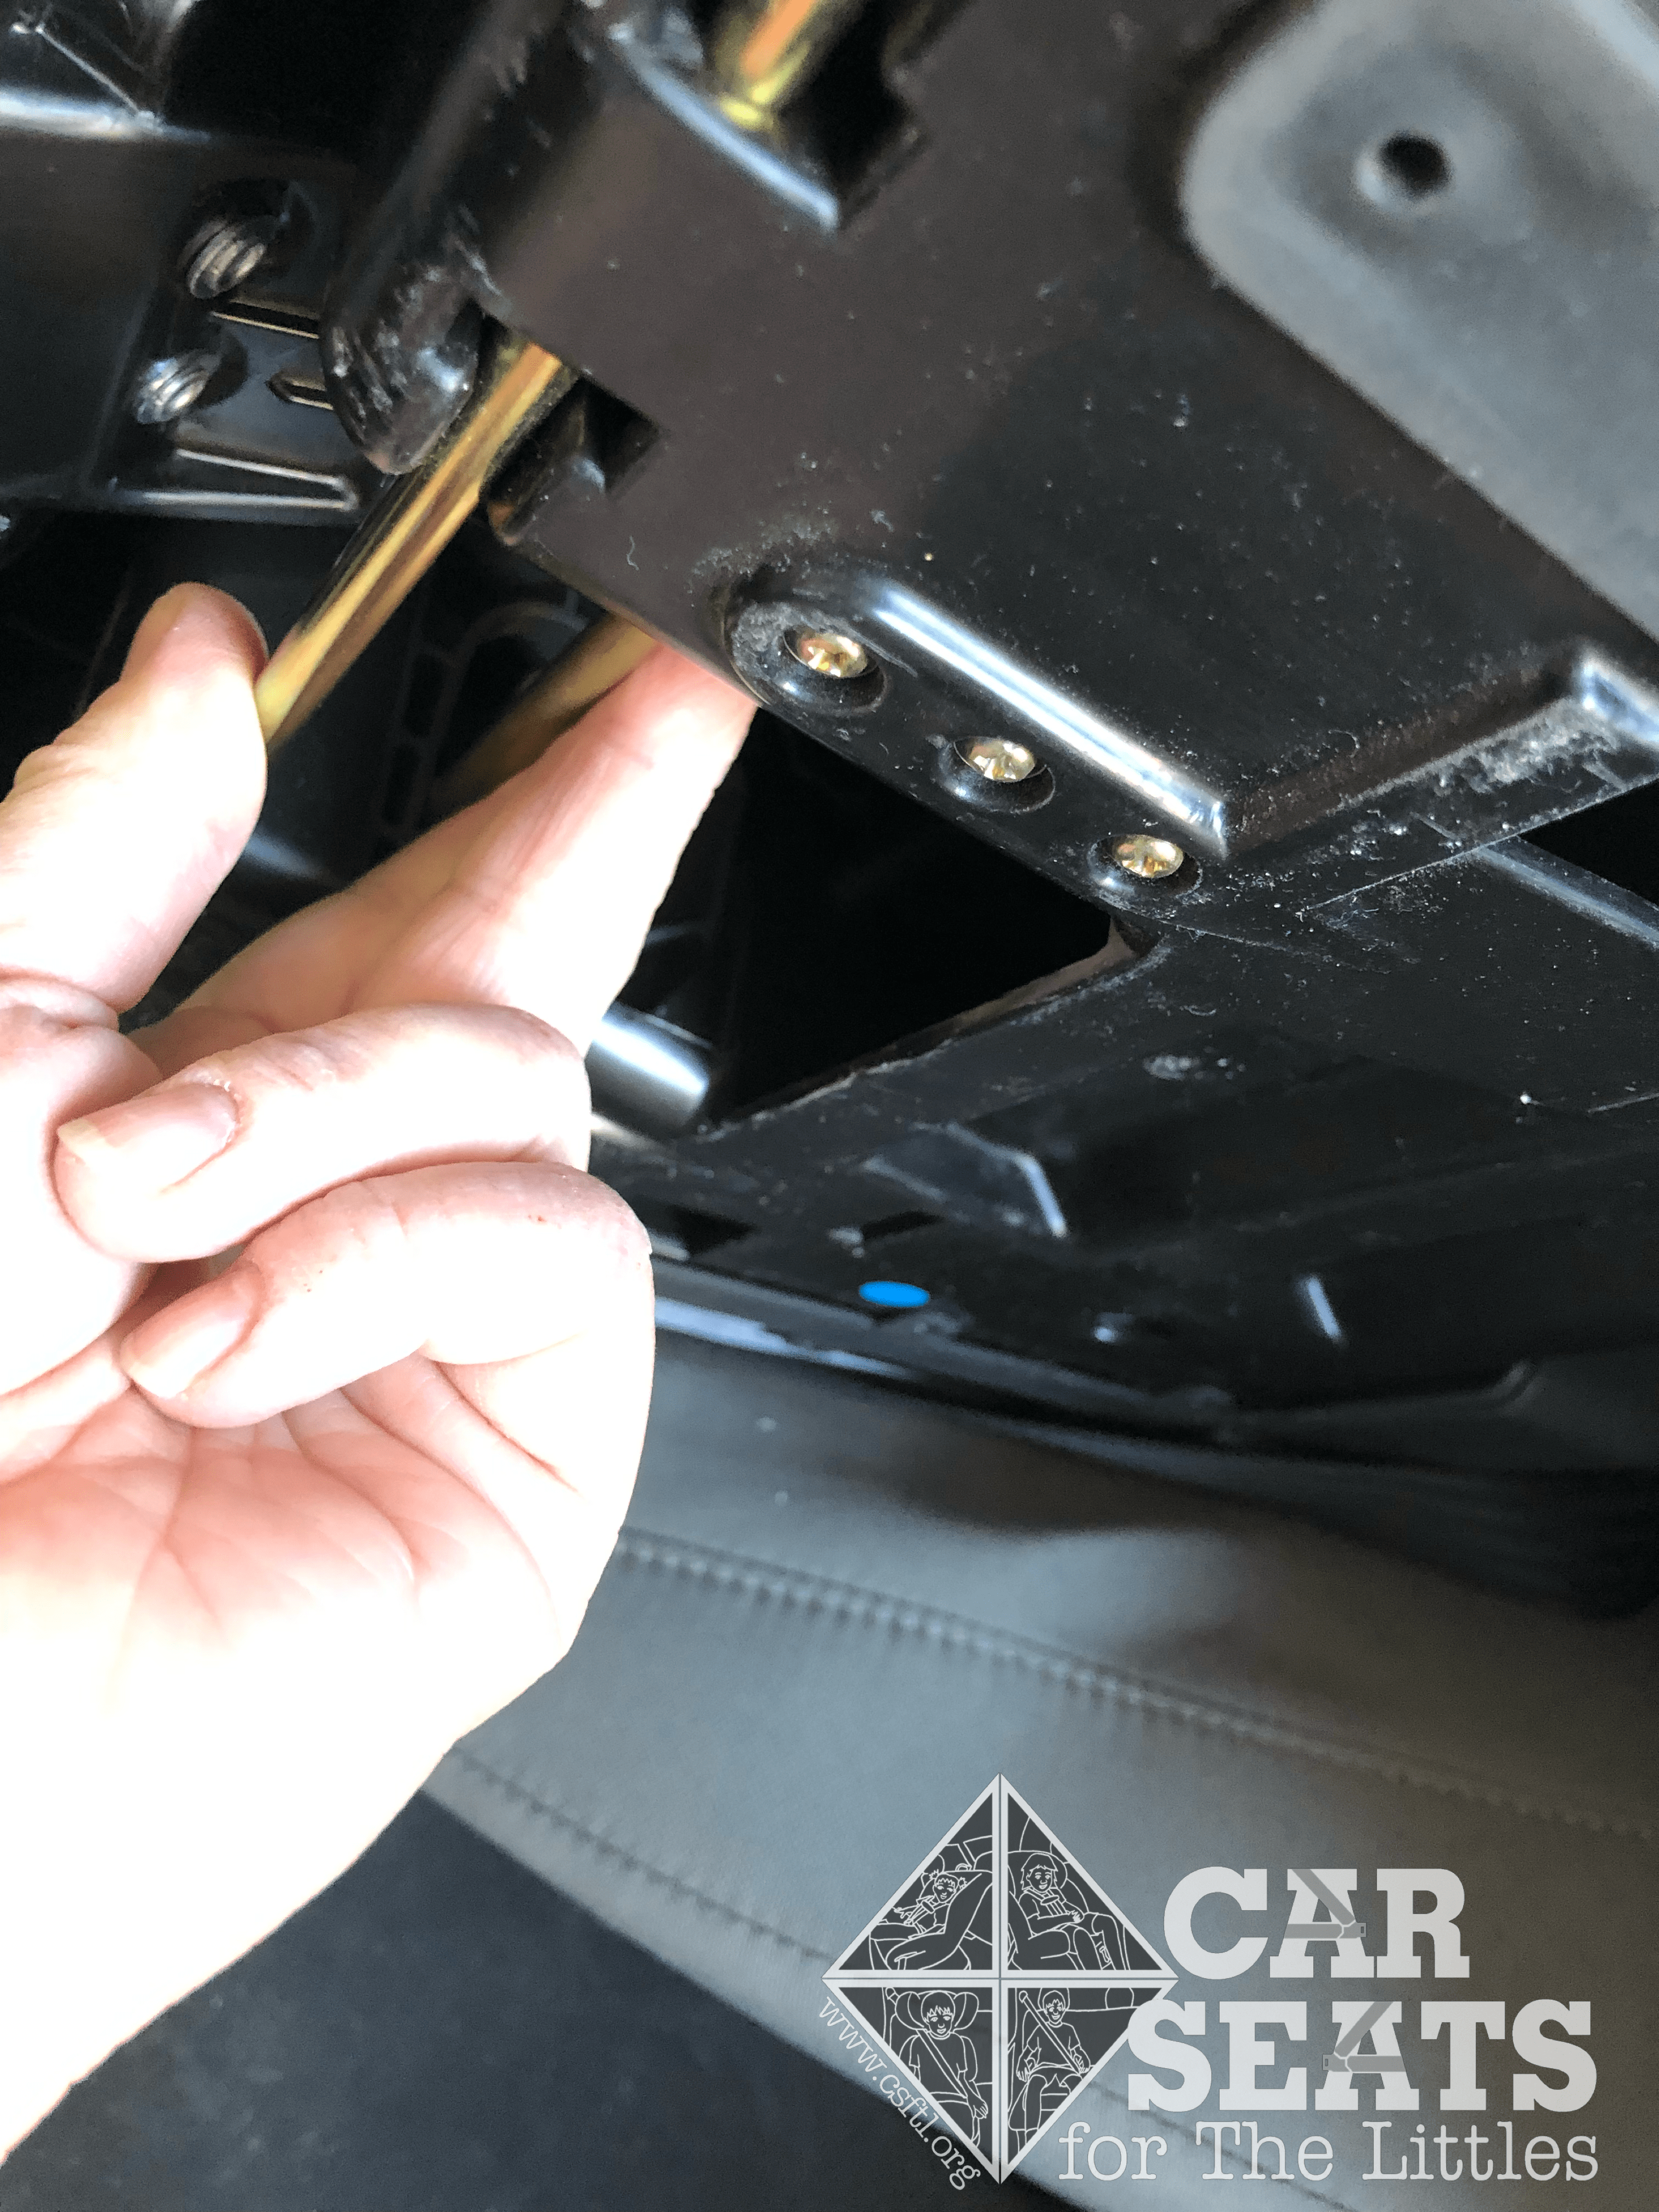
Installation: Lower Anchors
Diono radian 3RXT forward facing lower anchor installation
The radian 3RXT features a fabric cover with red cutout holes around the forward facing belt path. We cannot stress this next point enough: The seat belt or lower anchors MUST go through the belt path on the seat itself, not just through the fabric. I wish Diono had marked the belt path of the actual seat in red to match the red on the cover or given some other indication that there is a belt path on the seat itself.
Diono radian 3RXT forward facing lower anchor tightening method
To install with the lower anchors, guide the lower anchor connectors through the forward facing belt path. Connect the lower anchor connectors to the lower anchors. I find it best to hook on the top tether at this point, then tighten after the lower anchor webbing is tightened. (Those are the instructions in the manual as well!) The best way to tighten the lower anchor webbing is to separate the seat cover at the velcro seam nearest the adjuster strap. Pull the webbing through this slit to tighten. It may be necessary to put pressure on the seat.
We mentioned it earlier, but it’s worth mentioning here as well: Some early models of the radian 3RXT were delivered with top tether webbing attached backwards. Although Diono permits use of the webbing as it’s delivered (backwards), they also provide instructions to remove the tether, turn it around, then reattach it to the seat.
The radian 3RXT does allow “LATCH borrowing,” which is installing in a center seat which does not have its own lower anchors, and “borrowing” the inner lower anchor connectors from the outer seats. This is only allowed if the distance between the borrowed connectors is 11 to 14 inches, and if the vehicle allows it. Many do not. Diono had to confirm this for us as it’s not mentioned in the manual.
Installation: Vehicle Seat Belt
Diono radian 3RXT forward facing seat belt tightening method
Diono radian 3RXT forward facing seat belt installation
The first step in any forward facing car seat installation is to loosely connect the top tether so it doesn’t hide behind the seat during installation. Tighten the top tether as the final step after the seat is installed correctly.
To install forward facing with the vehicle seat belt, thread the seat belt through the forward facing belt path, then lock the belt (in most cars by pulling the belt out all the way). Tighten the seat belt and feed the slack back into the retractor. Just as with the lower anchor installation, the best method of tightening is often to separate the cover and pull the shoulder belt, then with the other hand grab the belt and feed in the slack.
Forward Facing Installation Challenges
In some vehicles, it can be very difficult to get Diono seats tight when installed forward facing. This is due to the geometry of the forward facing belt path. This usually happens when the buckles are naturally pointed toward the front of the car (many third rows have this issue). In this case, pulling the Diono bottom forward to the seat edge before installing often helps.
Another issue that pops up with forward facing installations is that the Diono seems tight, but then when the caregiver tries to tighten the straps, the bottom of the car seat slides forward towards the caregiver. The above trick – installing with the bottom on the seat edge – will help, but another trick for this situation is reclining the seat back before installing. Diono has approved this as long as there is nothing in the vehicle manual to prohibit it. Recline the seat back, then install the Diono with the bottom pulled to the seat edge. Then put the seat back upright. This helps lock the Diono into place.
Head Support
As the Diono seats are very tall, we often get asked whether the entire back of the Diono needs to be supported by the vehicle seat or headrest. Diono has confirmed for us that it’s ok if the radian 3RXT sticks over the top of the vehicle seat behind it.
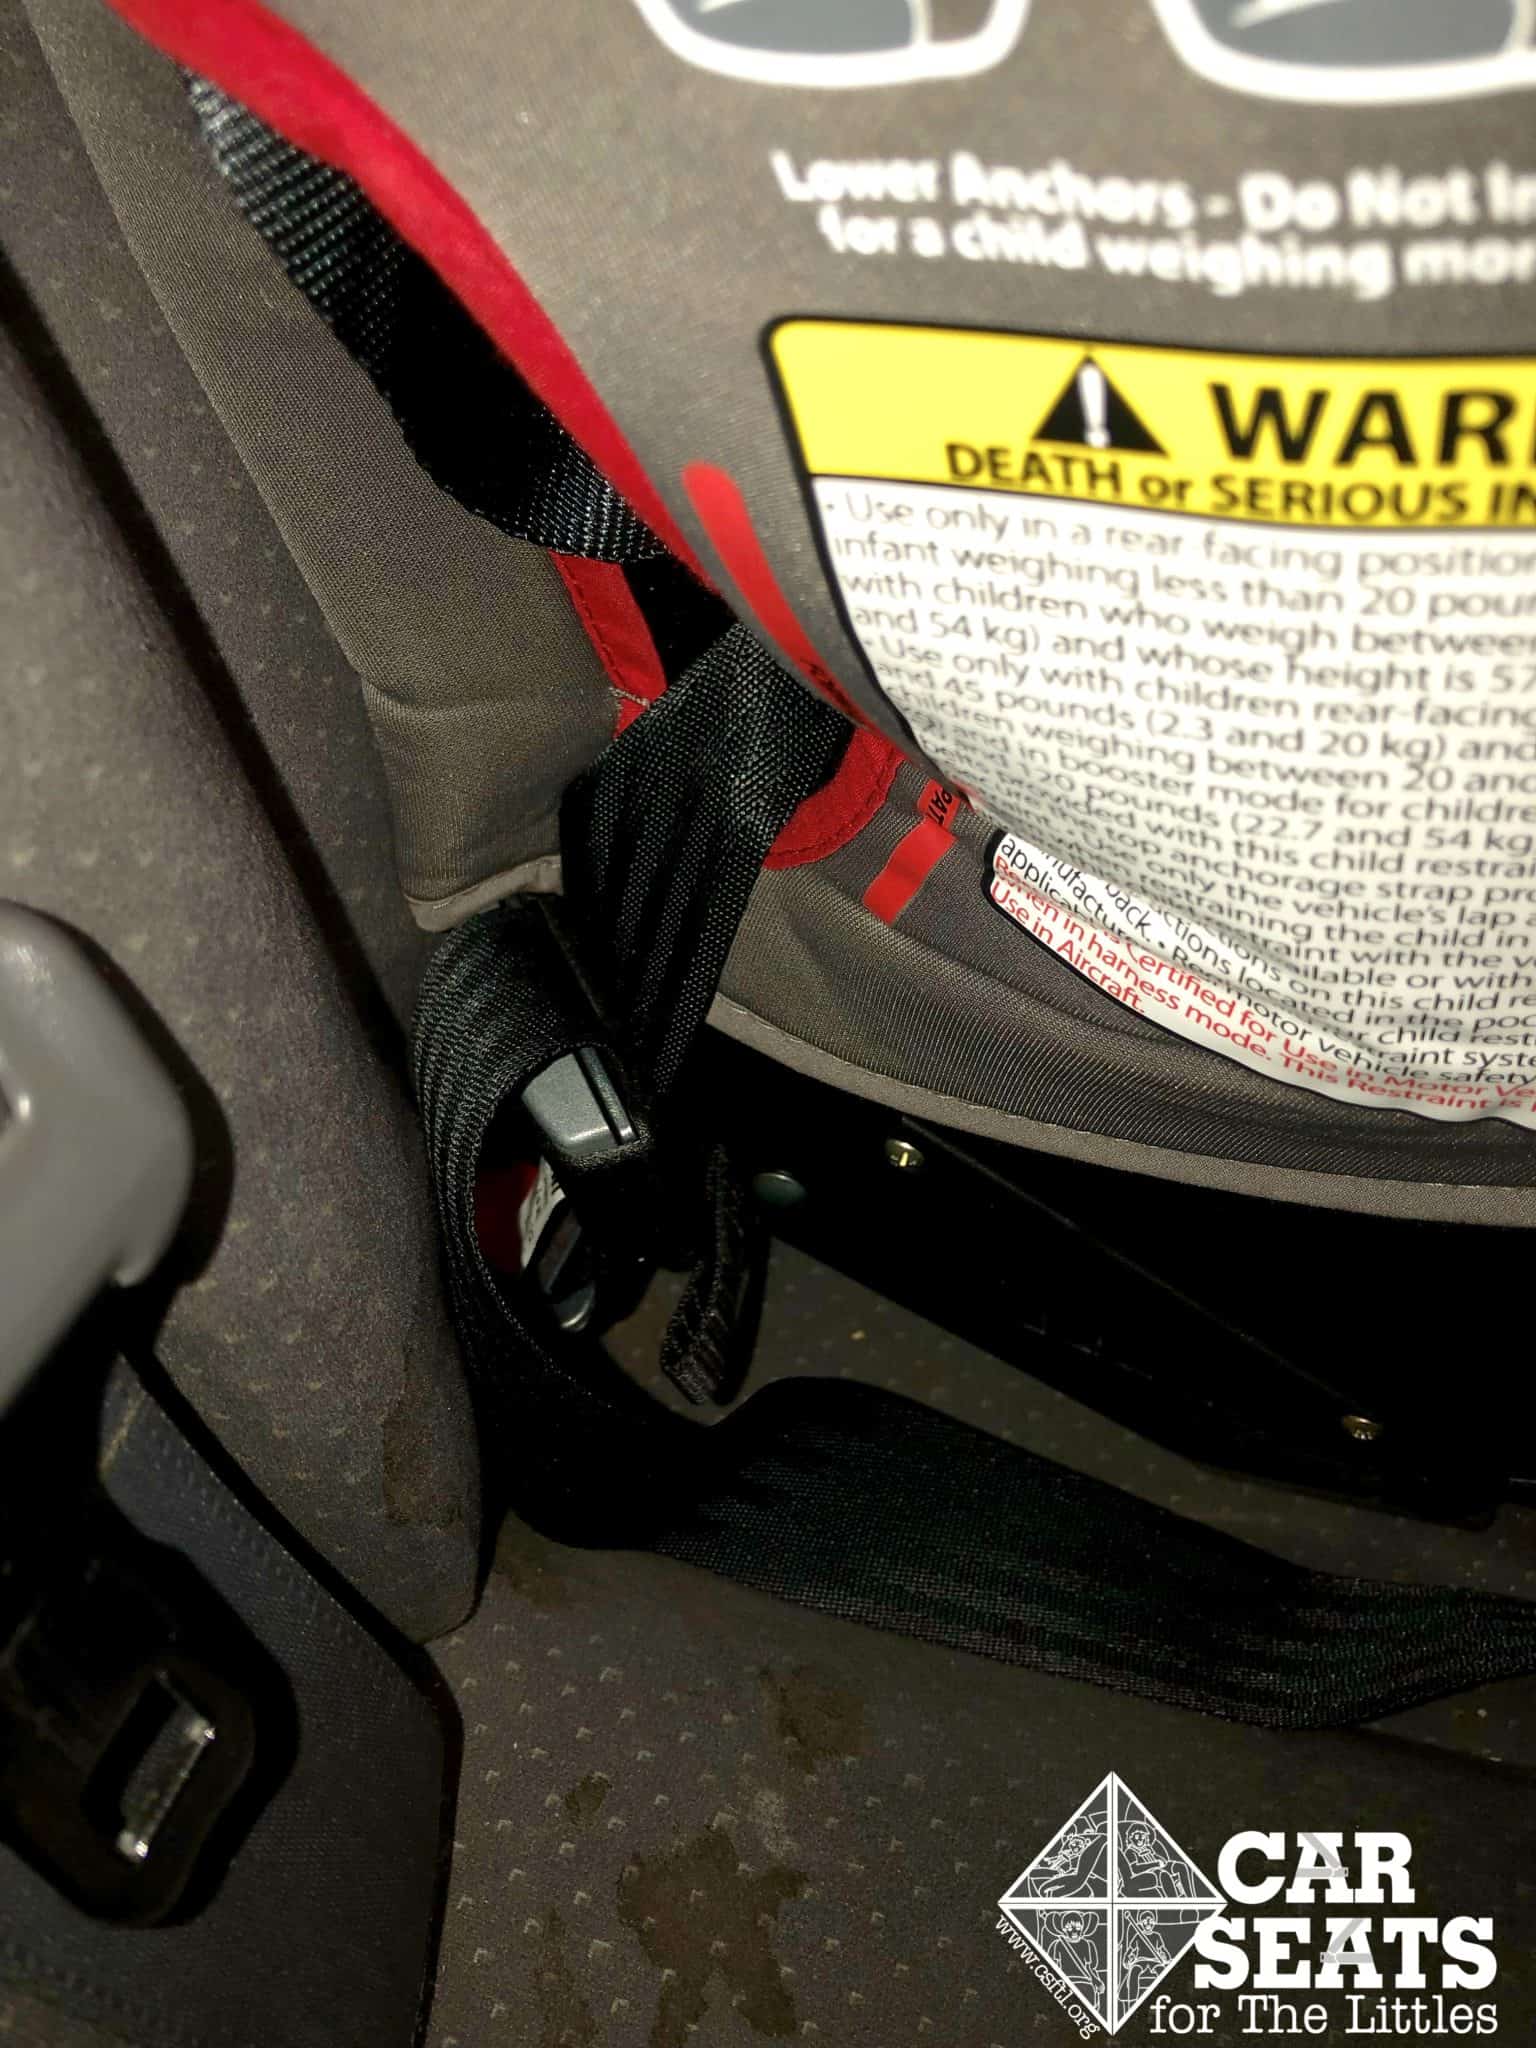
Lap Belt Cushion
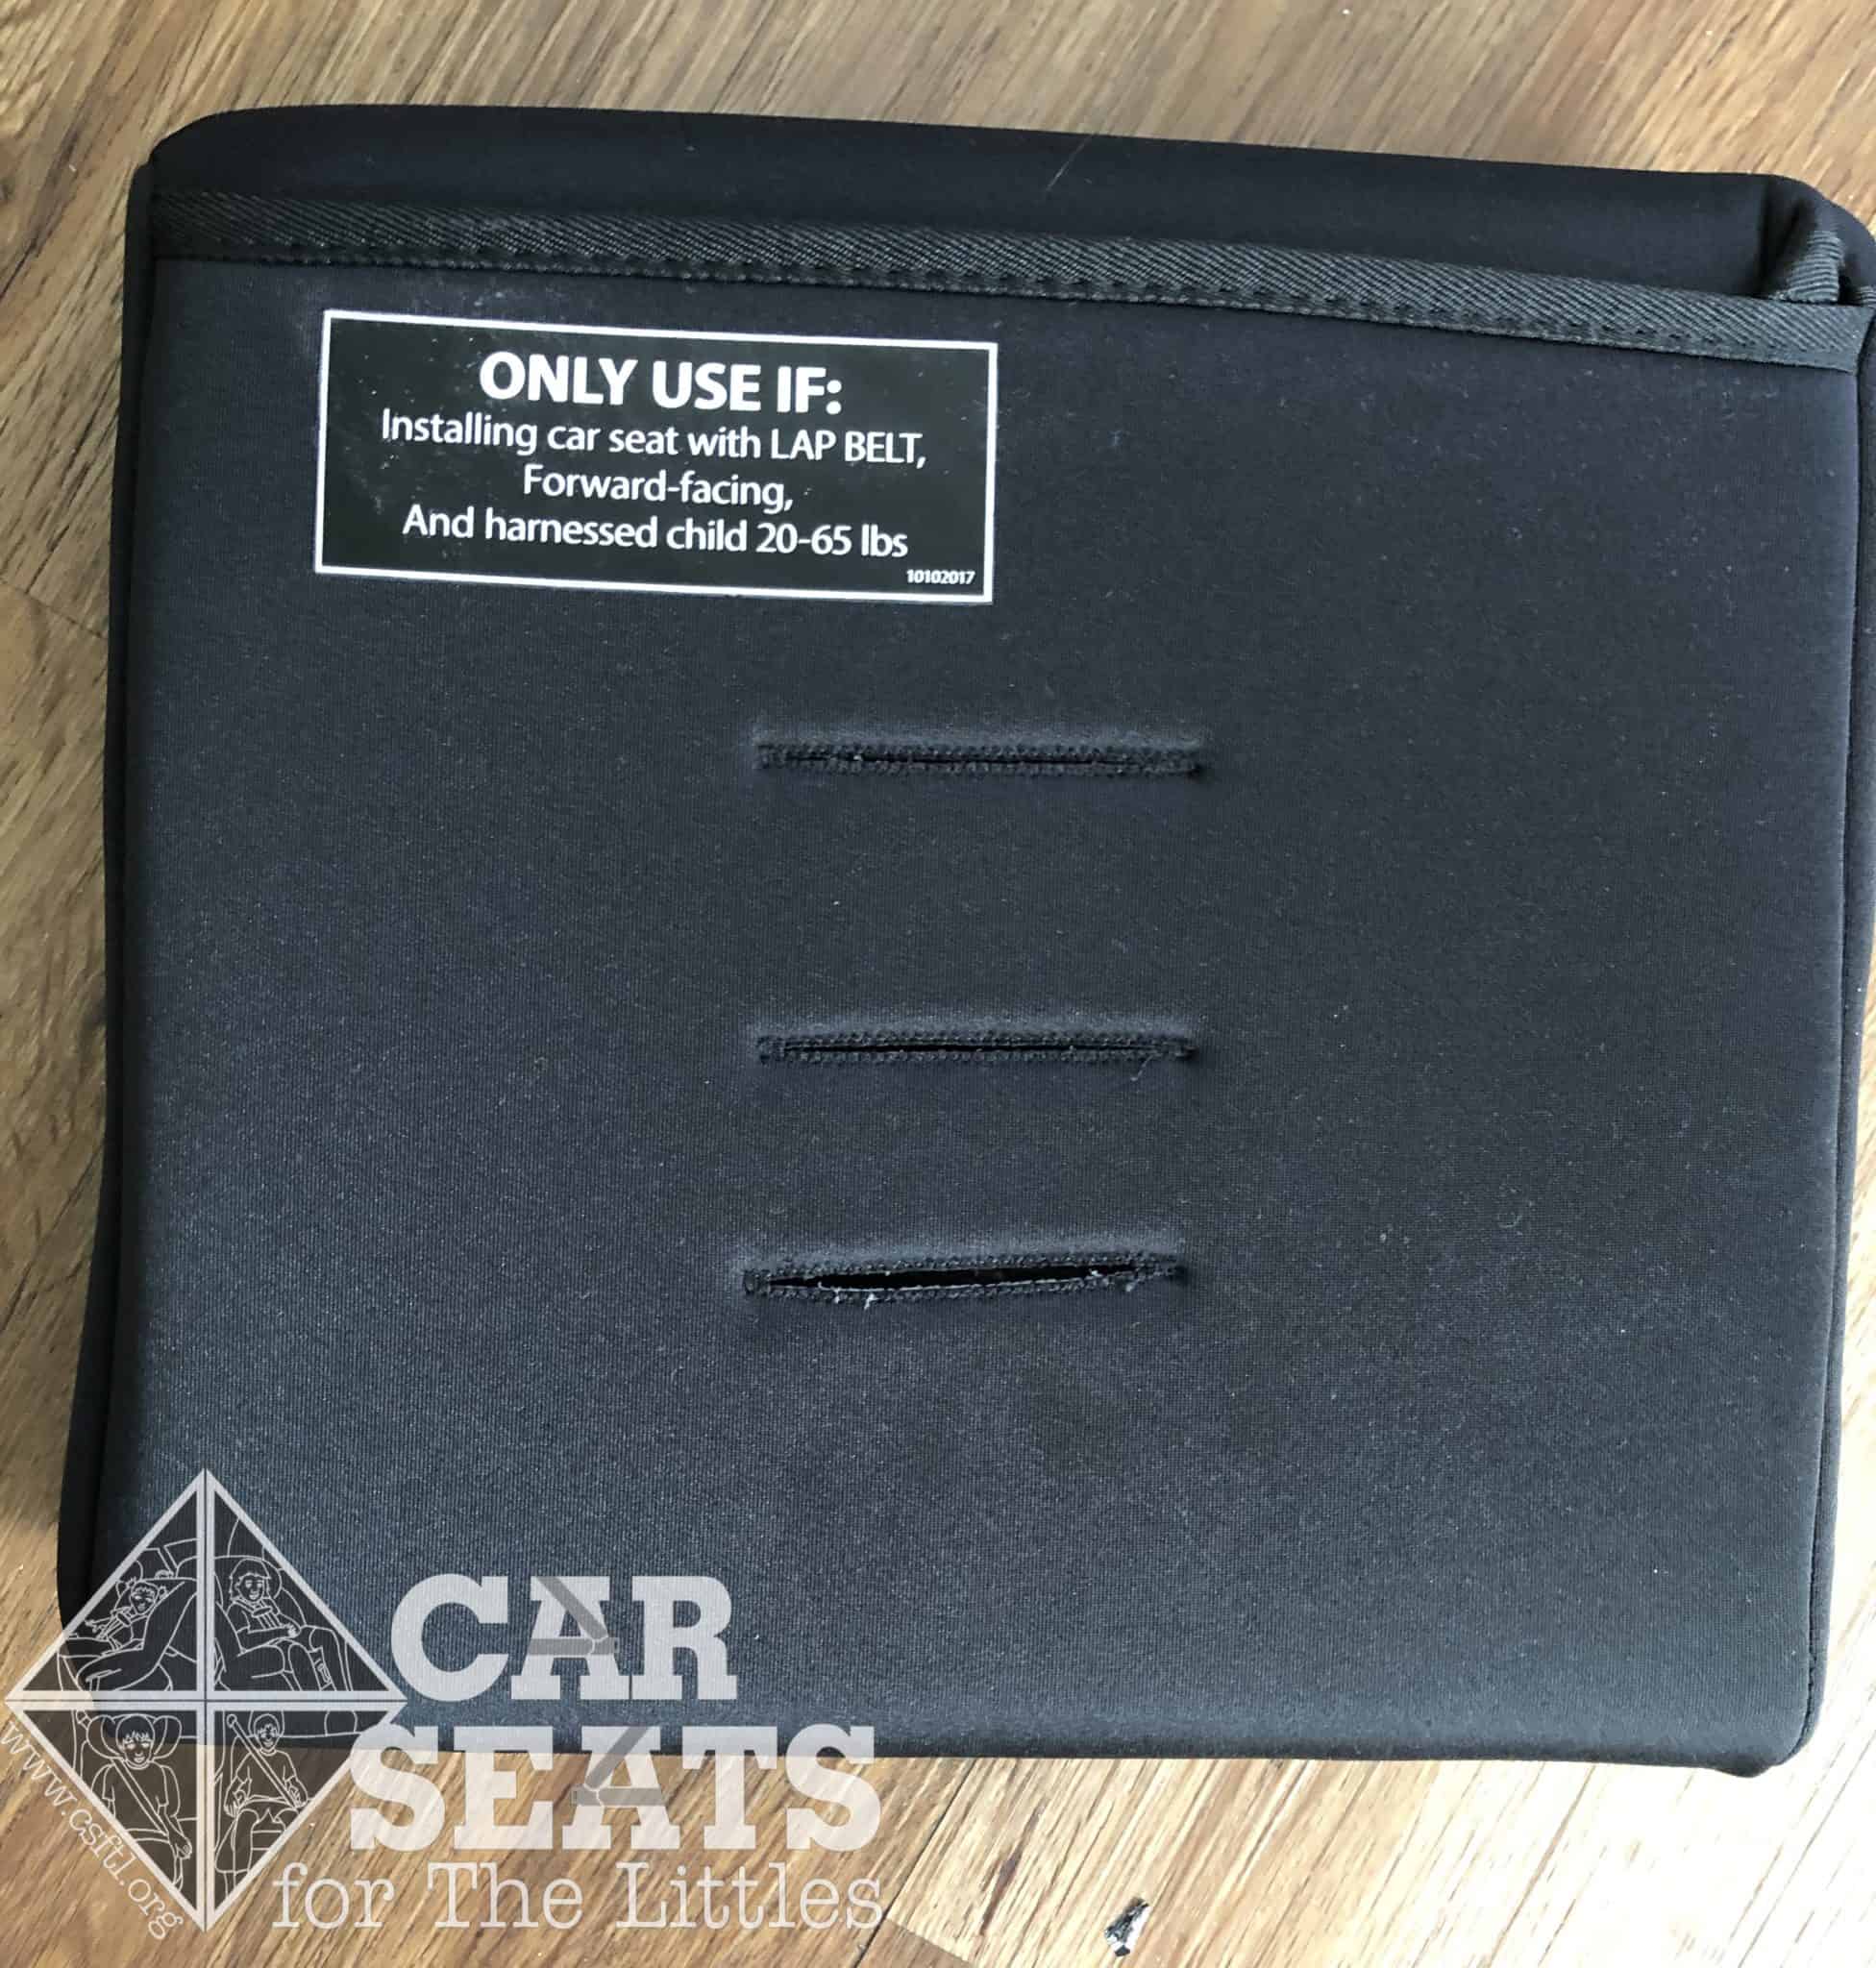
Diono radian 3RXT lap belt cushion
The radian 3RXT comes with a large black cushion that has been confusing to some families. This cushion is for use only in the following scenario: a forward facing installation with a lap belt only (not lap/shoulder belt!) and no top tether. As we ALWAYS recommend use of the top tether, we hope no one ever needs this cushion!
Diono has told us that the lap belt cushion is not needed on an airplane, despite the fact that it’s a situation with a lap belt and no top tether.
Diono has made longer crotch buckles available, since the crotch buckle that comes with the seat is barely long enough to poke through the top of the cushion.
Unfortunately, the cushion labeling is not complete — it omits the top tether portion, which is crucial. We’d urge Diono to correct this labeling.
Fit to Child
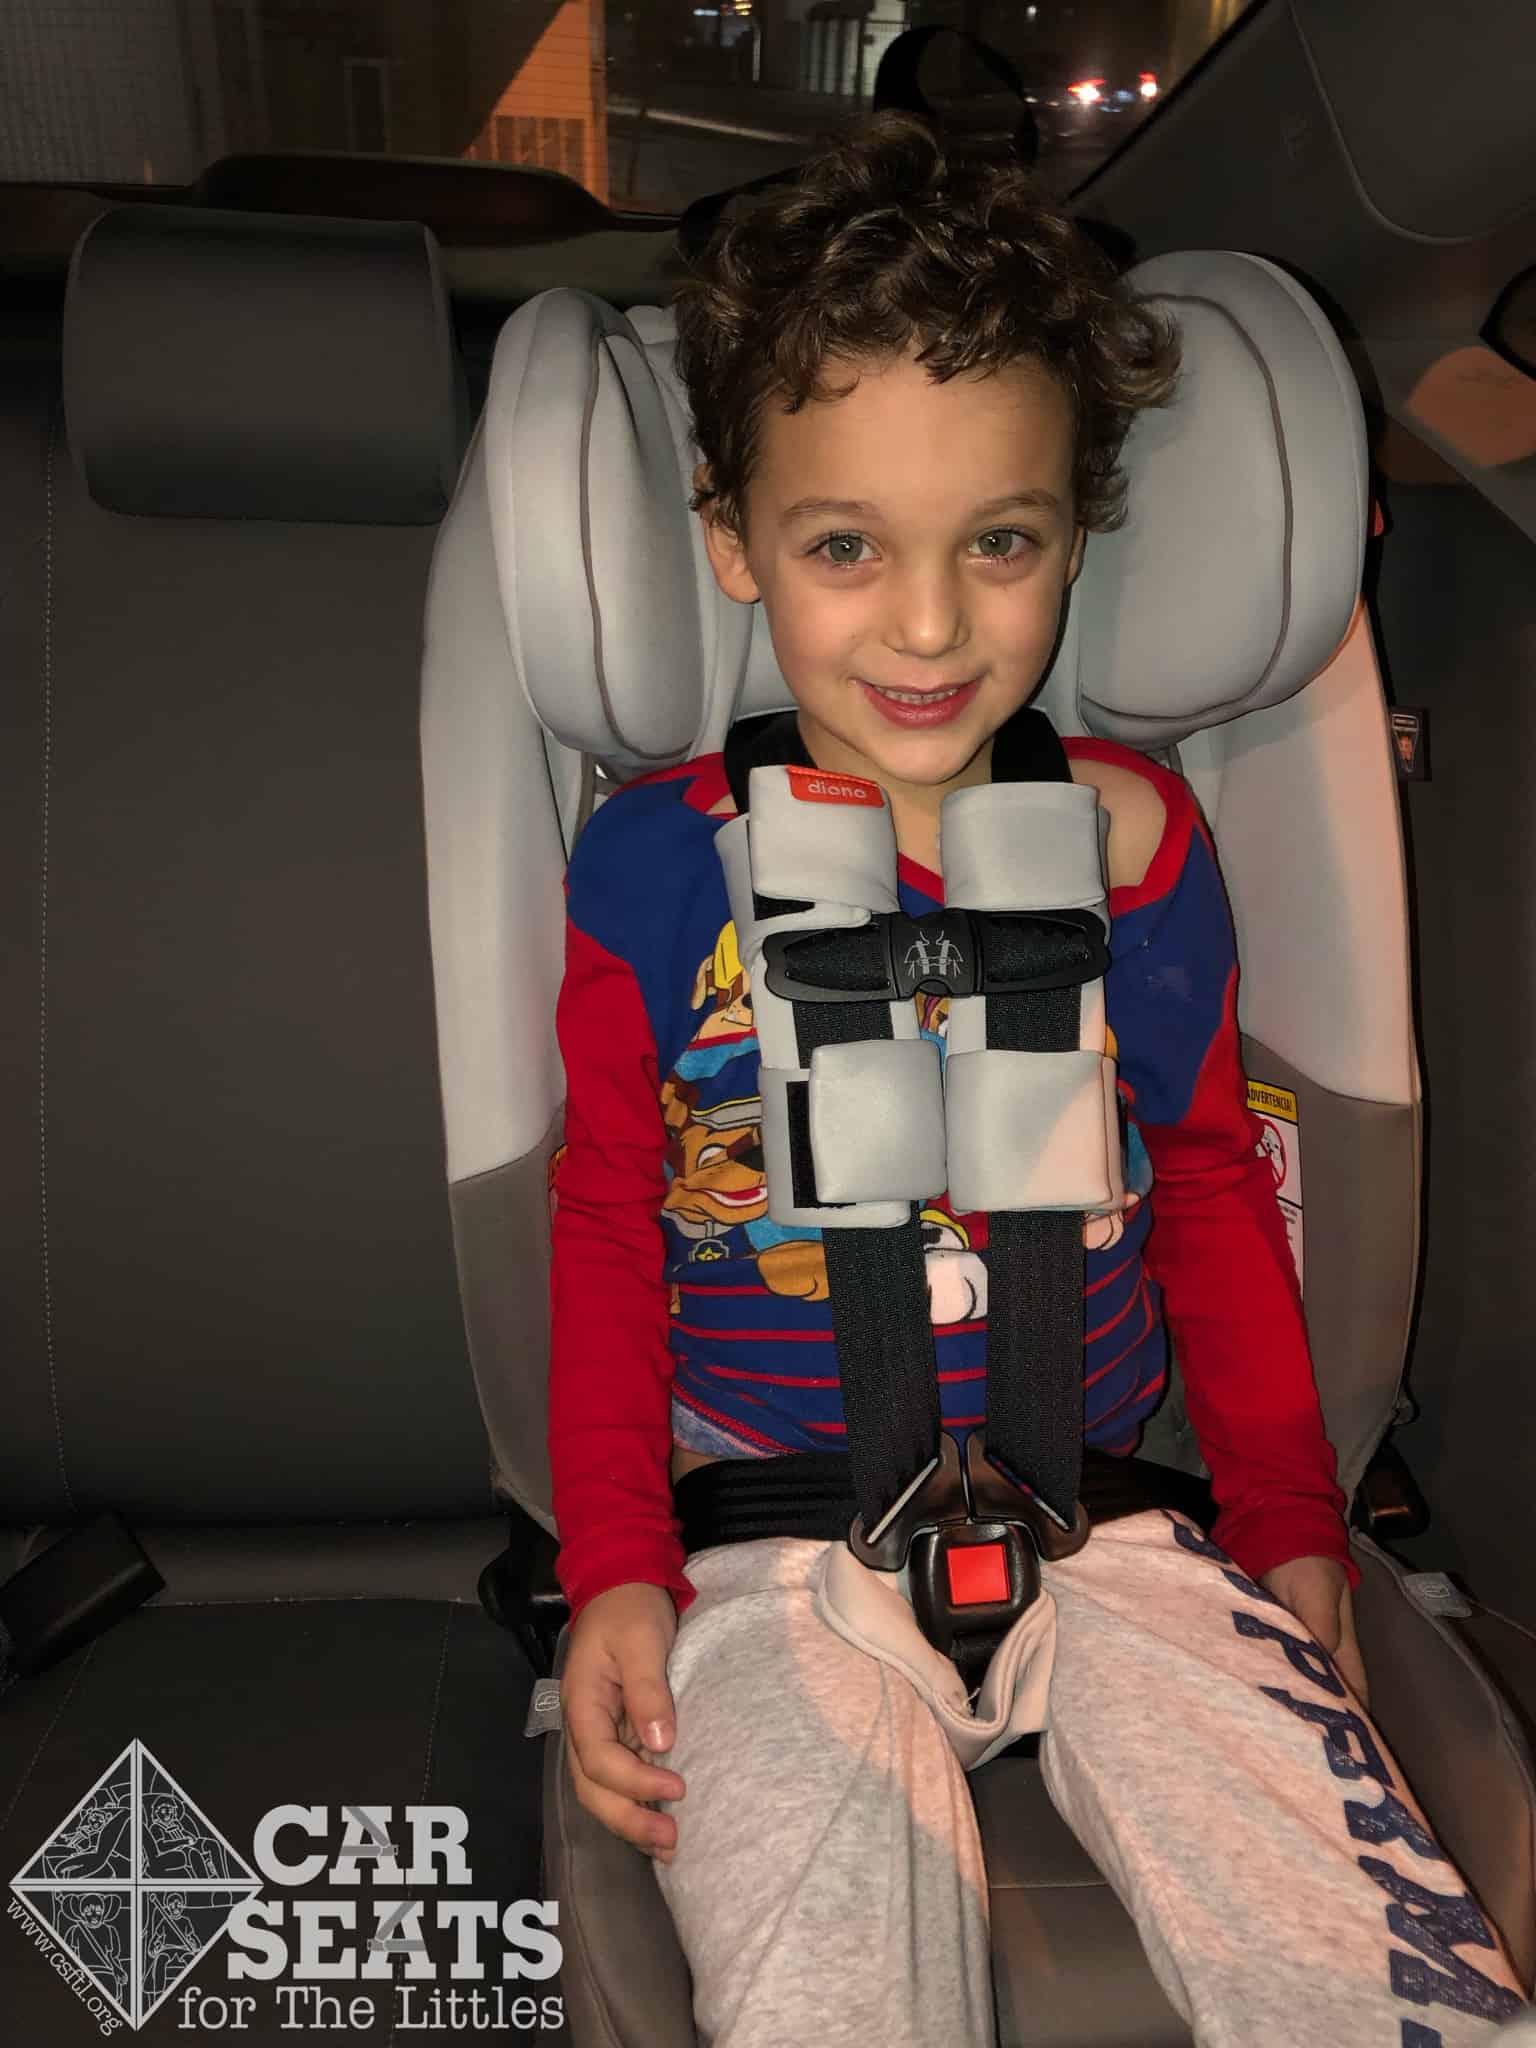
4 Year Old
Diono radian 3RXT foward facing 4 year old
Here is my son again, this time forward facing. He’s 4 years old, weighs 38 pounds, and is 40 inches tall. The radian 3RXT fits him nicely forward facing. You may notice that one of the strap covers isn’t closed all the way. This is because it arrived creased. We wish we could use that steamer we wanted for the back cover! Diono has confirmed that using it creased (and therefore not closed 100%) is acceptable.
4 Year Old #2
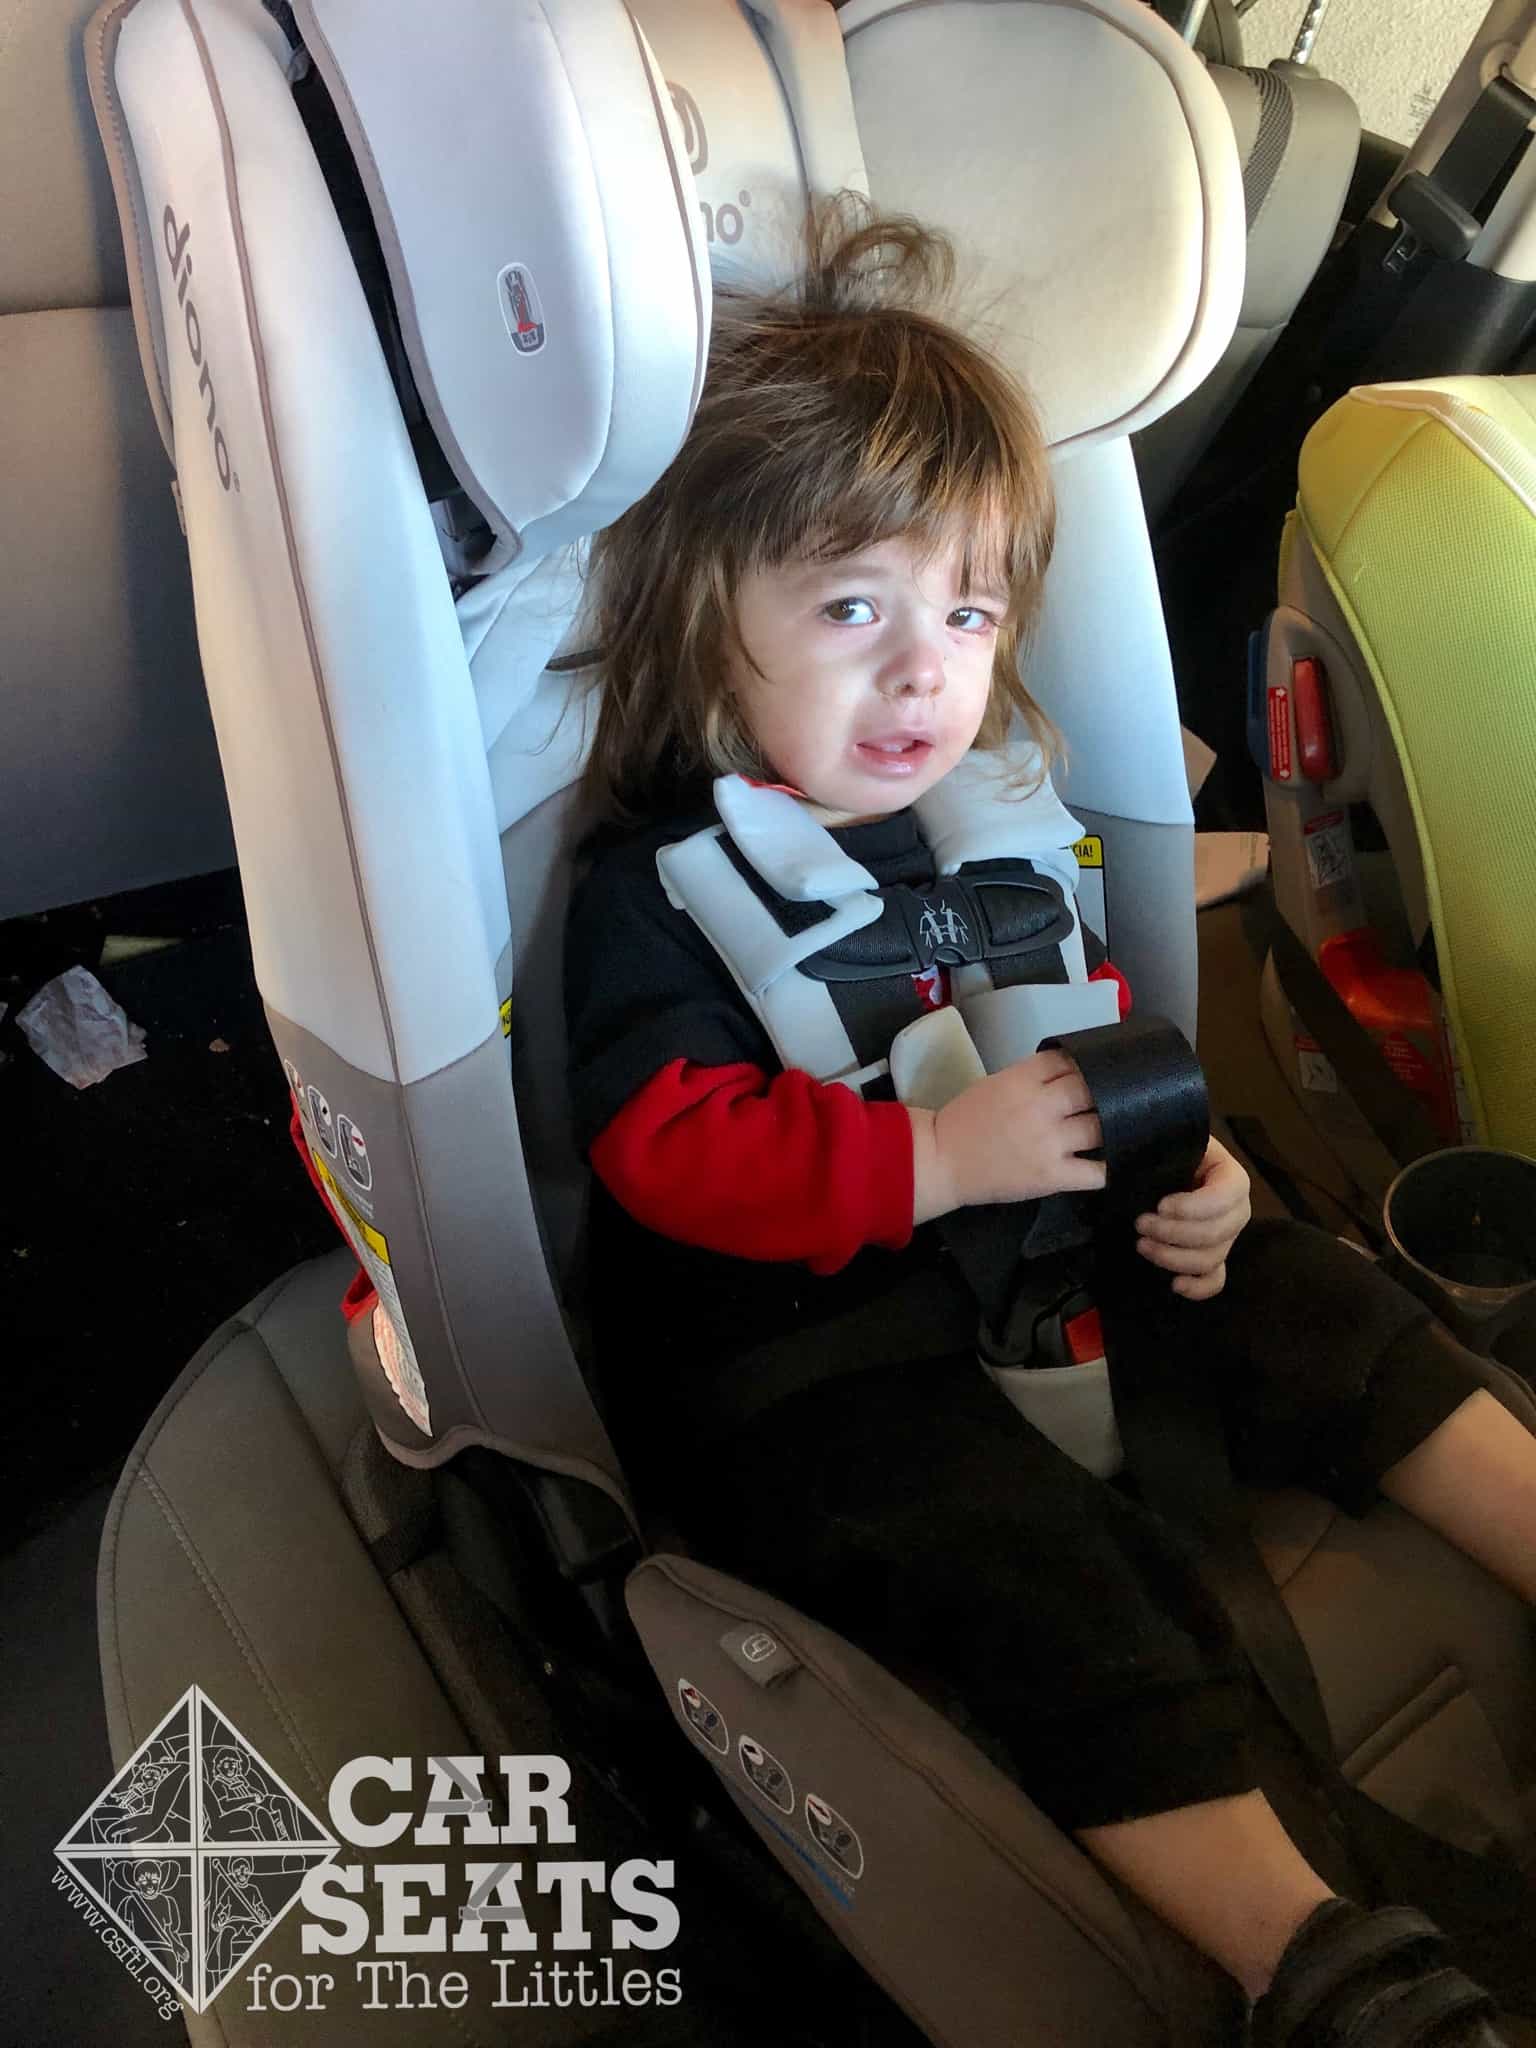
Diono radian 3RXT forward facing 4 year old
Here’s my son’s friend. He’s also 4 and weighs 43 pounds. He’s much taller than my son — this young man is 45.5 inches tall. We can see that he’s close to outgrowing the radian 3RXT, because his shoulders are nearly at the top slot and nearly hitting the headrest.
6 Year Old
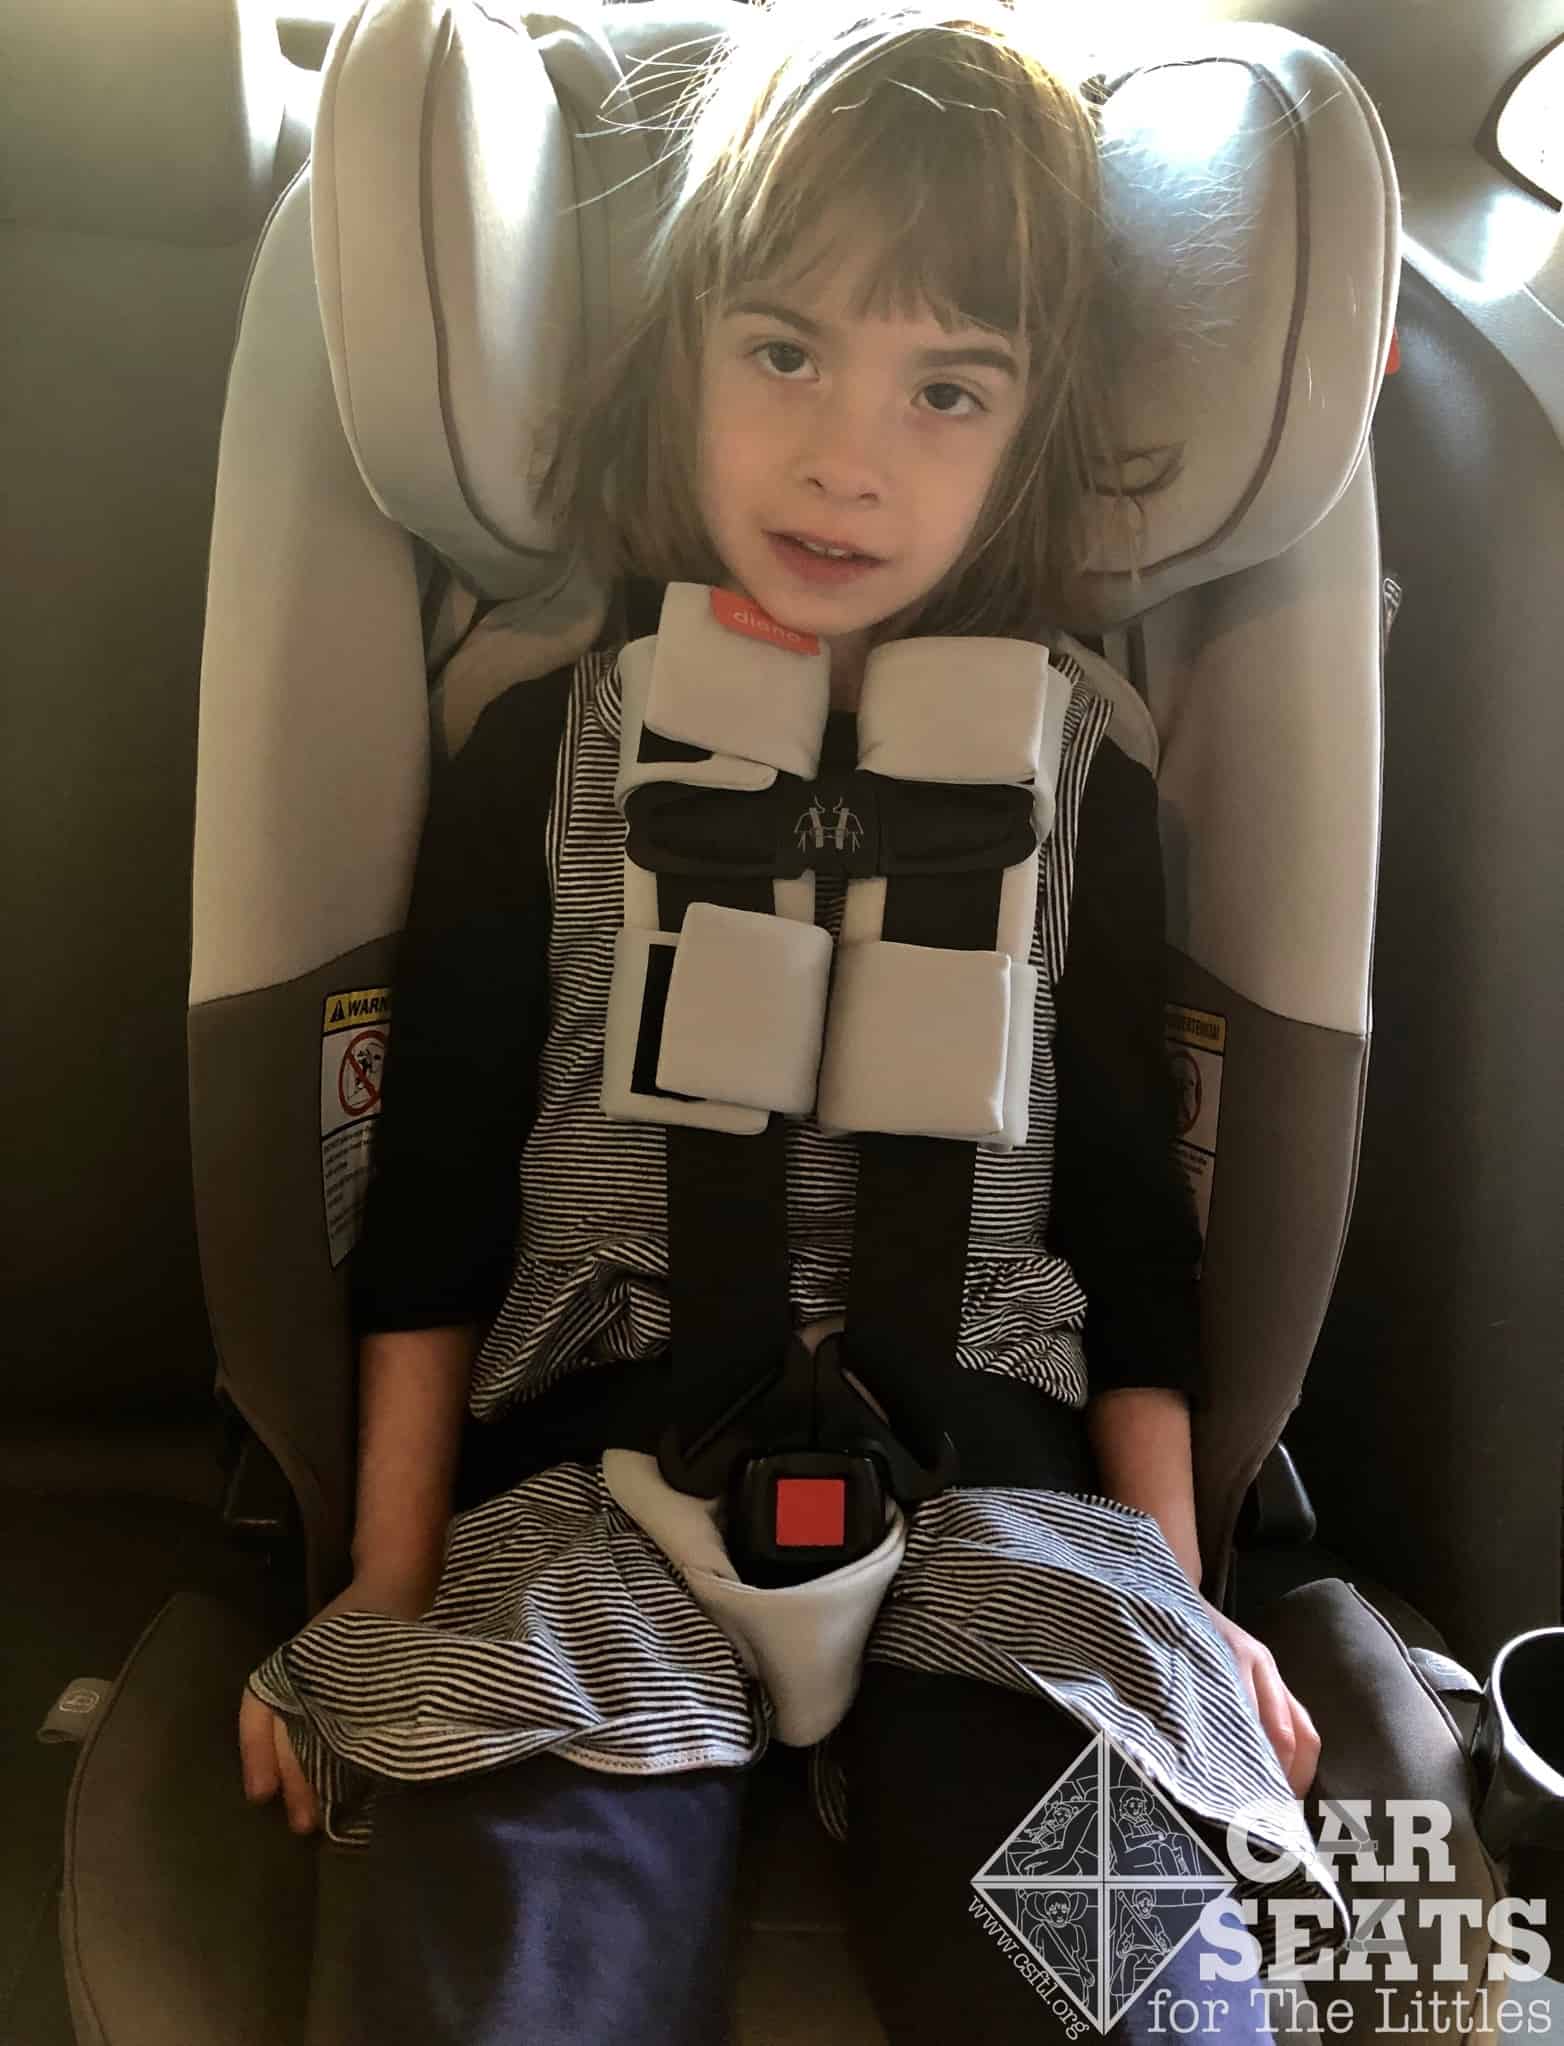
Diono radian 3RXT 6 year old forward facing
Here is my 6 year old daughter. She’s smaller than our 4 year old friend above! She weighs 35 pounds and is 44 inches tall. She still fits in the radian 3RXT forward facing. She’s not ready for a booster seat yet, but since she’s so small for her age, we have no problem finding harnessed car seats that still fit her.
Booster
Conversion to Booster Mode
Unfortunately, the radian 3RXT manual is very lacking in instructions for conversion to booster mode. For example, the crotch buckle must be removed, but the manual directs the reader to the section about adjusting the crotch buckle position. We’d urge Diono to create a separate set of instructions for conversion to booster mode.
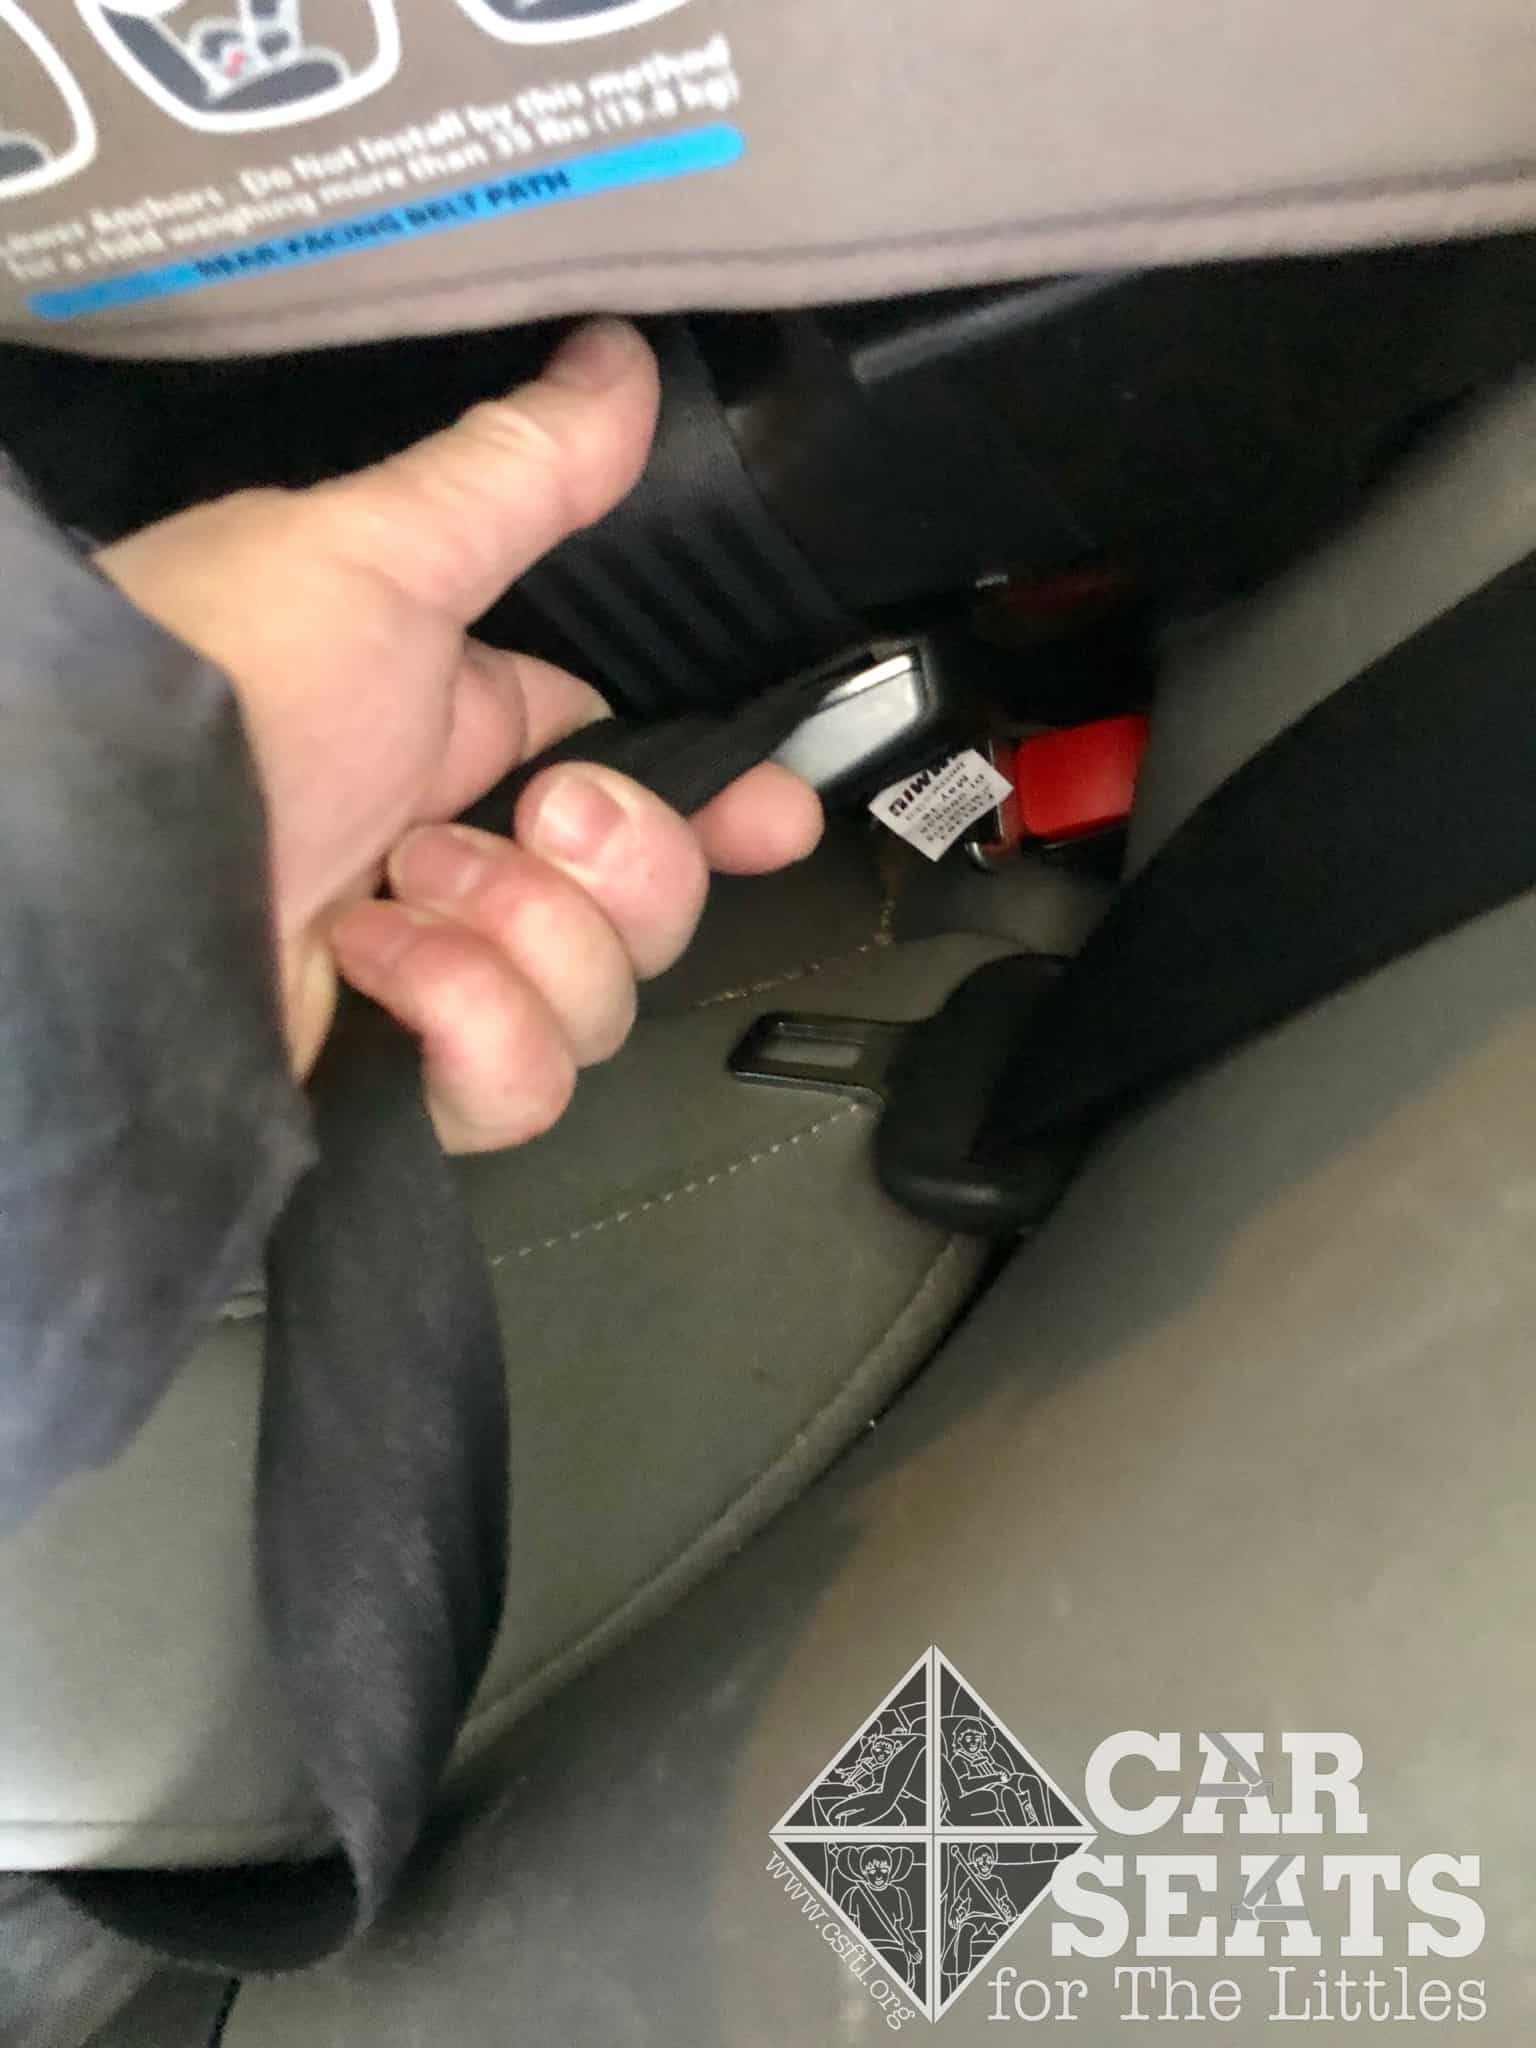
To remove the crotch buckle, put your hand into the rear facing belt path, locate the metal rectangular anchor, turn it sideways and push it up through the buckle slot.
The radian 3RXT does not include a place to store the buckle and straps on the seat. The harness adjuster strap is not removable; since the manual doesn’t mention it, I just let mine hang off the front of the seat when the radian was in booster mode.
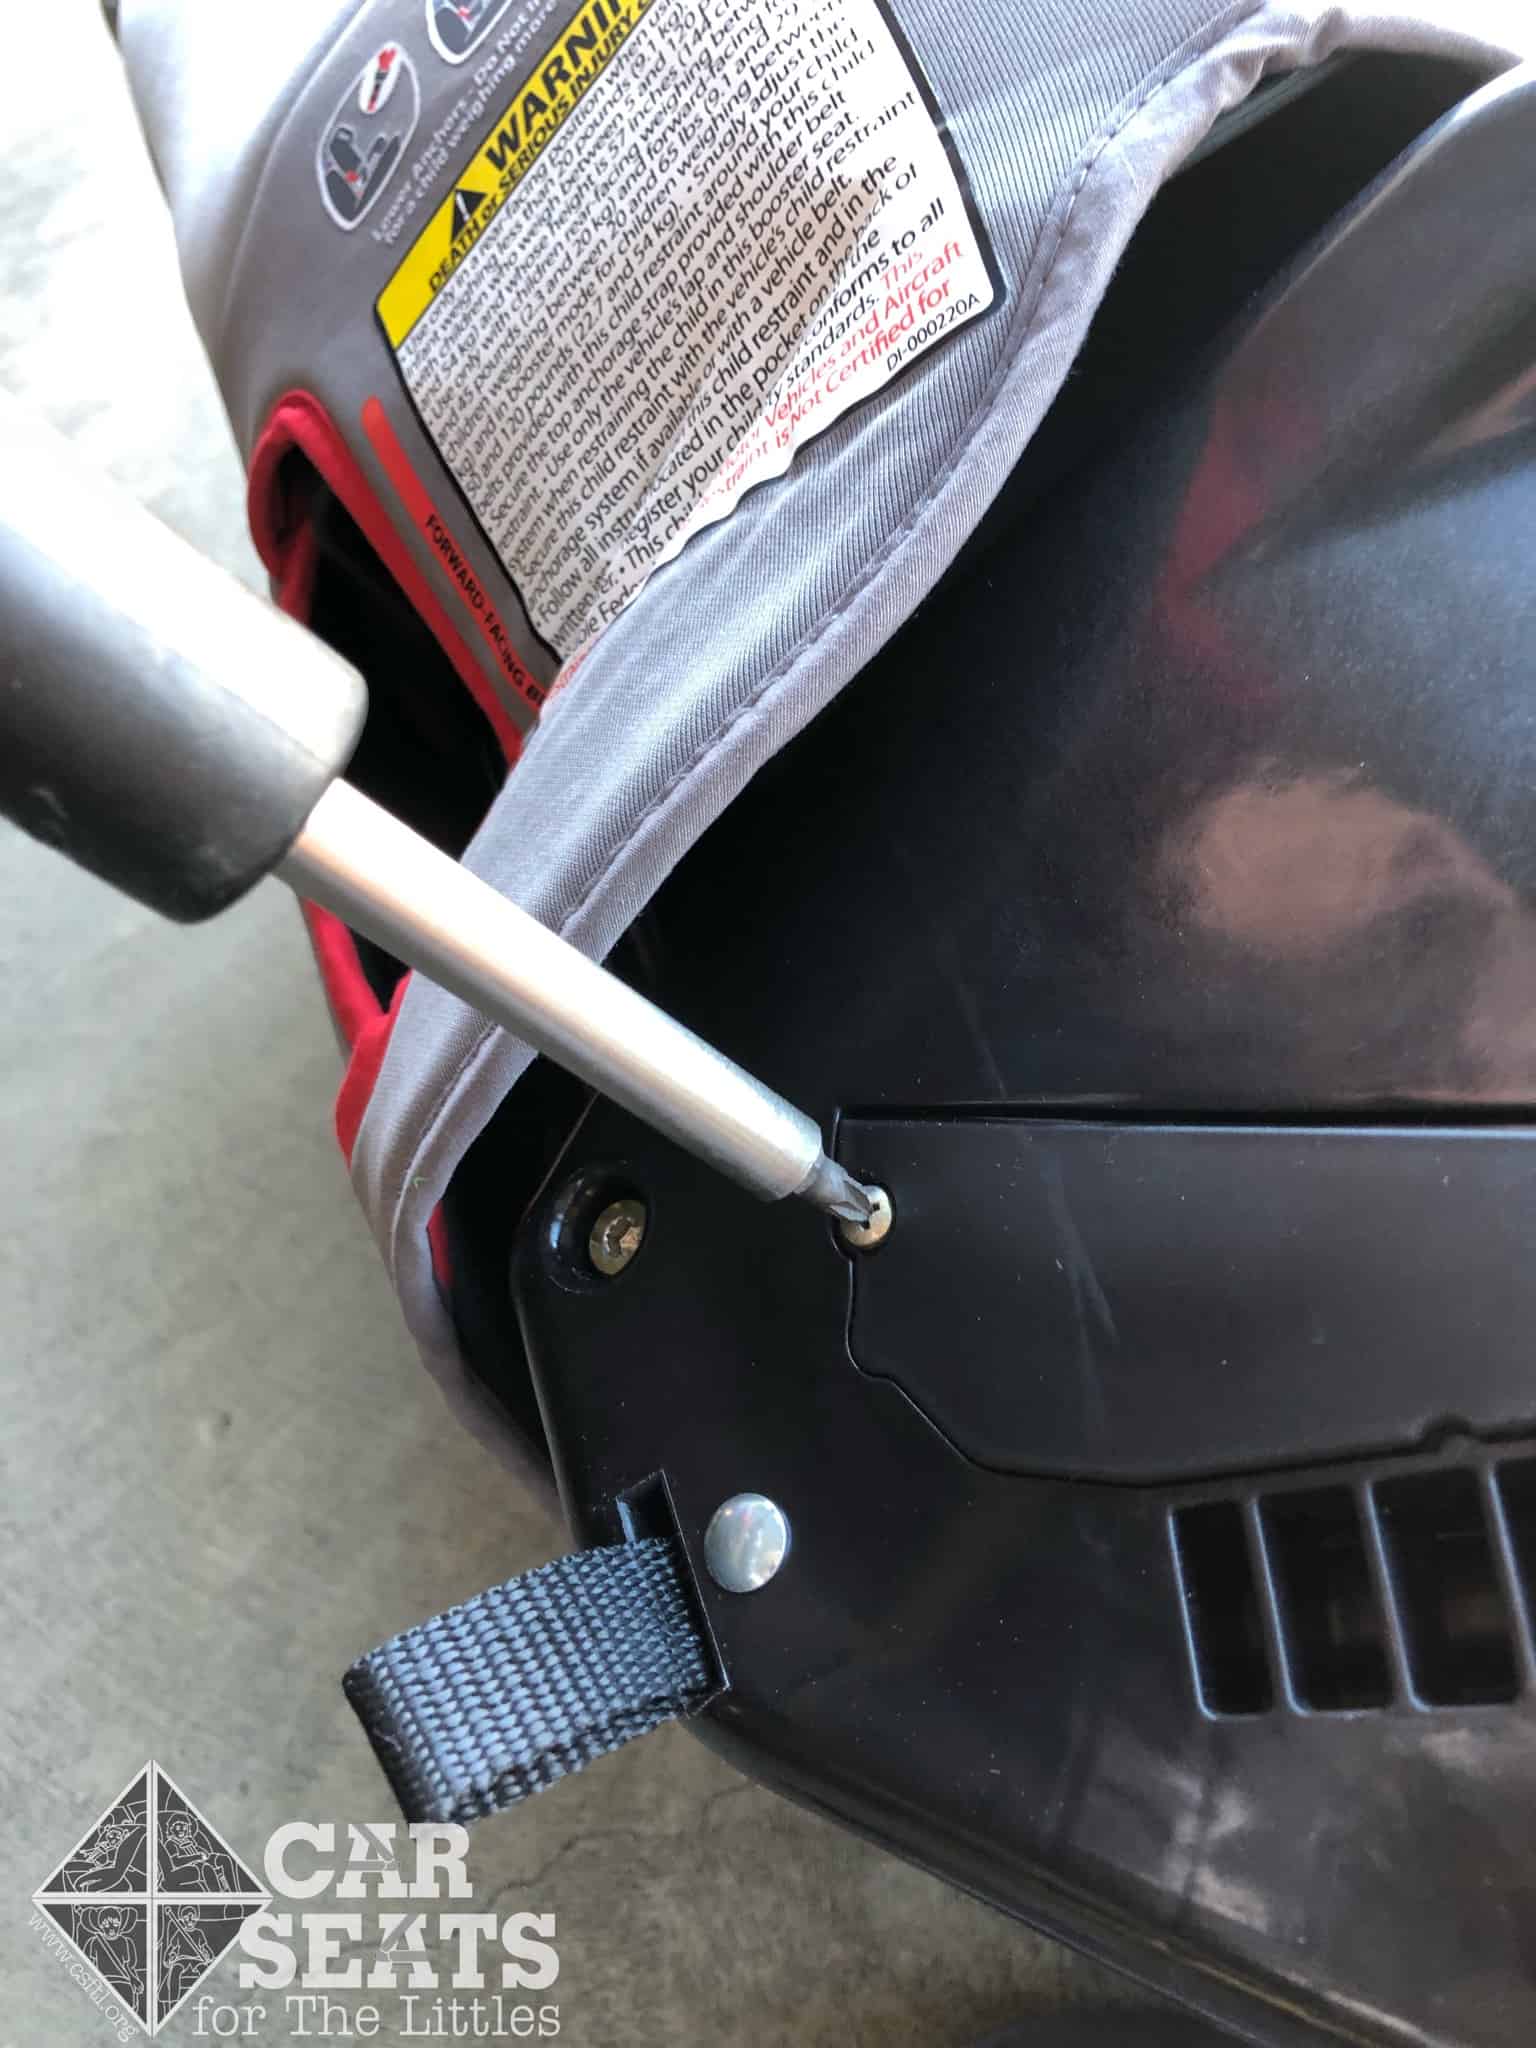
Diono radian 3RXT – unscrew side panels to remove harness
To remove the harness straps, unscrew the plastic plate on each side of the seat.
Diono radian 3RXT – harness strap removal
Keep an eye on the screws! I’m embarrassed to say that after trying for a few minutes to wedge the metal strap anchor through the slot, I realized that I should just pull the anchor towards me and pull the strap out that way. Oops! Again, keep an eye on the chest clip and buckle pieces that will need to come off the straps as they’re removed.
Once the straps are taken out, screw the plastic side panels back on.
Fit to Child: Booster Mode
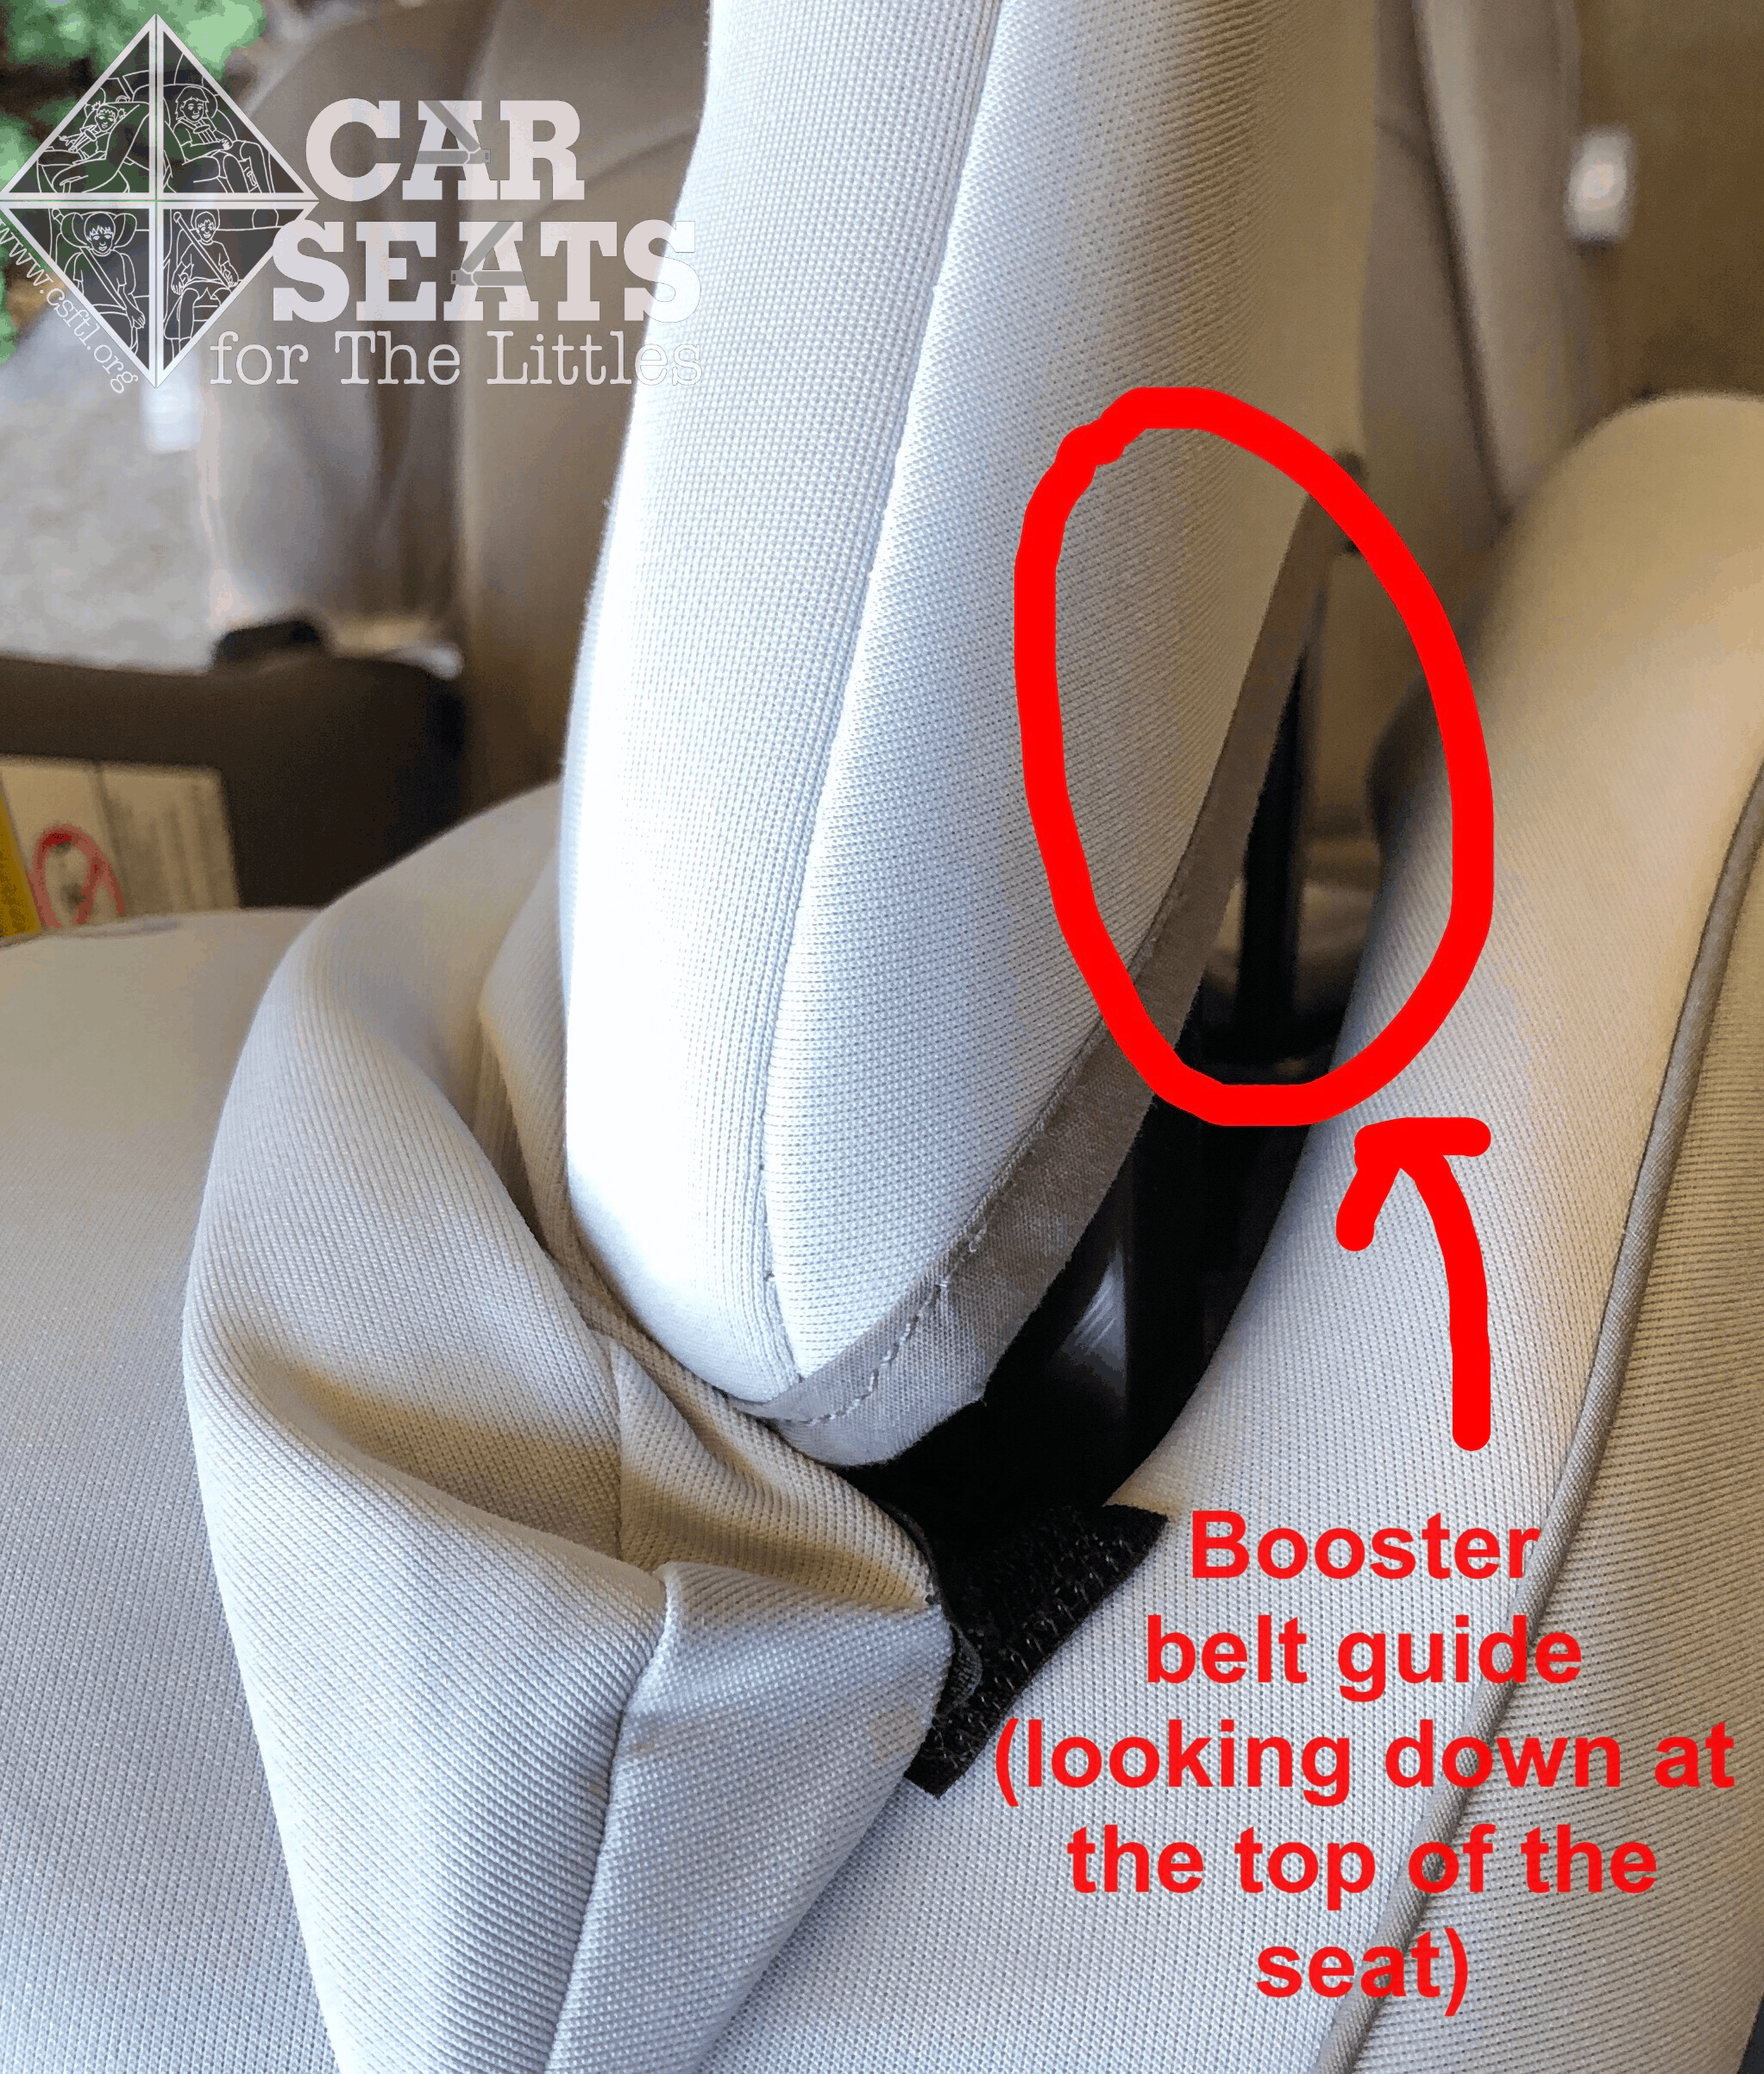
Diono radian 3RXT booster belt guide
The radian 3RXT manual states that the child’s shoulders must be at the 4th slot to use the seat in booster mode. The previous versions of this seat stated the shoulders should be at or above the 4th slot. We’ve confirmed with Diono that this is the case with the radian 3RXT as well.
The general problem with booster mode on the radian 3RXT is that it has a 50 pound minimum. Coupled with the fact that the seat is entirely outgrown – in both harness and booster mode – when the child’s shoulders hit the headrest, there are very few kids who will be able to realistically use this seat as a booster. In addition, even those who do fit by torso height will likely need a new high back booster before they’re ready for a backless booster.
But we do have some good news to report! Diono has redone the belt guide and increased the amount of space between the headrest and the shell of the seat, in order to improve belt retraction. The seatbelt should always “suck back in” if a child moves around while seated in a booster. In the cars where we tried the radian 3RXT as a booster, the retraction was indeed excellent.
Diono does allow and encourages the use of the lower anchors and top tether in booster mode. If these are not used, the booster should be buckled in when not in use.
To buckle the radian 3RXT as a booster, place the shoulder belt behind the plastic belt guide located between the headrest and the shell of the seat. The lap portion of the belt should go behind the raised plastic tabs near the child’s hips.
5 Year Old
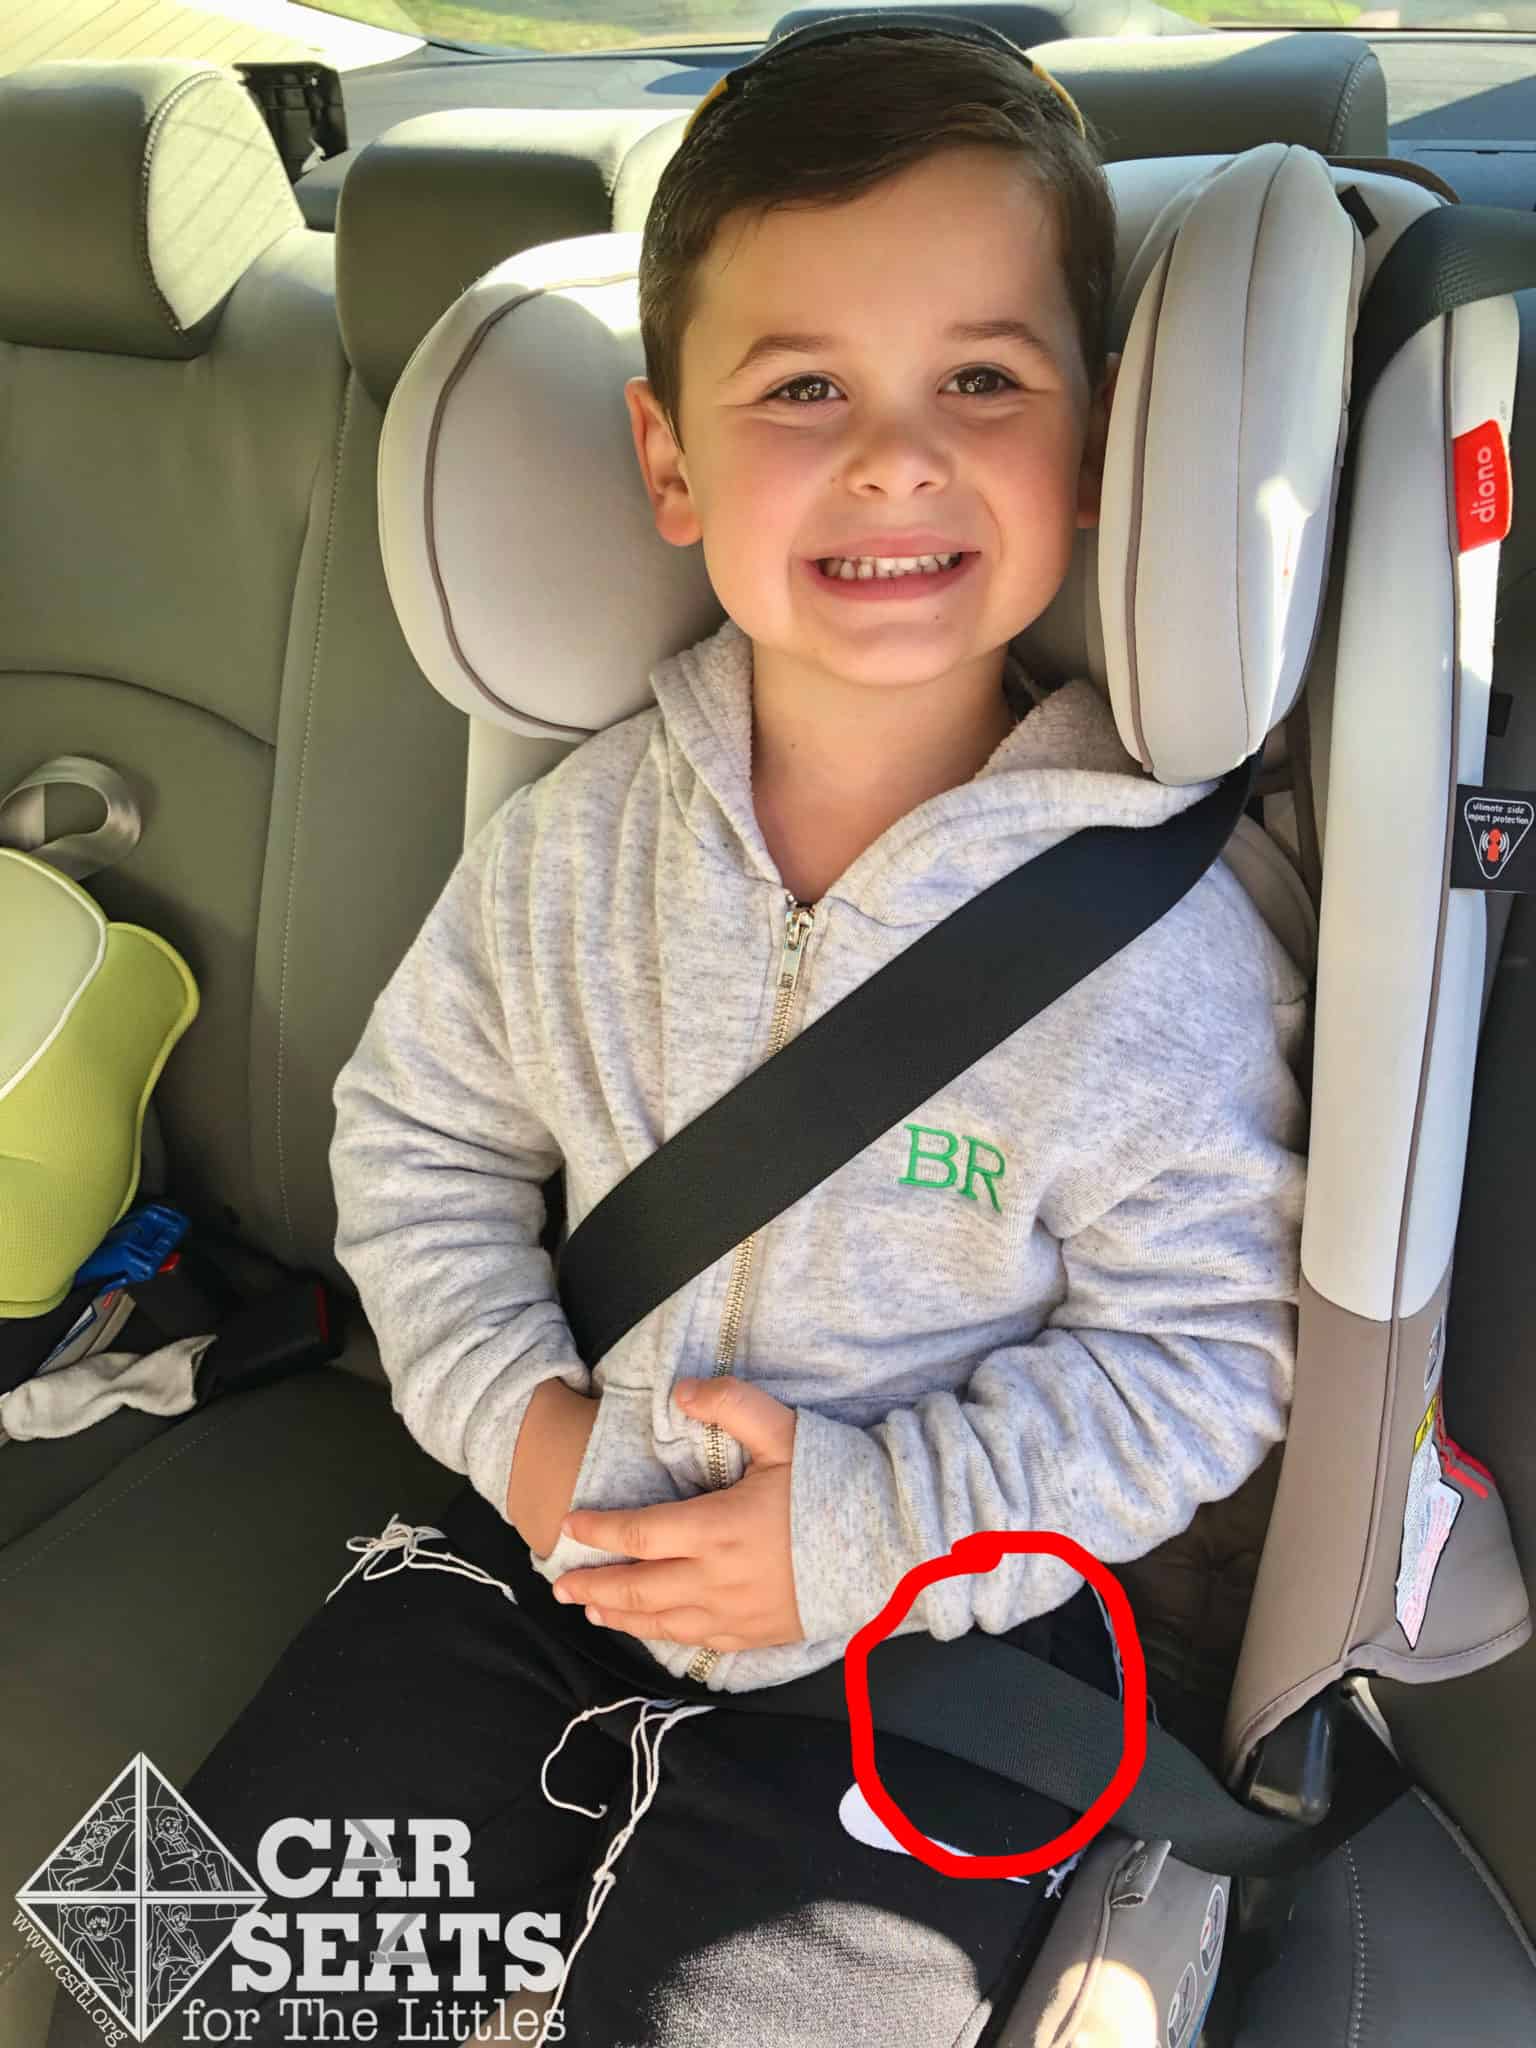
Diono radian 3RXT – 5 year old – booster
This young man is quite mature, and he’s in a high back booster in his own vehicle already. He’s 55 pounds and 45 inches. The radian 3RXT fit him well in booster mode. He’d benefit from having the headrest up a click or two to raise the shoulder belt. Since the black lap belt on his black pants is difficult to see, I’ve circled the belt in the picture to illustrate that it fits correctly.
6 Year Old
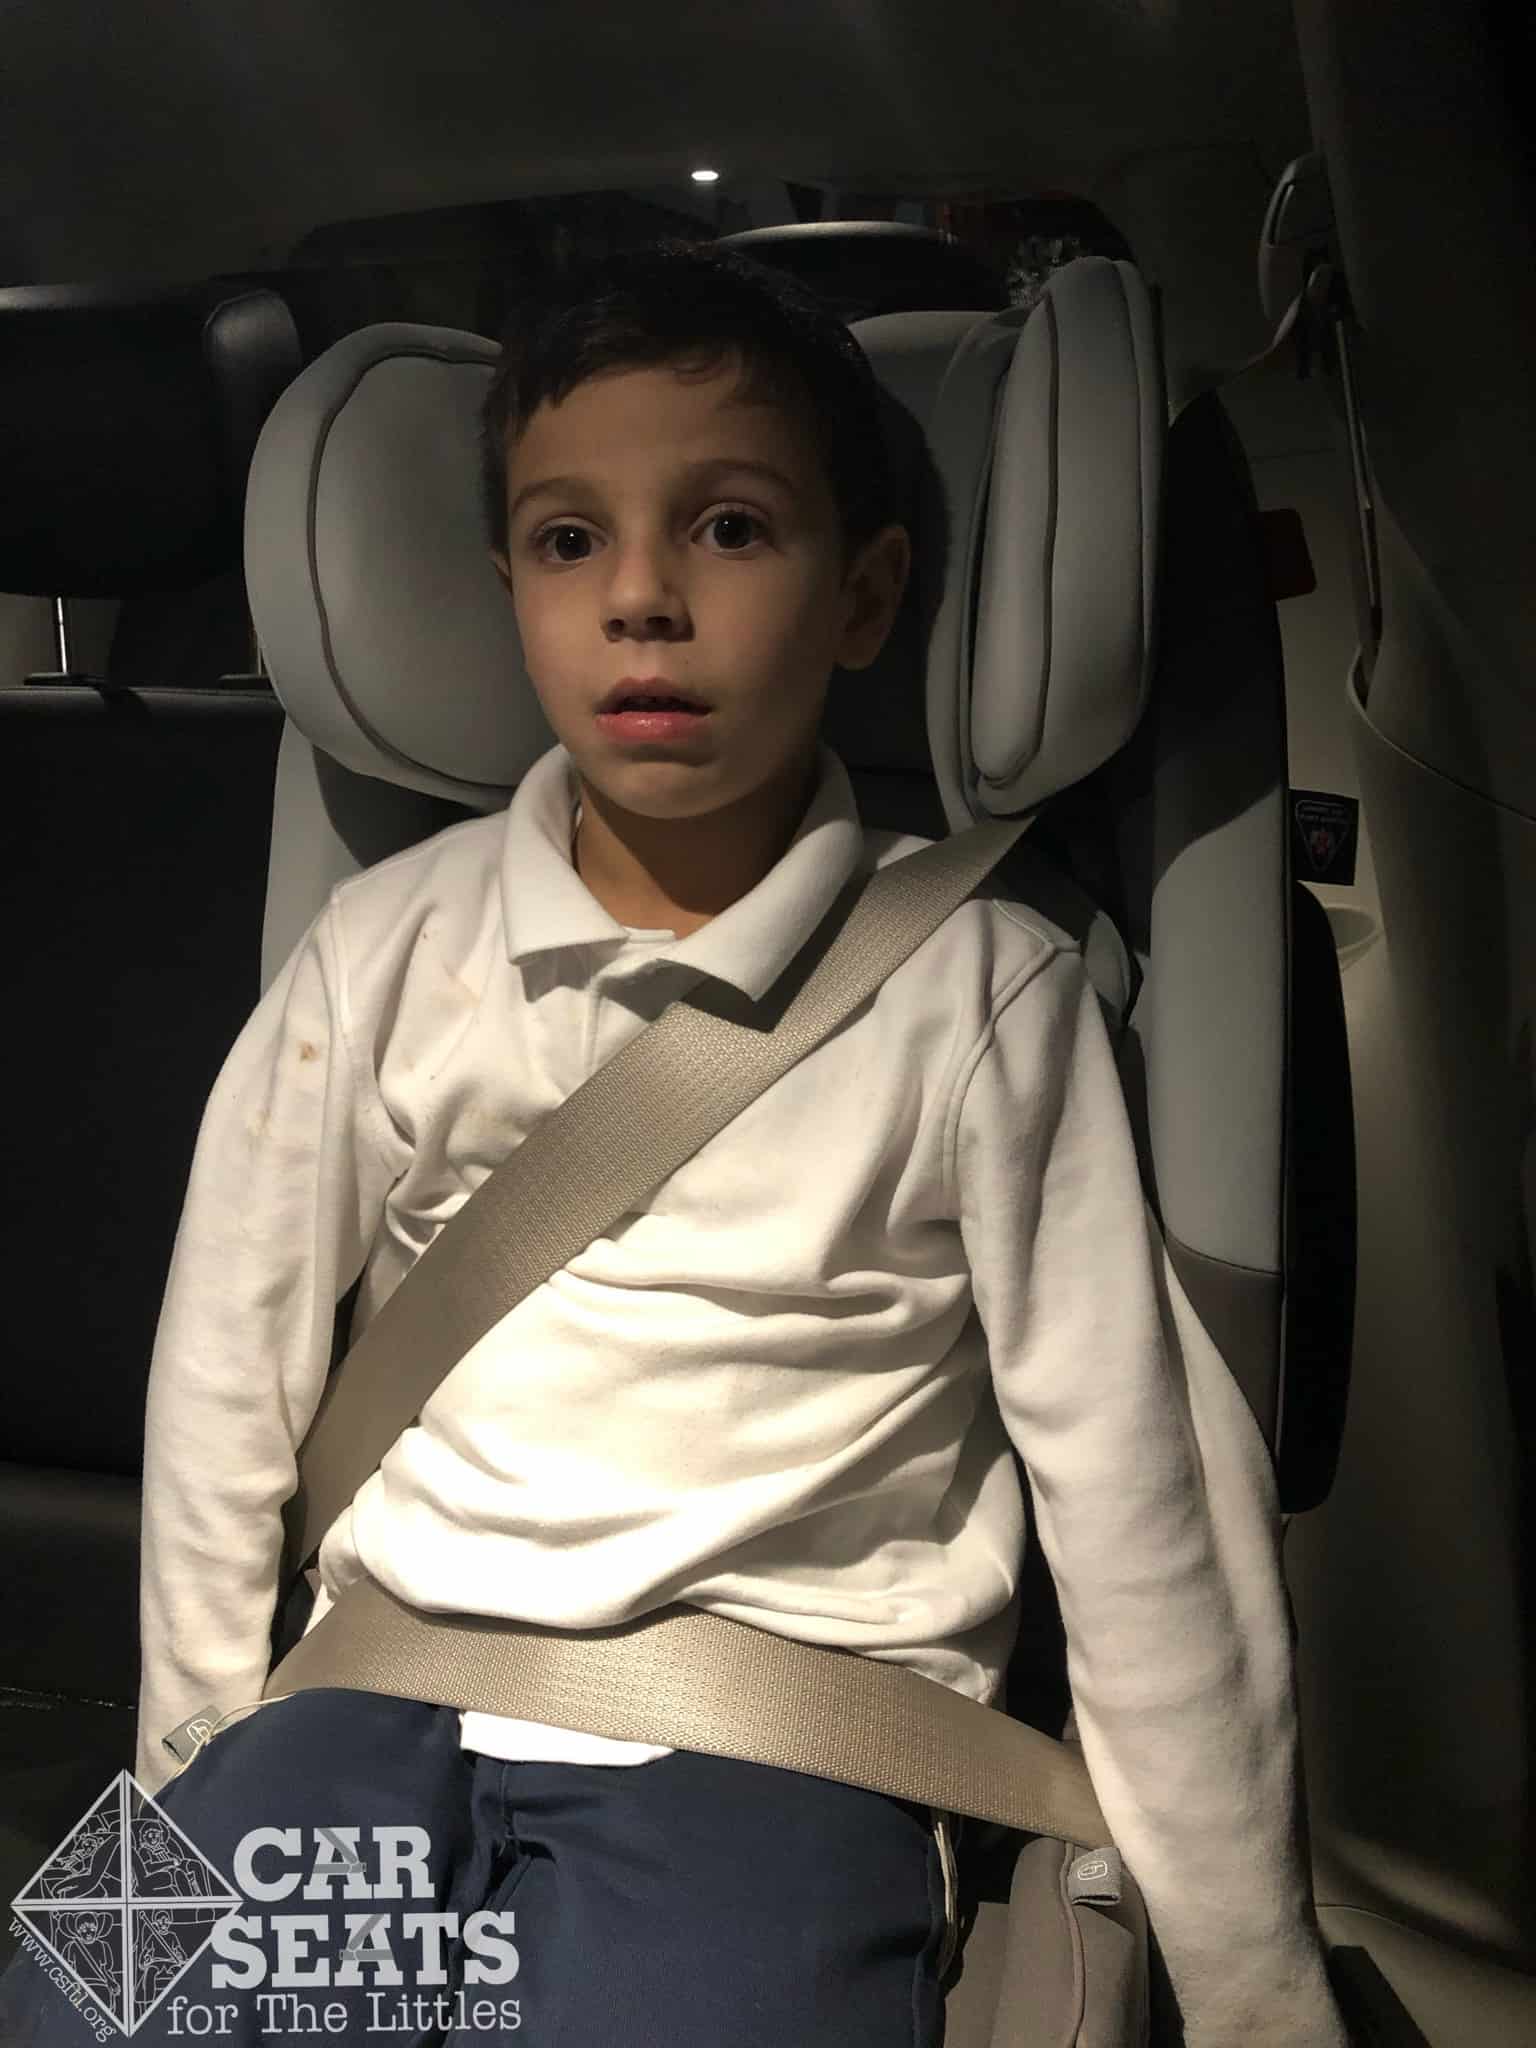
Diono radian 3RXT – 6 year old – booster
This young man is 6 and just about to transition to a booster in his car. He’s 50 pounds and 47 inches. The radian 3RXT did not provide a great fit for him, as the lap belt was higher than we like to see and did not rest low across the hips as the manual instructs.
8 Year Old – Outgrown

Diono radian 3RXT – 8 year old – outgrown in booster mode
This young lady is 8 years old. She’s 60 pounds and 54 inches. She rides in both high back and no back boosters in her family’s cars. Unfortunately, she’s outgrown the radian 3RXT in booster mode, as her shoulders are hitting the headrest.
Cupholder and Expanding Sides
Diono radian 3RXT cupholder insertion points
Diono radian 3RXT cup holder insertion
I’ve joked with CPST friends that as an experienced CPST, I have a familiarity with most seats, but give me a Diono cupholder and I’m lost. However, I have finally managed to develop a technique for inserting the cupholder! First of all, Diono has added a flag to indicate one of two places where the cupholder may be inserted. What works best for me is inserting the “stem” of the cupholder into the slot in the fabric, then inserting it into the designated hole on the seat, then pulling down the fabric. The cupholder is optional, so feel free to skip it as well!
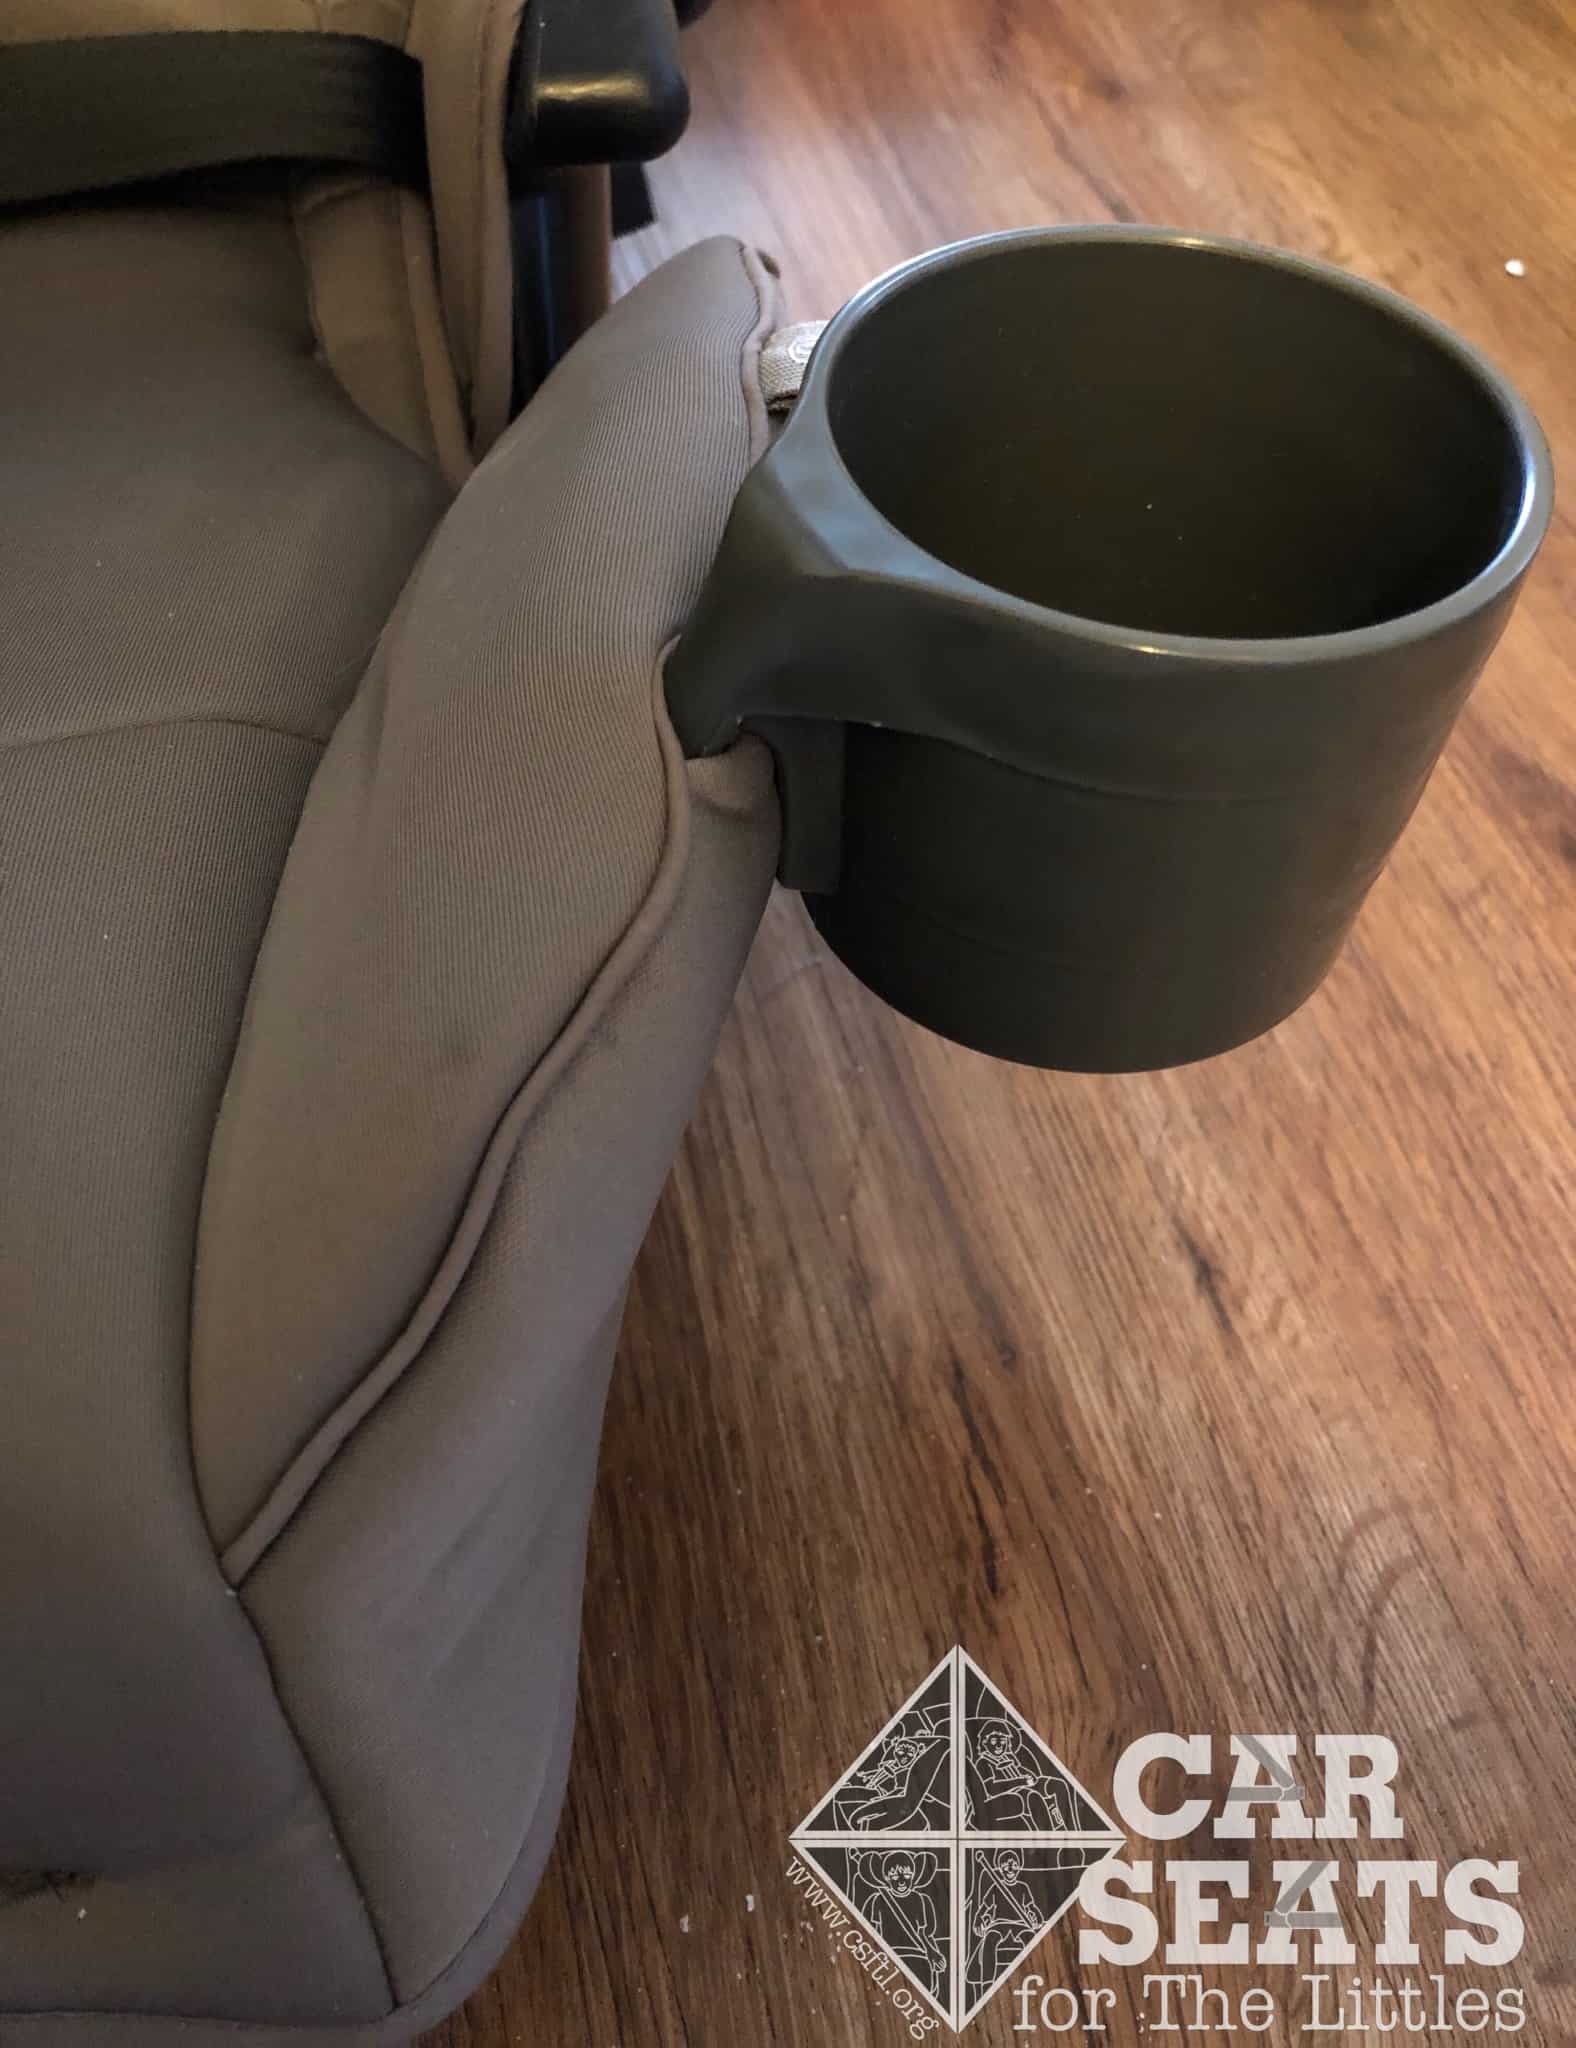
Diono radian 3RXT cupholder
The sides of the radian 3RXT can expand and collapse. Many families who see their children doing this think they’ve broken the seat, but fear not! This is a feature, not a bug. To use the cupholder, the seat must be in the expanded position, or else the cup holder won’t be at the correct angle.
Cleaning
The radian 3RXT cover cannot be put in the dryer. It should be machine washed in cold water on gentle cycle with mild detergent, then laid flat to dry. The manual says to dry it in the shade, but Diono has confirmed for us that this is just so it won’t fade and/or get too hot if the child is put in it immediately afterwards.
Important Information – Where to Find
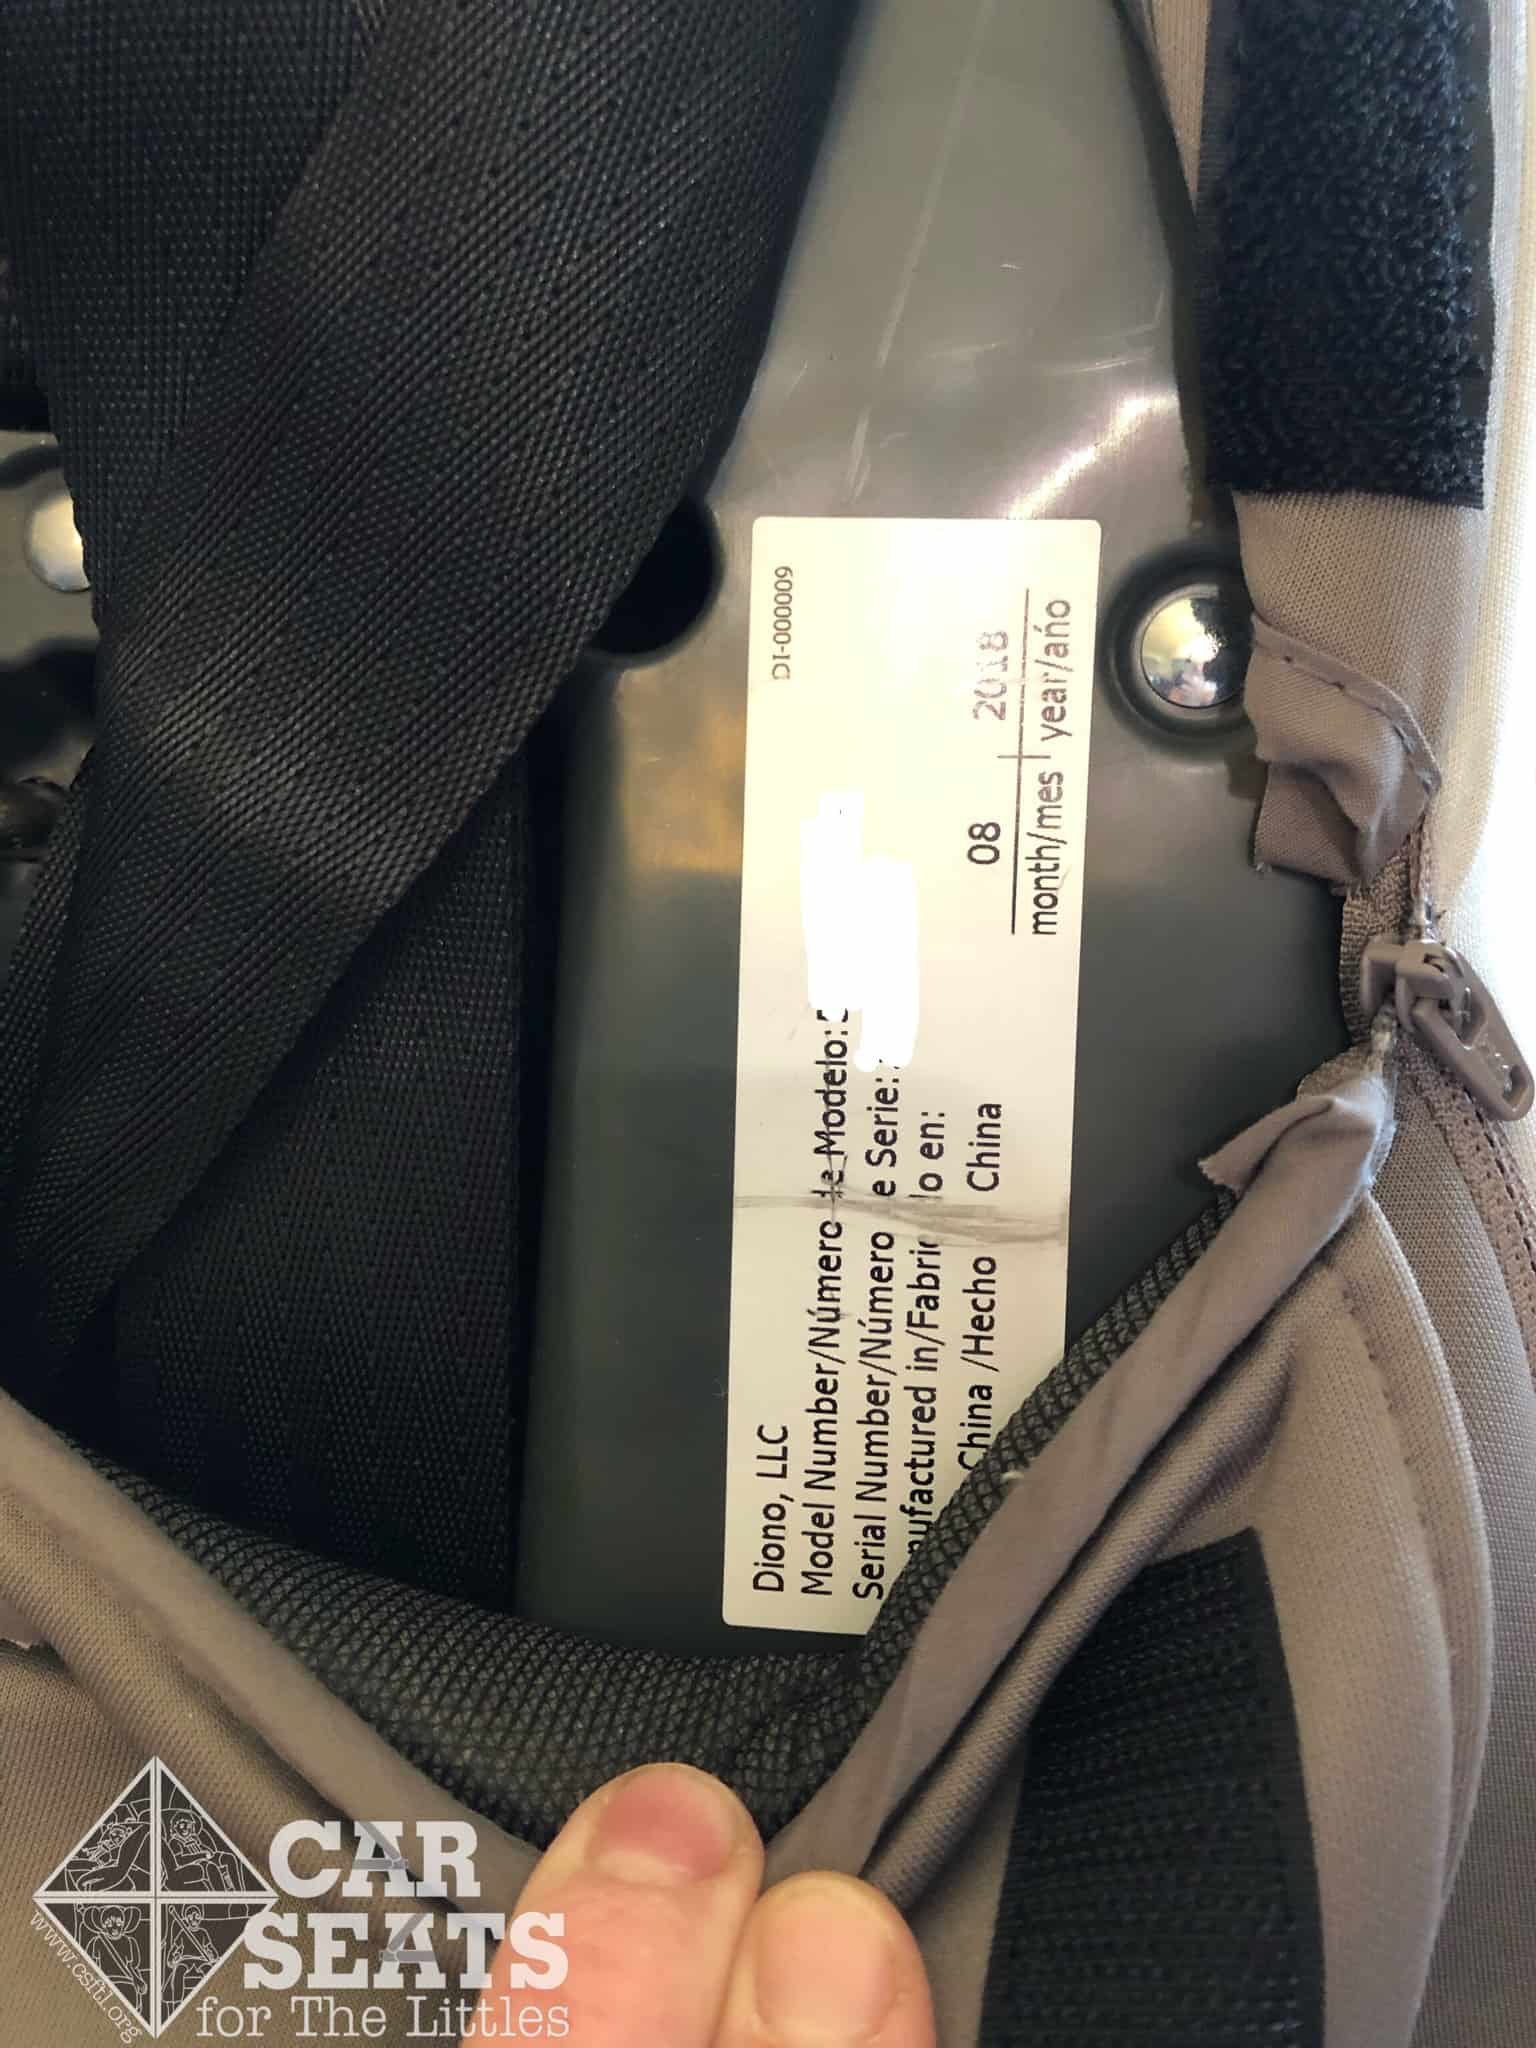
Diono radian 3RXT date of manufacture label
Expiration: The radian 3RXT expires a generous 10 years after the date of manufacture. The date of manufacture can be found on a label on the right side of the top of the back of the seat, under the cover. The expiration is listed in the manual. We always prefer that the expiration be listed on the seat itself.
Diono radian 3RXT manual storage
Manual Storage: The radian 3RXT manual can be stored in a pocket inside the bottom of the back cover. There is an indicator on the back of the cover that the manual is stored there.

Diono radian 3RXT incorrect aircraft statement on label
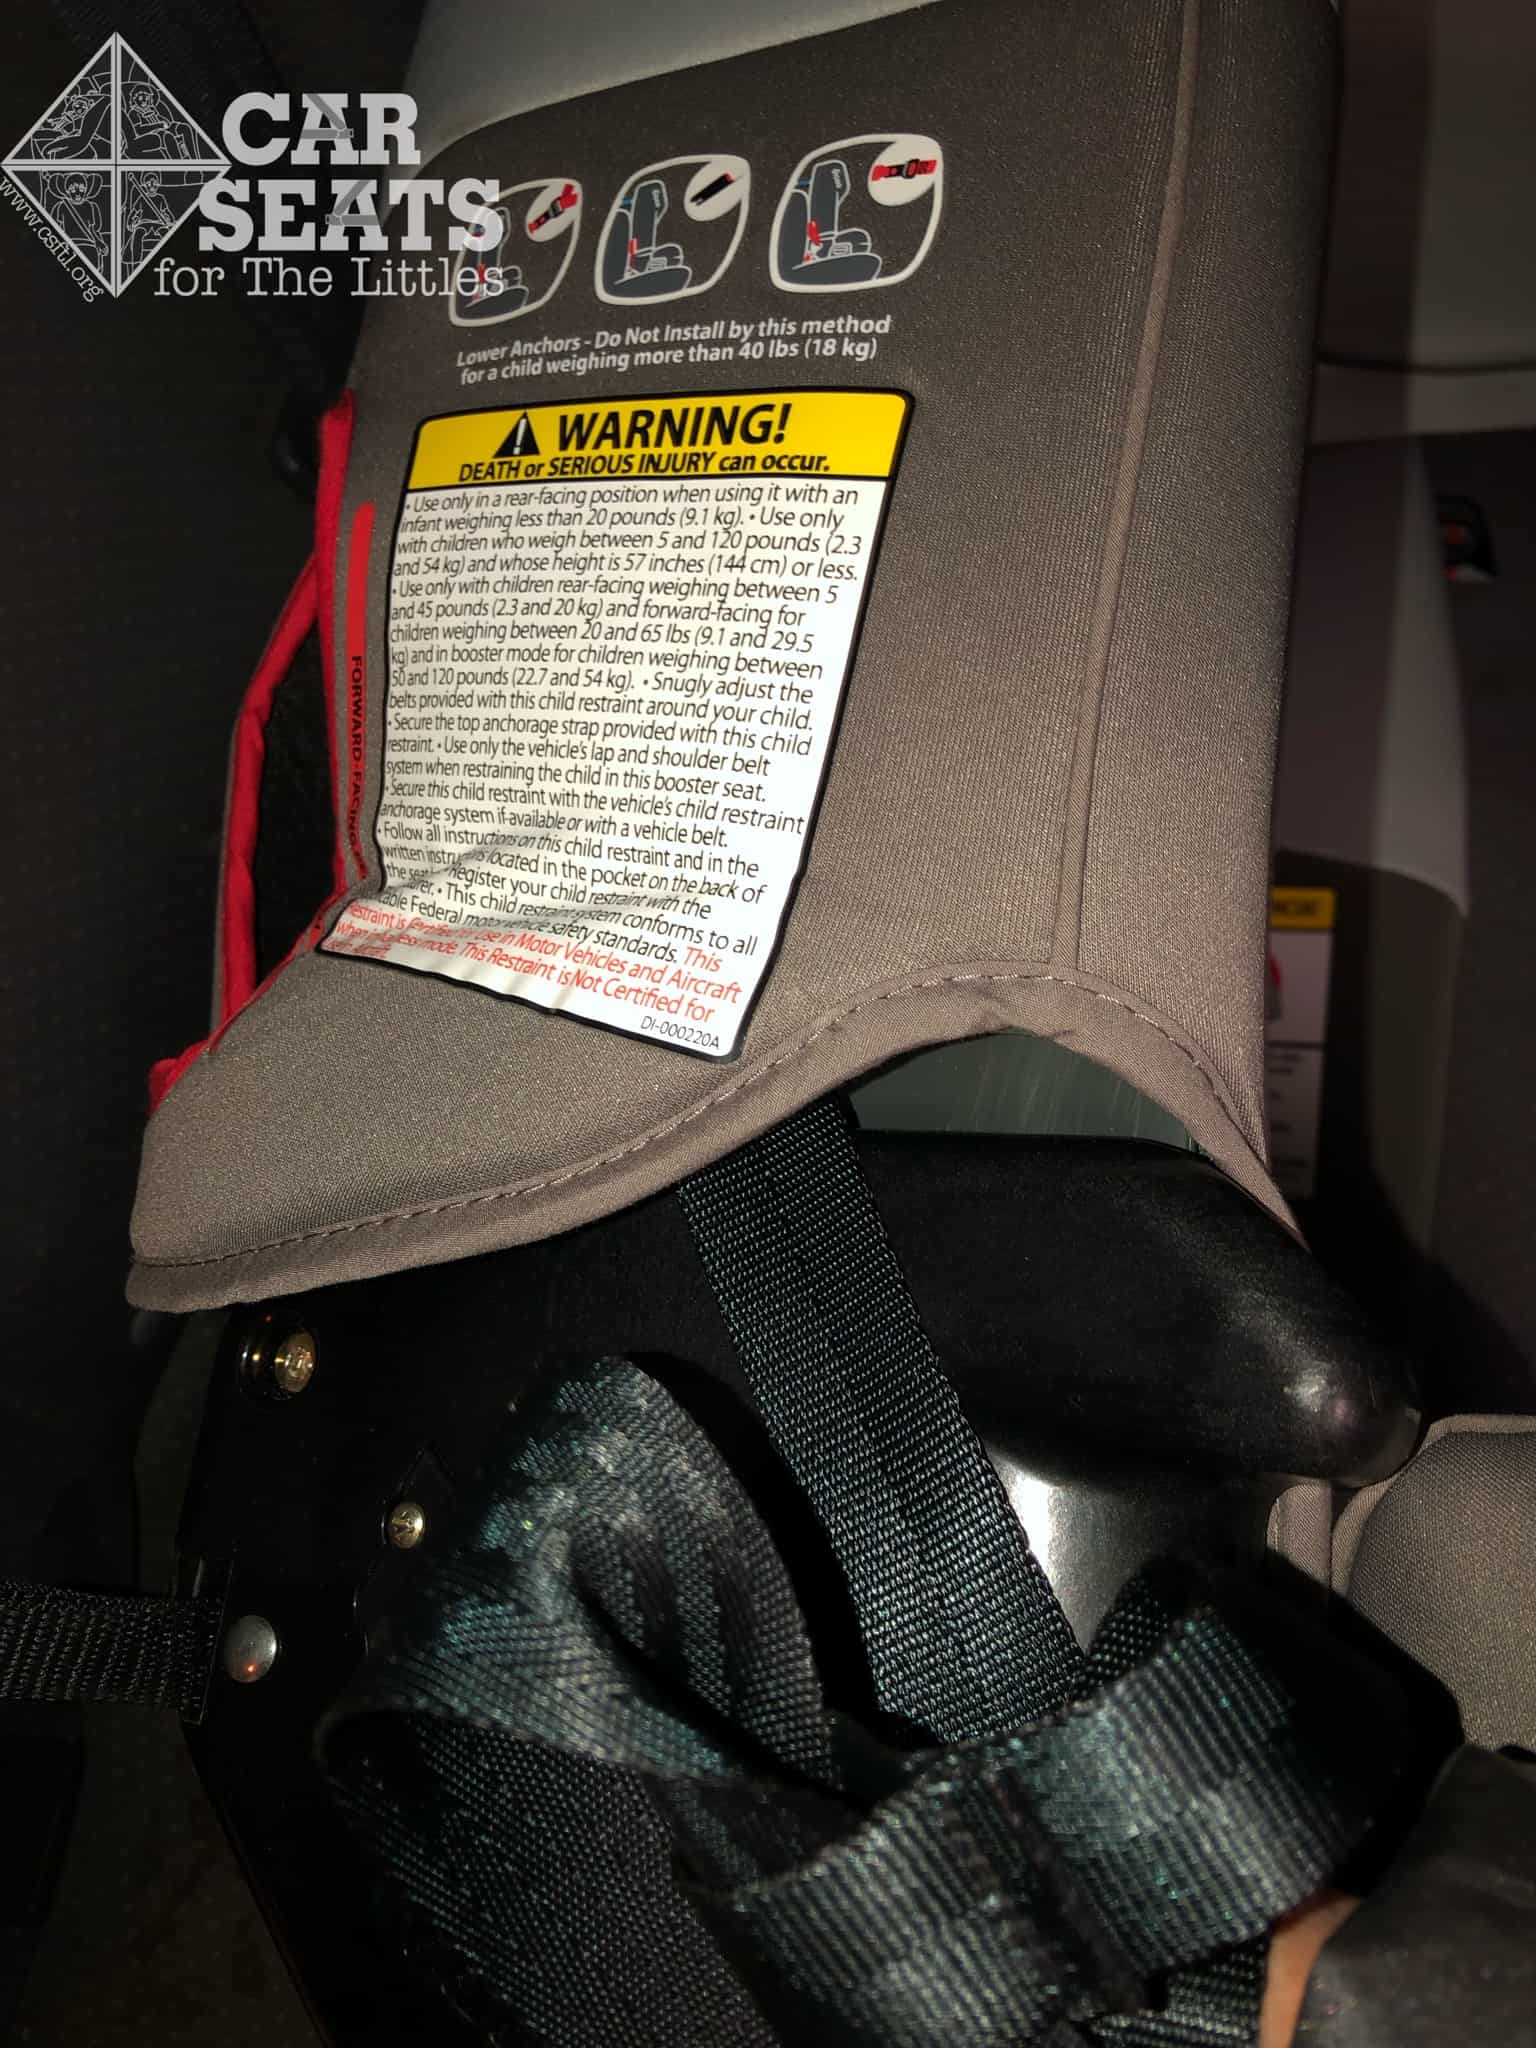
FAA Approval: The radian 3RXT is approved for use in aircraft in harness mode but not in booster mode. The label on my seat regarding aircraft approval has a significant error. It should say it’s approved in harness mode but not approved in booster mode, but instead it says it’s approved in harness mode but not approved. Diono is aware of this error, and the label will be correct on newer seats.
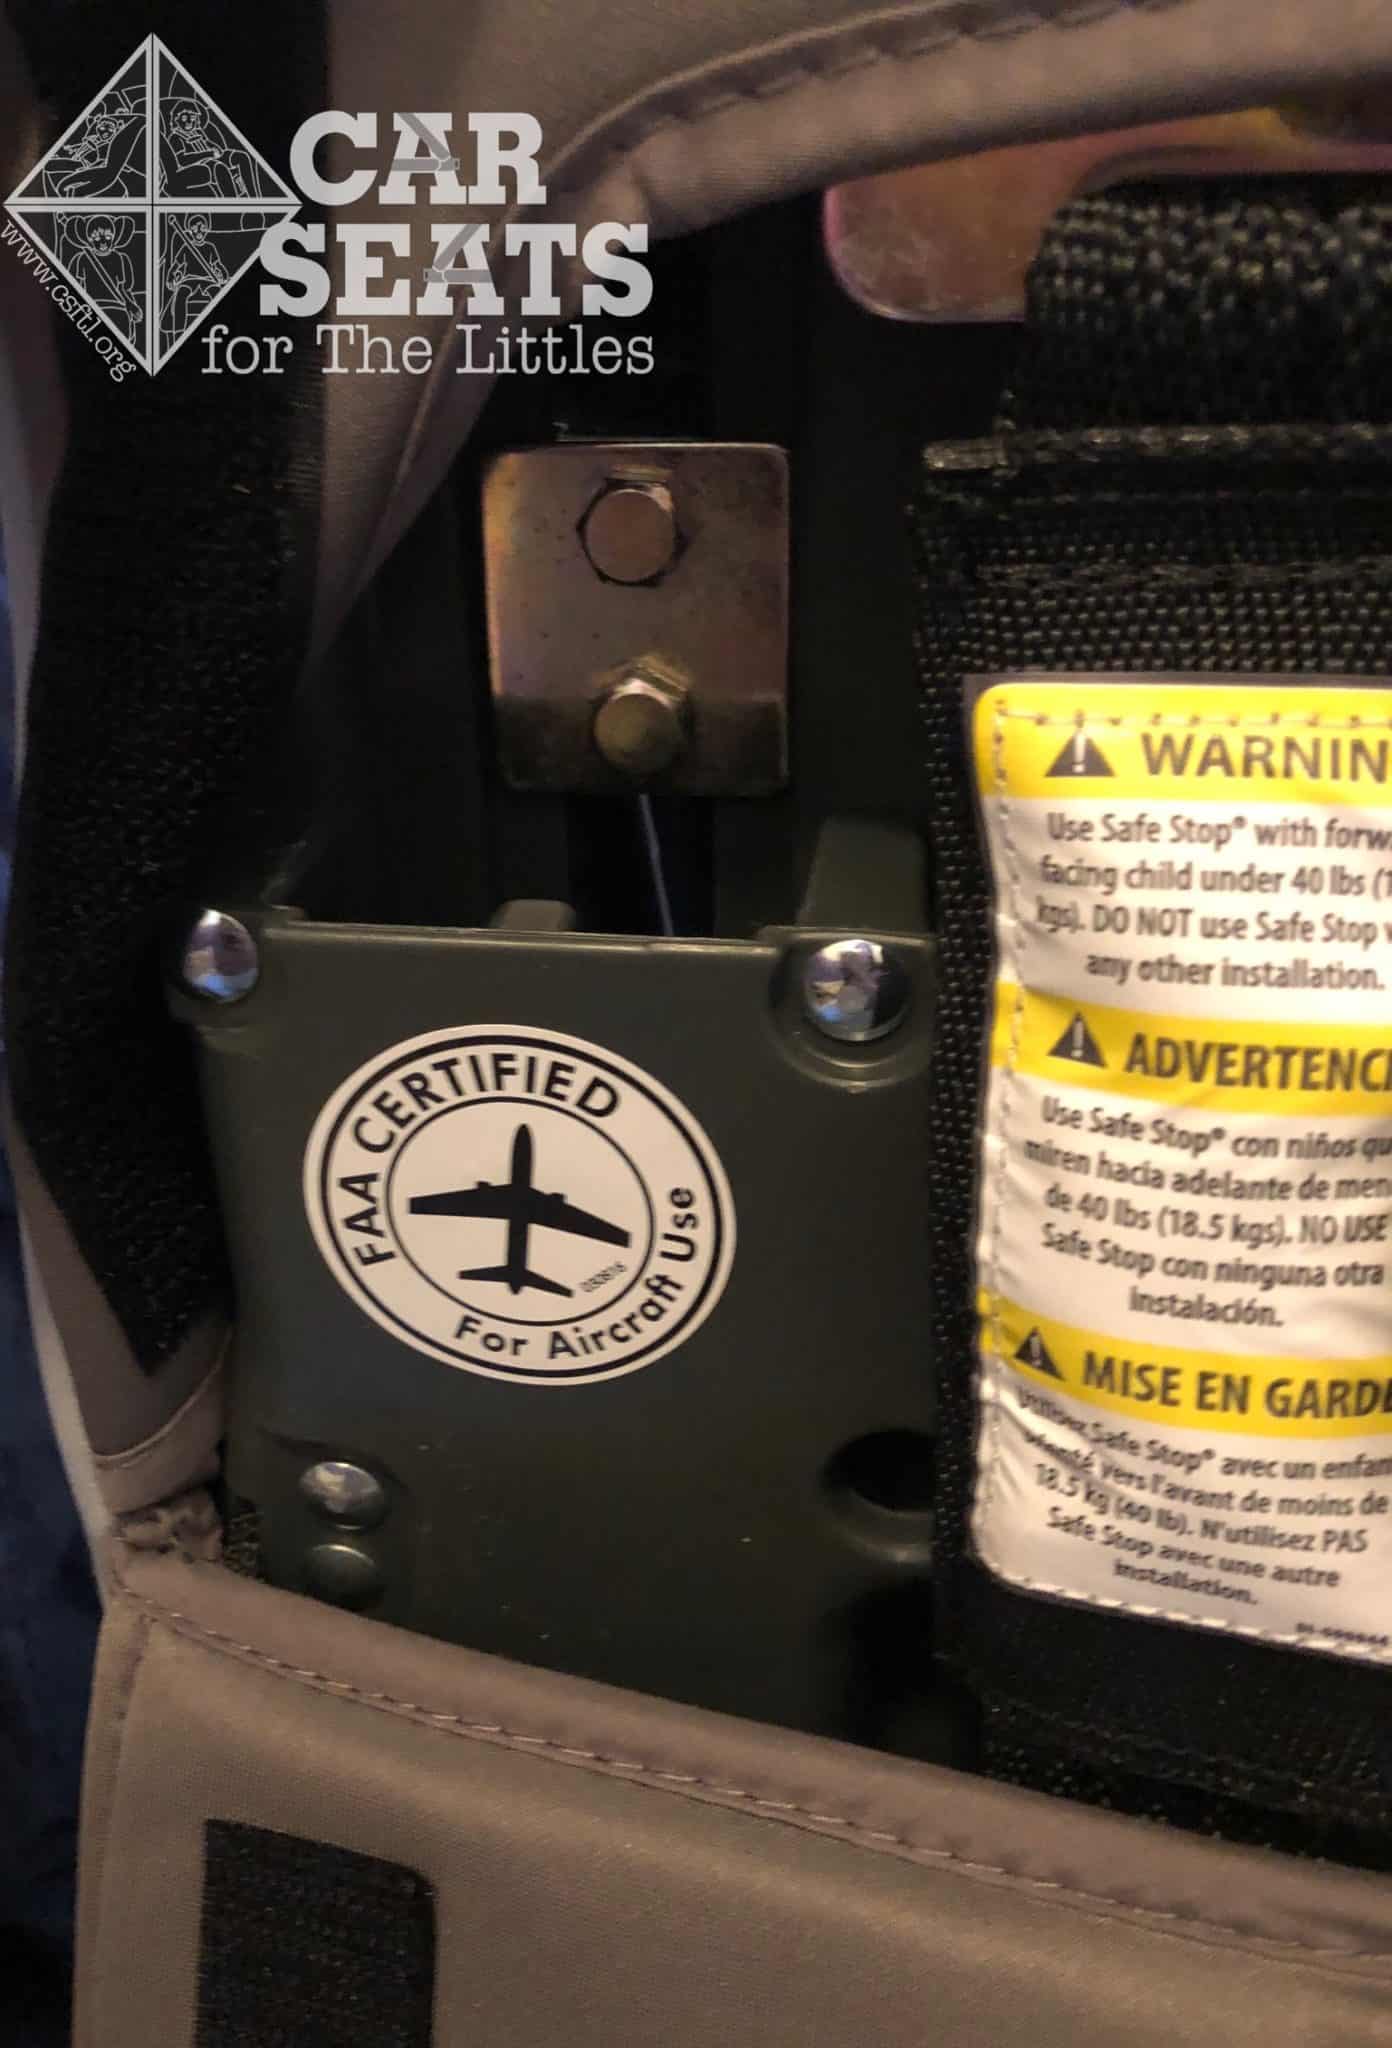
Diono radian 3RXT aircraft approval sticker
The radian 3RXT does also feature an aircraft approval sticker on the back of the seat, under the cover.
Final Thoughts
The differences between the Diono Radian RXT and the radian 3RXT are a mixed bag. Some we love (the new booster belt guide), some we’re neutral about (the new infant insert), and some (the back cover) we could do without. The radian 3RXT still features one huge plus: it’s extremely narrow. However, this must be balanced with the very large number of adjustments that must continually be made, the fact that it’s often difficult to install forward facing, and the fact that it makes a poor “carpool seat” because it would need to be readjusted and perhaps even reinstalled for each child. It doesn’t fit small infants, and we can’t recommend it for babies who cannot yet sit up, unless the vehicle has very flat seats. In addition, booster mode fits very few children. We also wouldn’t recommend it for a forward facing child (unless it will be passed down afterwards) because it would be such a short-lived purchase. However, if a child is moving out of a rear facing only seat, and if the caregivers need a narrow seat, are able to install it tightly and are committed to making the necessary adjustments, the radian 3RXT might be a choice to consider.
Originally written by Lani Harrison, edits maintained by CSFTL