Nuna Pipa rx
The original Nuna PIPA rear facing only car seat has been around, serving families with ease of use and an easy installation, since the earliest days of CSFTL. You could say that we’ve grown up along with Nuna’s product line!
The PIPA and PIPA Lite are a solid, popular seat that we see routinely at car seat check events and in classes that we teach. It’s hard to imagine how many positive changes could (or need to!) come to a seat that’s been such a consistently good option for so long but the PIPA rx delivers! The PIPA RELX base that’s included with the PIPA rx and PIPA Lite r models includes some significant and very nice changes that take the PIPA we’ve known and loved all this time to a new level.
CSFTL Quick Stats
- Weight range: 4 – 32 pounds
- Height range: less than 32 inches tall and the top of the child’s head is less than one inch from the top of the seat’s shell
- Optional infant insert with removable low birthweight insert for children who weigh less than 11 pounds
- Expiration: listed on a label on the seat (7 years)
- Replace after a moderate to severe crash — follows NHTSA’s crash replacement guidelines
Measurements
- Width at widest point (carrier handle): 17 inches
- Lowest harness slot: 6 inches with insert
- 3 harness slots: 6, 7.5, and 9 inches from the seat pan without the infant insert
- Seat pan depth: 12.5 inches
- Base width: 12 inches
- Base length: 24 inches
- Carrier weight: 8 pounds
- Base weight: 16.5 pounds
Features
- Includes PIPA RELX base
- Dream Drape canopy
- Lightweight carrier
- European baseless routing
- Rigid lower anchors with 3 position retraction on the base
- Stability (load) leg on the base
- On the go recline adjustment
PIPA Family Tree
There are now many PIPA models in the family. Here’s a handy chart to help you keep track of them!
Both the PIPA rx (reviewed here) and the PIPA Lite r include the new PIPA RELX base. We’ll talk more about this pretty awesome base later in this review. Nuna weighs the carriers without the canopy or infant insert. These items typically add about 1.5 pounds. We weigh seats with all of those items on the seat.
| PIPA | MSRP | Base Included | Weight* | Installation Method | Dream Drape | No Rethread Harness |
|---|---|---|---|---|---|---|
| These models include the PIPA RELX base but are compatible with the original (PIPA series) base | ||||||
| PIPA rx + PIPA RELX base | $379.95 | PIPA RELX base | 7.5 pounds | With or without base | Yes | No |
| PIPA lite r + PIPA RELX base | $399.95 | PIPA RELX base | 5.3 pounds | With base | No | No |
| PIPA Aire + PIPA RELX base | $400.00 | PIPA RELX base | Unknown | With base | Sky Drape | No |
| PIPA lite rx + PIPA RELX base | $499.95 | PIPA RELX base | 6.9 pounds | With or without base | Yes | Yes |
| PIpa urbn travel system | $800 | No base | 7 pounds | Rigid lower anchors attached to the carrier | Yes | Yes |
| These models include the original base but are compatible with the PIPA RELX base. All of these models are discontinued but many are not expired so they remain safe to use. | ||||||
| PIPA | $319.95 | PIPA series (original) base | 8 pounds | With or without base | Yes | No |
| NUNA PIPA lite | $349.95 | PIPA series (original) base | 5.3 pounds | With base | No | No |
| NUNA PIPA lite lx | $399.95 | PIPA series (original) base | 5.7 pounds | With base | Yes | No |
PIPA RELX Base Compatibility

Nuna PIPA PIPA RELX base
The PIPA rx includes NUNA’s PIPA RELX base. This base is compatible with all PIPA car seats. The manual clearly states to follow the directions included with your particular Pipa when using the PIPA RELX base.
PIPA RELX Base vs. the Original Pipa Base, a Quick Summary
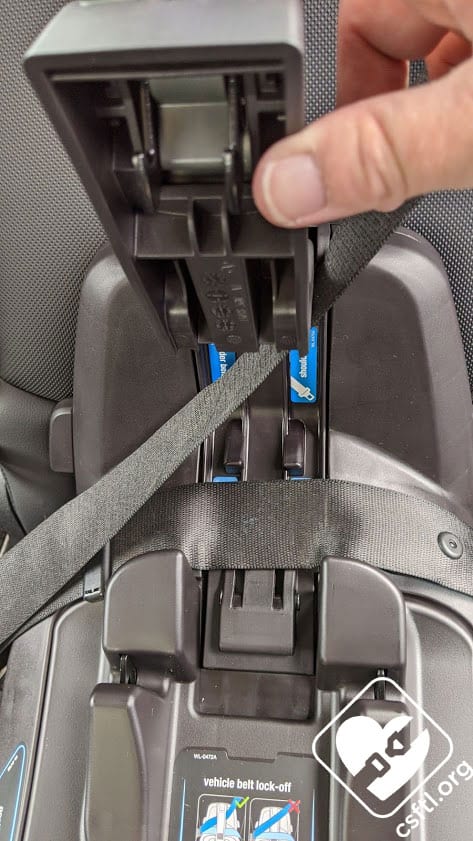
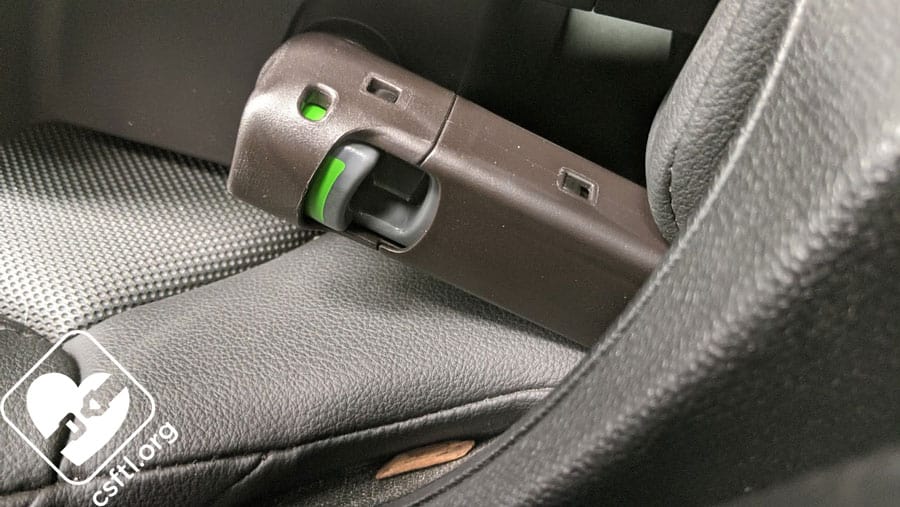
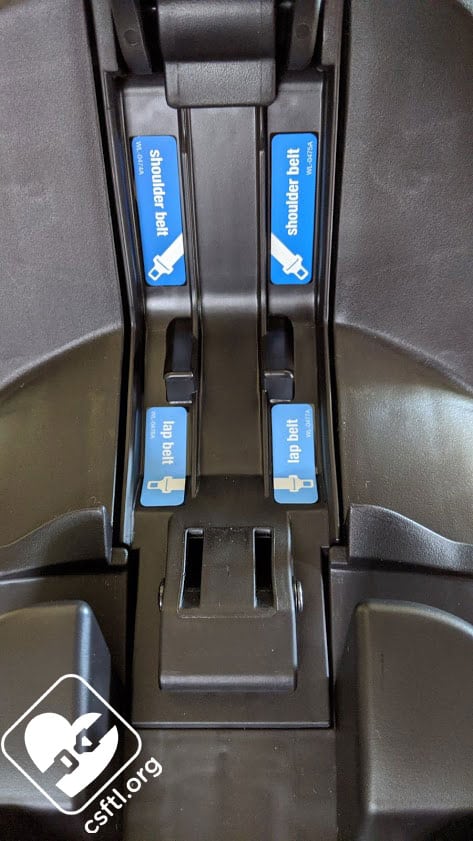
Nuna PIPA RELX base seat belt in lockoff
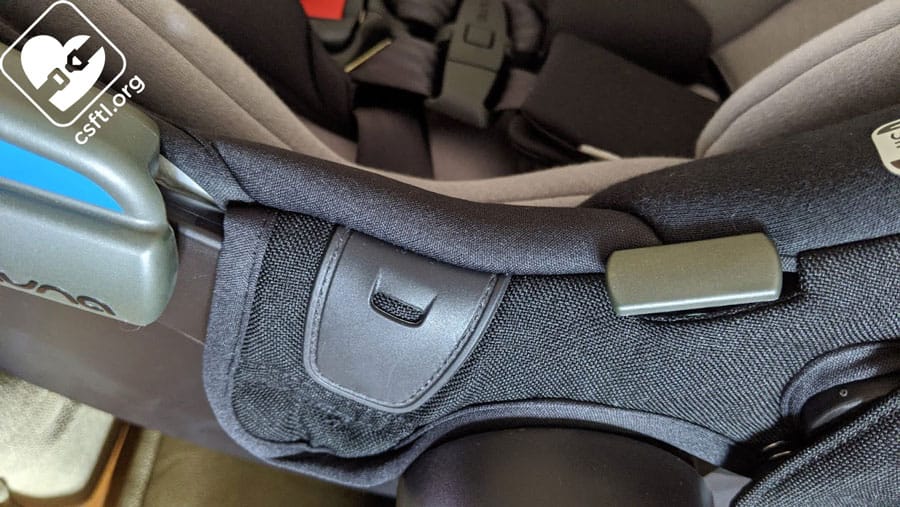
The PIPA rx includes the new PIPA RELX base. It’s hard to talk about this updated base without discussing the original PIPA base so we’ll do a quick comparison. The original base has a lot to offer — rigid LATCH and a load leg foremost among the features. It also had some challenges with fit to vehicle and with reading the recline angle indicator — the original base has a bubble indicator with a single line. The bubble must touch part of the line. That sounds simple enough, but many caregivers found this quite confusing. The new base includes a different type of recline angle indicator that’s a bit easier to read.
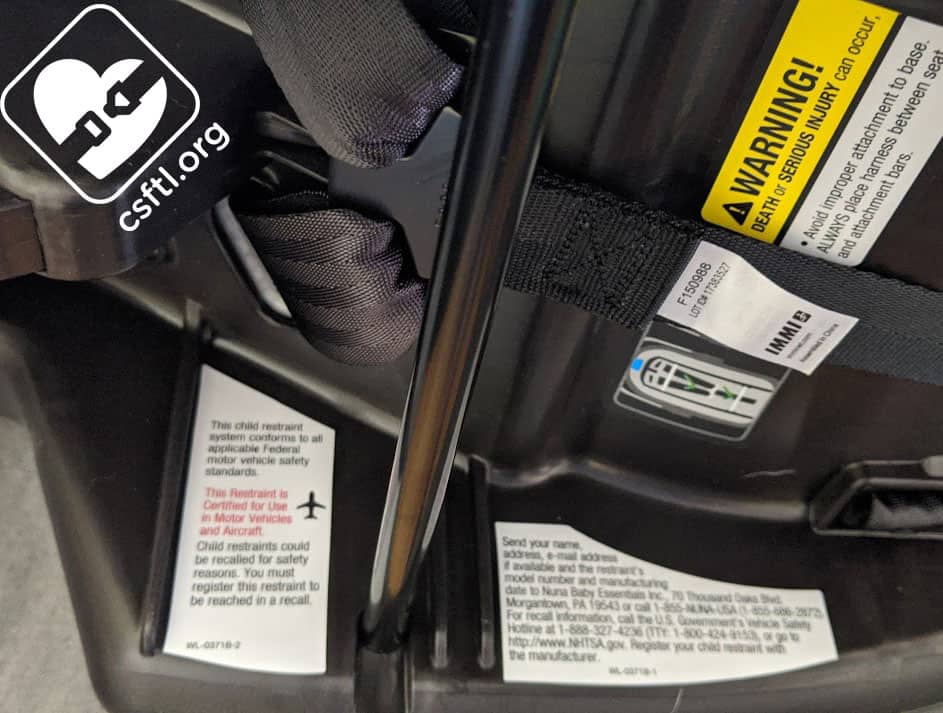
The PIPA RELX base also includes an updated lockoff device that includes separate spaces for the lap and shoulder portions of the vehicle seat belt. This is an important change that makes the lockoff a lot easier to use because the vehicle seat belt doesn’t bunch up in the lockoff!
Also on the base is an anti-rebound panel. This isn’t mentioned in the manual, probably because it doesn’t require any additional adjustment.
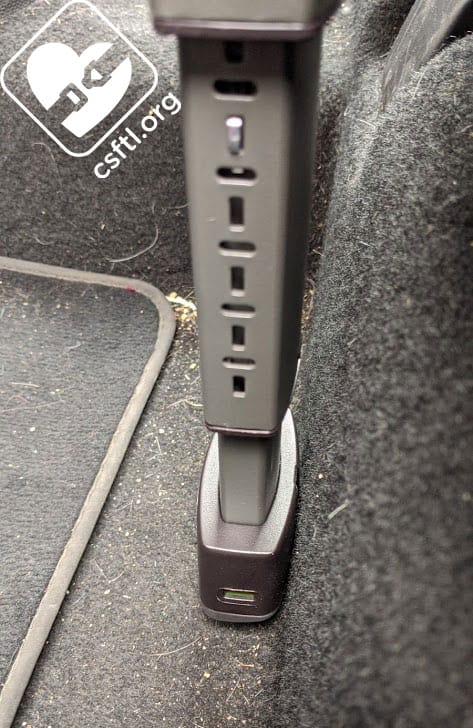
Stability Leg
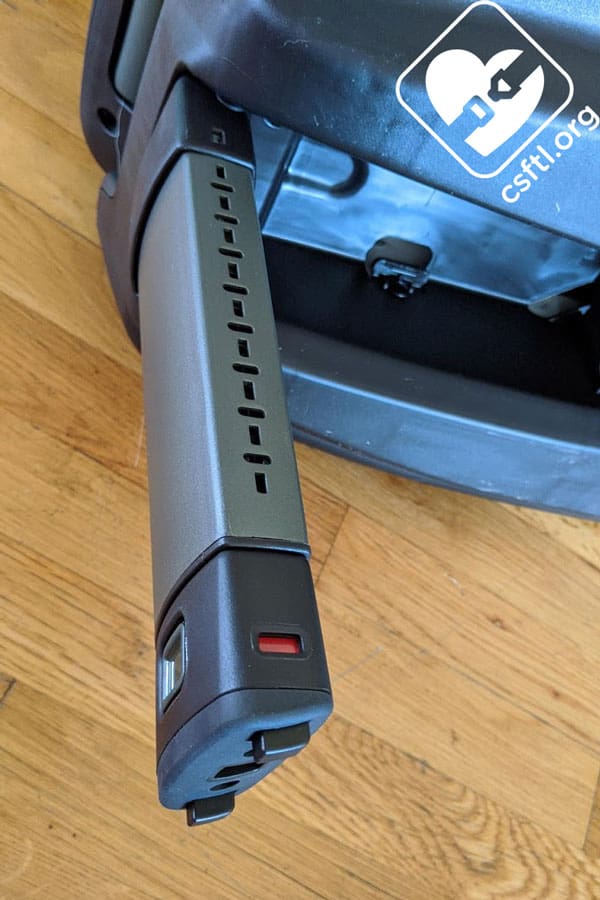
Nuna PIPA RELX base stability leg in the shortest position
Stability leg with multiple positions that accommodate smaller spaces — the original base has a load leg that’s often too long for the middle seating position in vehicles that have a pronounced hump on the floor. More than a handful of times, I’ve found myself telling caregivers that they need to choose between using the features they’ve paid for (stability leg and rigid lower anchors) or using the PIPA in the middle vehicle seat (in most cases, the lower anchors can only be used in the outboard seating positions). Adding the shorter position on the stability leg and an improved lockoff means that the PIPA RELX base is a terrific option in those middle seating positions.
Nuna PIPA RELX base stability leg in the longest position
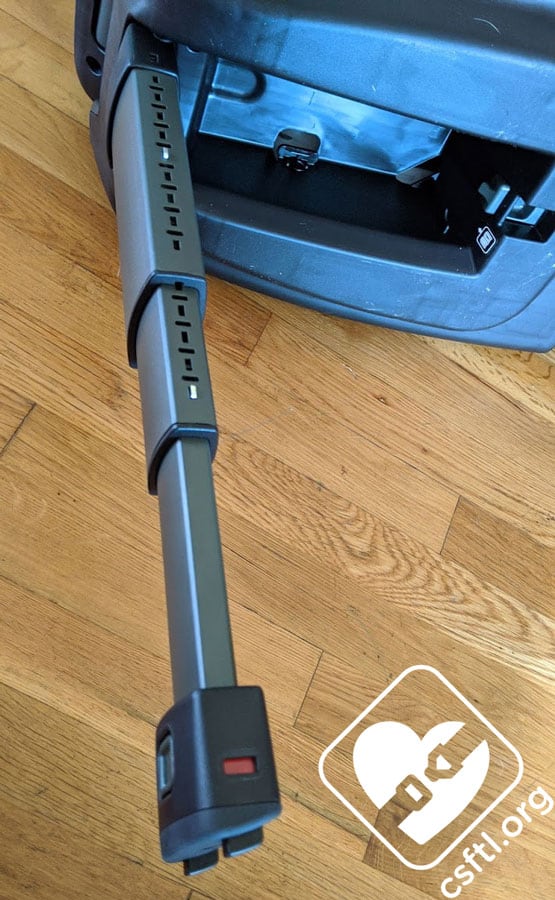
Of course, the PIPA RELX base’s stability leg extends to longer positions as well.
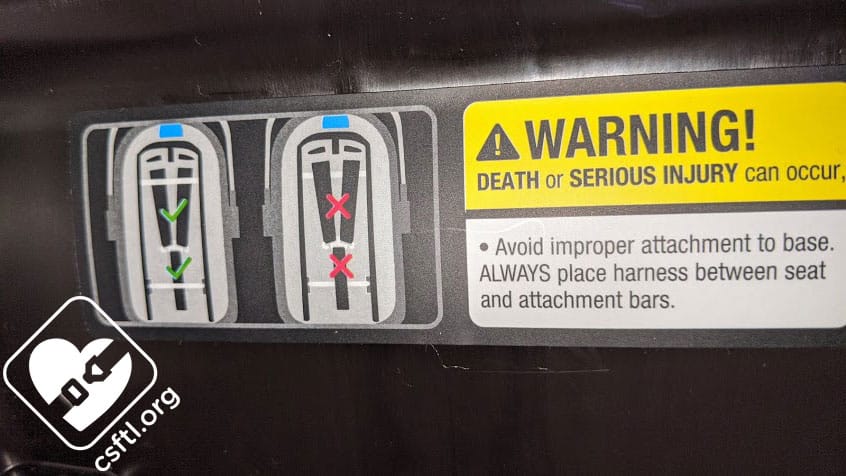
Rigid Lower Anchors
Nuna PIPA RELX base rigid lower anchors
Like the original base, the PIPA RELX base includes rigid lower anchors. Installing the previous version of the base with a vehicle seat belt often meant that the seat belt would interfere with the stubby little rigid lower anchors on the outside of the base.
The PIPA RELX base’s anchors are less likely to get in the way, though they’re still attached to the outside of the seat’s shell and pivot into position. The difference here is that the lockoff has two sections — lap belt and shoulder belt — this innovative design moves the belt path into two sections, avoiding interference with the lower anchor.
Lower Anchor Guides
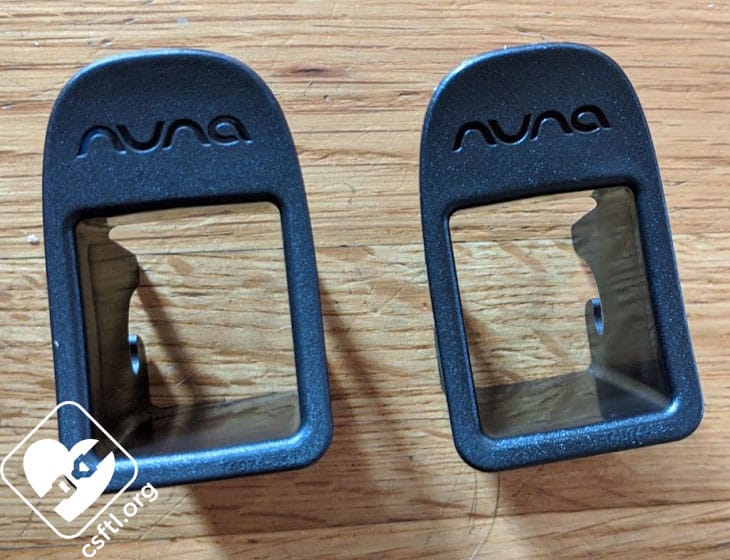
Nuna PIPA rx lower anchor guides
The PIPA rx includes a set of handy plastic guides that can help a caregiver visualize or more easily access the lower anchors in the vehicle.
BMW 3 Series
In the CPST community, the PIPA base was a bit notorious for not working in BMW 3 series vehicles. The combination of the vehicle seat’s shape and one angle only for the rigid lower anchors made it pretty much impossible to install the Pipa securely in that vehicle. Well! The first thing Pipa’s rep told us during a recent webinar is that the new base fits into the BMW 3 series! We will make every effort to confirm this, probably after the pandemic is over.
This update to the base takes everything that was problematic with the old base and resolves them in ways we hadn’t expected.
Recline Adjustment
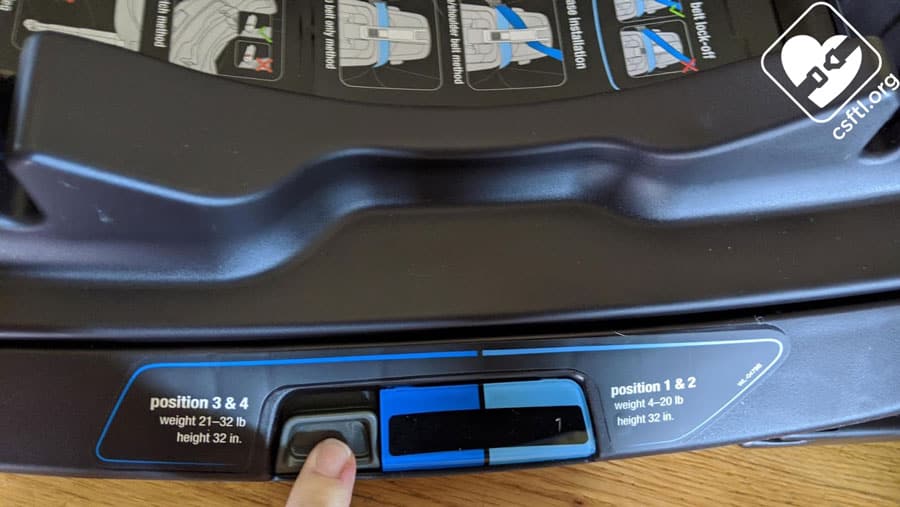
Nuna PIPA RELX base recline angle adjuster
The original base had a recline foot to help with the recline angle adjustment. It was fairly clunky and required a manual extension that wasn’t obvious to most of the parents I teach. This always surprised me a bit, considering how high-end the seat is. The recline angle adjustment on the PIPA RELX base is completely different!
The recline angle can be adjusted after the base is installed. This is something we’re seeing more often these days, marketed as a way to change the recline angle as the child grows. I’m not totally convinced that it’s a feature that needed to happen for that purpose — we don’t see a lot of caregivers who worry too terribly much about the recline angle on a rear facing only car seat after it’s been installed for their infant. But, the convenience of being able to press a button after the seat is installed to get the correct recline angle is pretty awesome. Actually pressing the button requires a bit of force but once it’s engaged, just slide the carrier forward or back to change the angle. The adjustment is secure when the carrier is locked into place.
This 4 position adjustment has two ranges: positions 1 and 2 are for children who weigh between 4-20 pounds, positions 3 and 4 are for children who weigh between 21-32 pounds. Now. It’s highly unlikely that a 32 pound child would fit in this seat. It is, however, fairly likely that a 21 pound child would still be using this seat. We are hopeful that caregivers remember to move this adjustment as the child grows.
Now, About the PIPA rx
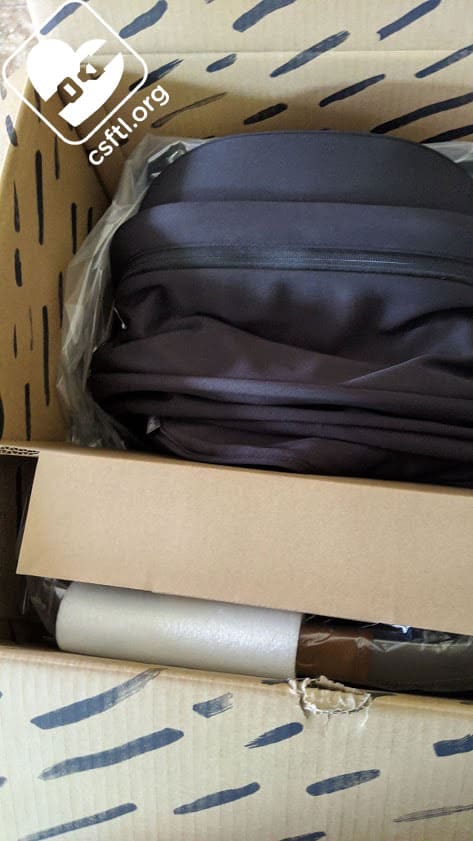
The Nuna PIPA rx box opens from the top
We’ll move on to talking about our seat, not just the awesome new PIPA RELX base. The first thing I want to point out is that the seat ships in this very sturdy, vertically-loaded box. When it’s time to open the box, you’ll do so from the top, pulling both the handle and the base out at the same time. I was kind of surprised at how heavy (and slightly awkward) it all was. This awkwardness is short-lived — I can’t think of many scenarios where a caregiver would be carrying both the base and carrier around together, holding the whole thing by the end of the base!
Child Information Card

Nuna child information label
The seat also includes a label that caregivers can use to include information about their child. The label instructs caregivers to attach it to the bottom of the seat — we’d interpret that to mean the bottom of the carrier (vs. the bottom of the base) so it’s always with the child.
Carrier Handle Rule
The carrier handle must not contact the vehicle seat or the vehicle interior
PIPA rx Infant Insert
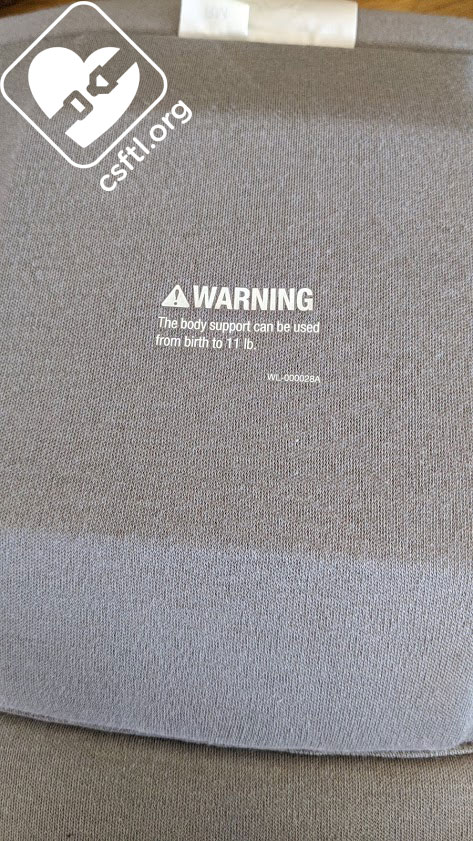
Nuna Pipa RX infant insert rules
Other versions of the PIPA include a very nice infant insert that has something kind of quirky — an extra bit of padding that ships tucked into the insert itself. This insert is mentioned in the manual — it must be removed when the child weighs 11 pounds — but it’s not labelled.
The PIPA rx has a much improved version of this insert that’s only one piece. There’s a clear label on the back of the insert that states the entire insert is to be removed at 11 pounds. We give this change a big thumbs up!
Smooth Harness
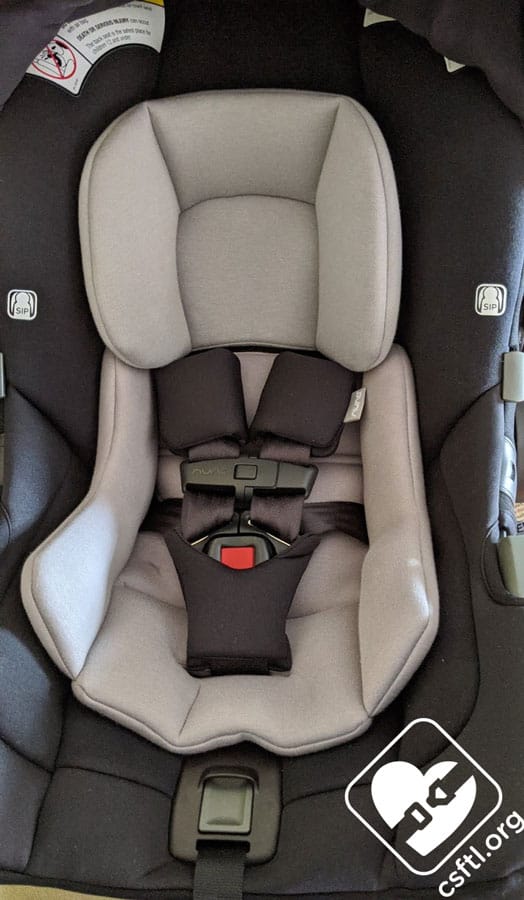
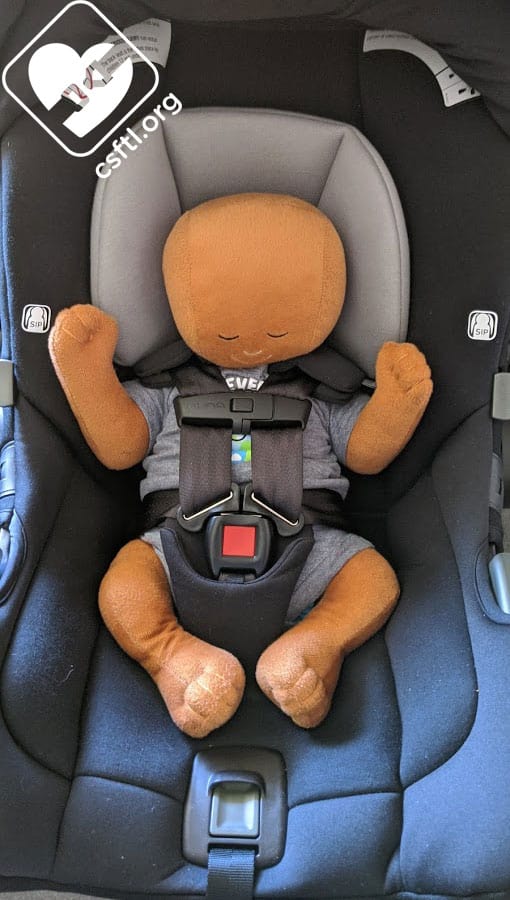
The PIPA rx’s harness adjustment is smooth like butter. It adjusts with ease and the release button is very easy to use.
Harness Adjustment
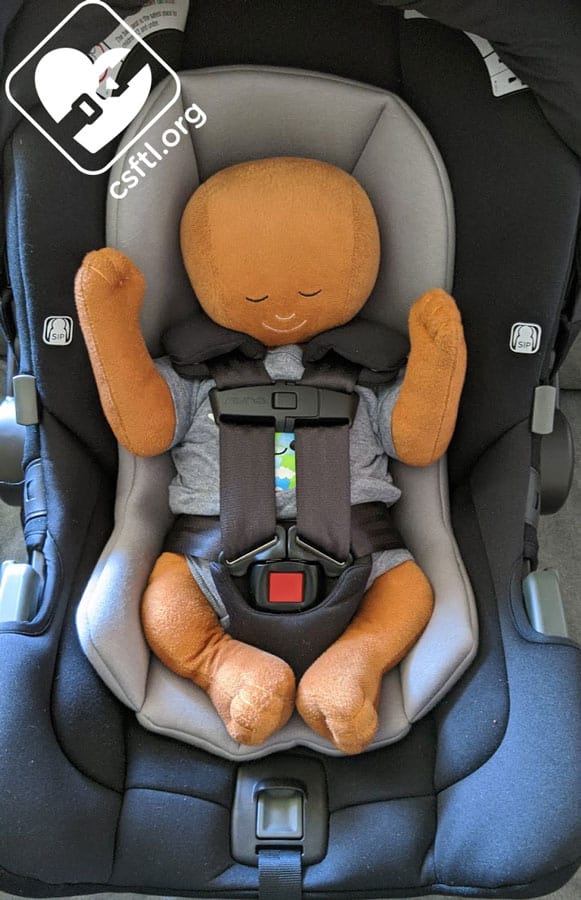
Nuna PIPA rx harness routing
There are 3 harness slots: 6, 7.5, and 9 inches from the seat pan without the infant insert in place. As the child grows, caregivers will need to remove the harness from the splitter plate, thread the harness through the next slot up, then re-attach the harness to the splitter plate. The manual has a clear explanation of how to move the harness.
Buckle Tongue and Chest Clip Holders
Nuna PIPA rx buckle tongue holders
The PIPA rx has a nice set of little pouches on the sides of the carrier to hold the buckle tongues and chest clip. These storage areas keep the harness out of the way while loading and unloading the child. As a bonus, using these holders will keep the buckle tongues from getting too hot.
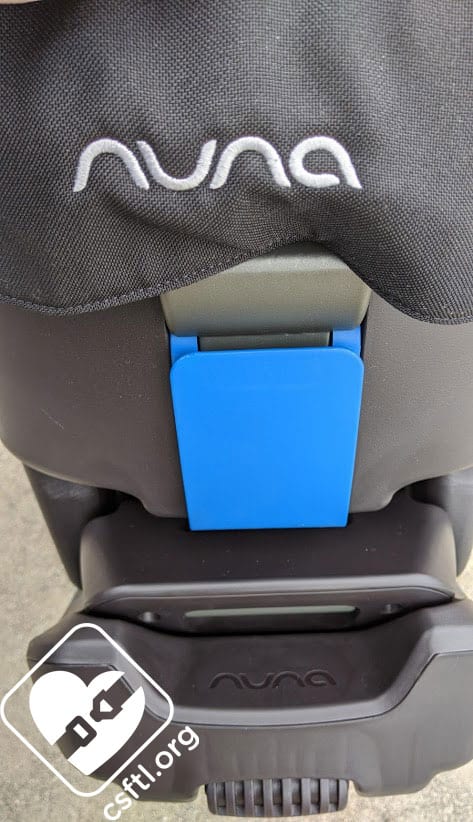
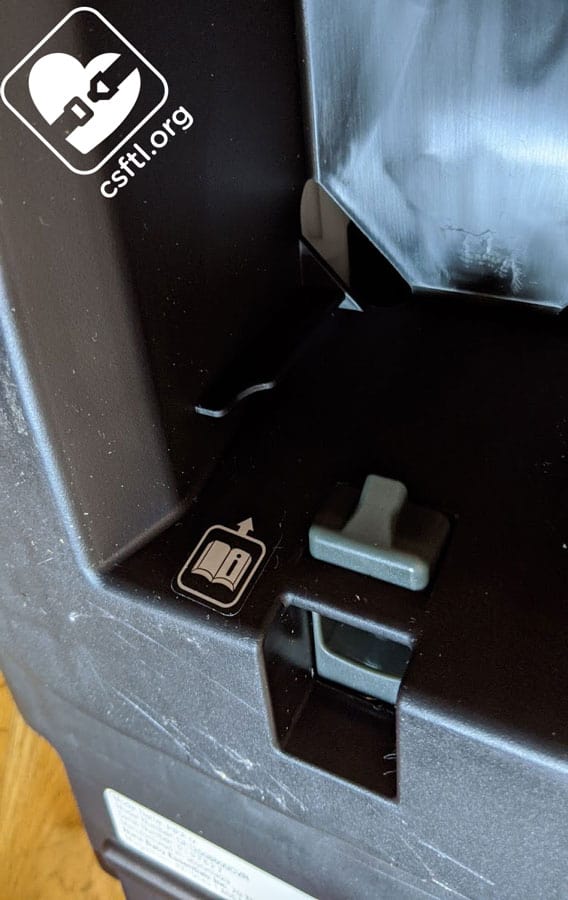
Carrier Release
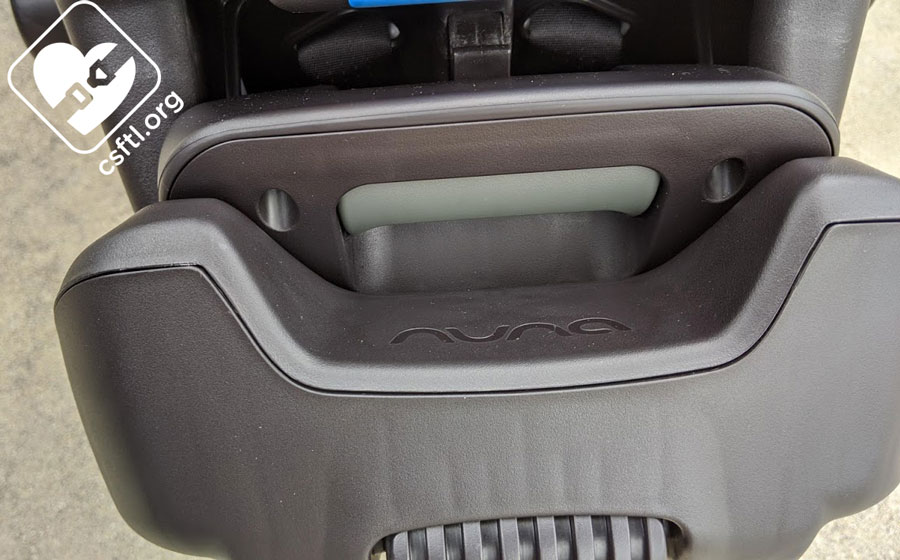
Nuna PIPA rx carrier release handle
The carrier release handle is mounted on the base itself (this is a little different than many other rear facing car seats that have this handle on the carrier). To remove the carrier from the base, squeeze this handle up, then lift the carrier out of the base.
Installation: with the Base
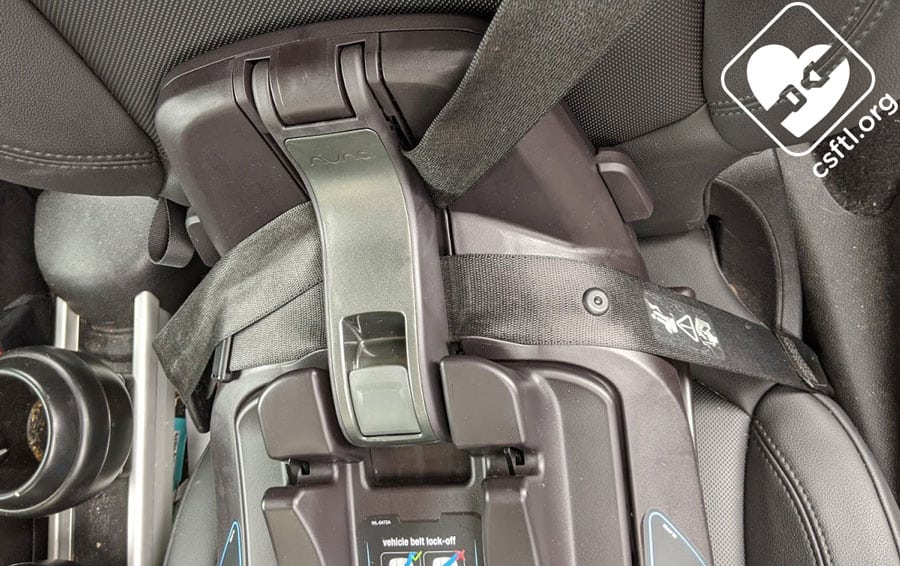
Vehicle Seat Belt
Nuna PIPA RELX base lockoff open
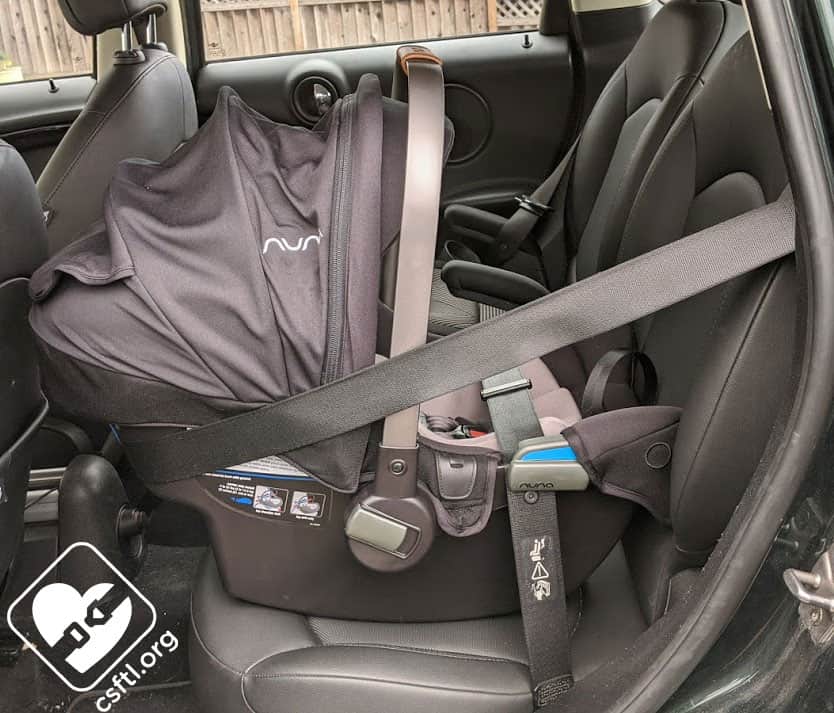
This is where the PIPA RELX base differs from the original base — the 2 section lockoff has clearly marked spaces for the lap and shoulder portions of the vehicle seat belt. I’ll start this section with a caveat — my vehicle, a 2011 Mini Countryman, has a fixed bukle and a shoulder belt that’s mounted in kind of an odd spot on the pillar behind the vehicle seat. This configuration has led to many a challenging installation so take all of my struggles with a Mini-sized grain of salt. The seat belt geometry meant that I needed to work just a little harder to install the PIPA RELX base using the vehicle seat belt than it would be in almost every other vehicle on the planet.
Nuna PIPA RELX base stability leg
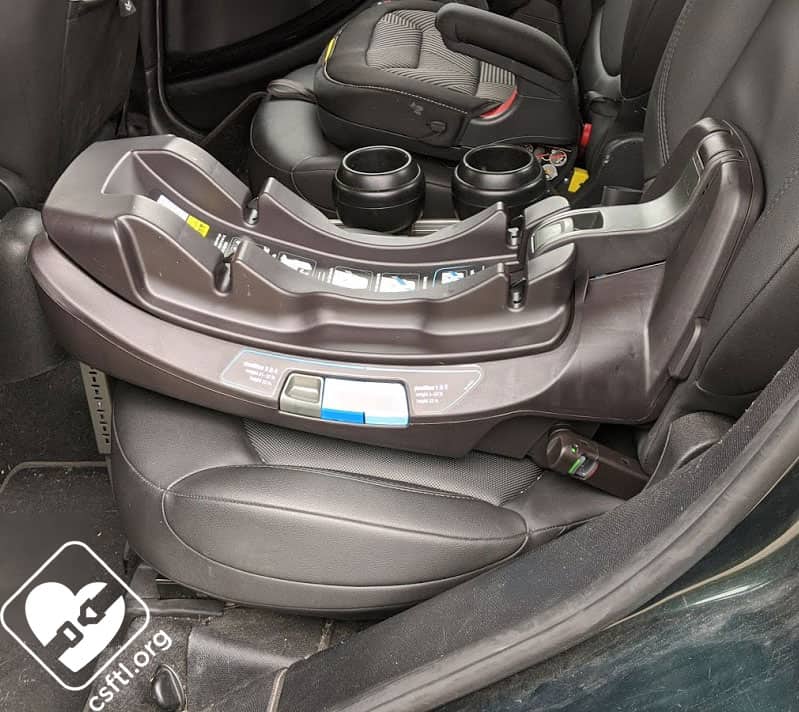
Set the base on the vehicle seat, then turn it on its side and extend the stability leg. Flip the base so the stability leg is pointed toward the vehicle’s floor and extend the leg until it reaches the floor.

Nuna PIPA RELX base release lockoff
Now, turn your attention to the base itself. Pull up on the lockoff to open it and thread the vehicle seat belt through the belt path. Make sure the lap and shoulder portions align with the proper section of the lockoff. This is where my car requires a little extra effort — I found that I had to really push the base into the vehicle seat while pulling on the vehicle seat belt to remove the slack in order to get a secure install.
Nuna PIPA RELX base lockoff closed
Once the slack is removed from the vehicle seat belt, hold the tension in place and close the lockoff. Check for movement at the belt path by giving the base a firm handshake. If the base moves less than one inch at the belt path, the installation is secure.
Without the Base
Nuna Pipa RX Euro routing
On the back of the PIPA rx’s carrier, there’s a blue piece of plastic that leads to something that I find almost magical. This belt guide allows for a secure installation without the base. It’s called Euro routing, and it makes baseless installations pretty darn simple for the most part. Here’s how it works: set the carrier on the vehicle seat with the harness facing the back of the vehicle. Pull the seat belt out, thread it through the belt guides at the child’s hips and buckle the belt. Then, gently, ever so gently, extend the seat belt and start to route it around the back of the carrier and through that blue belt guide on the back. This is where things could get a little tricky: the seat belt may be *just* long enough to reach the belt guide. In my car, I found that the retractor on my seat belt really, really wanted to lock into position during the process. Going really slowly once the seat belt was fully extended prevented that from happening. After the seat was installed via this method, it made for a very secure install.
Nuna PIPA rx installed without the base
This installation method can come in quite handy during travel. Whether it’s in an airplane or a taxi/rideshare, being able to install this lightweight carrier without the base in just a few moments can be a real lifesaver.
Pro tip: when installing any car seat in a taxi/rideshare, leave the vehicle door open. Your eager driver can’t drive away prematurely if the door is open.
The PIPA rx can also be installed without the base the more traditional way — by threading the lap portion of the vehicle seat belt through the well-marked blue belt guides. Once the seat belt is in the belt guide, buckle it, then press down on the carrier to remove the slack from the seat belt. Once the slack is removed, hold the belt in place (I usually grab the shoulder portion of the belt at the spot just above the belt guide for this) then, with your third hand, pull the shoulder belt from the retractor until it locks. Then, while still holding the belt in place, feed the seat belt back into the retractor until all of the slack is removed. Confirm that the carrier moves less than an inch side-to-side and the seat is ready for a ride!
Lower Anchors
Nuna PIPA RELX base installed with lower anchors
Installing the PIPA RELX base with the lower anchors is a pretty straightforward process, so much so that I’ve had more than one parent declare themselves a car seat expert after installing a PIPA! Here’s how this process works: set the base on the vehicle seat, then turn it on its side and extend the stability leg. Flip the base so the stability leg is pointed toward the vehicle’s floor and extend the leg until it reaches the floor. Extend the lower anchors from their storage position and point them toward the lower anchors in the vehicle. Make sure that the connectors are aligned with the vehicle’s lower anchors, then push the base toward the back of the vehicle seat. In many, many vehicles, this type of installation is about as easy at it gets. In my vehicle, getting the lower anchor connectors aligned with the lower anchors in the vehicle took some doing. Once it was all aligned, it just took one good shove toward the back of the vehicle to get the base installed securely. This process was a bit easier with the optional lower anchor guides.
The bottom of the base retracts into 4 different positions. If there’s a gap between the back of the base and the vehicle seat back, push the base toward the back of the vehicle until it clicks into place. If the base has clicked through all of the positions and there’s still a gap between the vehicle seat and the base, the manual states that the gap is acceptable.
Fit to Child
Preemie Doll
Nuna Pipa RX preemie doll
Our preemie doll weighs 4 pounds and is 17 inches long. With the infant insert in place, we found that the PIPA rx fit the doll reasonably well. The harness is just at the doll’s shoulders. Since a rear facing harness must be at or below the child’s shoulders, this was perfectly acceptable. We very consistently find that actual human babies fit in car seats just a bit differently than our dolls do (usually, just a bit better!) so we encourage any caregiver with a 4 pound preemie to check the fit for their child before heading home. Our friends at NUNA are available for fit checks, especially for these tiny passengers.
Nuna PIPA rx preemie doll
We also tested the third crotch buckle position by threading the buckle through the furthest slot from the back, then back up through the closest slot. This was a bit tricky, removing the buckle took a bit of force but it did come out. This configuration seemed to fit our preemie doll just a bit better.
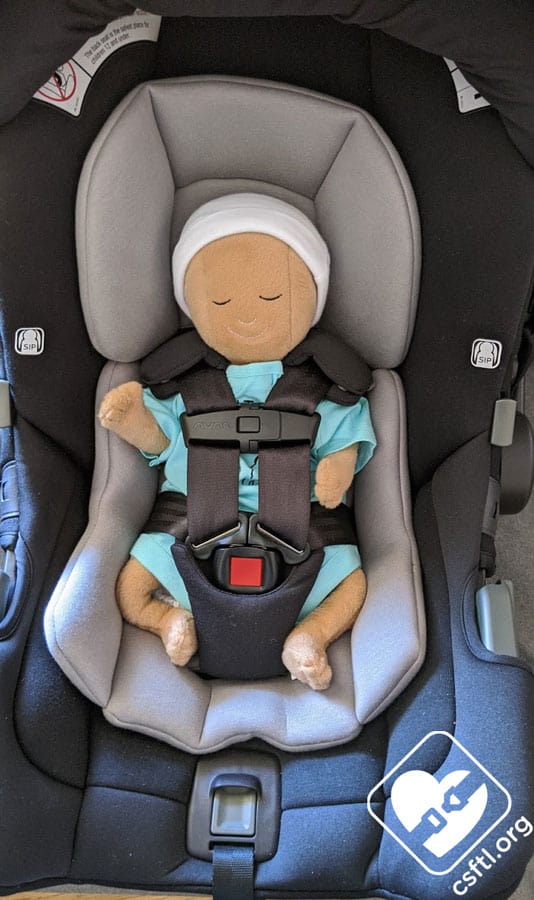
Newborn Doll
With Insert
Nuna Pipa RX newborn doll with infant insert
The infant insert is labeled for use with children who weigh up to 11 pounds. It’s not required so we’ve asked our 7 pound, 17 inch long Huggable Images doll to pose with the insert and without it.
With the insert in place, our doll fits well but almost seems a bit cramped. So we removed the insert to see how that would work.
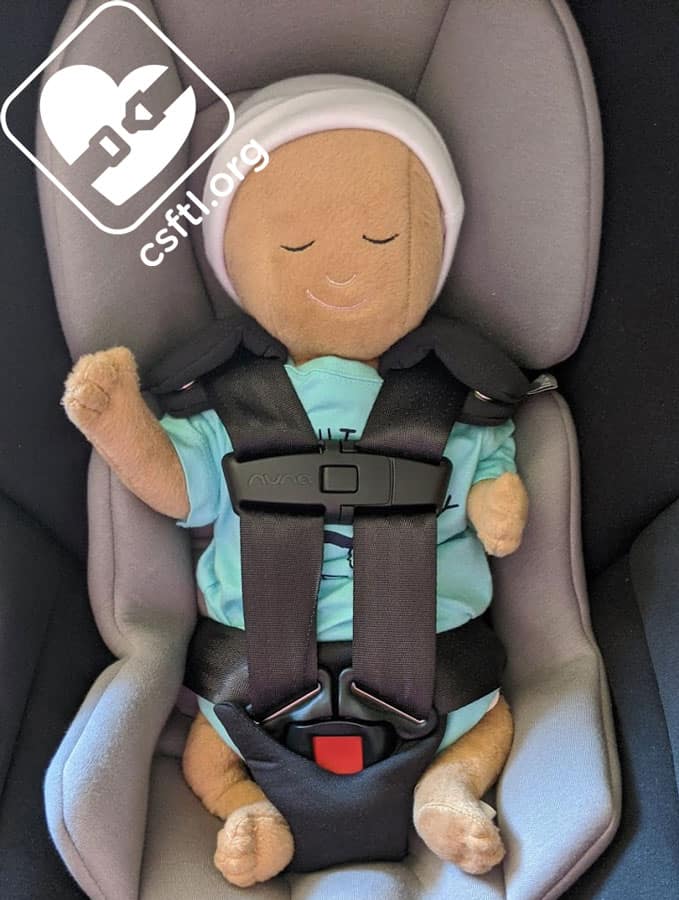
Without Insert
Nuna Pipa RX newborn doll without infant insert
…and here we are without the insert. The harness still provides an excellent fit for our doll but the doll seems a bit happier without all that padding behind them. Of course, we could totally be projecting here.
Important Information: Where to Find
Nuna PIPA RELX base manual storage
Manual storage — the manual stores on the bottom of the base. There isn’t a separate storage manual location on the carrier so if you’re traveling with the carrier only, you may want to download a copy of the manual.
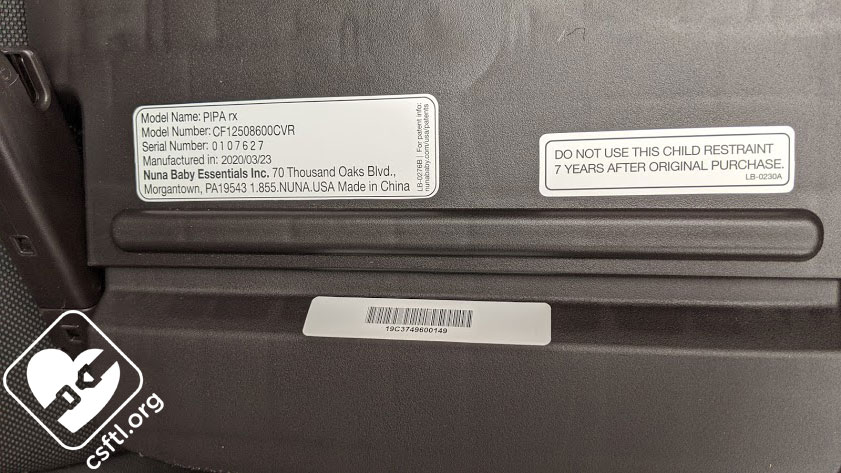
Nuna PIPA RELX base date of manufacture label
Date of Manufacture label — the PIPA rx expires 7 years after the date of purchase. This label and the date of manufacture label are on the bottom of the base.
Nuna PIPA rx FAA approval label
FAA approval — the PIPA rx can be used on airplanes, with or without the base. The base’s length would pretty much require a First Class airplane seat to fit properly but the option is available. The FAA approval label is on the bottom of the carrier. Conveniently, it has a little picture of an airplane on it so it’s easy to identify.
Overall Thoughts
From the first day we laid eyes on the PIPA, NUNA has produced a line of very nice, easy-to-install car seats. There were some minor challenges with the base but truthfully, we were willing to overlook them because so many other parts of the seat were quite nice. However, now that the PIPA RELX base has entered our lives, the difference between the bases almost seems night and day. The PIPA RELX base fixed every one of those challenges. The PIPA RELX base is compatible with all models of the PIPA so caregivers who need a second base for their seat could enjoy all of these wonderful changes and still use their existing PIPA.
The PIPA rx is a bit lighter than the PIPA, (but not as light as the PIPA Lite) and brings that clearly labeled one piece infant insert to the party. That sounds like a small thing but as CPSTs, we’ve observed a fair bit of misuse with that older two piece model so we’re pretty stoked about this change. The PIPA rx retains everything we like about the existing seat while shedding a few ounces, making it a bit easier to carry than its heavier processors. Overall, the PIPA remains a well-featured seat that takes a lot of the challenges out of installation. We’ve observed countless families installing their PIPAs with very few issues over the years and we welcome the PIPA rx into that category of car seats.
Giveaway!
Our friends at Nuna are giving away one PIPA rx to a lucky reader in the United States. Read our Terms and Conditions, then enter below for your chance to win.
a Rafflecopter giveaway