
Admittedly, one of the most daunting things about installing a car seat can be installing a car seat. The Cybex Sirona S adds a feature that we’ve seen in just a handful of other car seats over the years — it swivels on an attached base. That means (in theory) it can be installed once and turned between rear and forward facing modes as the child grows. Not only does it swivel, the Sirona S also has a load leg, a plush cover, and some other high-end features that add up to a fairly high price tag. This seat started in the European market, underwent a number of changes to the installation methods during the journey overseas, and has arrived in the United States. The North American version of the Sirona S looks quite similar to its European counterpart but it’s quite different under the hood.
Note: no matter how badly we want it to, we’re told that the S does not stand for Swivel.
Having a hard time keeping track of all the rotating seats? Check out our handy chart of rotating car seats, which has been upgraded to its own post.
CSFTL Quick Stats
- Rear facing weight range: 4 – 50 pounds
- Rear facing height range: 17 – 49 inches tall
- The child’s head must be 2.5 cm (1 inch) or more below the top of the headrest or the seat’s shell — whichever is higher
- Rear facing lower anchor weight limit: 30 pounds
- Recline requirements: United States: when used rear facing, make sure the recline ball is in the blue range, Canada: two weight-based recline ranges
- Forward facing weight range 22 – 65 pounds
- Forward facing height range: 28 – 49 inches tall and the top of the child’s ears are below the top of the headrest
- Forward facing minimum age: at least 1 year old. CSFTL advocates that children be at least 2 years old before riding forward facing.
- Forward facing lower anchor weight limit: 35 pounds
- When used forward facing, make sure the recline ball is in the red range
- FAA Approval: United States: cannot be used on aircraft, Canada: can be installed on aircraft
- Expiration: 10 years
Measurements
- Width at widest point: 21 inches at the child’s shoulder with one L.S.P. pod extended
- Lowest harness height: 7 inches with the infant insert, 8 inches without
- Highest harness height: 16.5 inches
- 3 crotch buckle positions — 5, 6, and 7 inches from the back of the seat’s shell
- Seat pan depth: 13 inches
- Front-to-back space: just over 29 inches when fully reclined Note: this measurement is taken on a level floor indoors so it’s prone to some variance when the seat is actually installed in a vehicle
- Weight: 31 pounds
Features
- The seat swivels on a base that remains installed in the vehicle
- Load leg
- Optional infant insert
- Linear side impact protection (LSP)
Comparison of Rotating Car Seats
Now that there are a number of car seats that swivel, we’ve developed a handy chart to help you keep track of some of the primary differences between them.
| Car Seats that Swivel: a Guide | ||||||||
| Car Seat Name | Rear Facing Weight Range | Rear Facing Height Range | Rear Facing lower anchor weight limit | Forward Facing Weight Range | Tether Use | Forward Facing Height Range | Forward Facing lower anchor weight limit | MSRP |
| Evenflo Revolve | 4 – 40 pounds | 17 – 40 inches tall or until the child’s head is within 1 inch of the top of the headrest or backrest, whichever is higher | 35 pounds | 22 – 65 pounds | Required in both modes, stays out of the way and can stay attached | 28 – 49 inches tall and the top of the child’s ears are below the top of the headrest | 40 pounds | $379 |
| Graco Turn2Me | 4 – 40 pounds | Child’s head must be at least 1 inch below the headrest adjustment handle | 35 pounds | 22 – 65 pounds | Required in forward facing mode, stays out of the way and can stay attached since the seat doesn’t swivel in forward facing mode | 28 – 49 inches tall and the top of the child’s ears are below the top of the headrest | 40 pounds | $449 |
| Cybex Sirona S | 5-50 pounds | 17 – 49 inches tall | 30 pounds | 22-65 pounds | Required for forward facing in Canada, optional for forward facing in the US, must be attached every time the seat swivels for forward facing | 28 – 49 inches tall and the top of the child’s ears are below the top of the headrest | 35 pounds | $500 |
| Baby Jogger City Turn | 4-50 pounds | Until the child’s head is 1 inch below the adjuster handle on the headrest when fully extended | 35 pounds | 22-65 pounds | Required in forward facing mode, stays out of the way and can stay attached since the seat doesn’t swivel in forward facing mode | less than 49 inches tall | 40 pounds | $500 |
| NUNA REVV | 5-40 pounds | 43 inches tall max | 30 pounds | 5-40 pounds | Required in both directions, stays out of the way and can stay attached | 43 inches tall | 30 pounds | $599 |
Rotating the Seat
Cybex Sirona S load leg and seat locked
This seat is quite unique because it rotates on a base. This translates to two big advantages: first, you don’t have to uninstall and reinstall the seat when changing between rear facing and forward facing, though the top tether must be attached and secured when the seat is forward facing. Secondly, rotating the seat makes accessing the harness and loading the child into the seat easier.
Top Tether Rules
Since the Sirona S swivels, we have questions about how the top tether works with this type of seat. If a caregiver rotates the seat to load the child, they would need to remove and re-attach the tether when the seat is locked into position. This situation led Cybex to provide the following guidance:
Sirona S USA – Do I need to use top tether for forward-facing installation?
The Sirona S convertible car seat includes a tether for forward-facing use and typically, CYBEX recommends the use of tether when installing a car seat in a forward-facing position. The Sirona S innovative load leg feature, however, like a tether, is designed to reduce seat movement in the event of a crash, so use of the tether is not required in forward-facing mode for this seat when using the load leg. Importantly, the Sirona S meets or exceeds applicable U.S. federal safety standards both with and without the tether, and with and without the load leg.
We struggle a bit with this advice because the top tether as a requirement is part of the CPST curriculum and we’ve been encouraging caregivers to use the top tether with every forward facing harnessed car seat since we began as an organization. We recognize that the load leg changes things for this particular seat but would still encourage caregivers to use the top tether when this seat is in forward facing mode.
The Canadian version of this seat requires the top tether when it is installed forward facing. This requirement adds an extra step to loading the child because the seat cannot swivel when the tether is attached. Caregivers would either need to undo the tether (or just loosen it in some vehicles) every time the child got into the seat or not use the swivel feature in forward facing mode. or just loosen in some vehicles) the top tether and reattach it with every swivel.
Moving Between Modes
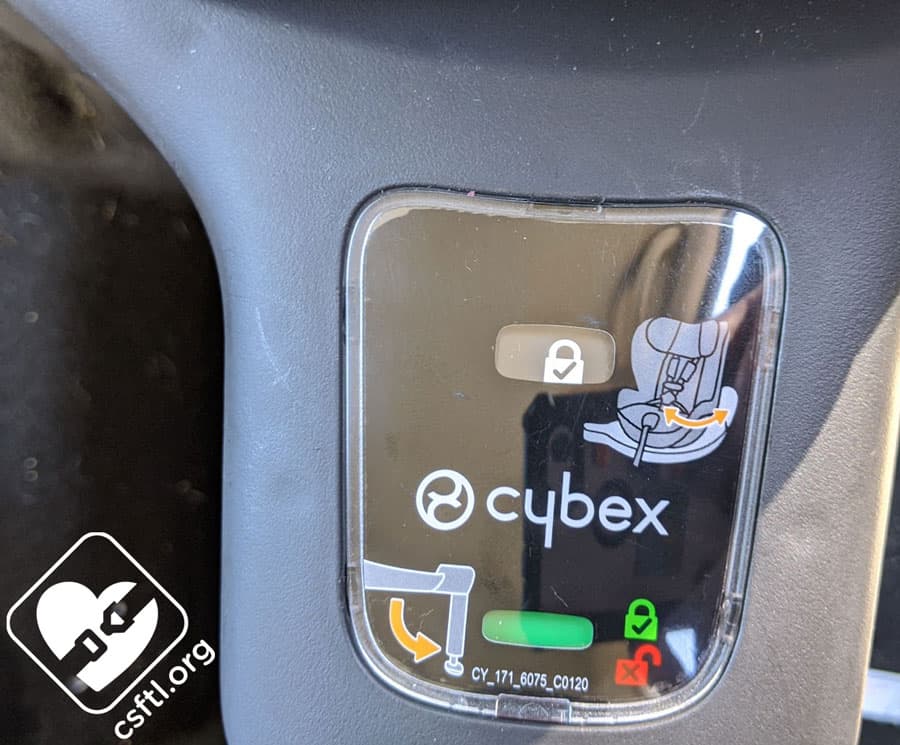
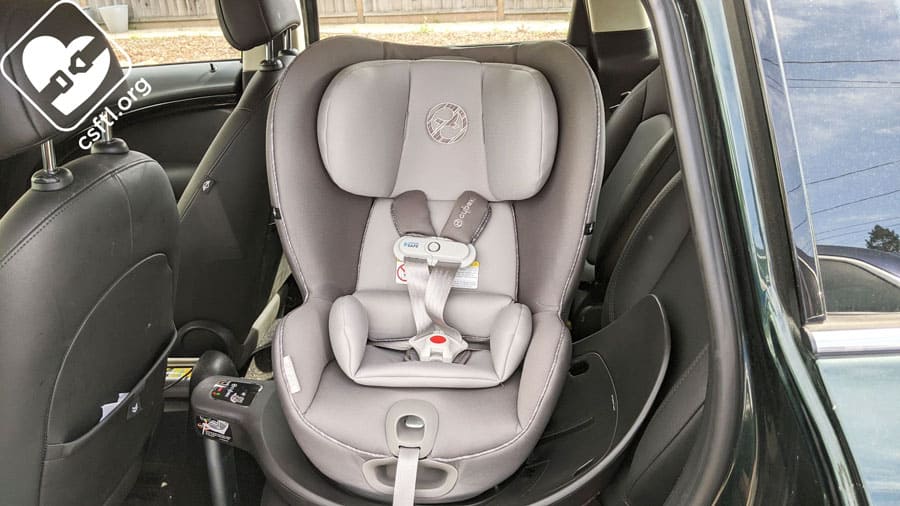
Cybex Sirona S ready to install
Here’s how to move the Sirona S between modes. Squeeze the recline handle, then move the seat to the most upright position. The rotation lock indicator will show the word UNLOCK. Though we don’t doubt that parents will attempt otherwise, this system safeguards that the Sirona S can only rotate when the seat’s shell is in the proper position and the indicator shows UNLOCK.
Cybex Sirona S turned for installation
We found that our Sirona S had trouble staying locked into the most upright and out of the way position while we were installing the seat. The seat kept slipping out of position and banging the seat onto my hand while I was fussing with the vehicle seat belt or the lower anchors. The newer models of this seat lock into the most upright position for installation, but it can be a bit finicky to get it to stay locked.
Rotating is for Loading/Unloading ONLY
No, your child can’t ride in the Sirona S when it’s in the rotated position. The seat must be either locked into rear or forward facing mode when you’re driving, regardless of whether or not a child is in the seat.
The manual is quite clear on this: The Sirona S MUST BE LOCKED for proper use when vehicle is moving.
While the seat doesn’t lock into this position, we did find that it somehow magically stayed put when we were putting our dolls into the seat. I cannot speak to the sorcery that makes this possible but I assure you that it is a real thing.
SensorSafe
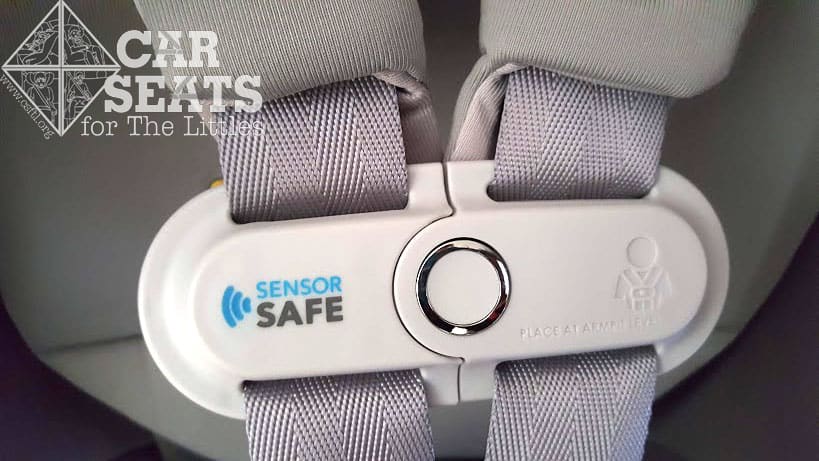
Cybex Eternis S SensorSafe 2.1 chest clip
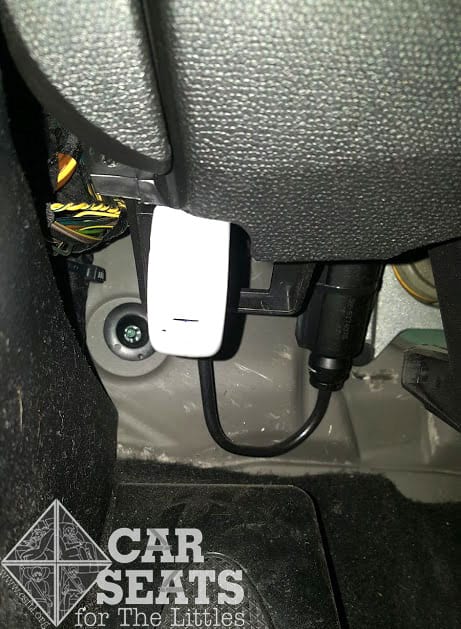
The Sirona S includes the SensorSafe system that we’ve also seen on the Cybex Eternis S so I’ll be borrowing my content from the SensorSafe section of that review. The SensorSafe system includes a special chest clip and a receiver that plugs into the vehicle’s OBD port. This system also works with an app that caregivers can download to their phones. The SensorSafe system still provides the critical alerts — child is left in the vehicle and the chest clip is undone — via the receiver in the vehicle and the chest clip on the car seat.
Whether families are using the app or just the receiver+chest clip, all of this combines to do one important thing: remind caregivers when a child is left inside the car. Since preventing hot car deaths is never far from our minds, we welcome this system.
Newer versions of this seat include Sensorsafe 3.0. This version of the system does not need to connect directly to your vehicle, instead, it connects via Bluetooth to the app on your smartphone. That still doesn’t solve our “Grandma has a flip phone” problem but it’s a big improvement!
Cybex Eternis S SensorSafe
Here’s how it works: plug the receiver into your vehicle’s OBD port. Then, download the SensorSafe app to your phone. This app does a number of things, but the most important thing it does is alert you, then alert a backup caregiver if your child is left in the vehicle.
The emergency contacts feature requires those emergency contacts to also have the app. We don’t find this ideal — relying on other people to have the same app installed could be a bit of a burden. In my case, I’d be likely to have my parents be that emergency caregiver and their flip phone (no, I am not kidding, this is still their primary phone) does not install apps. I’d prefer to see these secondary contacts notified in some other way that’s more accessible.
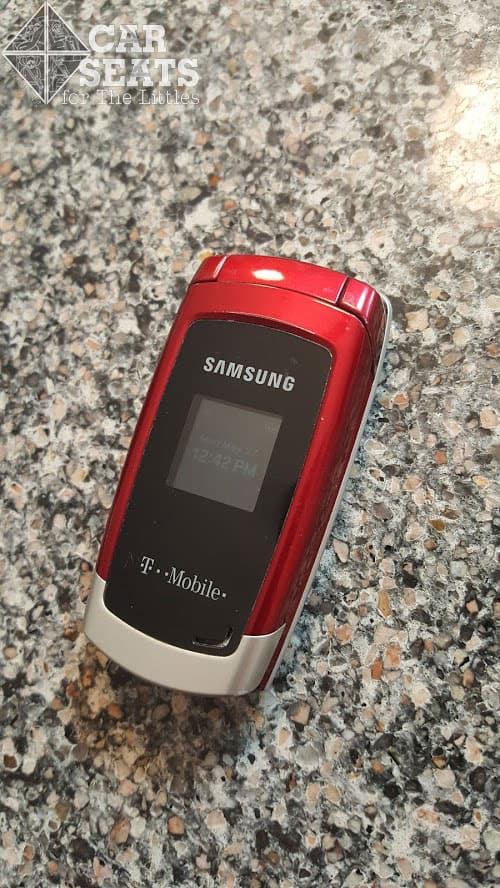
This flip phone could not use the SensorSafe app
The system checks to see if the chest clip is connected, there’s a battery embedded in the clip itself. The manual warns to not leave the chest clip connected when the child isn’t in the car because it will wear the battery out, though it does shut itself off after 12 hours.
I tested the system by installing the adapter into my OBD port, then using the app to connect both my car and the Sirona S. I was also prompted to add an additional contact to our little family.
On my first trip with SensorSafe fully engaged on my phone and via the adapter in my car, a very pleasant, yet striking set of tones played when I turned off the car. That was my initial reminder that the chest clip was connected, it’s pretty hard to ignore. I purposefully left the chest clip connected to see what would happen. Within seconds, I got a notification on my phone that a child was left in the car. That notification included the location of my car and asked if I wanted to alert my alternate caregiver or call emergency services.
While we love the advantages of the SensorSafe chest clip and its ability to sense the rising or dropping temperatures and the effect that could have on children, we found that it would beep about being cold even when the car and child were not overly cold. At 8 a.m. on a winter day in Canada, the temperature is going to be cold!
We’re pretty low-tech around here when it comes to preventing hot car deaths. Our mantra tends to be look before you lock, lock before you leave. But we also encourage caregivers to implement any system that works for them. If a caregiver chose the Sirona S or any other car seat with this feature solely because the SensorSafe system gives them extra peace of mind, we totally get that.
Plush Cover
The Sirona S’s cover is quite plush, with a smooth feel to it. The set of infant padding included with the seat is also well padded.
Lower Anchor Storage
The lower anchors store on the side of the seat’s base.
Lower Anchors
Cybex Sirona S lower anchors
The Sirona S’s lower anchor connectors are a little different than the ones we’re used to seeing, they’re more industrial looking than most other lower anchor connectors and the adjuster is fused to one of the connectors. We found that this configuration effectively shortened the amount of webbing we were able to work with during the installation and made that install just a bit more challenging.
Linear Side-Impact Protection
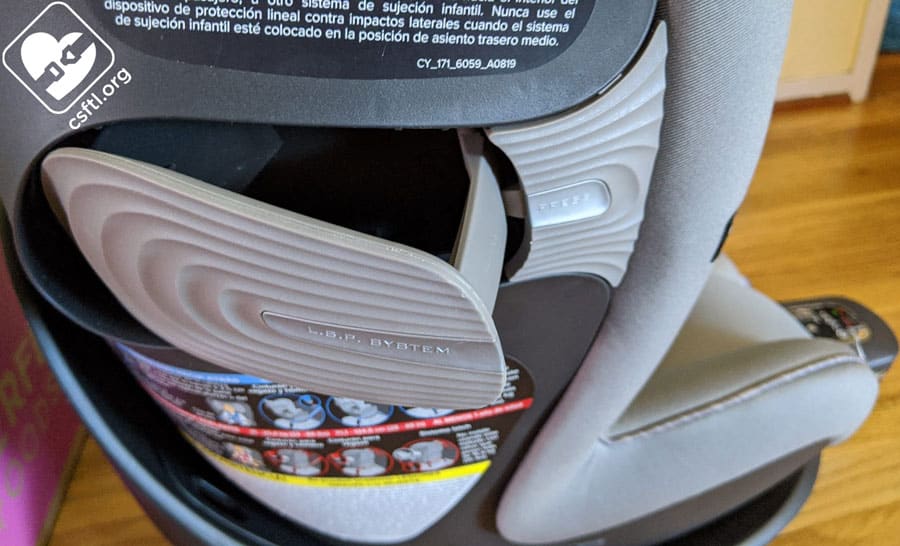
Cybex Sirona S LSP
The Linear Side Impact Protection pods extend from the side of the seat that’s closest to the vehicle door.
Cupholder
The Sirona S includes one optional cupholder. It slides into the plastic shell of the car seat.
Load Leg
Cybex Sirona S load leg
The Sirona S includes an impact-absorbing load leg that extends from the base. The load leg has a short setting that should work well in vehicles that have a protruding axel on the floor in front of the center seat.
Load Leg and Floor Mats
After one of our team members had some struggles with a floor mat and the Sirona S’s load leg, we reached out to Cybex to see what the official position on load legs and floor mats is. They let us know that as long the load leg can to extend to a locked position it is fine to use or to remove the floor mat — whichever option works best for that particular vehicle.
Anti-Rebound Base
The attached, non-removable base flares up toward the back of the vehicle seat. This flare creates a convenient hiding place for the belt path and helps to reduce rebound in the event of a crash.
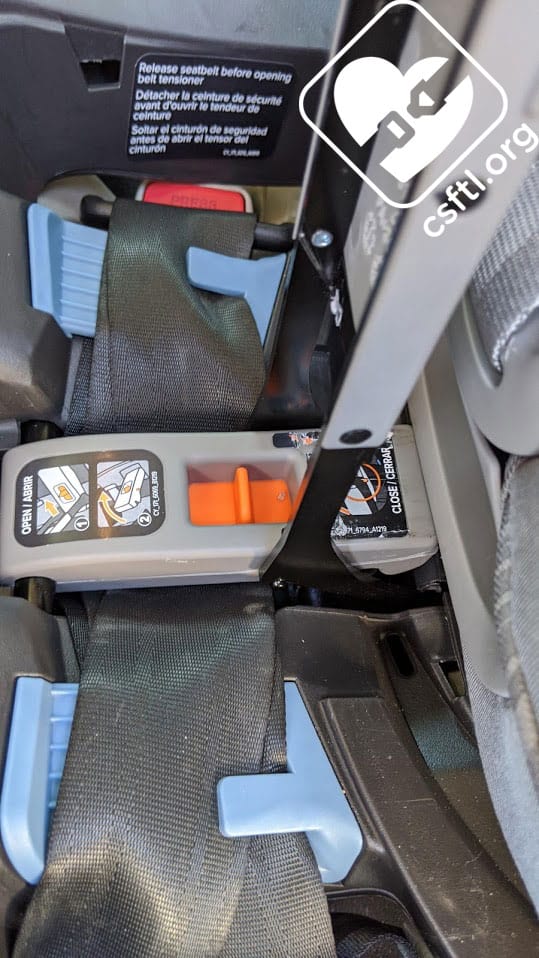
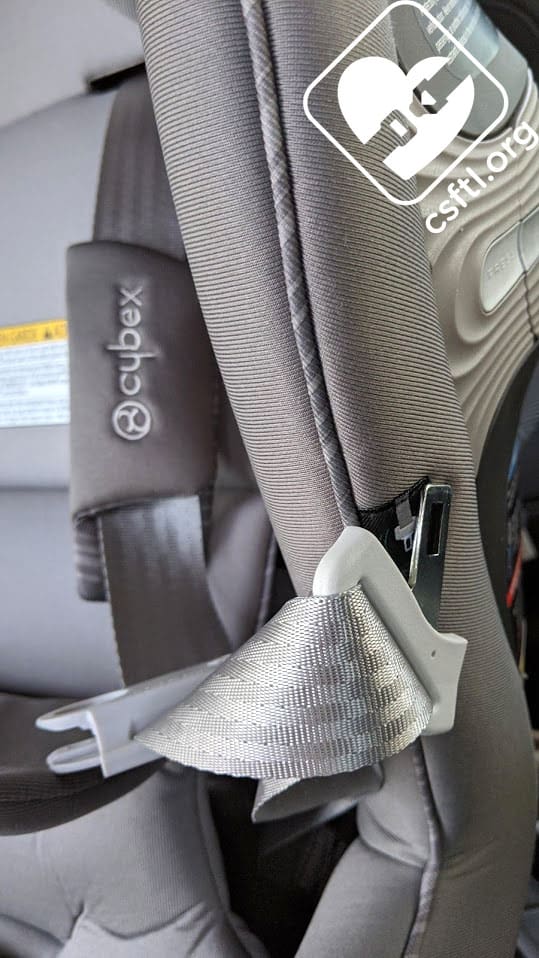
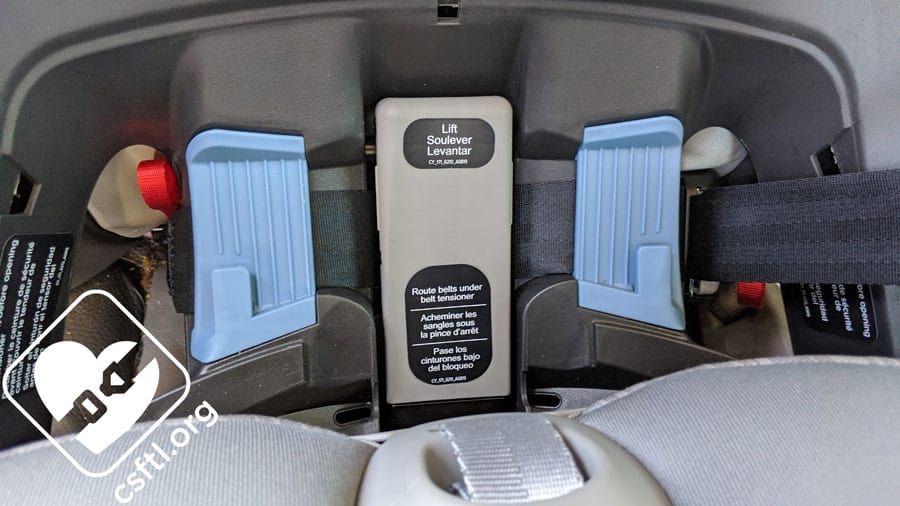
EasyLock and Belt Tensioner
Cybex Sirona S EasyLift and Belt Tensioner
Once I figured out the trick (I explain this in more detail below!), securing the lower anchors or vehicle seat belt via the Belt Tensioner and Easy Lock was super simple. But even though I’d read the manual before heading out to the car, the way that the Belt Tensioner and Easy Lock mechanisms work together wasn’t totally intuitive to me. So I’ll do my best to explain it.
Cybex Sirona S EasyLift and Belt Tensioner
These two pieces work together to secure the vehicle seat belt or lower anchor webbing. There are two little posts on the side of the Belt Tensioner. Though they be but little, these little posts are the key to a solid installation. The EasyLock must be aligned on either side of these posts, once that’s set up, closing the EasyLock secures the Belt Tensioner with one easy motion.
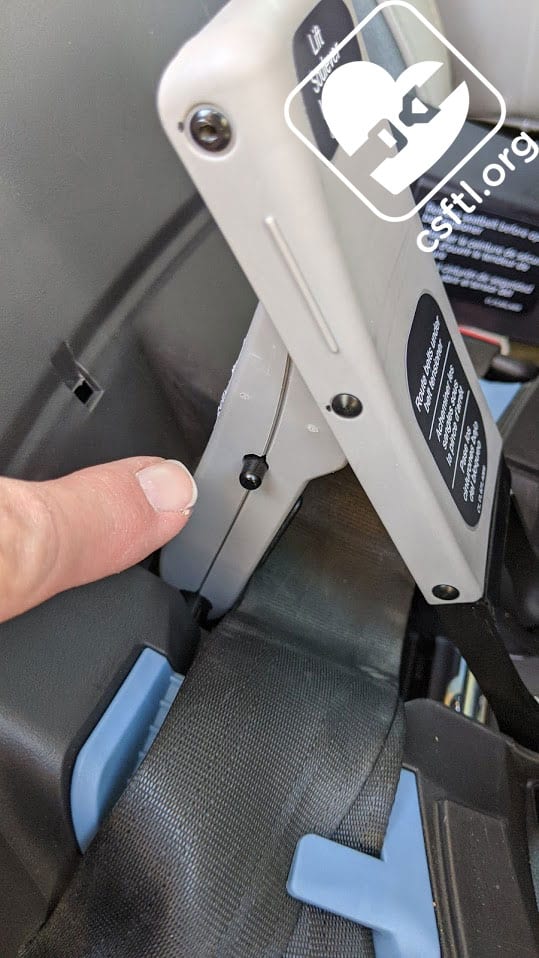
Cybex Sirona S EasyLock closure
Getting the hang of lining the EasyLock up with those little posts was a bit of a learning curve. Once I had it figured out, however, that part of the installation was pretty easy. I’ll go into this in more detail during the Installation section of this review. I’ll also repeat this tip because those little posts are so important.
Overhang Indicator

Cybex Sirona S overhang indicator
There’s a really small indicator on the edge of the seat’s base that marks the exact portion of the seat that must be on the vehicle seat if the load leg is NOT used. If this indicator is not on the vehicle seat, the Sirona S cannot be used in that seating position. This indicator is 15.5 inches from the back of the seat’s base.
Fairly Compact
I measured the Sirona S inside my living room, using the very official and scientific method of placing it on the floor, reclining the seat all the way, then measuring the distance from the wall to the top of the seat. I mention this method because the actual amount of front-to-back space that the Sirona S will take up in a car, once installed, will be slightly different. The Sirona S measured roughly 29 inches front-to-back using this living room floor measuring method. That’s pretty compact! Other, larger seats measure 30 or even 31 inches in this setup so we find it safe to assert that the Sirona S is on the compact side.
Buckle Tongue Storage
Cybex Sirona S buckle tongue storage
There are handy little magnets on the seat’s shell. The buckle tongues store right there to keep the harness out of the way while loading the child into the seat.
Crotch Buckle Rules and Adjustment

Cybex Sirona S crotch buckle adjustment
The crotch buckle should be as close to but never underneath the child’s bottom. Moving the crotch buckle involves removing the padding to access the slots. The good news here is that the buckle remains attached to the seat — it just slides between the different positions. Getting the padding off was the most challenging part of this process!
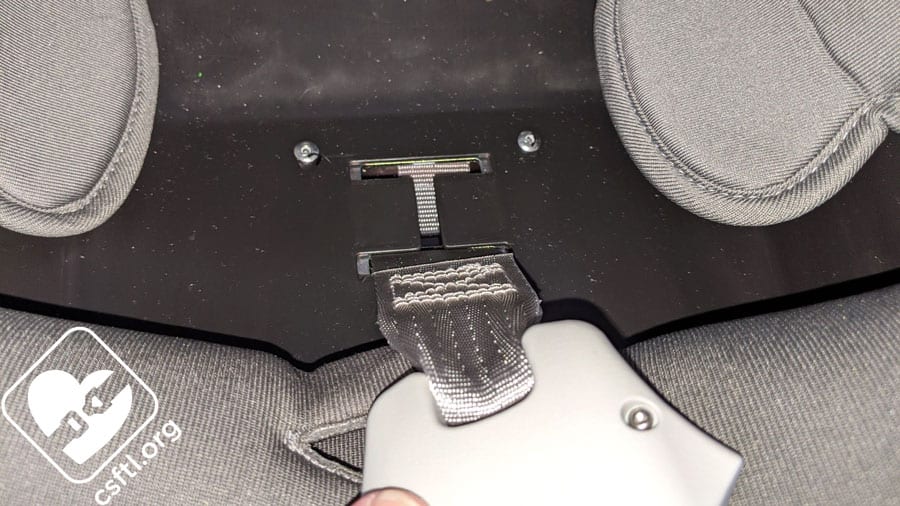
Cybex Sirona S crotch buckle adjustment
Normally, I’d find myself taking the cover off and on to access the belt path many times during the course of a review but with the Sirona S, I only had to remove the cover when I needed to move the crotch buckle.
Installation
Cybex has created some installation videos that we found really helpful when learning how to install this seat. They’re accessible via the SensorSafe mobile app and via the Sirona S website. We strongly suggest that caregivers take the time to watch these videos before starting to install their Sirona S.
Normally, this section in our convertible car seat reviews is divided into four parts: Installation Rear Facing with Lower Anchors, Installation Rear Facing with Vehicle Seat Belt, Installation Forward Facing with Lower Anchors, and Installation Forward Facing with Vehicle Seat Belt. But since the Sirona S has just one belt path, there are only two ways to install it — lower anchors or vehicle seat belt.
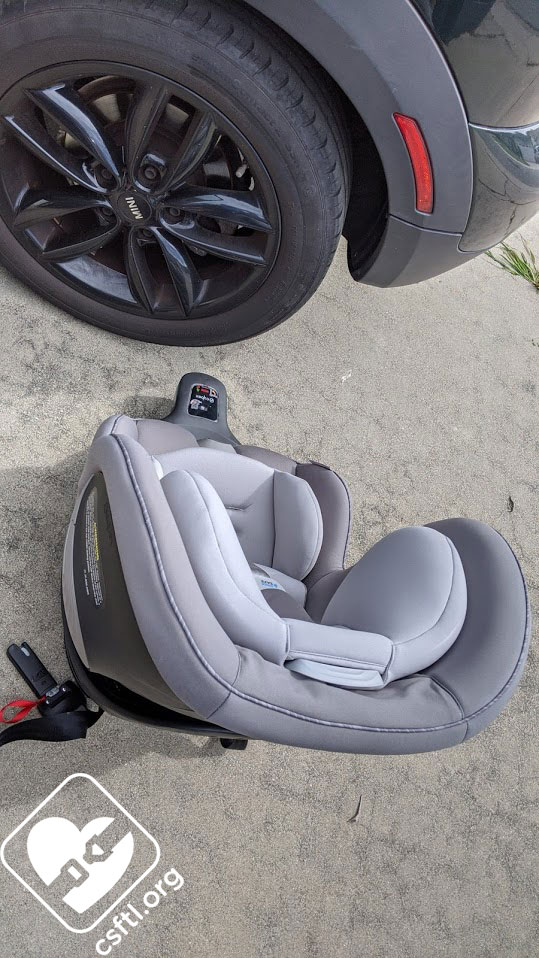
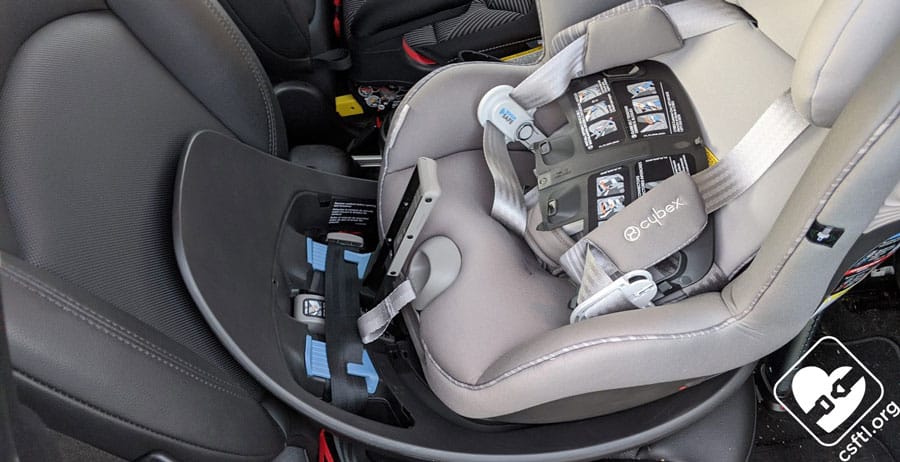
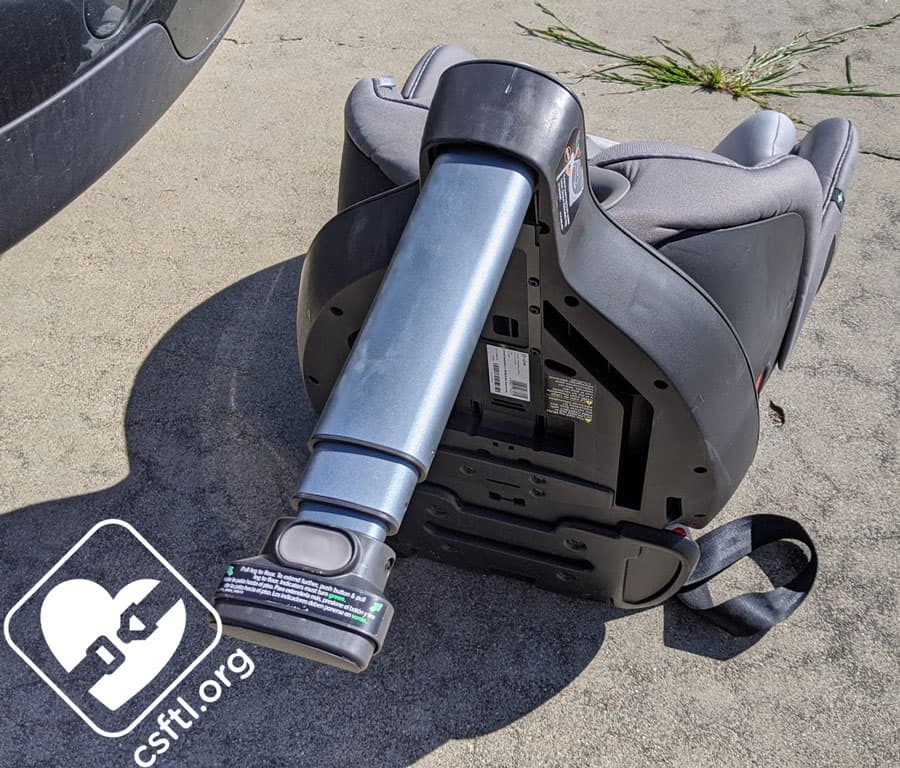
Cybex Sirona S — not small nor lightweight
First, lug the Sirona S out to your vehicle. Keep the load leg stored during this portion of the process or the seat becomes pretty much impossible to carry around without a lot of awkwardness. Yes, I tested this for you already.
Assuming your car door is already open or opens itself by magic or other means, set the Sirona S on your vehicle seat, then lay it on its side. Otherwise, set the Sirona S gently on the ground, then open your car door, set the Sirona S on your vehicle seat, then lay it on its side. Unfold the load leg and extend it down, then move the Sirona S into an upright position. There are a few criteria for using the load leg:
- The load leg MUST be locked in position and have firm contact with vehicle floor.
- There should NEVER be any space between the load leg foot and the vehicle floor.
- The load leg should NEVER push the base off the vehicle seat.
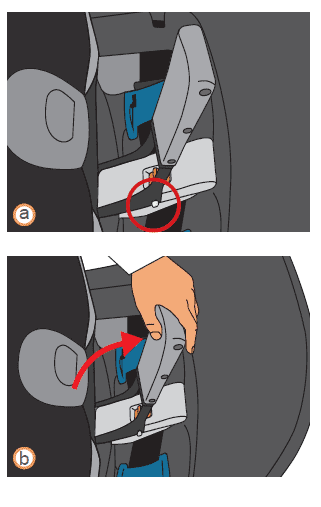
Using the load leg requires a little bit of setup. First, turn the base over. Then, grab the load leg and pull it away from the base until it’s locked in the fully open position. When the load leg is locked in place, the load leg indicator will turn green.
I had a bit of trouble getting the load leg into the correct position in my 2011 Mini Countryman without a child in the seat. Removing the floor mat helped but it seemed like the sweet spot where the indicator stayed consistently in the green was hard to come by. Once the weight of a child is in the seat, this issue should resolve itself.
Position the Sirona S on the vehicle seat with the angled portion of the base against the back of the seat. This angled portion of the base is where all the magic happens.
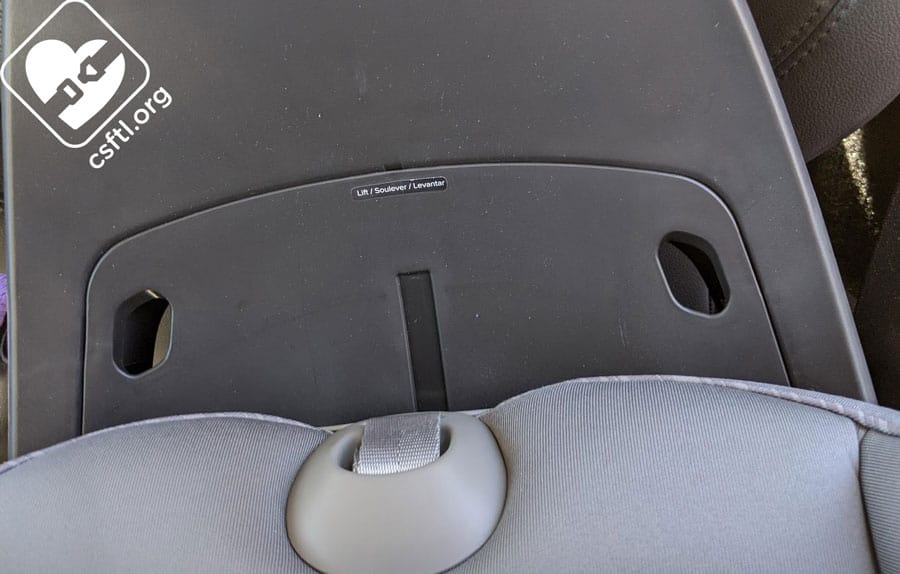
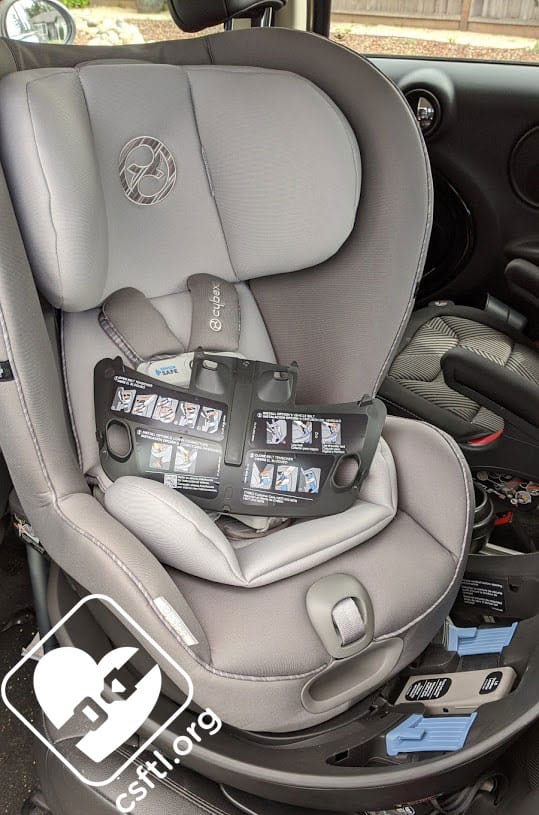
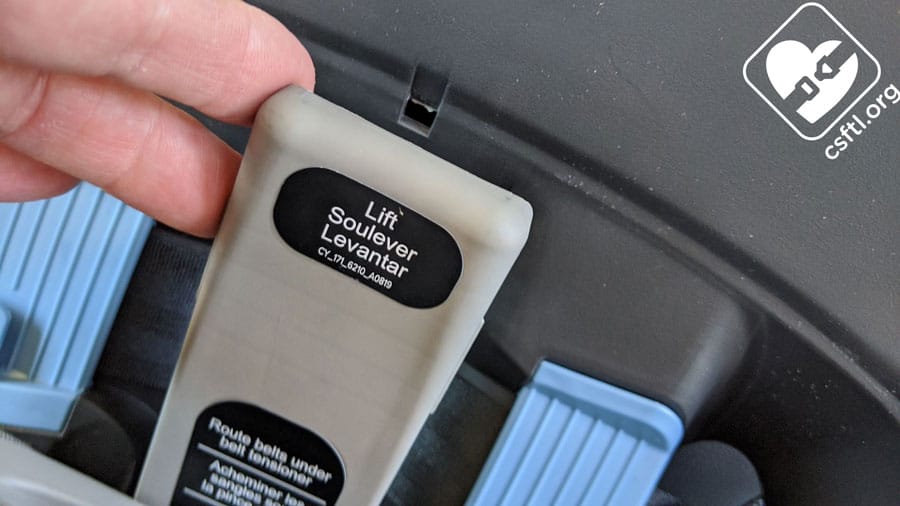
Cybex Sirona S belt path access
To access the belt path, the Belt Tensioner, and the EasyLock, there’s a trick: remove the plastic cover that’s marked by a teeny tiny label that says Lift in 3 different languages. The inside of this panel is a plethora of useful information — diagrams for lower anchors and vehicle seat belt installations.
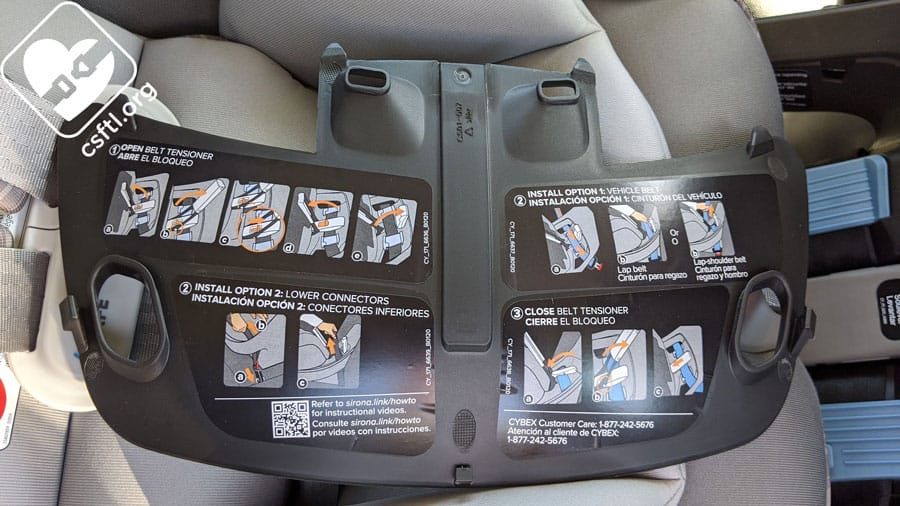
Cybex Sirona S panel removed
I have no doubt that the teeny tiny label on this cover contributes to the overall sleek look of the seat but I’d prefer to see a much larger indication that all of the installation magic happens behind this panel.
Note about the Narrow Belt Path
Cybex Sirona S belt path
The Sirona’s belt path is stunningly narrow. For us, this narrowness translated into some real challenges with installation because there wasn’t enough space to work with. This is a fine line — a super wide belt path would likely make installation a little easier since there would be more places to use for leverage during installation. But a wider belt path = a wider seat, which can be a drawback. The Sirona is fairly narrow, especially at the base. Finding the exact amount of tension in the lower anchor webbing or vehicle seat belt for the EasyLock and Belt Tensioner to get the seat installed correctly took a lot of trial and error.
The SensorSafe app and Sirona S website include handy installation videos that we’d suggest all caregivers who use this seat take some time to watch before attempting to install it. We find this suggestion so important that we’ll make it a couple of times during this review.
The app also includes a digital version of the manual — we love that! Unfortunately, the included manual is only the version sold in the United States. We would suggest that Canadian families who own this seat keep their paper copy handy or download a digital copy of the manual from Evenflo’s website.
Lower Anchors
Back to the installation process…remove the lower anchors from their storage spots on the base. Then remove the on the panel to expose the belt path, plus the handy reference guide on the back of the panel. Extend the lower anchor webbing so there’s some slack to work with. Attach the lower anchor connectors to the lower anchors in the vehicle, then pull straight up on the webbing to remove the slack. Since the EasyLock and Belt Tensioner will help to complete the installation by securing the webbing, leave a little bit of slack in the middle of the belt path so those mechanisms can do their jobs. Lay the tail end of the webbing in the belt path, it will close underneath the Belt Tensioner.
The rear facing lower anchor weight limit is 30 pounds, the forward facing weight limit is 35 pounds.
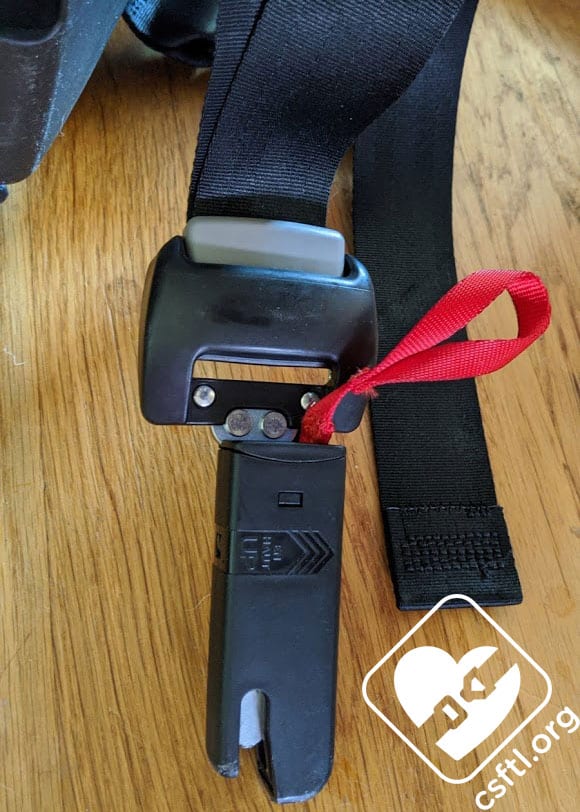
Cybex Sirona S EasyLift and Belt Tensioner
THIS IS THE TRICKIEST PART! Line the EasyLock up with the outside of the Belt Tensioner so the notch/bend in the arm goes beyond those little pegs on the belt tensioner in order for the two pieces to engage correctly. Once the pieces are aligned, press down on the EasyLock and, as if by magic, the Belt Tensioner will lock the lower anchor webbing in place.
Because the Sirona’s belt path is so narrow, it took a few tries to find the right amount of slack (spoiler: pretty much none) for a solid install. We’d suggest leaving some extra time for your installation to accommodate for this challenge.
Vehicle Seat Belt

Cybex Sirona S vehicle seat belt in belt path
Installing the Sirona S with the vehicle seat belt is quite similar to installing it with lower anchors. Once the Sirona S is on the vehicle seat with the flared piece of the base against the back of the vehicle seat, remove the on the panel to expose the belt path, plus the handy reference guide on the back of the panel. Pull out the vehicle seat belt and thread it through the belt path. Buckle the seat belt, then pull the lap portion of the belt straight across the belt path to remove the slack. Since the EasyLock and Belt Tensioner will help to complete the installation by securing the webbing, leave a little bit of slack in the middle of the belt path so those mechanisms can do their jobs.
In my 2011 Mini Countryman, I had a pretty tough time getting the belt to lie flat in the belt path. The seat belts in my car are mounted pretty high up on the vehicle and the buckle stalks are rigid — this setup has made for more than one challenging installation with the seat belt so take this with a grain of salt. I didn’t have that trouble when I installed the Sirona S in our 2012 Mazda CX-9.
Cybex Sirona S EasyLift and Belt Tensioner
Moving on and repeating myself on purpose here….THIS IS THE TRICKIEST PART! Line the EasyLock up with the outside of the Belt Tensioner so the notch/bend in the arm goes beyond those little pegs on the belt tensioner in order for the two pieces to engage correctly. Once the pieces are aligned, press down on the EasyLock and, as if by magic, the Belt Tensioner will lock the vehicle seat belt in place.
Because the Sirona’s belt path is so narrow, it took a few tries to find the right amount of slack for a solid install. I found that it involved removing almost all of the slack from the seat belt was about the right amount. This is a little different than some other car seats that have lockoffs, where they need a bit of slack in the belt or webbing to close properly. We’d suggest leaving some extra time for your installation to determine the right amount of slack to leave before closing the EasyLock.
Note: the vehicle seat belt must be locked when the Sirona S is installed with the vehicle seat belt. The manual explains this in kind of a roundabout way: “In most vehicles, you can switch shoulder belt retractor into locking mode by pulling out shoulder belt all the way and letting it rewind into the retractor. Pull on shoulder belt to make sure it is locking.” .” This final step is kind of a big deal — we’d love to see this instruction have its own “step” in the manual, because it is very easy to miss.
Loading the Child
Cybex Sirona S ready to load
This is where the Sirona S shines — the swivel means that it’s fairly simple to bring the seat toward the door opening and load the child. It was pretty awesome to have this level of access. When my kids were rear facers, I often had quite a struggle getting them into their car seats if they weren’t feeling compliant.
Loading the child into the Sirona S can be an adventure
Having the ability to turn the seat toward the open door and load them in directly could have made that a lot easier, though it also could have resulted in me getting kicked directly in the face. Know your child’s mood before deciding whether to load them into the Sirona S via the traditional method or by rotating the seat!
The Canadian version of this sweat has two weight-based recline ranges. We found this a bit annoying, because every time the seat swivels, it changes the recline angle. The seat must be adjusted to the appropriate recline angle for their weight every time the child is loaded into the seat. If your driveway is on a large hill (or you frequent uneven parking lots) it’s nearly impossible to check the recline level.
I worked around this by memorizing the number of recline positions (audible clicks) from fully reclined that would put my children into the appropriate recline range while I was parked on flat ground. I wouldn’t say this is the ideal solution to a sloped driveway because the different positions are quite close together and I could easily recline the seat too much, or not enough.
Fit to Child
The pandemic continues so we’re still here with our set of Huggable Images dolls. We hope to update this review with actual human models once the world is a slightly safer place to be.
Rear Facing
Preemie Doll
Cybex Sirona S preemie fit
Our preemie doll weighs 4 pounds and is 17 inches long. The harness on the Sirona S is right at our doll’s shoulders. As with any newborn or preemie fit, we definitely recommend that caregivers check the fit on their child before heading out for a drive.
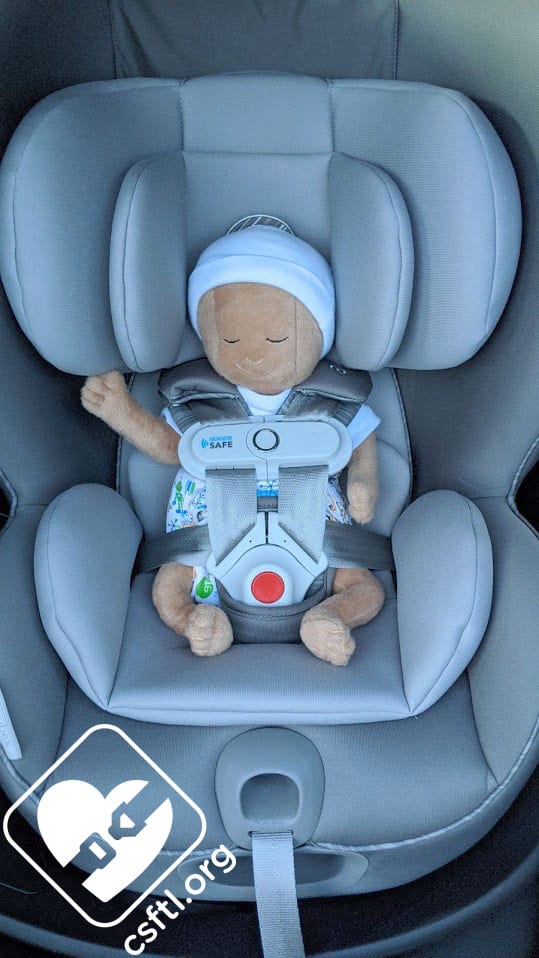
Newborn Doll
Cybex Sirona S newborn fit
The newborn doll weighs 7 pounds and is 17 inches long. On the lowest setting, the harness is right at our doll’s shoulders. The robust set of infant padding makes for a plush seating area for both our preemie and our newborn dolls.
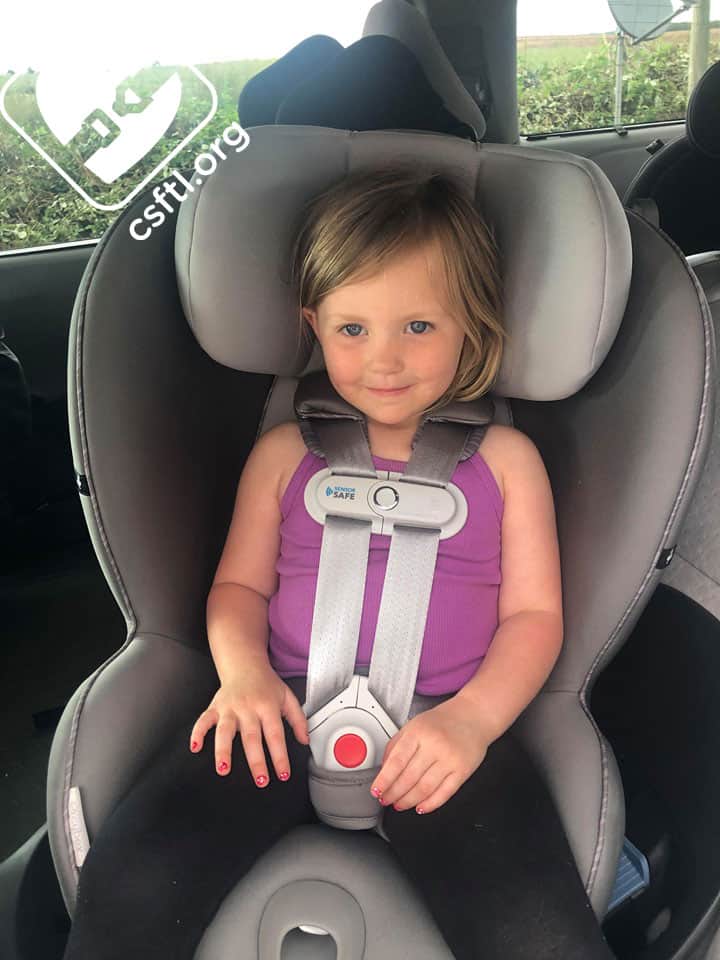
15 Month Old Child
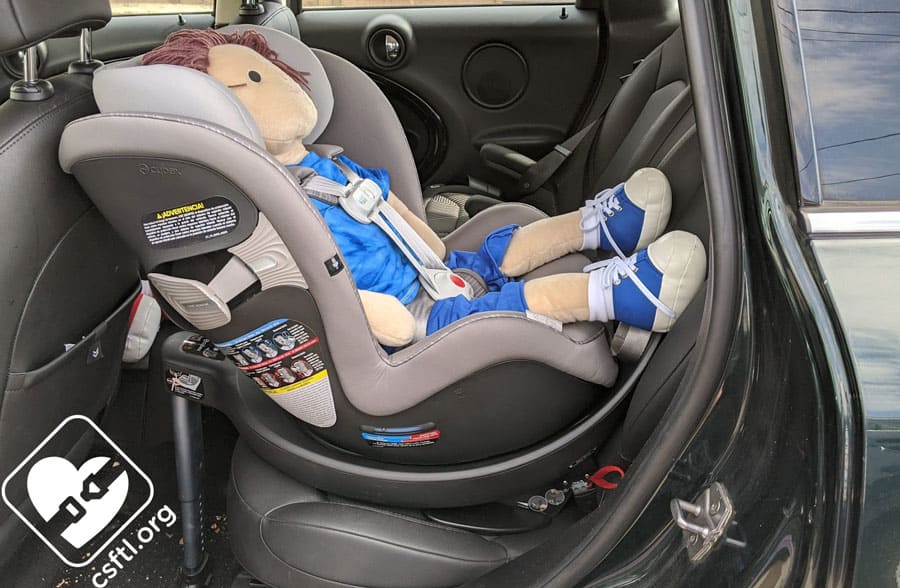
Cybex Sirona S 15 month old rear facing
Our 15 month old human model is 32 inches tall, and weighs 25 pounds. She’s got plenty of room to grow in this seat and the harness fits her quite well.
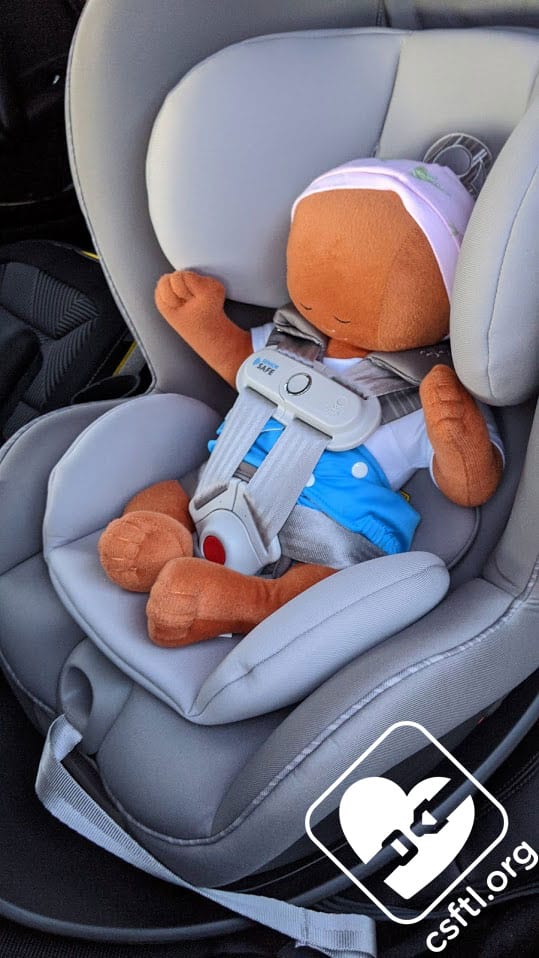
16 Month Old Doll

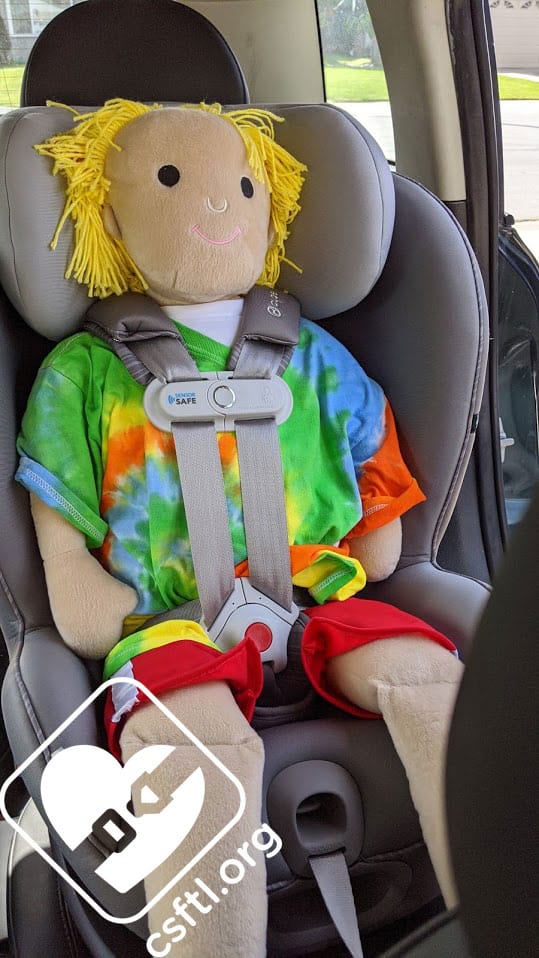
Cybex Sirona S 16 months old
Our 16 month old doll is 31 inches tall. The doll has plenty of harness height left in this seat and there’s plenty of legroom, too! The Sirona S fits the doll well and since the seat has a plush cover and lots of padding, we’d expect that human models will find it quite comfortable.
Cybex Sirona S 16 months old
Once again, we’ll attempt to compensate for the lack of human models by sharing additional pictures of the fit on our doll. Our doll didn’t complain about the seat’s overall comfort or about the extra photo shoot.
3 Year Old Doll

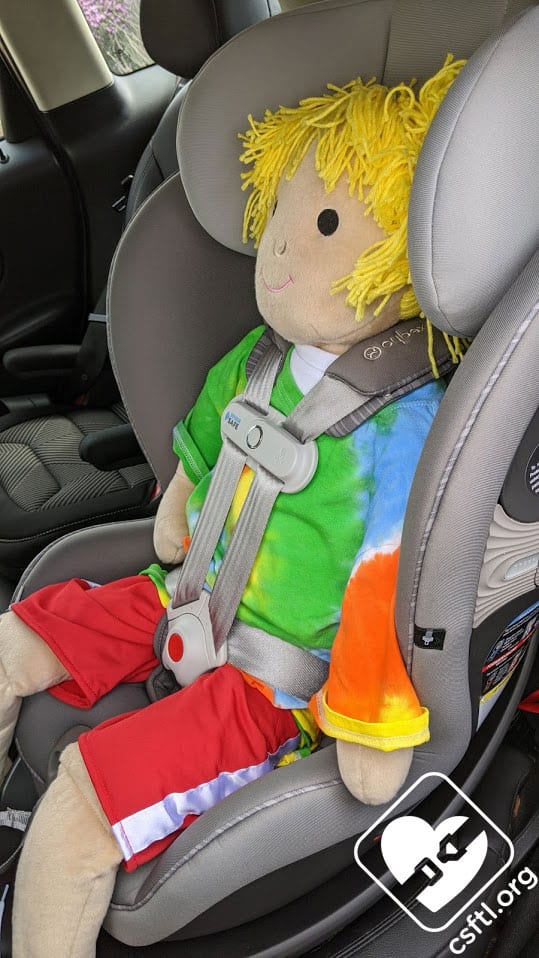
Cybex Sirona S 3 years old rear facing
The 3 year old doll is 38 inches tall. There’s a fair bit of harness height left and the doll has plenty of legroom in rear facing mode. The Sirona S’s base offers a bit of extra legroom in rear facing mode, something that we know is important to a lot of caregivers.
Converting to Forward Facing
Moving the Sirona S between modes is every bit the piece of cake that you’d hope it would be. First, remove the top tether from its storage location on the back of the seat. Squeeze the handle at the bottom of the seat, then turn the seat into the upright position. Rotate the seat until the harness is facing the front of the vehicle until the lock indicator shows locked. Attach and secure the top tether. The Sirona S is now ready for a forward facing passenger.
Harness Height
The Sirona S’s maximum harness height is 16.5 inches. That’s a bit on the low side for forward facing mode. We mention this because this low height could mean that a taller child would outgrow the Sirona S by height before they’re ready to move to a booster seat. We suspect that families who purchase this seat aren’t necessarily using this maximum height as the deciding factor in the buying process but we wanted to mention it in case it is one factor in their decision-making.
Fit to Child
3 Year Old Doll
Cybex Sirona S 3 years old
Our 3 year old doll remains 38 inches tall. The doll had the same excellent harness fit that we saw in rear facing mode. We loaded the doll into the seat by rotating the seat toward the vehicle door, then putting the child into the seat and securing the harness. I can totally see where having a seat that rotates makes putting the child into the car seat a lot easier. This could be especially useful for older toddlers who are rear facing, though the top tether would need to be removed when turning the seat, then re-attached once the child is secured in the seat.
Cybex Sirona S 3 years old
I can see where caregivers of children who ride forward facing in this seat would just leave it in the locked position and load/unload their child by accessing the seat from the front.
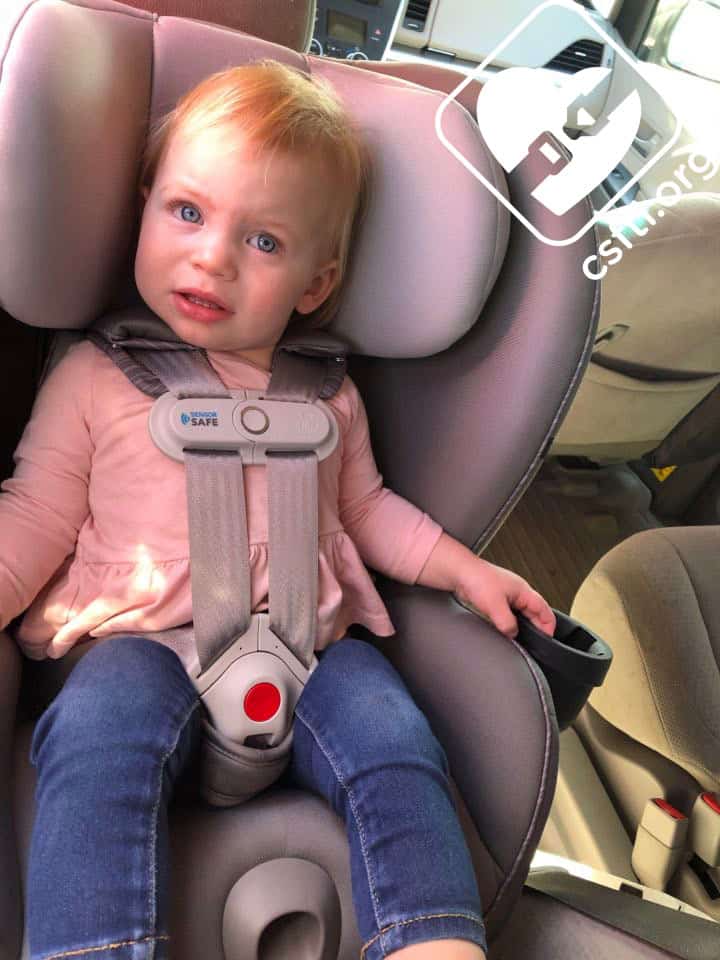
3.5 Year Old Child
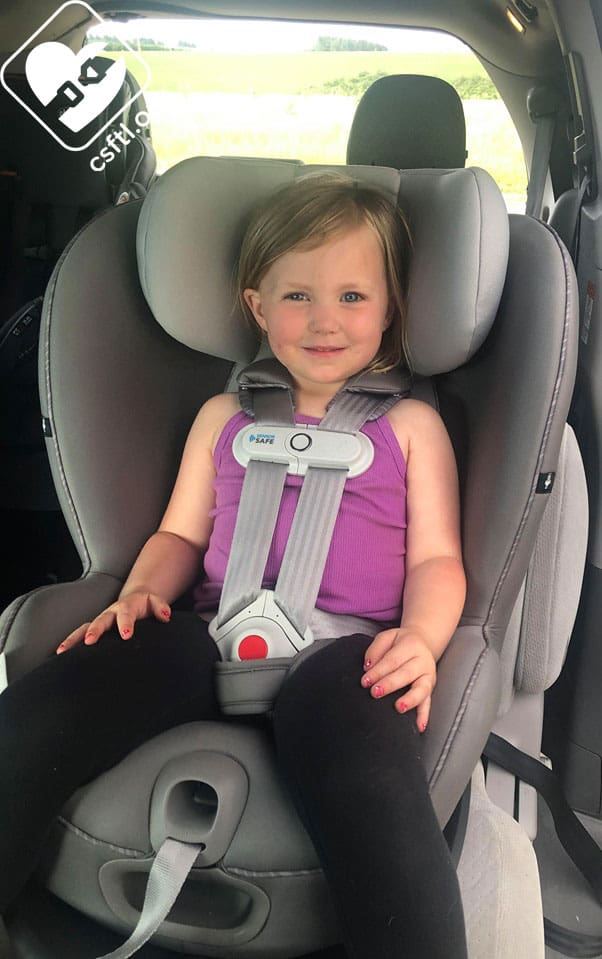
Cybex Sirona S 3 years old forward facing
Thanks to another CSFTL team member, the Sirona is now home to a family with children who fit in the seat! That includes this 3.5 year old cutie. She weighs 35 pounds and is 36 inches tall. There are three more clicks on the harness, so she has quite a bit more time to use this seat.
She thought it was “cumby,” which we later learned means comfy!
Important Information: Where to Find
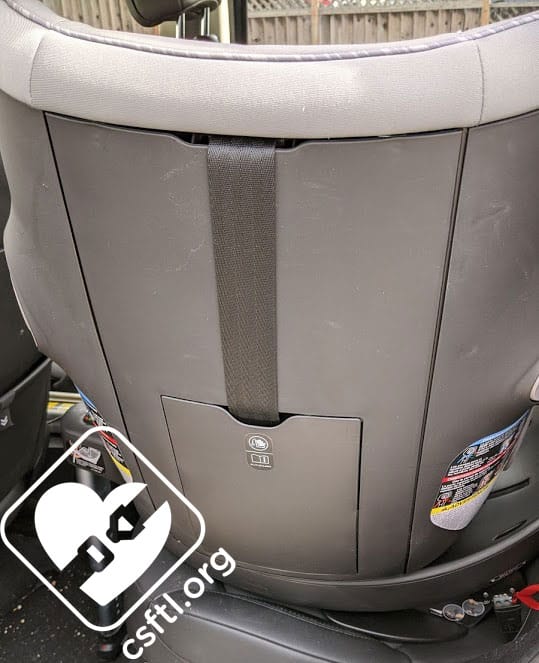
Cybex Sirona S manual and top tether storage
Manual and top tether storage — on the back of the seat’s shell
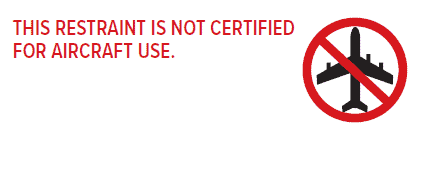
Cybex Sirona S cannot be used on airplanes
FAA approval — the Sirona S is not approved for use on aircraft so there isn’t an FAA approval label. The manual includes the warning shown here.
The Canadian version is approved for use on aircraft. The manual includes instructions for this type of installation — it is very similar to installing in the vehicle. The load leg must remain stored when the seat is installed on an aircraft and we would suggest shifting the seat to one side to keep the airplane’s seat belt buckle out of the belth path.
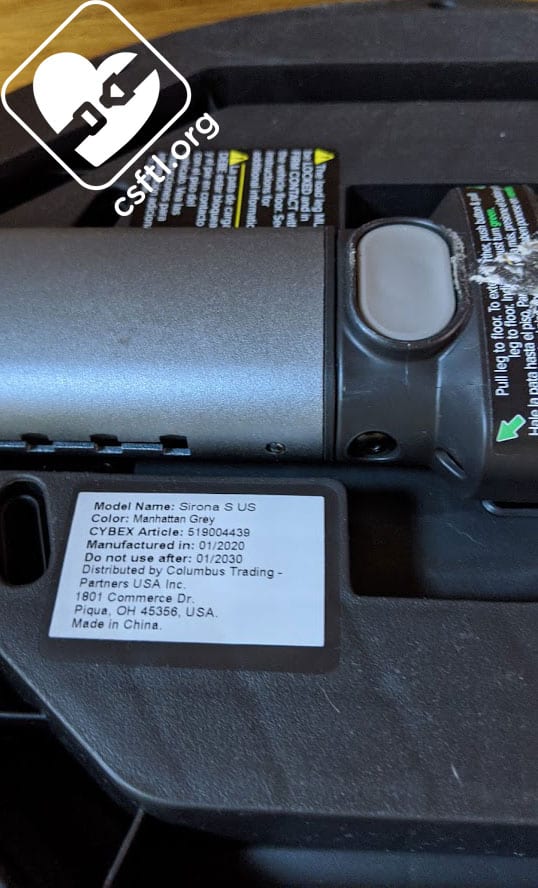
Cybex Sirona S date of manufacture label
Date of manufacture label — this label is located on the bottom of the seat’s base. The Sirona S expires 10 years after the manufacture date. This information is on the label.
Overall Thoughts
The Sirona S has a lot to offer — it’s a plush seat, it fit all of our models well, and of, course, it spins. The install is a bit quirky, it has a pretty high price tag, and it can’t be used on an airplane (unless you’re Canadian), so this seat isn’t for everyone. However, caregivers who want to struggle less to load their child into the car seat every day, families who prefer a plush seat, and families who want to use SensorSafe technology would find a winner in the Sirona S.