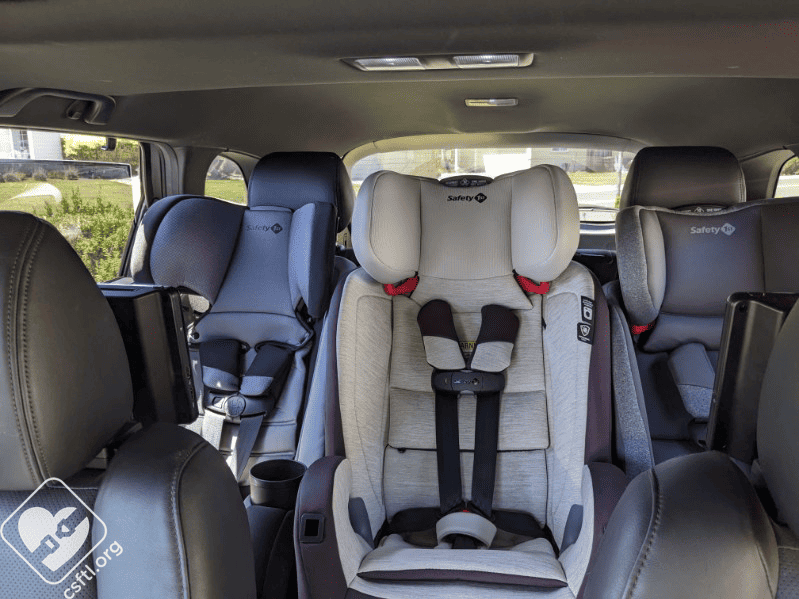
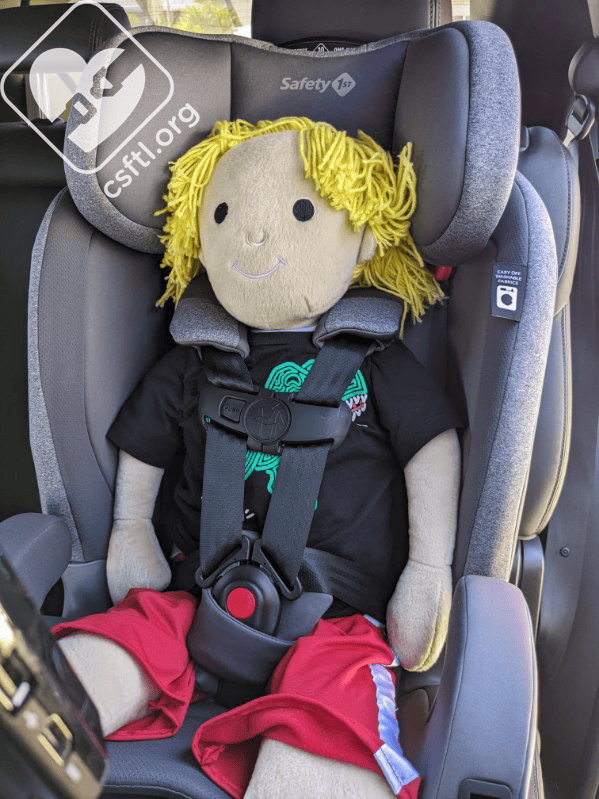
Safety 1st EverSlim, SlimRide, and TriMate three across
Trends seem to drive changes to the car seat lineup at your local store. Whether it’s color patterns (grey all the way at times is the current trend), a specific feature (rotating is the trend of the day right now), or something else, when we see one car seat from a major manufacturer with a certain feature, others are sure to follow. One trend that we love and cannot wait to see more of is narrow car seats. Many of the families we help struggle to secure all of their passengers safely because the car seats they chose for their children don’t actually fit in their vehicles when those seats are installed next to each other.
The latest set of seats to join the narrow seat trim comes from our friends at Safety 1st. The EverSlim and SlimRide (Walmart exclusive) are roughly 17 inches wide* at their widest point, which instantly makes them a contender in the 3 across Olympics!
*The marketing information for this seat claims that it’s 16.75 inches wide but we measured the width at 17 inches.
CSFTL Quick Stats
- Rear facing weight range: 5-40 pounds
- Rear facing height range: 19-40 inches tall and the top of the child’s head must be at least 1 inch below the top of the car seat’s headrest.
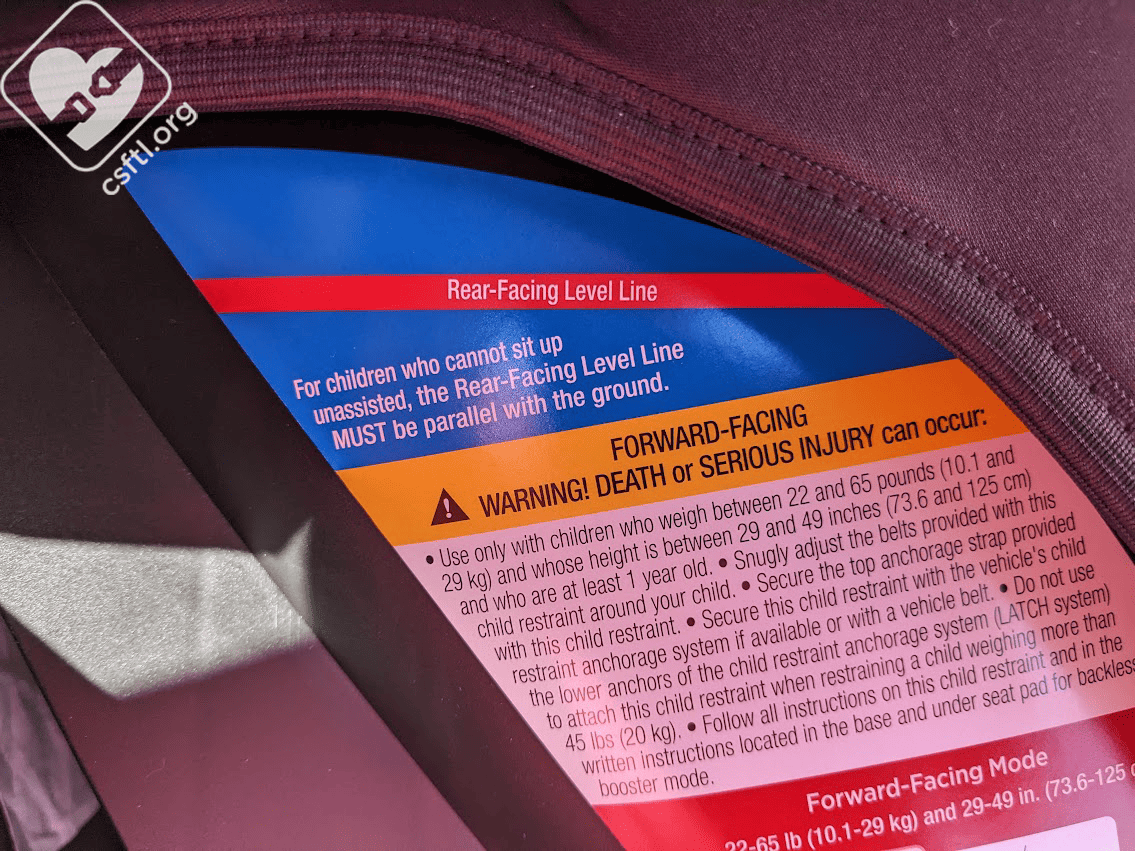
- Forward facing weight range: 22-65 pounds
- Forward facing height range: 29-49 inches tall and at least 1 year old
- CSFTL advocates that children be at least 2 years old before they ride forward facing
- Lower anchor weight limit: 45 pounds in forward facing mode, none listed in rear facing mode so we’ll assume that means 40 pounds
- High back and backless booster weight range: 40-100 pounds
- High back and backless booster height range: 43-52 inches tall
- In high back booster mode, the top of the child’s ears should never be above the top of the booster seat’s headrest.
- Do not use either booster mode if your child’s head is less than 5 inches below the roof of the vehicle
- CSFTL recommends that children be at least 5 years old before moving to a booster seat.
- Expiration:10 years from the manufacture date
- LATCH not allowed in booster mode
Measurements
- Lowest harness position (with insert): 6.5 inches
- Lowest harness position (without insert): 7 inches
- Highest harness position: 16.5 inches
- Highest booster shoulder belt guide position:
- Width at widest point: 16.75 inches
- Crotch buckle positions: 4, 5, and 6 inches from the back of the seat pan
- Seat weight: 22 pounds in harness and high back booster mode
- Backless booster weight: 6 pounds
Unique Features
- Narrow seat, 17 inches wide, makes it a nice option for tight spaces
- Backless booster seat is removed from the seat in a very easy, unusual way
Features
- No rethread harness (10 positions)
- Newborn harness routing options for smaller infants
- Machine washable and dryable fabric
- Removable cup holders are top-rack dishwasher safe (optional in all modes)
- A snack lid cover for the cupholder comes with some models
- SecureTech Magnetic Chest Clip on the SlimRide and EverSlim DLX
- Standard j-hook lower anchors on all models (that we could determine)
Unique Rules
- The head and body pillow are for use in rear facing mode only, they must be used together
- The vehicle seat back must be upright in all modes
- No gap between the vehicle headrest and the vehicle seatback is allowed in forward facing or high back booster mode
- Buckle and harness covers are optional in RF and FF modes
- 3 crotch buckle positions: The outermost slot is for forward facing only, it cannot be used for rear facing
- 5 recline positions:
- 2-5 for rear facing children who cannot sit unassisted
- 2-4 for rear facing children who can sit up unassisted
- 1 is for forward facing/booster mode use only
Three Across
Safety 1st EverSlim, SlimRide, and TriMate three across
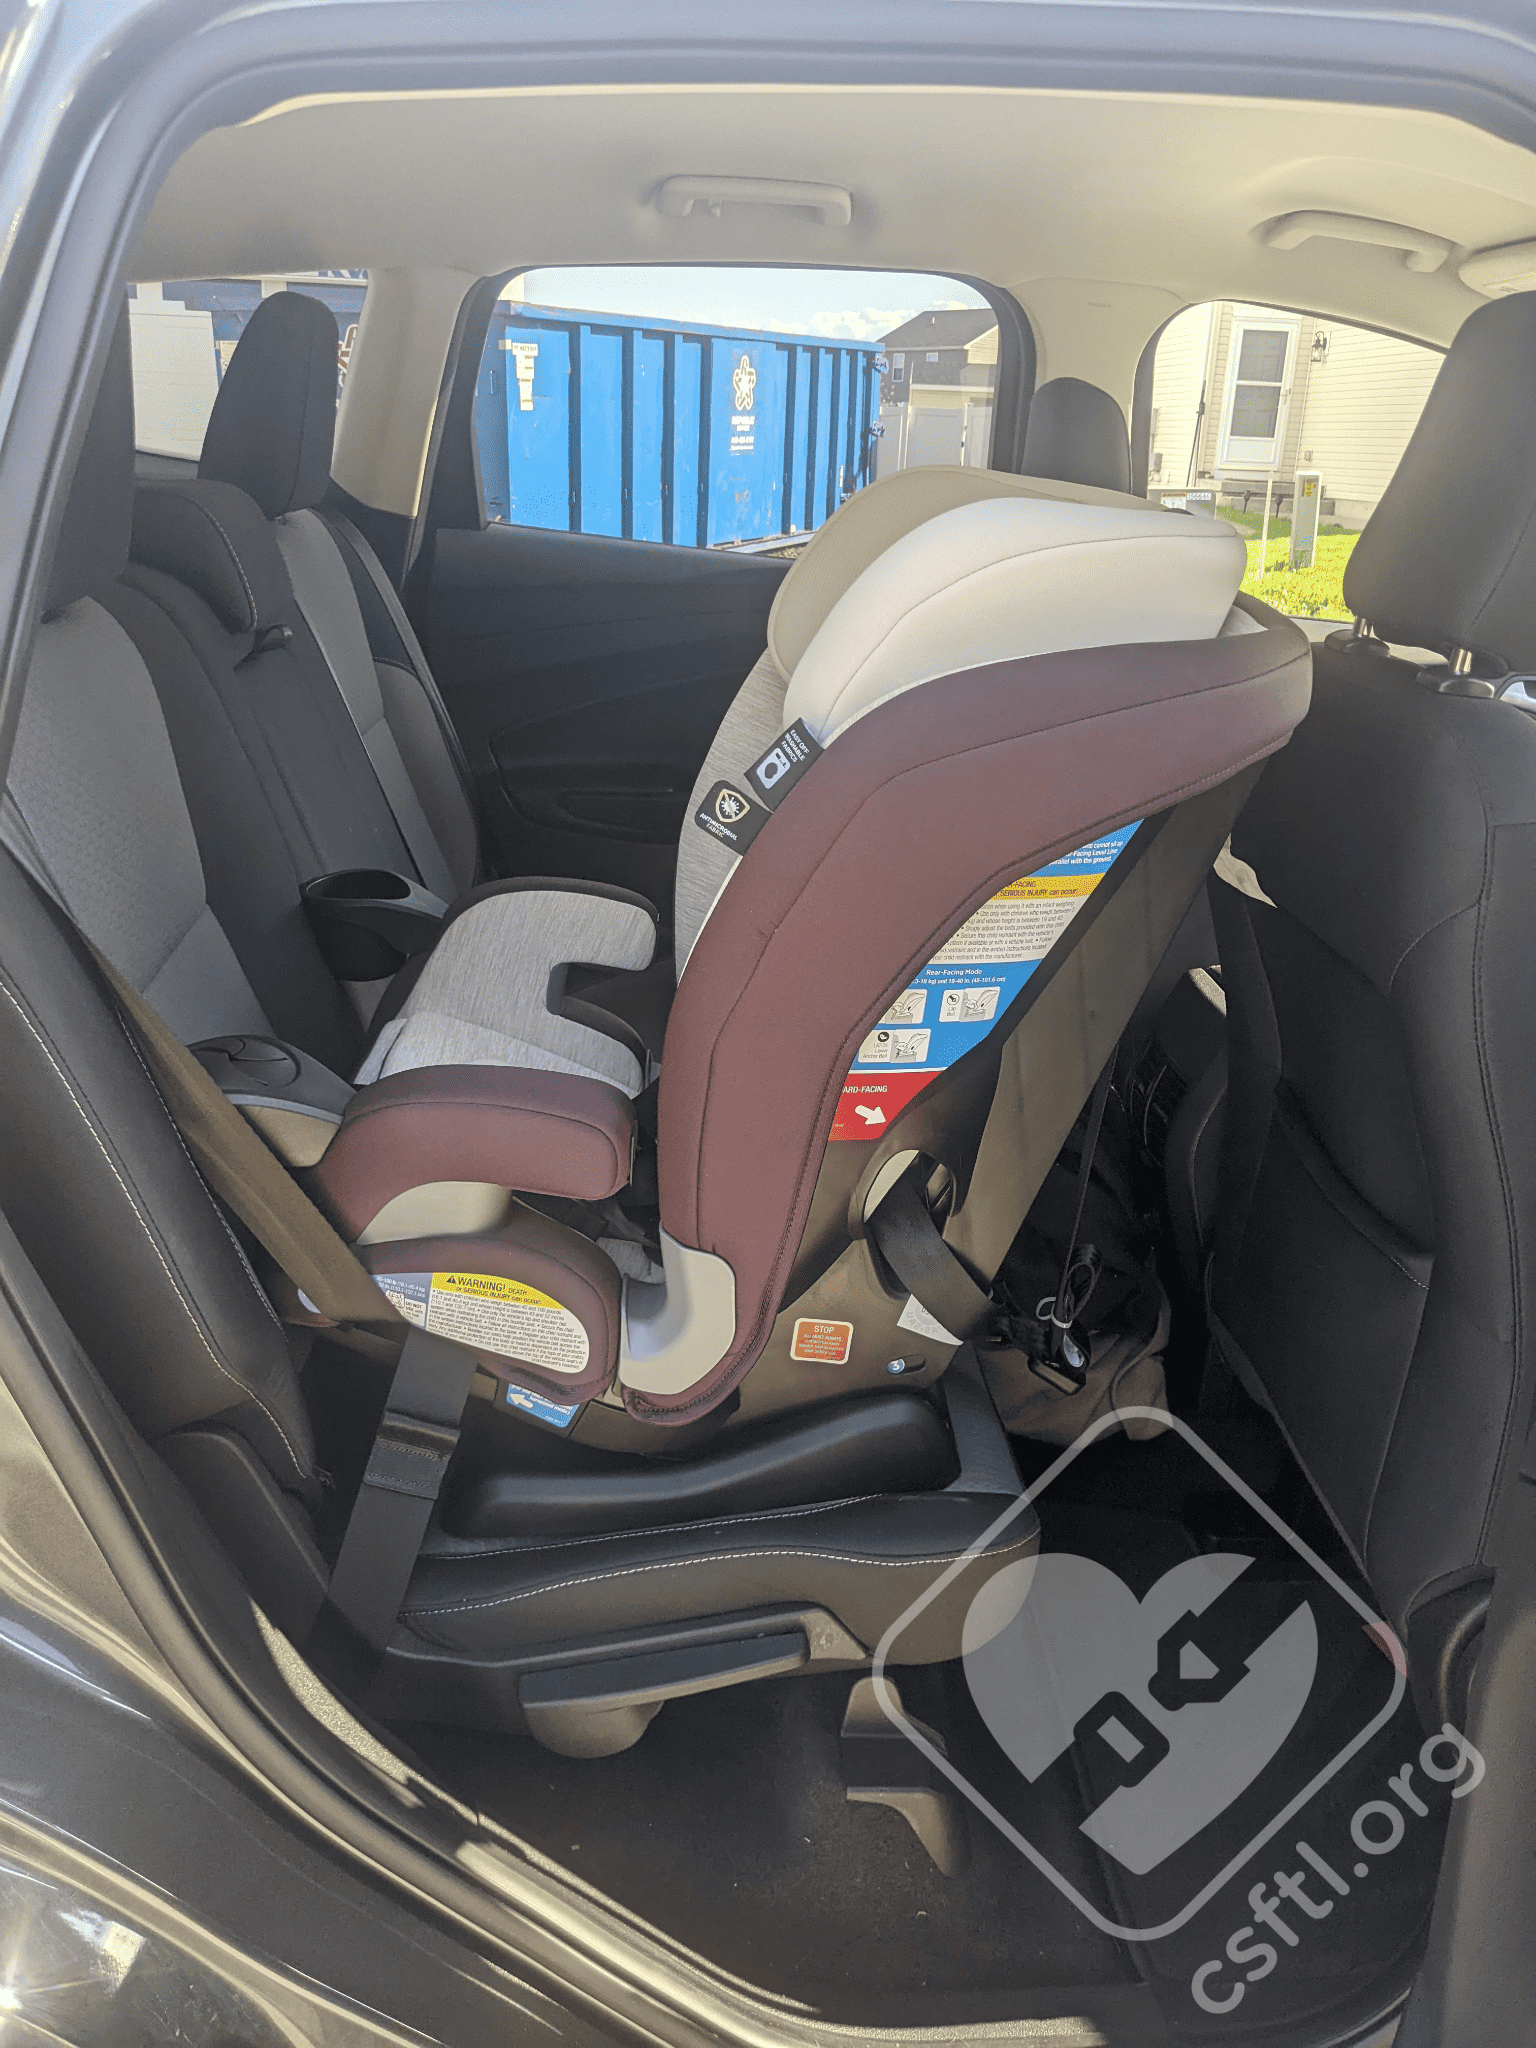
Since Slim is in the name of both models of this seat, we took the hint and understand that the seat’s narrowness is a big selling point. We’re so happy that manufacturers are noticing the struggle that comes from trying to fit 3 children in one row safely, they’re responding with narrower car seats that fit well in tighter spaces. We measured seat’s widest point as 17 inches wide, making it a solid option in the world of 3 seats across!
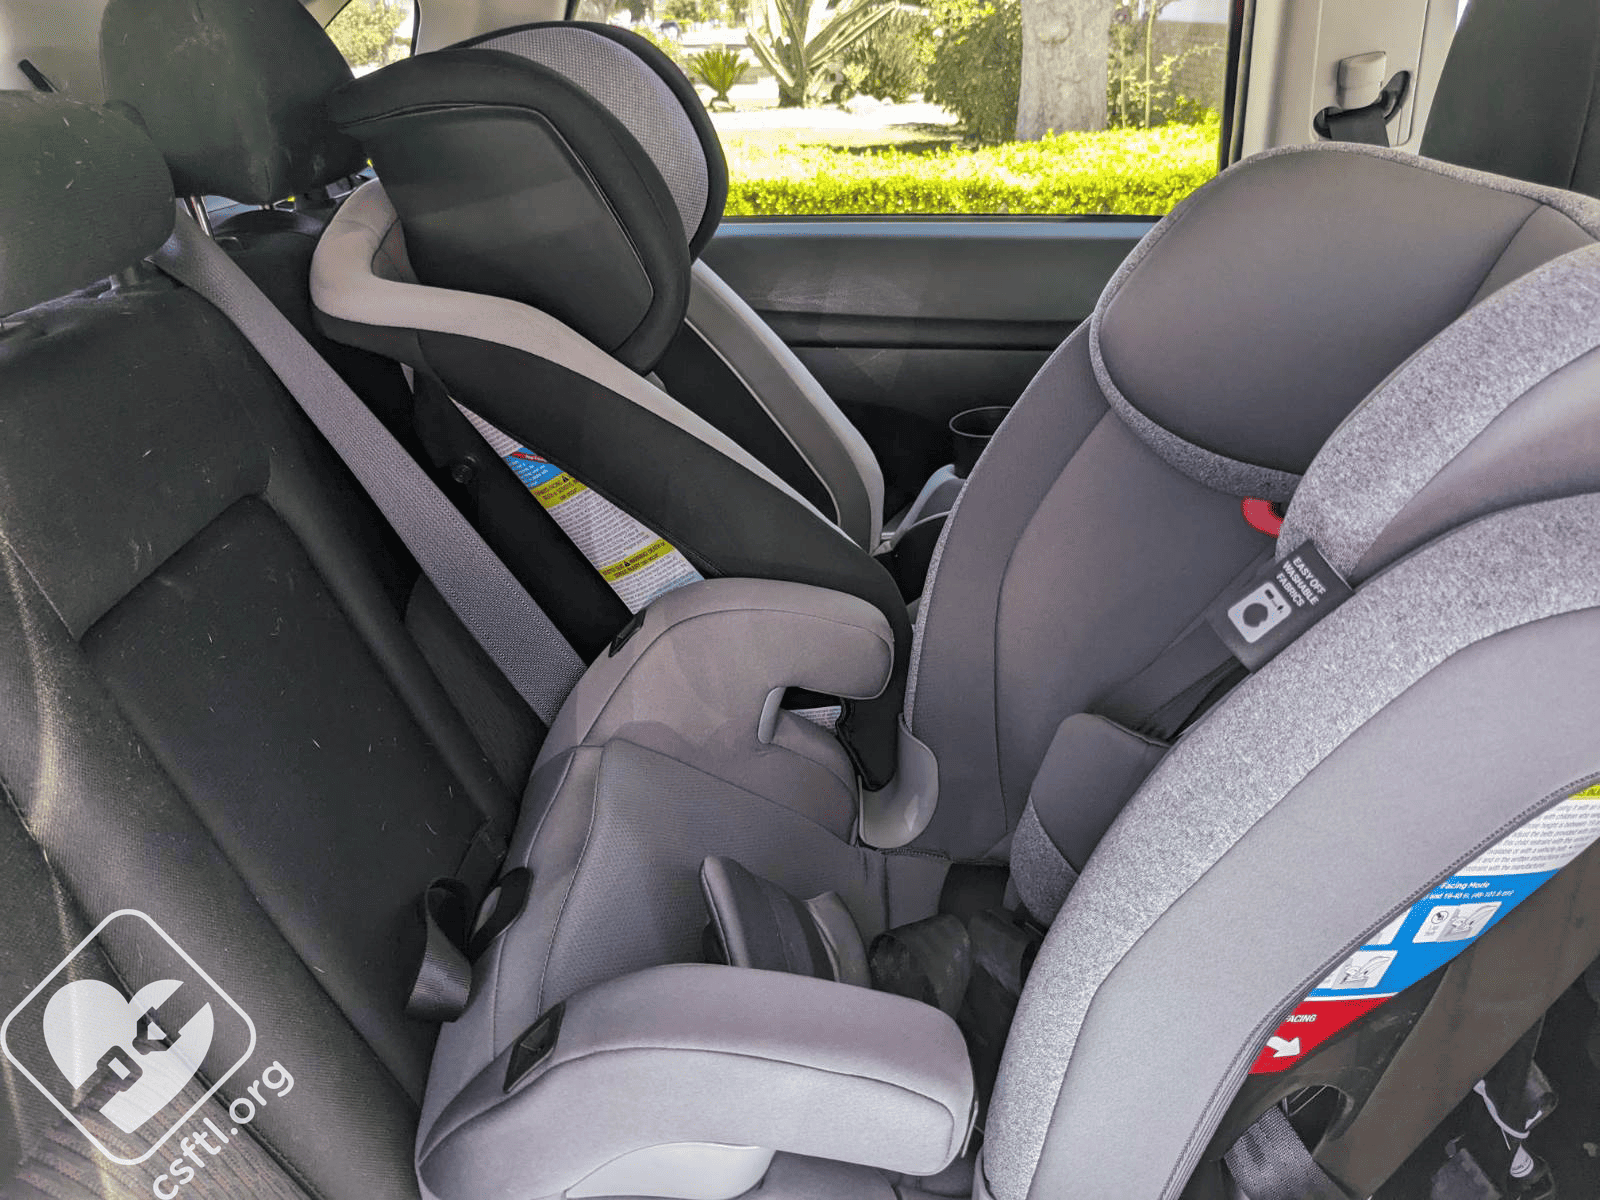
Safety 1st SlimRide installed next to a Safety 1st TriMate
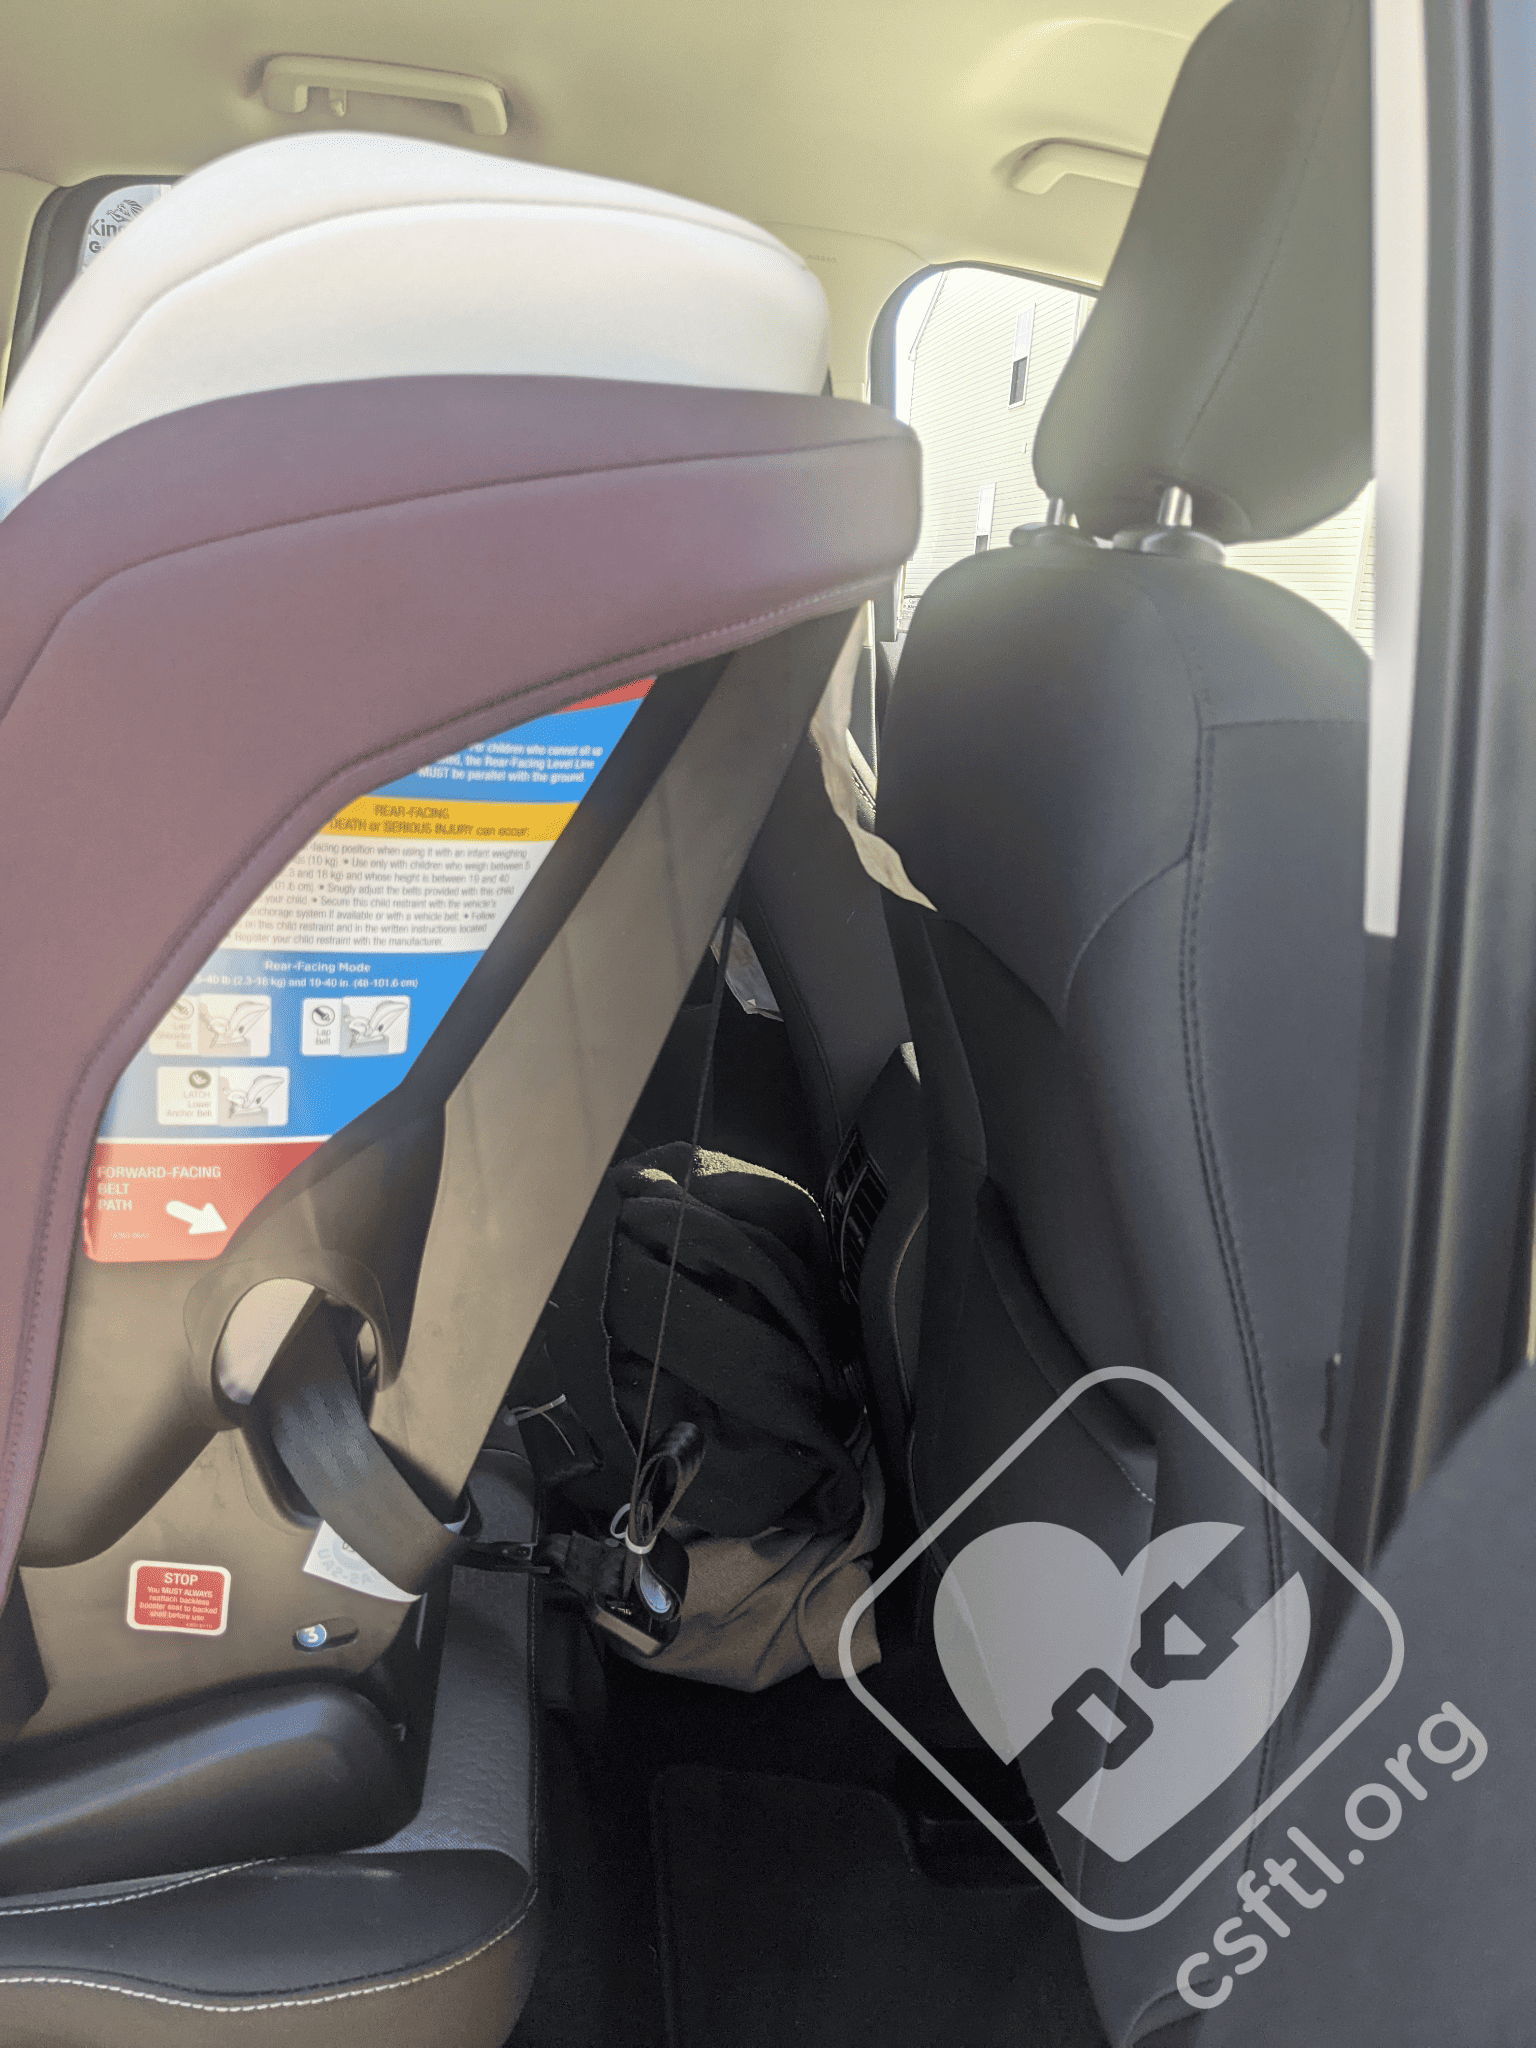
We tried it in a variety of configurations, including the 2019 Mazda CX-9, the seats fit very well. We also tried installing all 3 of these seats in a 2019 Mitsubishi Outlander, while they all technically fit forward facing, the vehicle seat in the middle has a bit of a hump to it so it looked like the car seat in the middle was spilling over into the other car seats. It’s not, but our readers love to overanalyze things (don’t worry, we do too!) so we’re leaving that picture out. If the weather cools off, we may try the EverSlim and SlimRide next to a Cosco Scenera, which is a bit narrower than the TriMate pictured here.
Here’s a rear facing SlimRide next to that TriMate, again, no trouble at all to install them next to each other. The only challenging part of this setup was reaching the buckles. We’d urge a bit of caution when using either the EverSlim or SlimRide in high back booster mode if it was part of a tight space since the booster rider would need to buckle and unbuckle themselves on every ride.
Accessories
The EverSlim comes with a number of accessories that are all optional.
Inserts and Covers
The seat comes assembled with the head pillow, body pillow, harness covers and buckle cover in use. The head and body pillow are for use inrear facing mode only. The buckle cover and harness covers can be used in both rear facing and forward facing modes. There are no weight limits for any insert. They are all very easy to attach to and remove from the seat.
(Optional) Cupholders
The optional cupholders must be installed when the seat arrives. Attach them by pushing the cupholder post into the end of the armrest until you hear a click. The cupholders are interchangeable and can be used on either side of the seat.
To remove them, grab the cupholder and pull out. It does take a little bit of force to get them out.
Some models of the EverSlim include a snack lid for the cupholders!
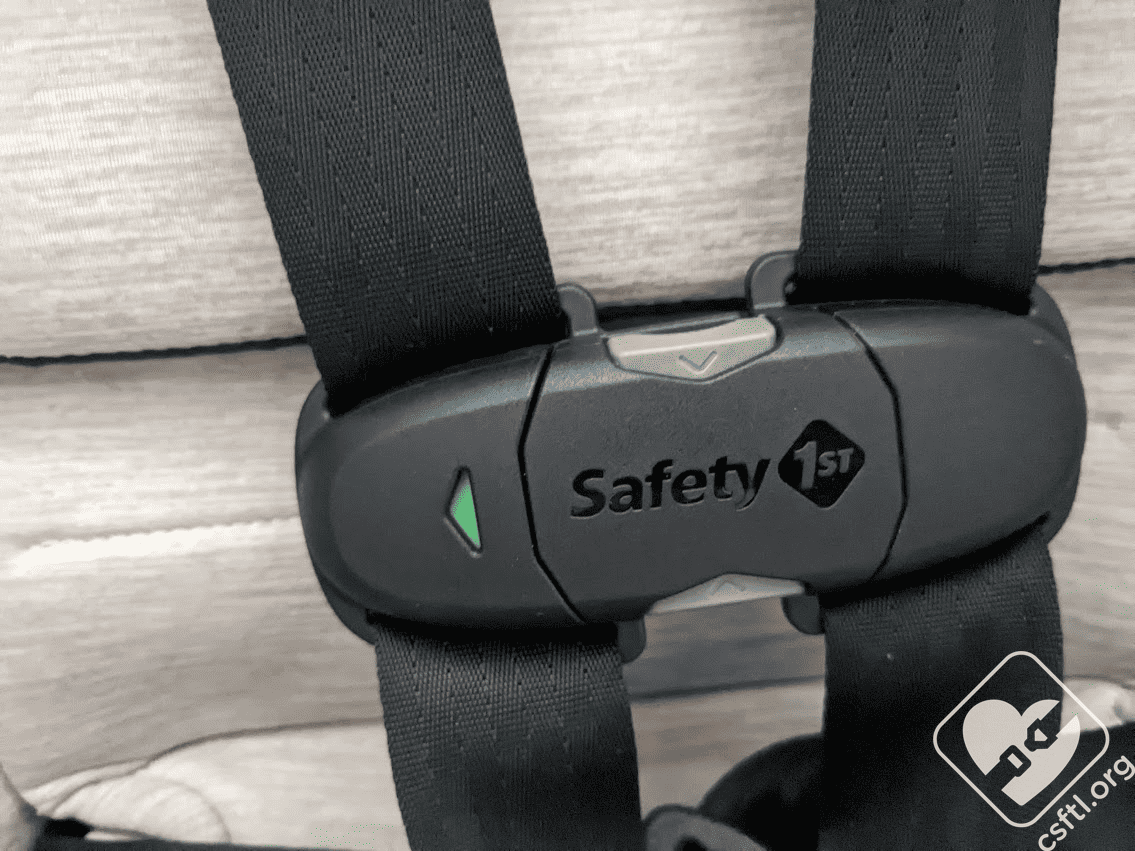
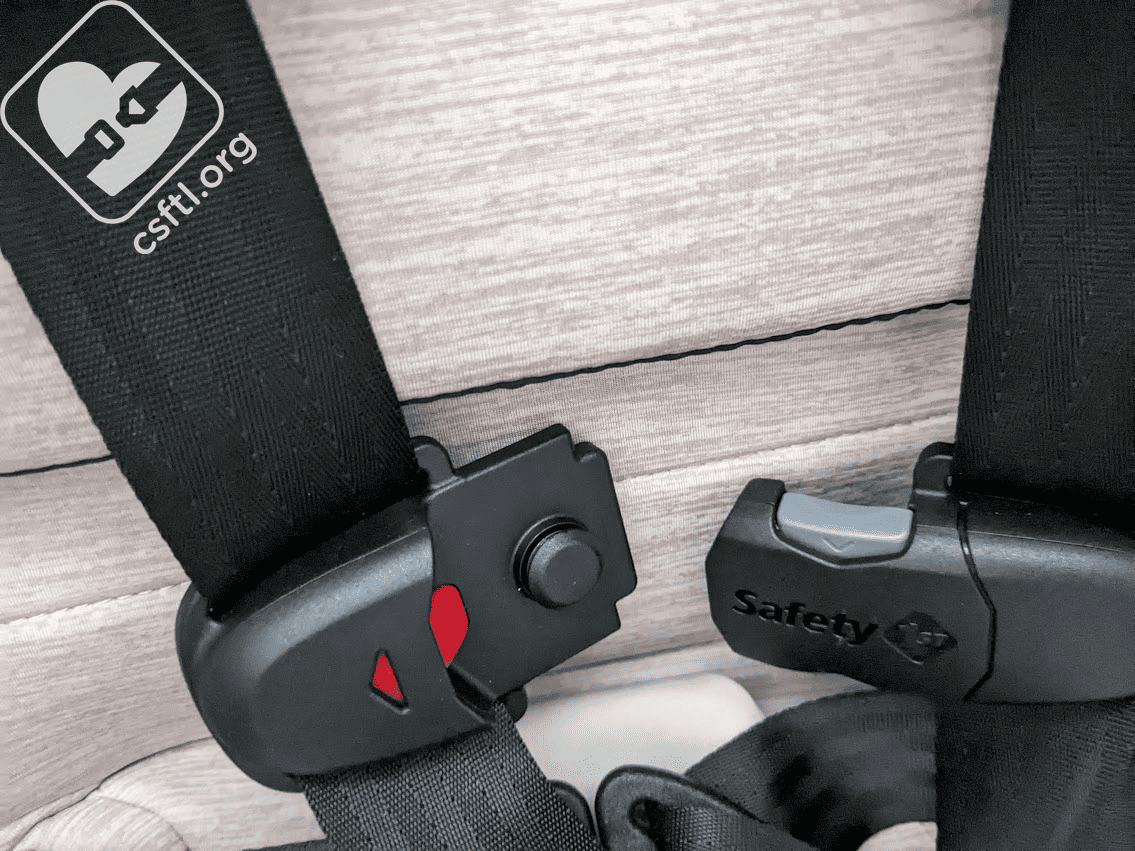
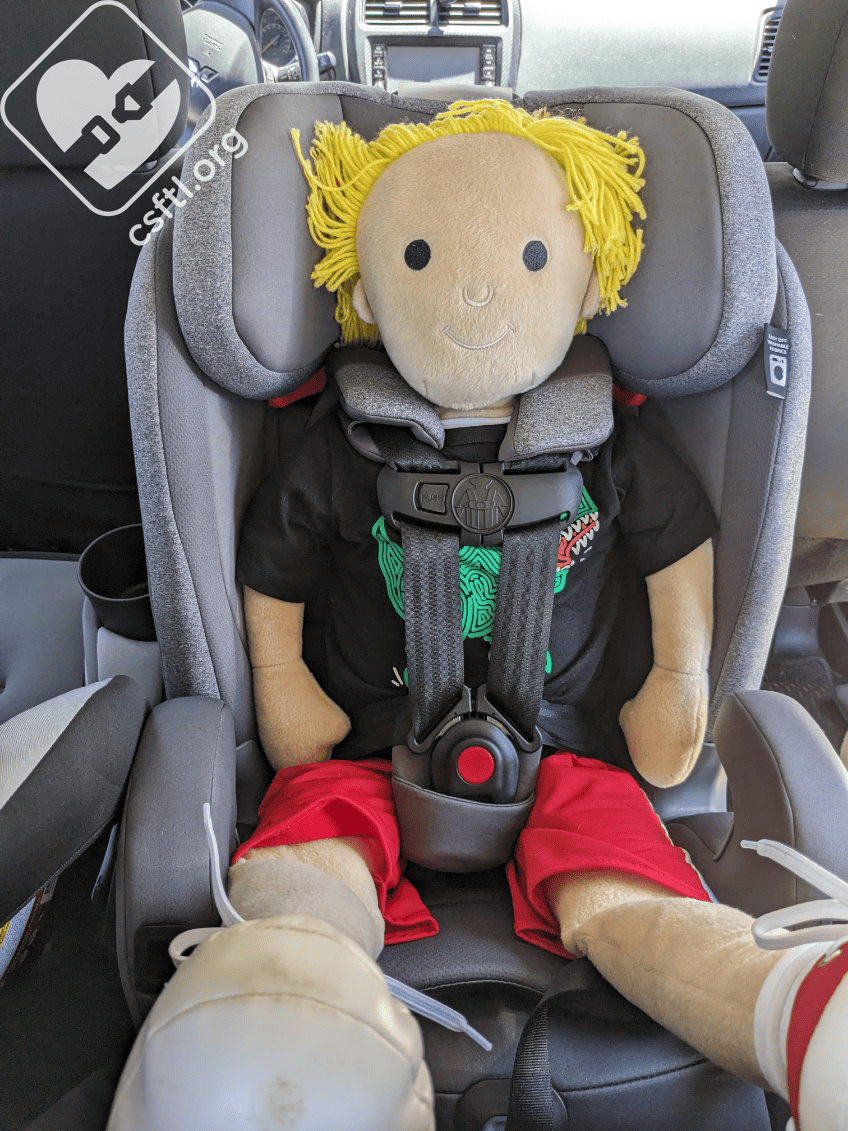
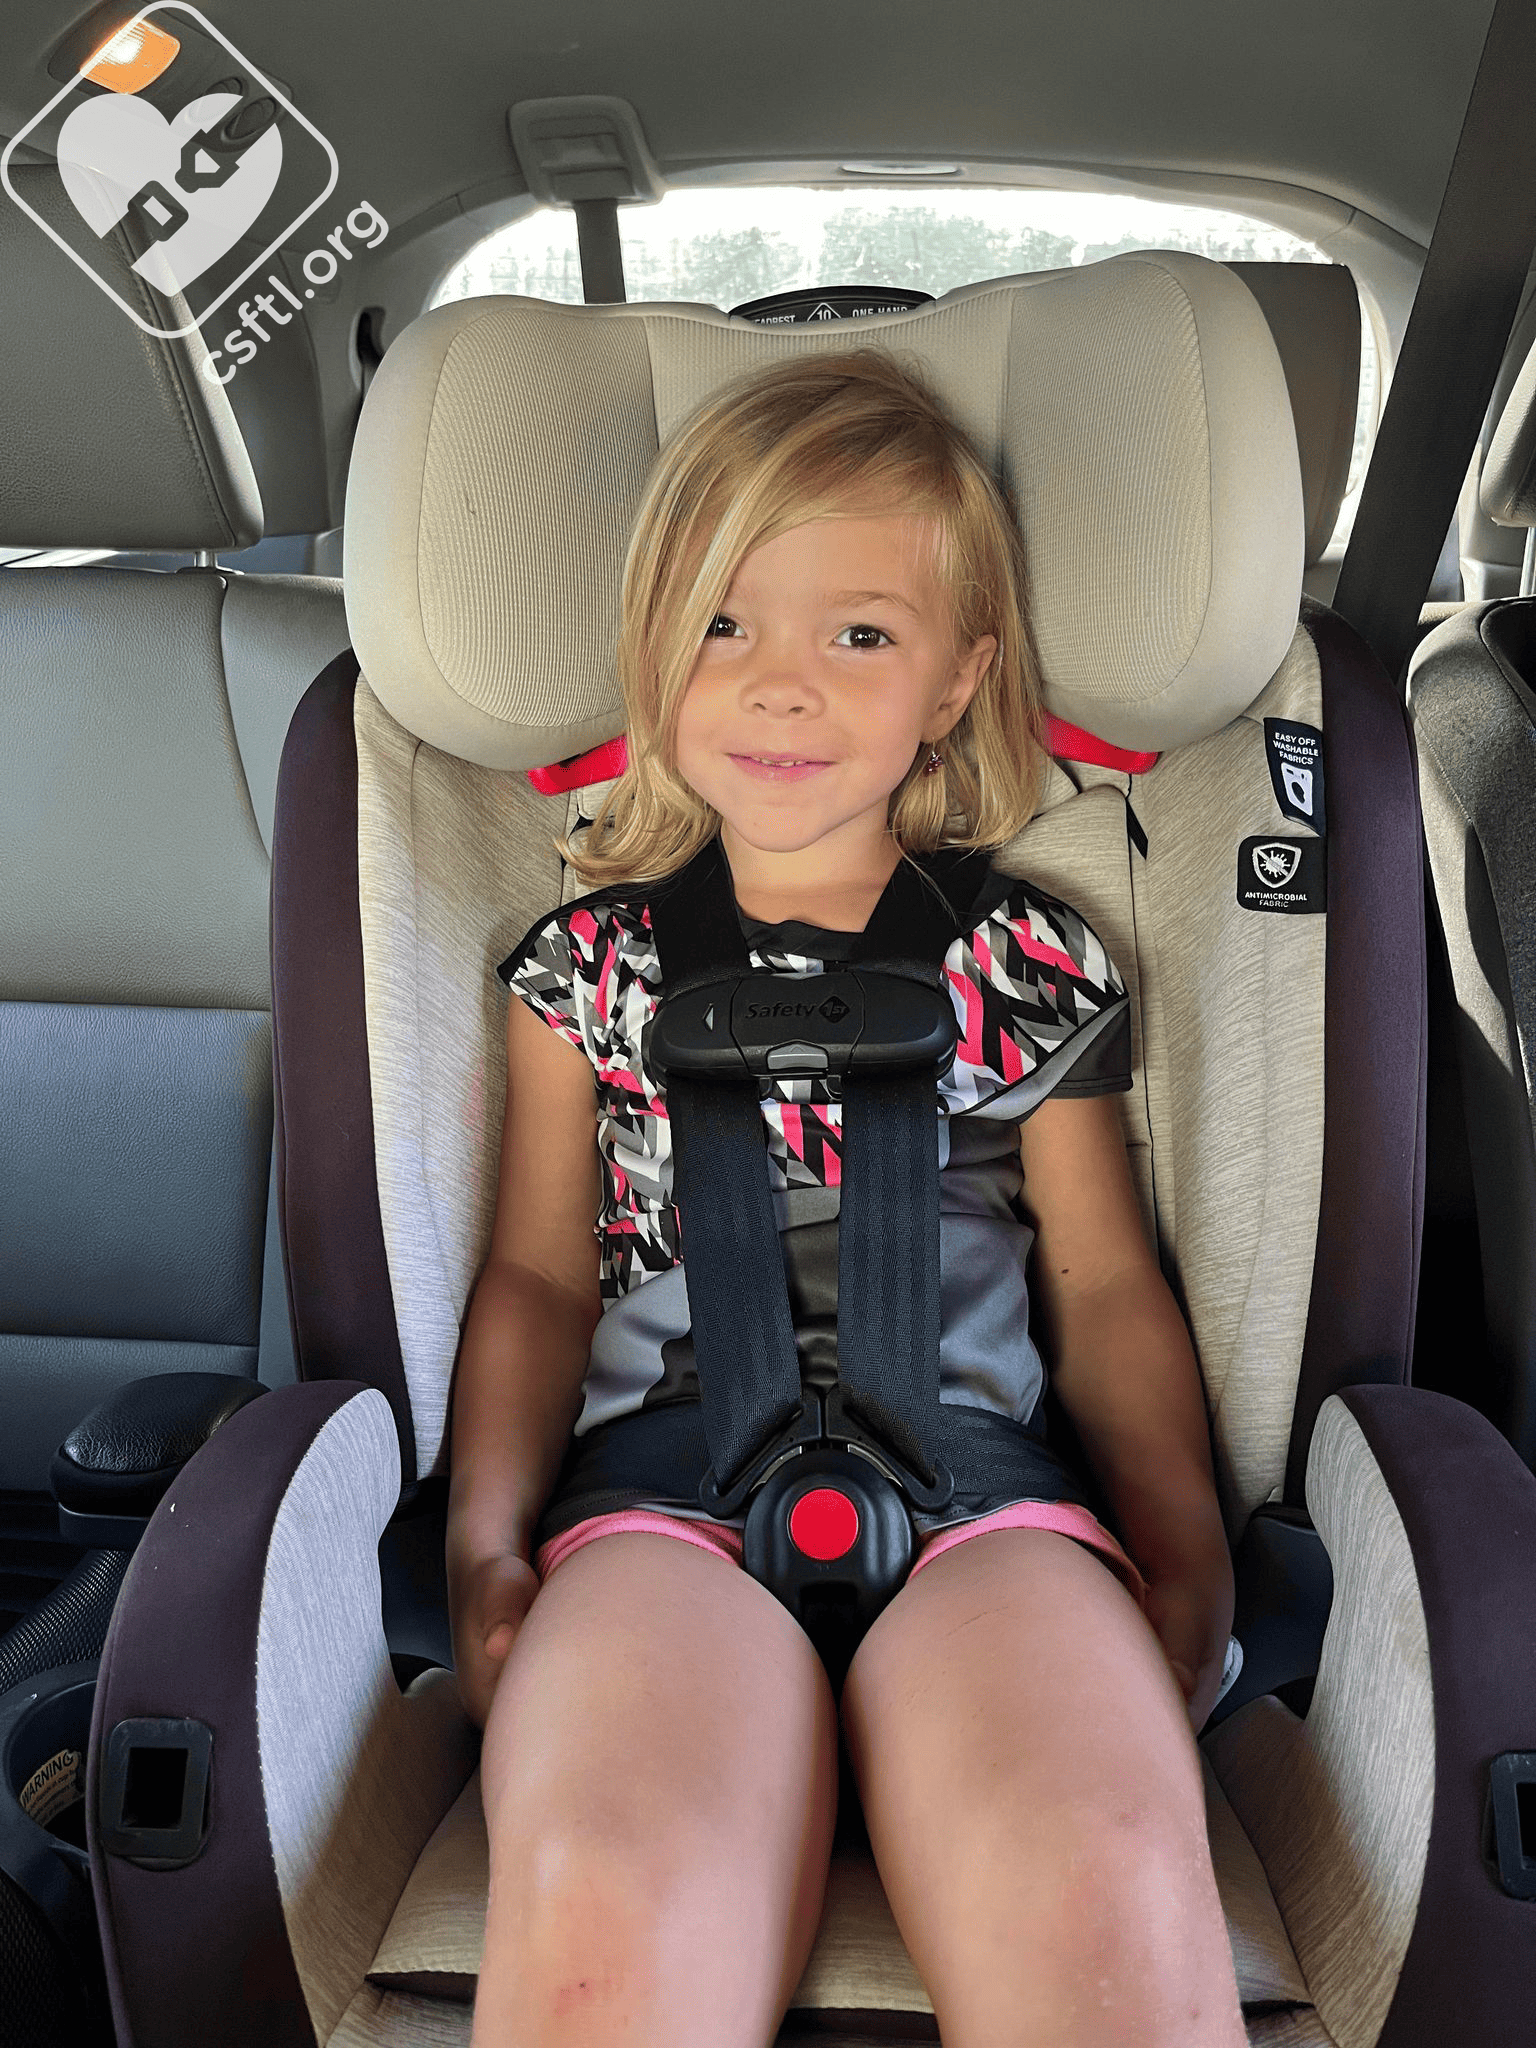
SecureTech Chest Clip
We had two slightly different versions of this seat. The EverSlim and EverSlim DLX include the SecureTech magnetic chest clip while the SlimRide includes a more traditional chest clip.
Safety 1st EverSlim SecureTech chest clip
SecureTech is a bit different than most other chest clips, so much so that I (a person who has opened and closed chest clips many, many times) had to refer to the manual for instructions. To open, press in on the light grey top and bottom buttons and pull apart. They pull apart in a front-to-back direction and not side-to-side like a traditional chest clip. The chest clip indicator is red when unlocked and turns green when locked. Although every child has different levels of fine motor skills, I can see this being either really easy or really hard for a child to undo.
Safety 1st EverSlim SecureTech chest clip
The manual contains a warning about using the SecureTech magnetic chest clip advising parents and caregivers to not use the chest clip if the child has an implanted electronic medical device. The chest clip contains a magnet, used to secure the locking mechanism, that can interfere with the proper function of an electronic medical device. If you need a standard chest clip, you can contact Safety 1st to request one.
Crotch Buckle
The crotch buckle is a pretty standard-looking crotch buckle, but we had some trouble releasing it when we didn’t press the button in the exactly right place. The manual gives the tip to press towards the top, center of the button and I’m happy to report – that does help!
A Word About the Manual
The manual has a lot of clear diagrams and explains things that often confuse caregivers well. We applaud that clarity and will continue to applaud that clarity because it means that caregivers aren’t struggling as much to install or use this seat as they could be.
One small thing: the manual explains how to fit the child in the seat before explaining how to install the seat. Since we know that children are far safer riding in installed car seats, we’d probably rather see the installation sections listed first. But that’s a small thing and the instructions themselves are quite clear.
The manual also contains multiple warnings against installing the seat with the vehicle seat belt and lower anchors. One method is sufficient.
A Word About the Harness Adjuster
We’ve seen more than a few harness adjusters in our day, some are easy to access, some are hard to find. Others are smooth like butter while some harnesses seem to stick a bit when they’re being tightened or loosened. The EverSlim’s harness adjuster is super easy to access, it takes a simple push to release it. If we gave out CSFTL awards for specific things, the EverSlim would be among the top candidates for Best Harness Adjuster.
Installation: Rear Facing
Recline Positions
Safety 1st EverSlim recline angle indicator — does not apply to children who can sit upright unassisted
The EverSlim base features 5 different positions, 4 of which you can be used in rear facing mode.
Do not use position 1 in rear facing mode. There’s an unusual rule around the recline angle indicator — it doesn’t apply to children who can sit up unassisted, though the seat must be in recline positions 2-4 for them.
- Children who can not sit up unassisted: the rear facing level line on the side of the seat must be parallel to the ground using positions 2-5. If you can not get the rear facing level line parallel to the ground, you can use a pool noodle or tightly rolled towel under the front of the car seat base.
- Children who can sit up unassisted: use positions 2-4 install the seat at a more upright angle. In this case, the recline angle indicator does not need to be parallel to the ground.
The Safety1st EverSlim/SlimRide on recline 3 for a child with full head control in a 2019 Ford Escape.
To our surprise, the seat was decently compact in my vehicle on recline 3. It is not as compact as my Graco Extend2Fit, but allowed enough space for a front seat passenger.
Installation: Lower Anchors
To install the lower anchor webbing in the rear facing belt path, pull the front of the seat pad down. Gather the entire webbing, including the lanyard to the side, of the harness webbing, making sure they don’t cross over one another, and route the belt under the seat pad. Pull the front of the seat pad up and feed the lower anchor webbing through the exposed belt path. Ensure the lower anchor webbing goes in front of the buckle (towards the front of the seat). The adjuster can be on either side of the seat. The instructions were pretty straightforward in the manual and I had no issues moving the lower anchor webbing into the rear facing belt path.
Two of our three reviewers reported having no real struggle with installing the seat with lower anchors. However, our third review found it a bit difficult to get less than 1 inch of movement at the belt path so take that under consideration. Using the tip in the manual to feed the free end of the lower anchor webbing back through the belt path and pull from the side while applying pressure downwards on the seat. With a bit of elbow grease, reviewer #3 was able to get the seat installed with less than an inch of movement at the belt path. She found the vehicle seat belt install much easier!
Installation: Vehicle Seat Belt
The Safety1st EverSlim/SlimRide installed rearfacing with the vehicle seatbelt.
To install the seat with the vehicle seat belt, thread the lap and shoulder belt through the rear facing belt path.Feeding the lap and shoulder belt through the belt path was mostly painless – my large hands didn’t play well trying to reach into the belt path to feed the buckle through, however, once it was set up, installing the seat securely was pretty easy. Buckle the vehicle seat belt, then pulled the shoulder portion of the belt all the way out to engage the retractor. When you hear a clicking sound, the seat belt is locked into child seat mode, just let it go back into the vehicle. Remove the last bits of slack from the belt by standing outside of the seat and holding the shoulder portion of the seat belt to remove slack while pushing the car seat away from you. Feed that last bit of slack back into the retractor and then check your work to make sure the seat isn’t moving more than an inch at the belt path.
Fit to Child – Rear Facing
Newborn Harness Routing
The seat is rated from 5-40 pounds in rear facing mode so there’s a possibility that a newborn could ride in this seat. There is an extra, smaller set of harness loops available for that scenario. Should this be the case for your family, read your manual for instructions on how to use them.
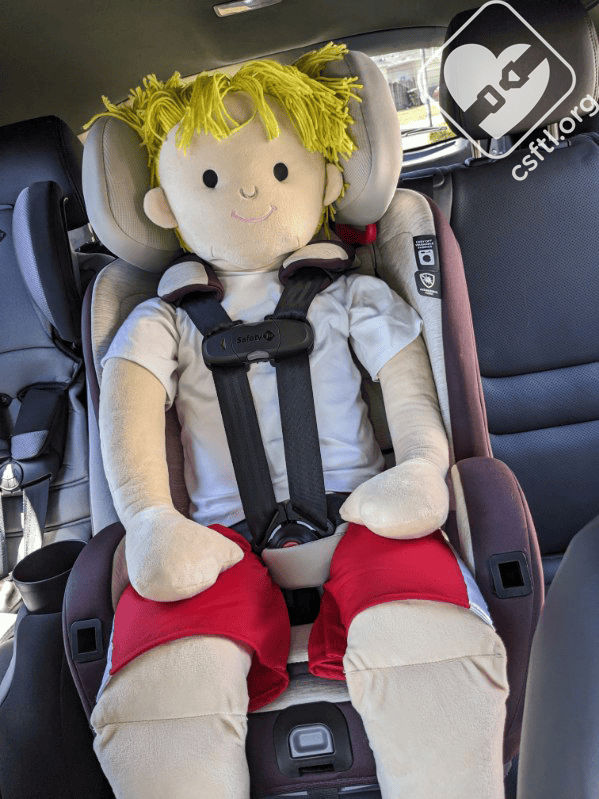
Newborn Doll

Safety 1st SlimRide newborn doll rear facing
Our newborn doll weighs 7 pounds and is 17 inches long. We found that the doll fit better without the shoulder pads and with the infant inserts in place. It took some trial and error to find the best fit, if you’re planning on using this seat with a newborn, try removing or adding the padding and removing or adding the shoulder pads — before you head out for a ride.
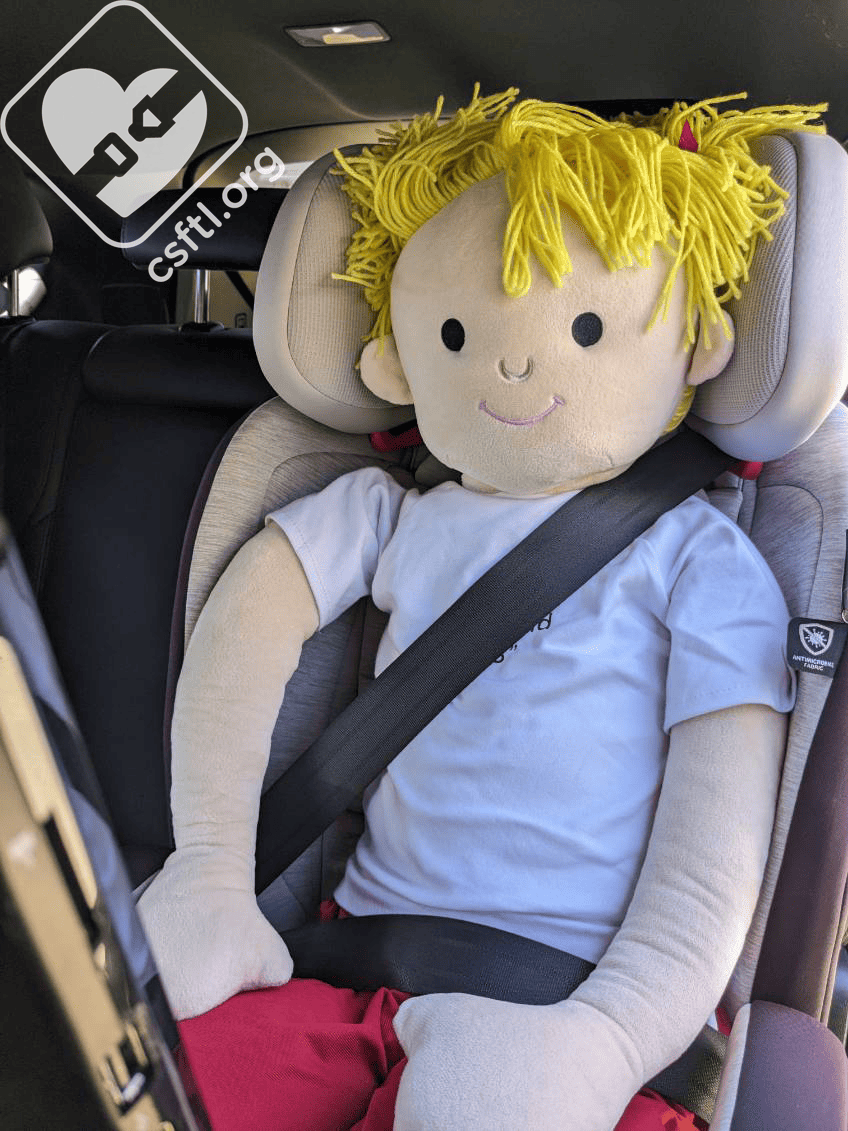
16 Month Old Doll
Safety 1st SlimRide 16 month old doll rear facing
Our 16 month old doll has no stated weight and is 31 inches tall. We removed the infant inserts and put the shoulder pads back on for this doll. The seat fits the doll well and there’s plenty of room to grow.
3 Year Old Doll
Safety 1st SlimRide 3 year old doll rear facing
3 year old doll is 38 inches tall. Sometimes we find that this doll is close to the maximum height range for rear facing in some of the seats we review but the SlimRide offers plenty of room for the child to grow. There’s also a substantial amount of rear facing legroom in this seat, something I would not have expected!
Installation: Forward Facing
Recline Position
The seat can only be used forward facing on recline position 1 (the most upright position). The vehicle seatback must also be upright.
Headrest Interference
If your vehicle has protruding headrests that can’t be removed, this seat may not be the best option. If the vehicle manual prohibits the headrests from being adjusted or removed, try the seat in a different seating position that doesn’t have this type of headrest.
Top Tether Usage
The top tether, a crucial component of forward facing safety, is required when tether anchors are available. Loosely attach the top tether to the top tether anchor in the vehicle before starting your forward facing installation.
Installation: Lower Anchors
Safety 1st EverSlim forward facing with lower anchors
The forward facing lower anchor weight limit is 45 pounds. If your child weighs more than 45 pounds, use a vehicle seat belt to install this seat.
To install the seat forward facing, make sure that the lower anchor connectors are in the forward facing belt path and it’s not twisted. Similar to installing with lower anchors in rear facing mode, I used the tip in the manual to feed the free end of the webbing back through the forward facing belt path and pull from the side. I found it even harder to remove enough slack from the lower anchor webbing in forward facing mode than in rear facing mode.
Once the seat is installed, check for movement at the belt path by giving the seat a firm handshake. If it moves less than an inch in any direction, you’re good to go! Tighten the top tether as the final step.
Installation: Vehicle Seat Belt
Safety 1st EverSlim installed with the vehicle seat belt
To install the seat with the vehicle seat belt, feed the buckle through the forward facing belt path, make sure it’s not twisted, then buckle it in. Buckle the vehicle seat belt, then pulled the shoulder portion of the belt all the way out to engage the retractor. When you hear a clicking sound, the seat belt is locked into child seat mode, just let it go back into the vehicle. Remove the last bits of slack from the belt by standing outside of the seat and holding the shoulder portion of the seat belt to remove slack while pushing the car seat away from you.
Once the seat is installed, check for movement at the belt path by giving the seat a firm handshake. If it moves less than an inch in any direction, you’re good to go! Tighten the top tether as the final step.
Fit to Child: Forward Facing Mode
3 Year Old Doll
Safety 1st EverSlim 3 year old doll forward facing
Once again, our very compliant doll is ready to assist. The doll remains 31 inches tall, it has plenty of room to grow in this seat.
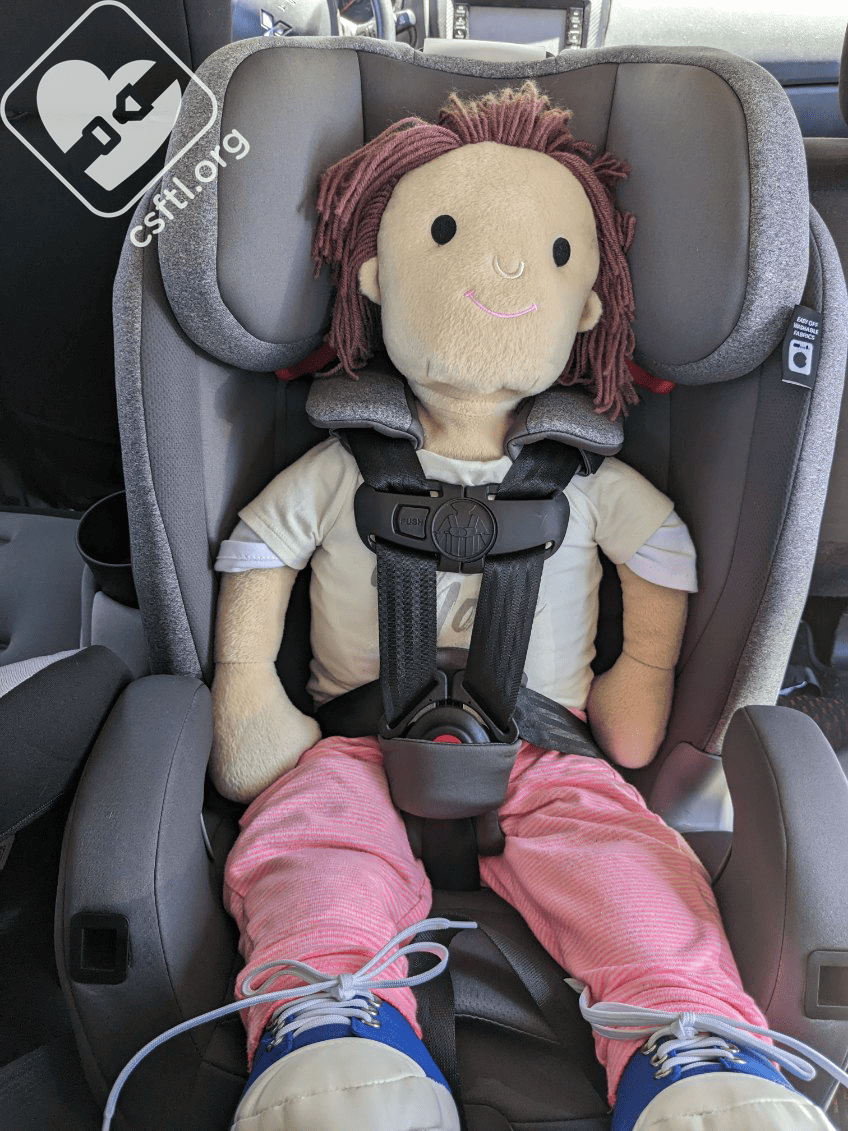
4 Year Old Child
Safety 1st EverSlim 4 years old forward facing
Finally! We have a child available to model this seat. This 4 year old weighs 36 pounds and is 40 inches tall. She’s got room to grow in this seat and she finds it comfortable.
6 Year Old Doll
Safety 1st EverSlim 6 year old doll forward facing
Since the maximum height limit for this seat is 49 inches, it’s not too surprising that our 48 inch tall doll is at the very top of the seat’s height range. The doll has the teeniest bit of room to grow but does fit for now.
Converting to High Back Booster Mode
The conversion to high back booster mode is also pretty straightforward. First, fully loosen the harness, raise the headrest to the highest position, then undo the chest clip and crotch buckle.
Remove the backless booster portion (the bottom part of the seat) by squeezing the grey tabs under the seat pad and pulling it towards you. Remove the crotch buckle by pushing the metal retainer up and out of the slot. Slide the shoulder straps out of the slots in the seat pad and pull the bottom of the seat pad down.
From the front of the seat, thread each side of the chest clip and buckle tongue through the slots in the back of the seat. Clip the chest clip behind the seat and slide the buckle tongues into the backwards crotch buckle. Thread the metal retainer on the crotch buckle behind the buckle and up between the harness straps, between the chest clip and crotch buckle. Attach the backless booster to the main seat shell. Replace the seat pad and store the top tether and lower anchors in a safe place that future you will be able to find.
Using the EverSlim/SlimRide in High Back Booster Mode
The seat has a couple of use restrictions in booster mode.
- Do not use the booster seat in either mode if the child has less than 5 inches of space between the top of their head and the roof of the car, this might make for some challenging situations if the car’s roof is kind of sloped or particularly low.
- Do not use the booster if your child’s ears are above the top of the booster’s headrest.
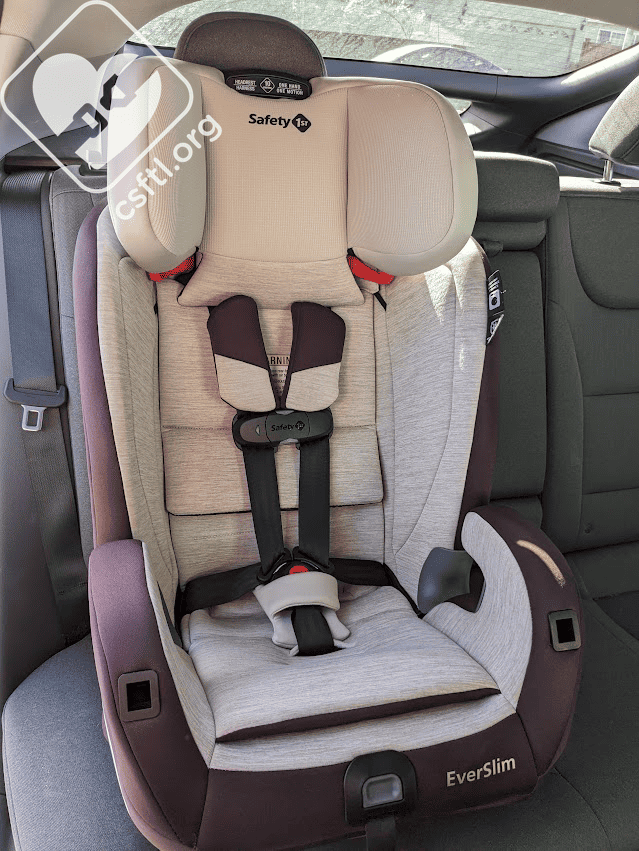
Safety 1st EverSlim shoulder belt guide
The shoulder belt should be routed under the armrest on the vehicle buckle side in both high back and backless booster seat modes. We often find that the vehicle seat belt can get stuck in a shoulder belt guide when the headrest is below the shell of the seat but there must be some kind of magic in this seat — even with the headrest below the shell, the seat belt moved freely through the belt guide.
Fit to Child: High Back Booster Mode
6 Year Old Doll
Safety 1st EverSlim 6 year old doll high back booster
Here’s our doll, ready to take on the world of high back boosters. The doll remains at the top of the height range for the seat — even though the max height for booster mode is 52 inches tall, the headrest is on the highest setting here. That means the shoulder belt guide is also as tall as it can be. Our doll fits well enough here but wouldn’t last long in this seat if it was an actual growing child.
7 Year Old Child
Safety 1st EverSlim high back booster 7 years old
This model weighs 72 pounds and is 50 inches tall. He’s at the top of the booster mode height range (43-52 inches tall) so we wouldn’t expect him to have a lot of room to grow here. Which he does not. He fits at the moment but is already a bit squished and he had a hard time buckling himself in.
This seat isn’t the longest lasting high back booster we’ve ever seen but it also doesn’t need to be since it also rear faces, forward faces, and converts to a backless booster. Families can expect to get a lot of use out of this seat between all 4 modes.
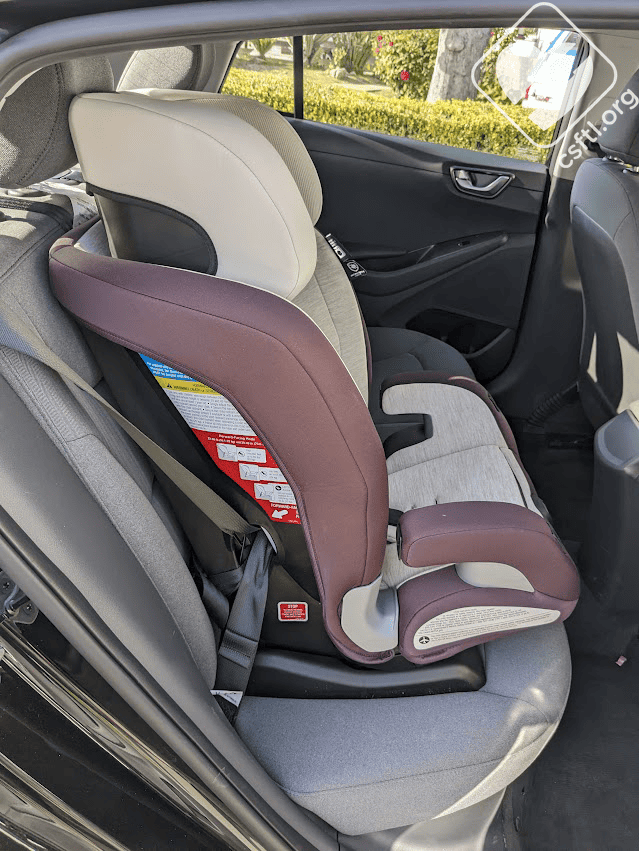
Converting to Backless Booster Mode
Safety 1st EverSlim converting to backless booster mode
If you ask us, this conversion is one of the most unusual and awesome parts of the seat. Basically, the backless part of the seat just pops off of the front, leaving the rest of the seat in one piece that’s so large, it would be hard to lose.
Safety 1st EverSlim after converting to backless booster mode
Here’s how it works: push the harness adjuster strap through the hole in the cover. Find the opening in the seat pad at the front of the seat. Lift the flap on the front of the seat pad and find the grey release levers, squeeze both of them to release the seat pad. Remove the crotch buckle by turning the retainer and pushing it up through the seat base. If the cupholders are attached, remove them, turn the booster around, and put the cupholders on the other side of the seat.
Safety 1st EverSlim backless booster mode
Wrap the loose end of the seat pad under the booster seat and snap the cover into the base, attaching both elastic straps.
Using the EverSlim/SlimRide in Backless Booster Mode
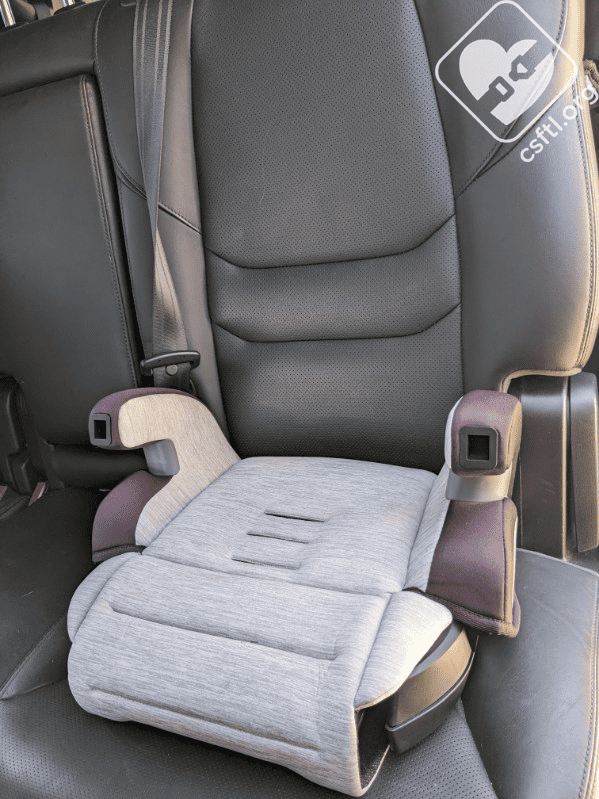
Safety 1st EverSlim backless booster mode
In backless booster mode, the child’s head must be completely below the vehicle seat back.
Shoulder Belt Guide Adjuster
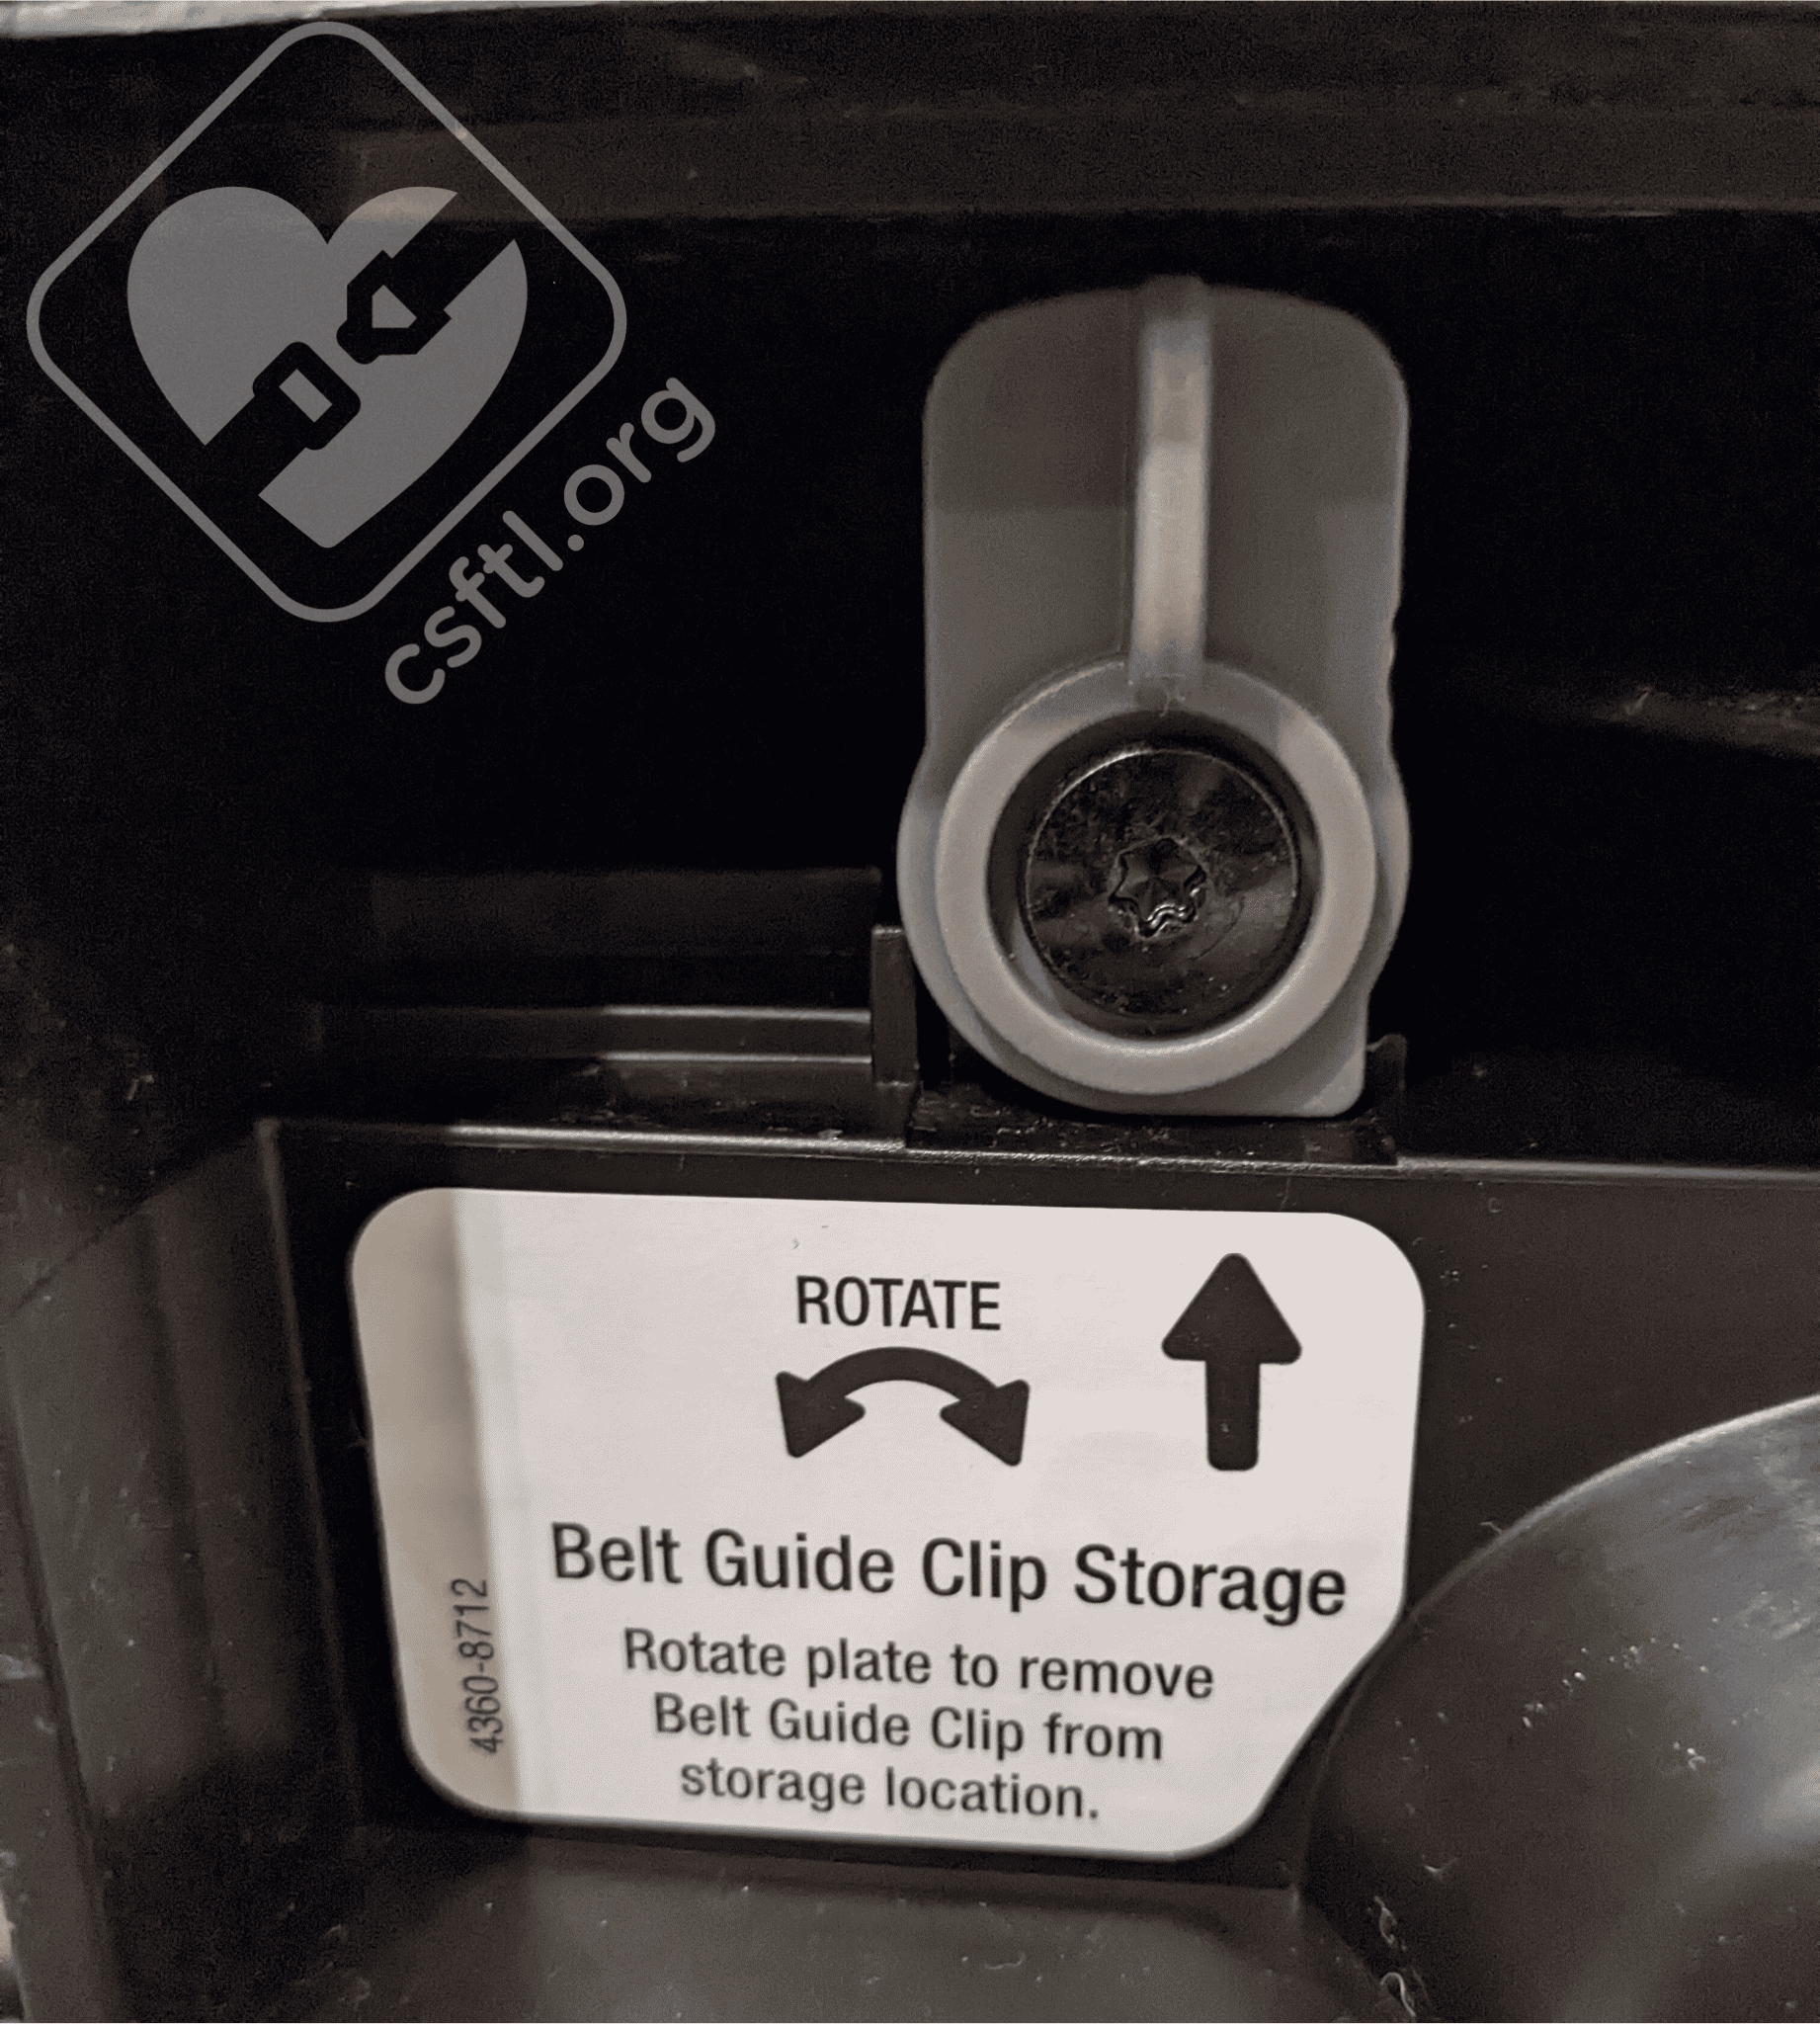
The shoulder belt positioning clip storage is on the underside of the carseat.
This adjuster is for use in backless booster mode only.
If you didn’t purchase the seat to use it in backless mode right away, save this important piece for use in backless mode sometime in the future. Our shoulder belt guide adjuster arrived in the same bag the cupholder and instruction manual arrived in, this bag was not attached to the seat.
We highly recommend storing this adjuster in the specified location on the seat itself there so you do not lose it in the future.
The storage are for the adjuster is on the underside of the seat, look for the white label identifying the “Belt Guide Clip” storage location (we call this piece a shoulder belt guide adjuster, every manufacturer uses a slightly different term).
Using the Shoulder Belt Guide Adjuster
If the vehicle seat belt doesn’t fit the child properly — with the lap portion of the belt across the top of the child’s thighs or over their hips and the shoulder portion squarely across the center of the child’s neck, this handy adjuster can help get the vehicle seat belt into the right position. Here’s how to set it up: feed the loop end of the adjuster’s webbing up through the bottom buckle slot in the shell of the seat. Then, lift up the front of the seat pad so you can feed the loop end back down through the middle slot. Then, feed the plastic shoulder belt guide adjuster through the loop part of the strap.
To use, have the child sit in the booster and pull the clip across the child’s back to the top of the shoulders, then line up the bottom edge of the adjuster with the child’s shoulder.
Fit to Child: Backless Booster Mode
6 Year Old Doll
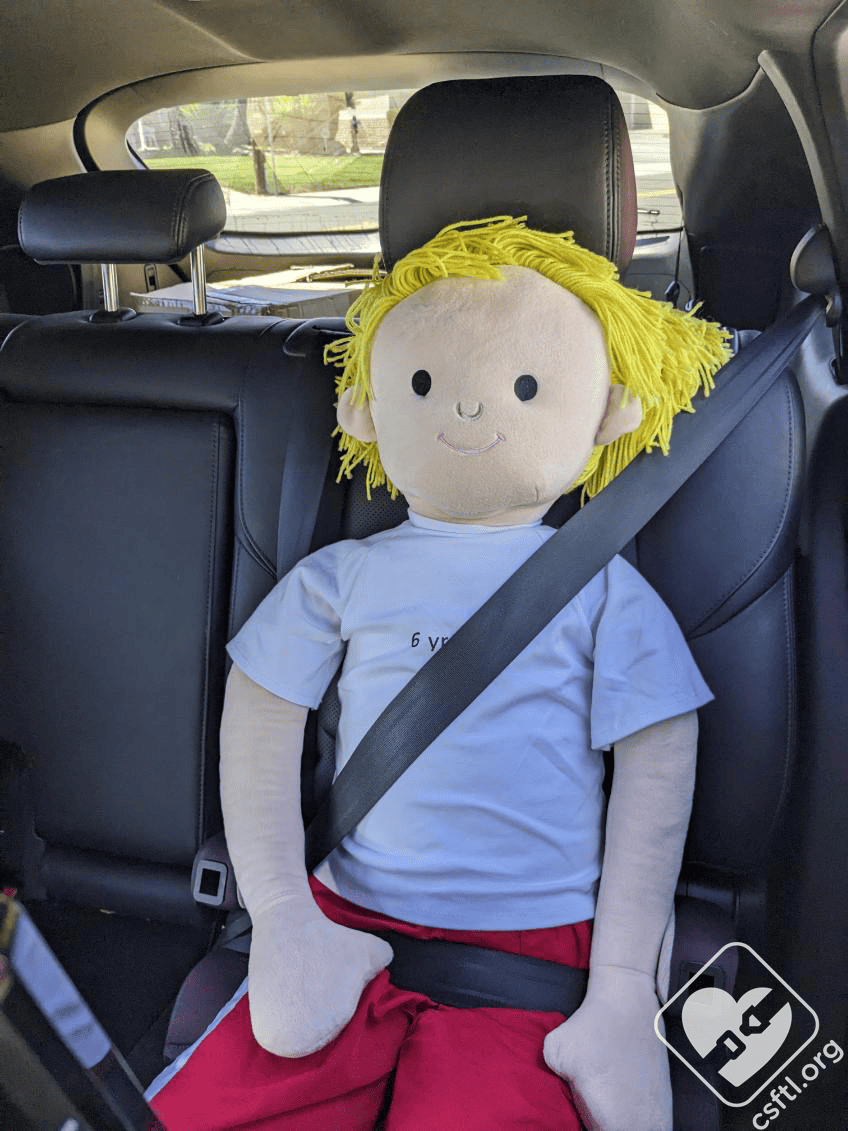
Safety 1st EverSlim 6 year old doll backless booster mode
At this point in the review writing process, our doll and our author were wilting in the summer heat. But they both paused for one last photo. In backless booster mode, the seat offers an excellent belt fit, the doll doesn’t need that shoulder belt guide adjuster that we’ve talked about so much.
7 Year Old Child
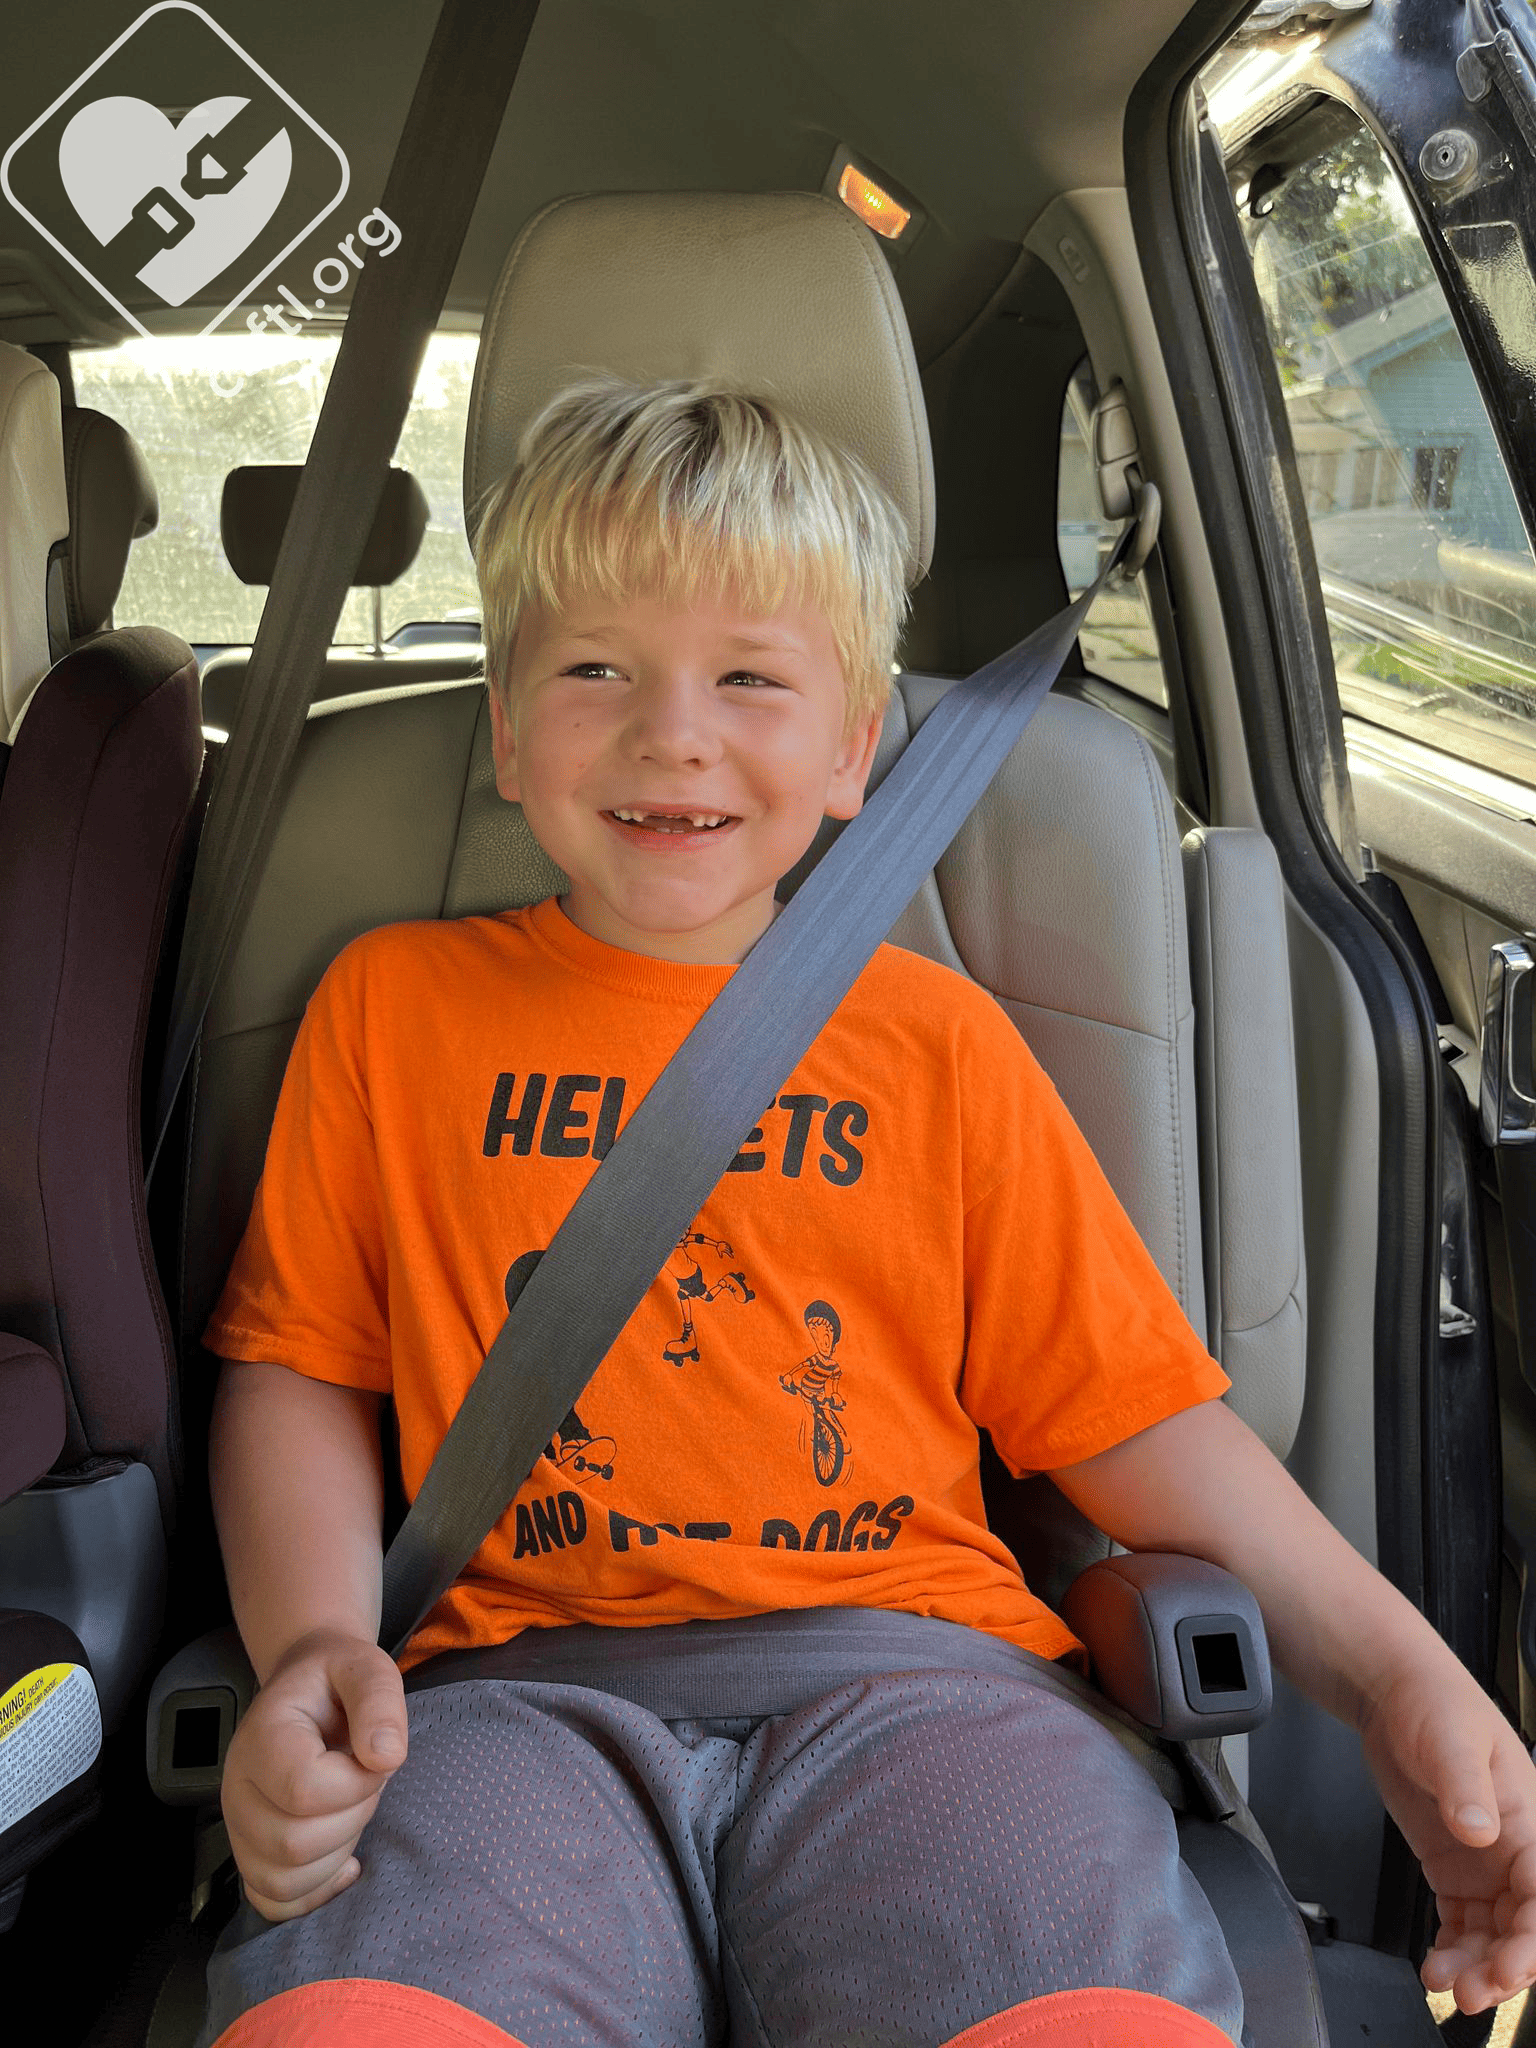
Safety 1st EverSlim backless back booster 7 years old
Our 7 year old model comes through once again, he’s far more comfortable in this mode. The shoulder belt is a bit high so if he were to use this seat long term, adding the shoulder belt guide adjuster would improve the fit.
Cleaning the Seat
The manual contains instructions on how to remove the soft goods of the seat before washing as well as how to put them back on after. The harness straps can not be fully removed from the seat for cleaning. The manual states that if you remove the hip harness threads, you will not be able to rethread it.
Important Information: Where to Find
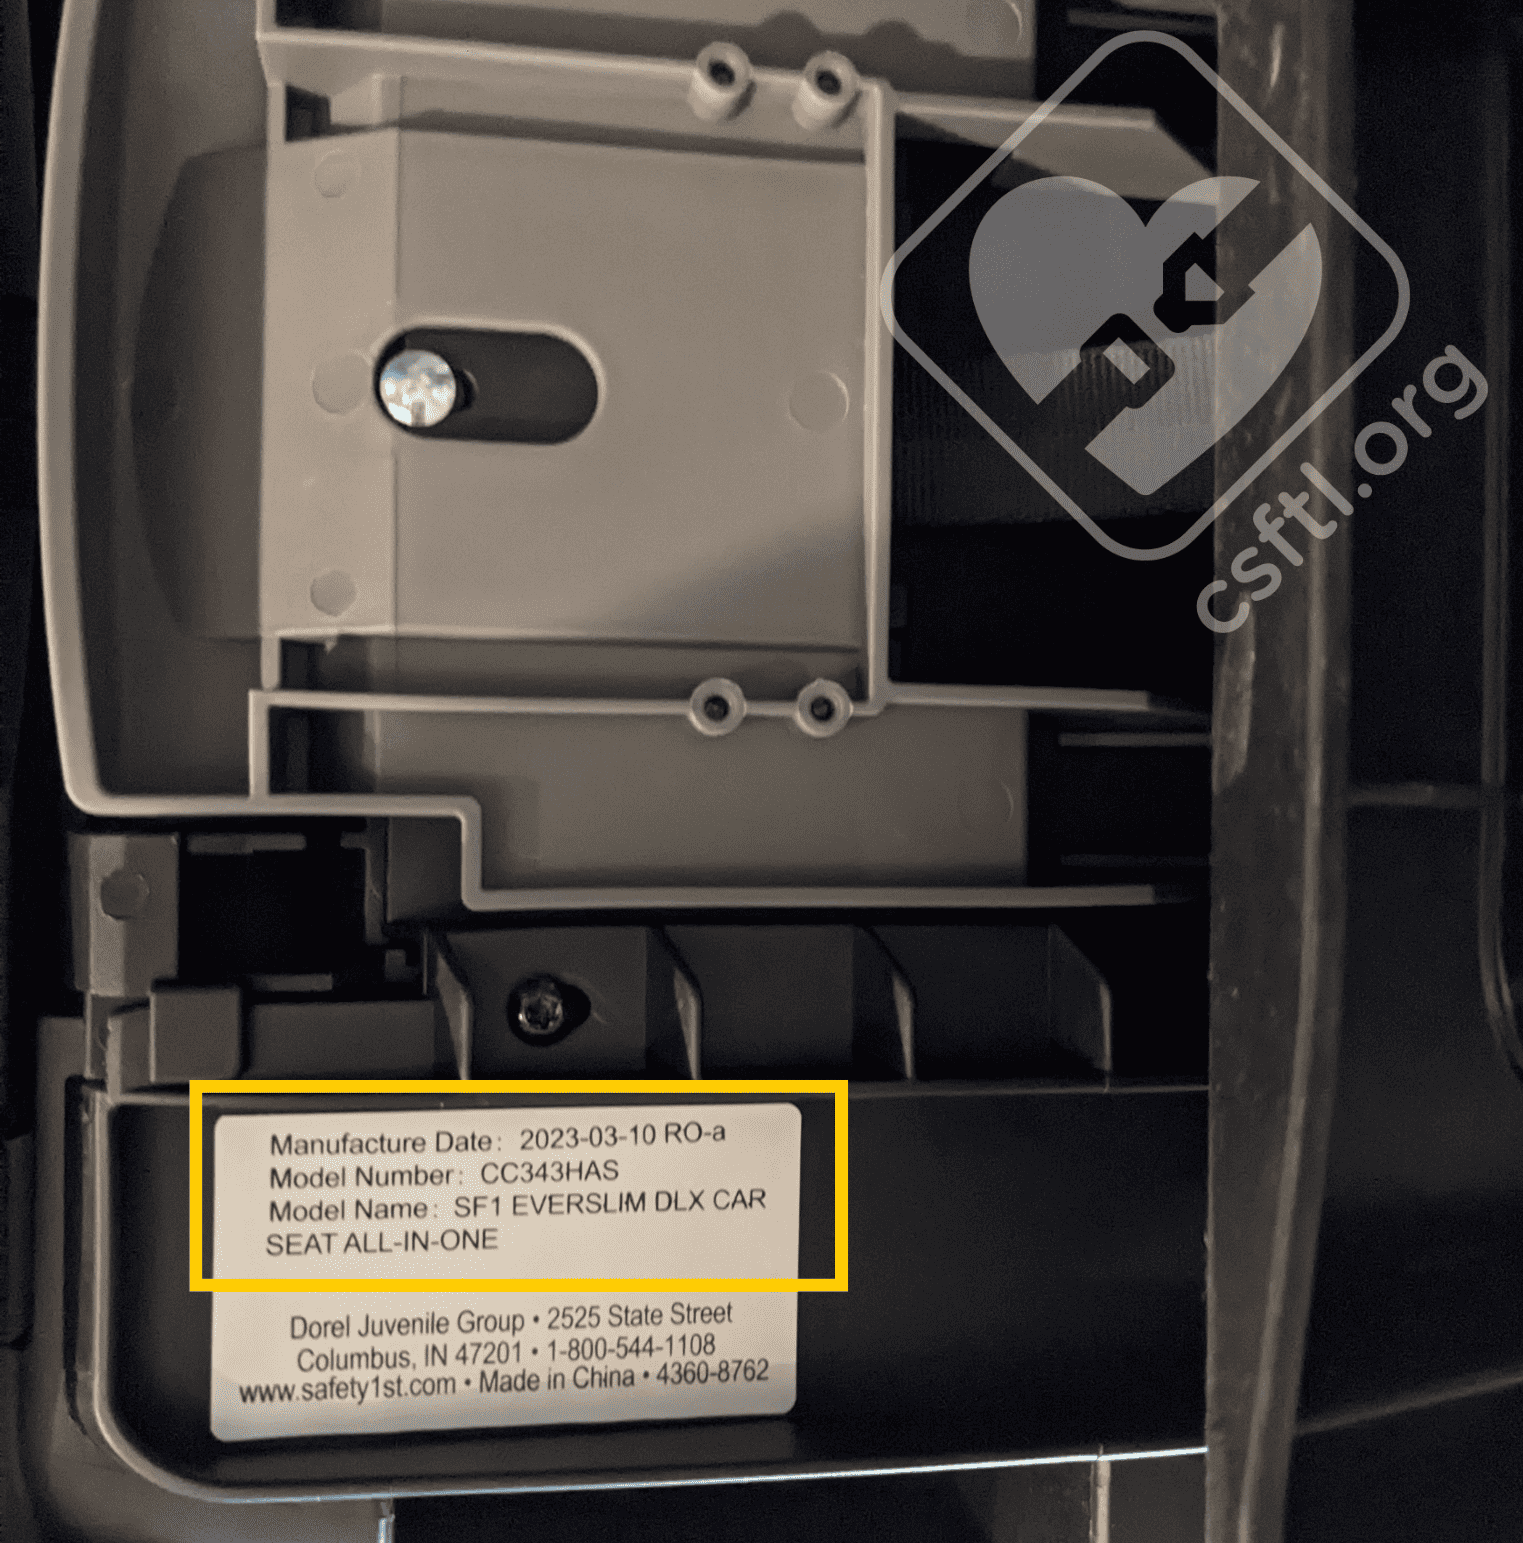
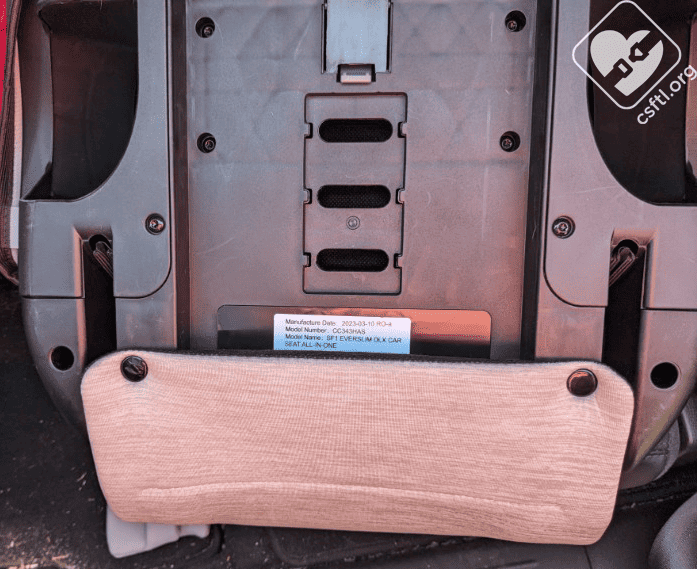
The EverSlim/SlimRide’s manfacturer label is on the bottom of the seat.
Date of manufacture label: The white, rectangular label with the date of manufacture is on the bottom of the main car seat shell and the bottom of the backless booster.
Expiration: Page 75 of the manual states the seat expires 10 years after the date of manufacture.
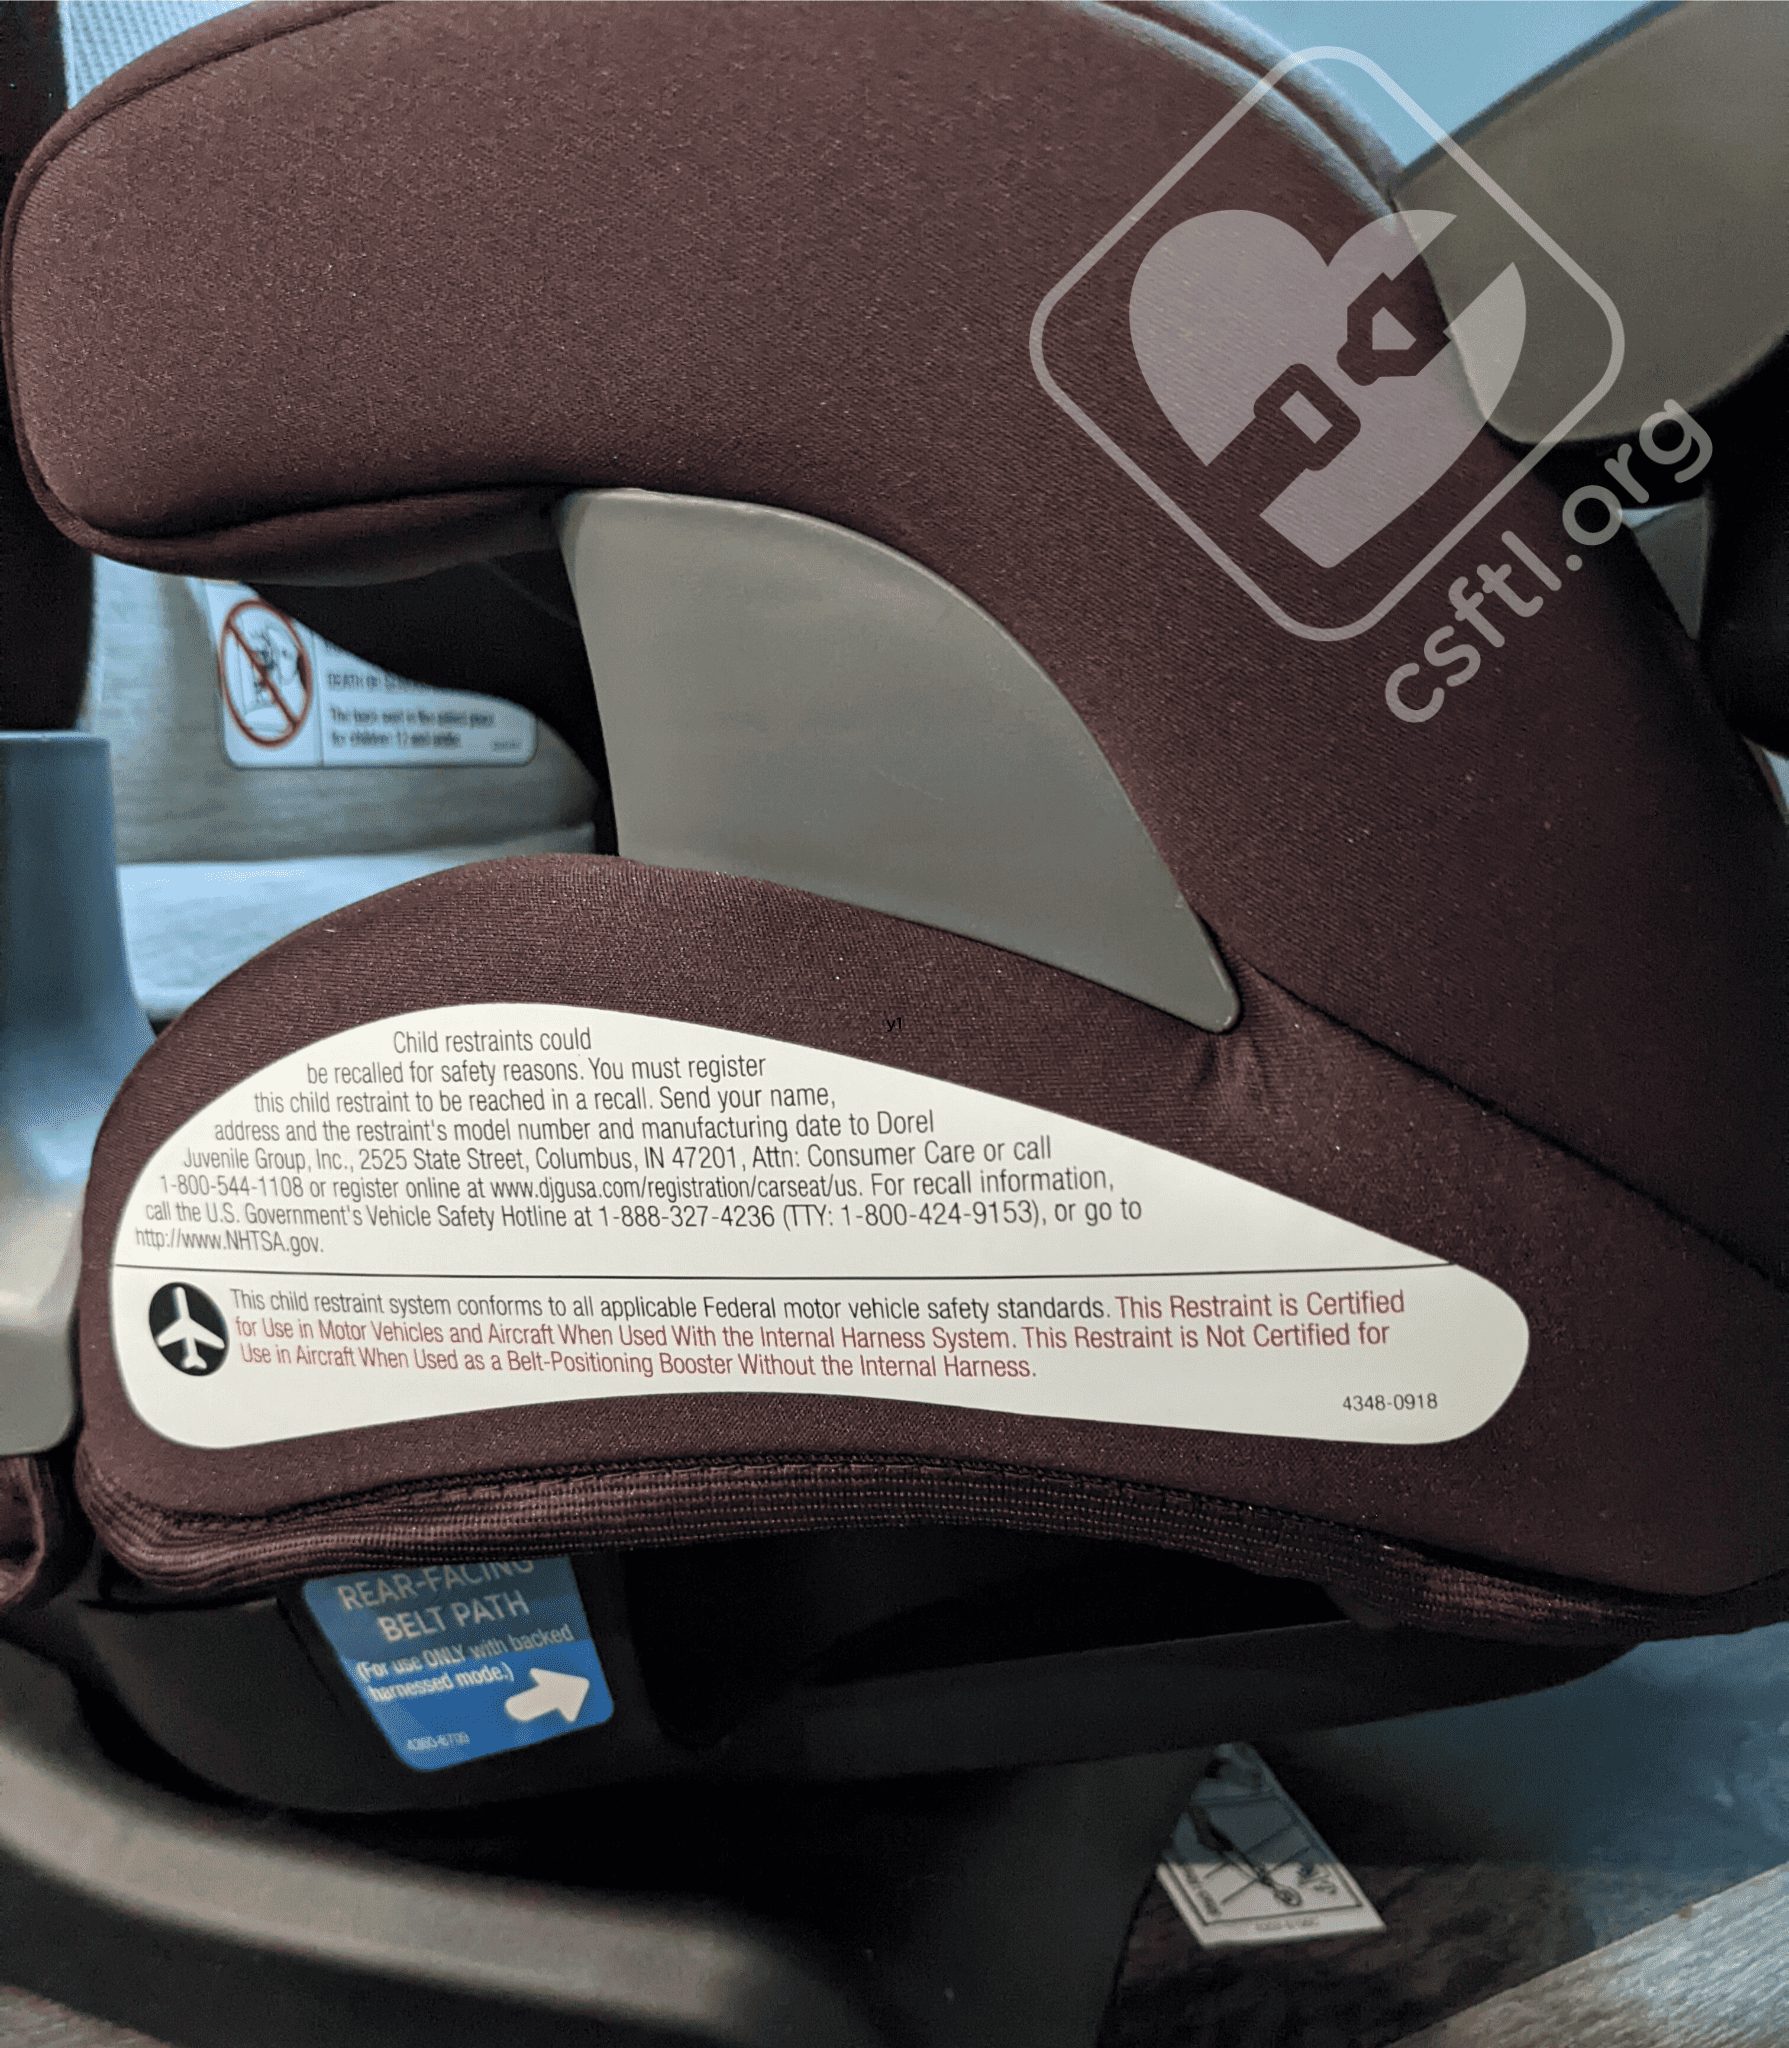
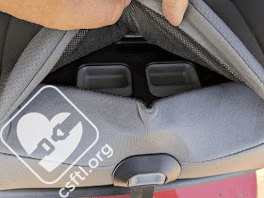
The FAA approval label for the Safety1st EverSlim/SlimRide is under the armrest.
FAA Approval: The EverSlim is FAA approved in harness mode only. The label is on the side of the seat under the armrest of the backless booster.
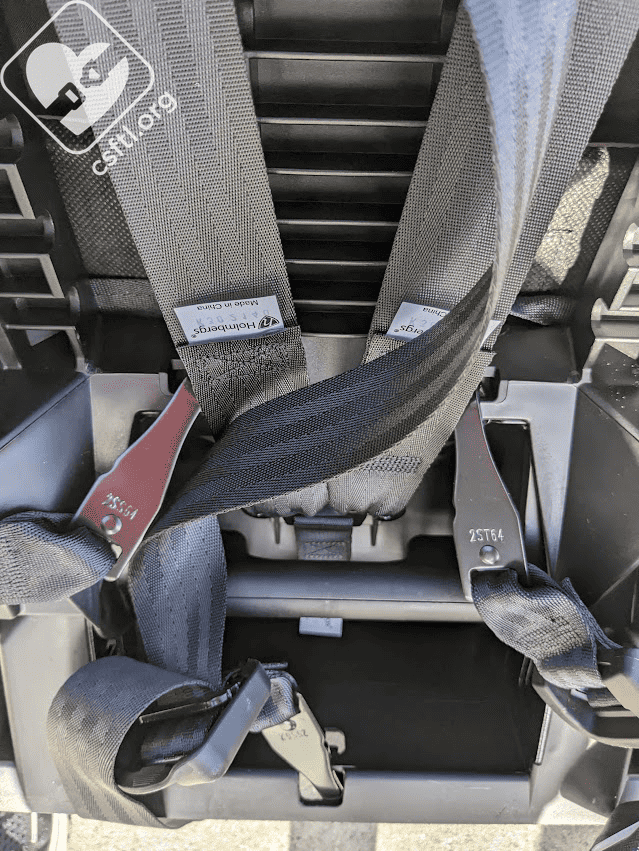
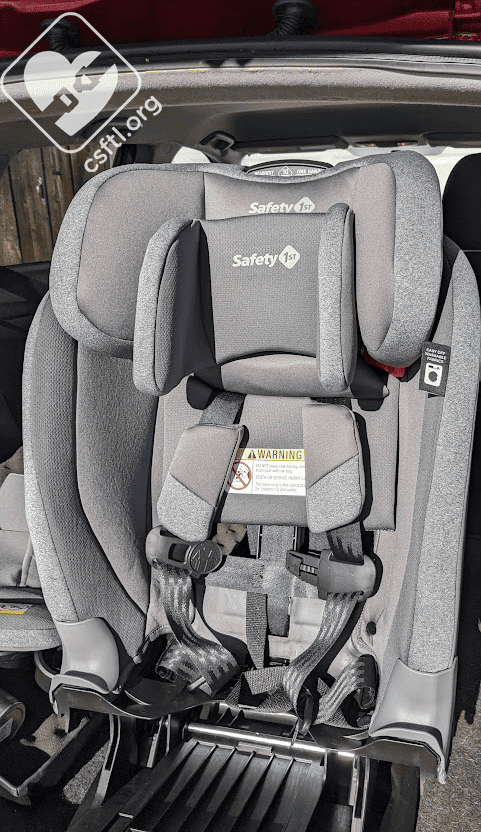
Safety 1st EverSlim top tether and lower anchor storage
Top Tether Anchor Storage: The tether anchor stores on its own bar in the center at the bottom of the back of the seat.
Lower Anchor Storage: Each lower anchor stores on its own bar on either side of the back of the seat, above the top tether anchor storage.
Overall Thoughts
A team of CSFTL admins contributed to this review. We were pleasantly surprised by the seat in a lot of ways: overall, it is overall fairly easy to use. Its narrow width makes it a great contender tight spaces. It’s not extra long-lasting in terms of child height (though it does fit our 6 year old doll in all modes, we’d love to see children ride in harnessed car seats until around that time so that’s actually fine) but for what it is — a well-featured, reasonably-priced, narrow car seat that installs without too much fuss, the EverSlim/SlimRide is a winner of a seat!*