
UPPAbaby Rove
The UPPAbaby Mesa and now the Aria are mainstays of the rear facing only car seat world. It’s exciting to see that UPPAbaby has added a new convertible car seat to their lineup. Let’s meet the Rove!

UPPAbaby Rove QR Code
Right out of the box, the packaging includes a helpful QR code to get you started with registration and helpful videos. We love to see manufacturers include multiple ways for families to learn how to use their seats properly. Reading manuals can be tricky for many so having video resources via the QR code is a big win!
CSFTL Quick Stats
- Rear facing weight range: 14-50 pounds
- Rear facing height range: 49 inches or less, at least 1 inch of space above the child’s head
- Comfort inlay (rear facing insert): 14-20 pounds, optional
- Forward facing weight range: 30 – 65 pounds
- Forward facing height range: 49 inches or less
- Forward facing age minimum: None listed (best practice is to rear face until at least 2 years old, CSFTL and UPPAbaby strongly recommend keeping children rear facing until they reach the maximum height or weight limits of the car seat)
- Lower anchor weight limit:
- Rear facing: 40 pounds
- Forward facing: 45 pounds
- Replacement policy: replace after any crash
- Recline positions: 5
- Expiration: 10 years
- FAA certified for use on aircraft
Features
- Lockoff
- No rethread harness
- Multidirectional top tether — can be used in rear or forward facing mode
- Bubble recline indicator for rear and forward facing
- Detachable cupholder
Measurements
- Lowest harness position with insert: 8 inches
- Lowest harness position without insert: 10 inches
- Highest harness position: 16.5 inches
- Crotch Buckle Positions: 2, 3, and 4 inches
- Width of seat at shoulders: 19 inches
- Width of base: 14 inches
- Total seat weight: 25.7 pounds
Unique Feature
Multidirectional Top Tether
UPPAbaby Rove Multidirectional Tether Rear Facing
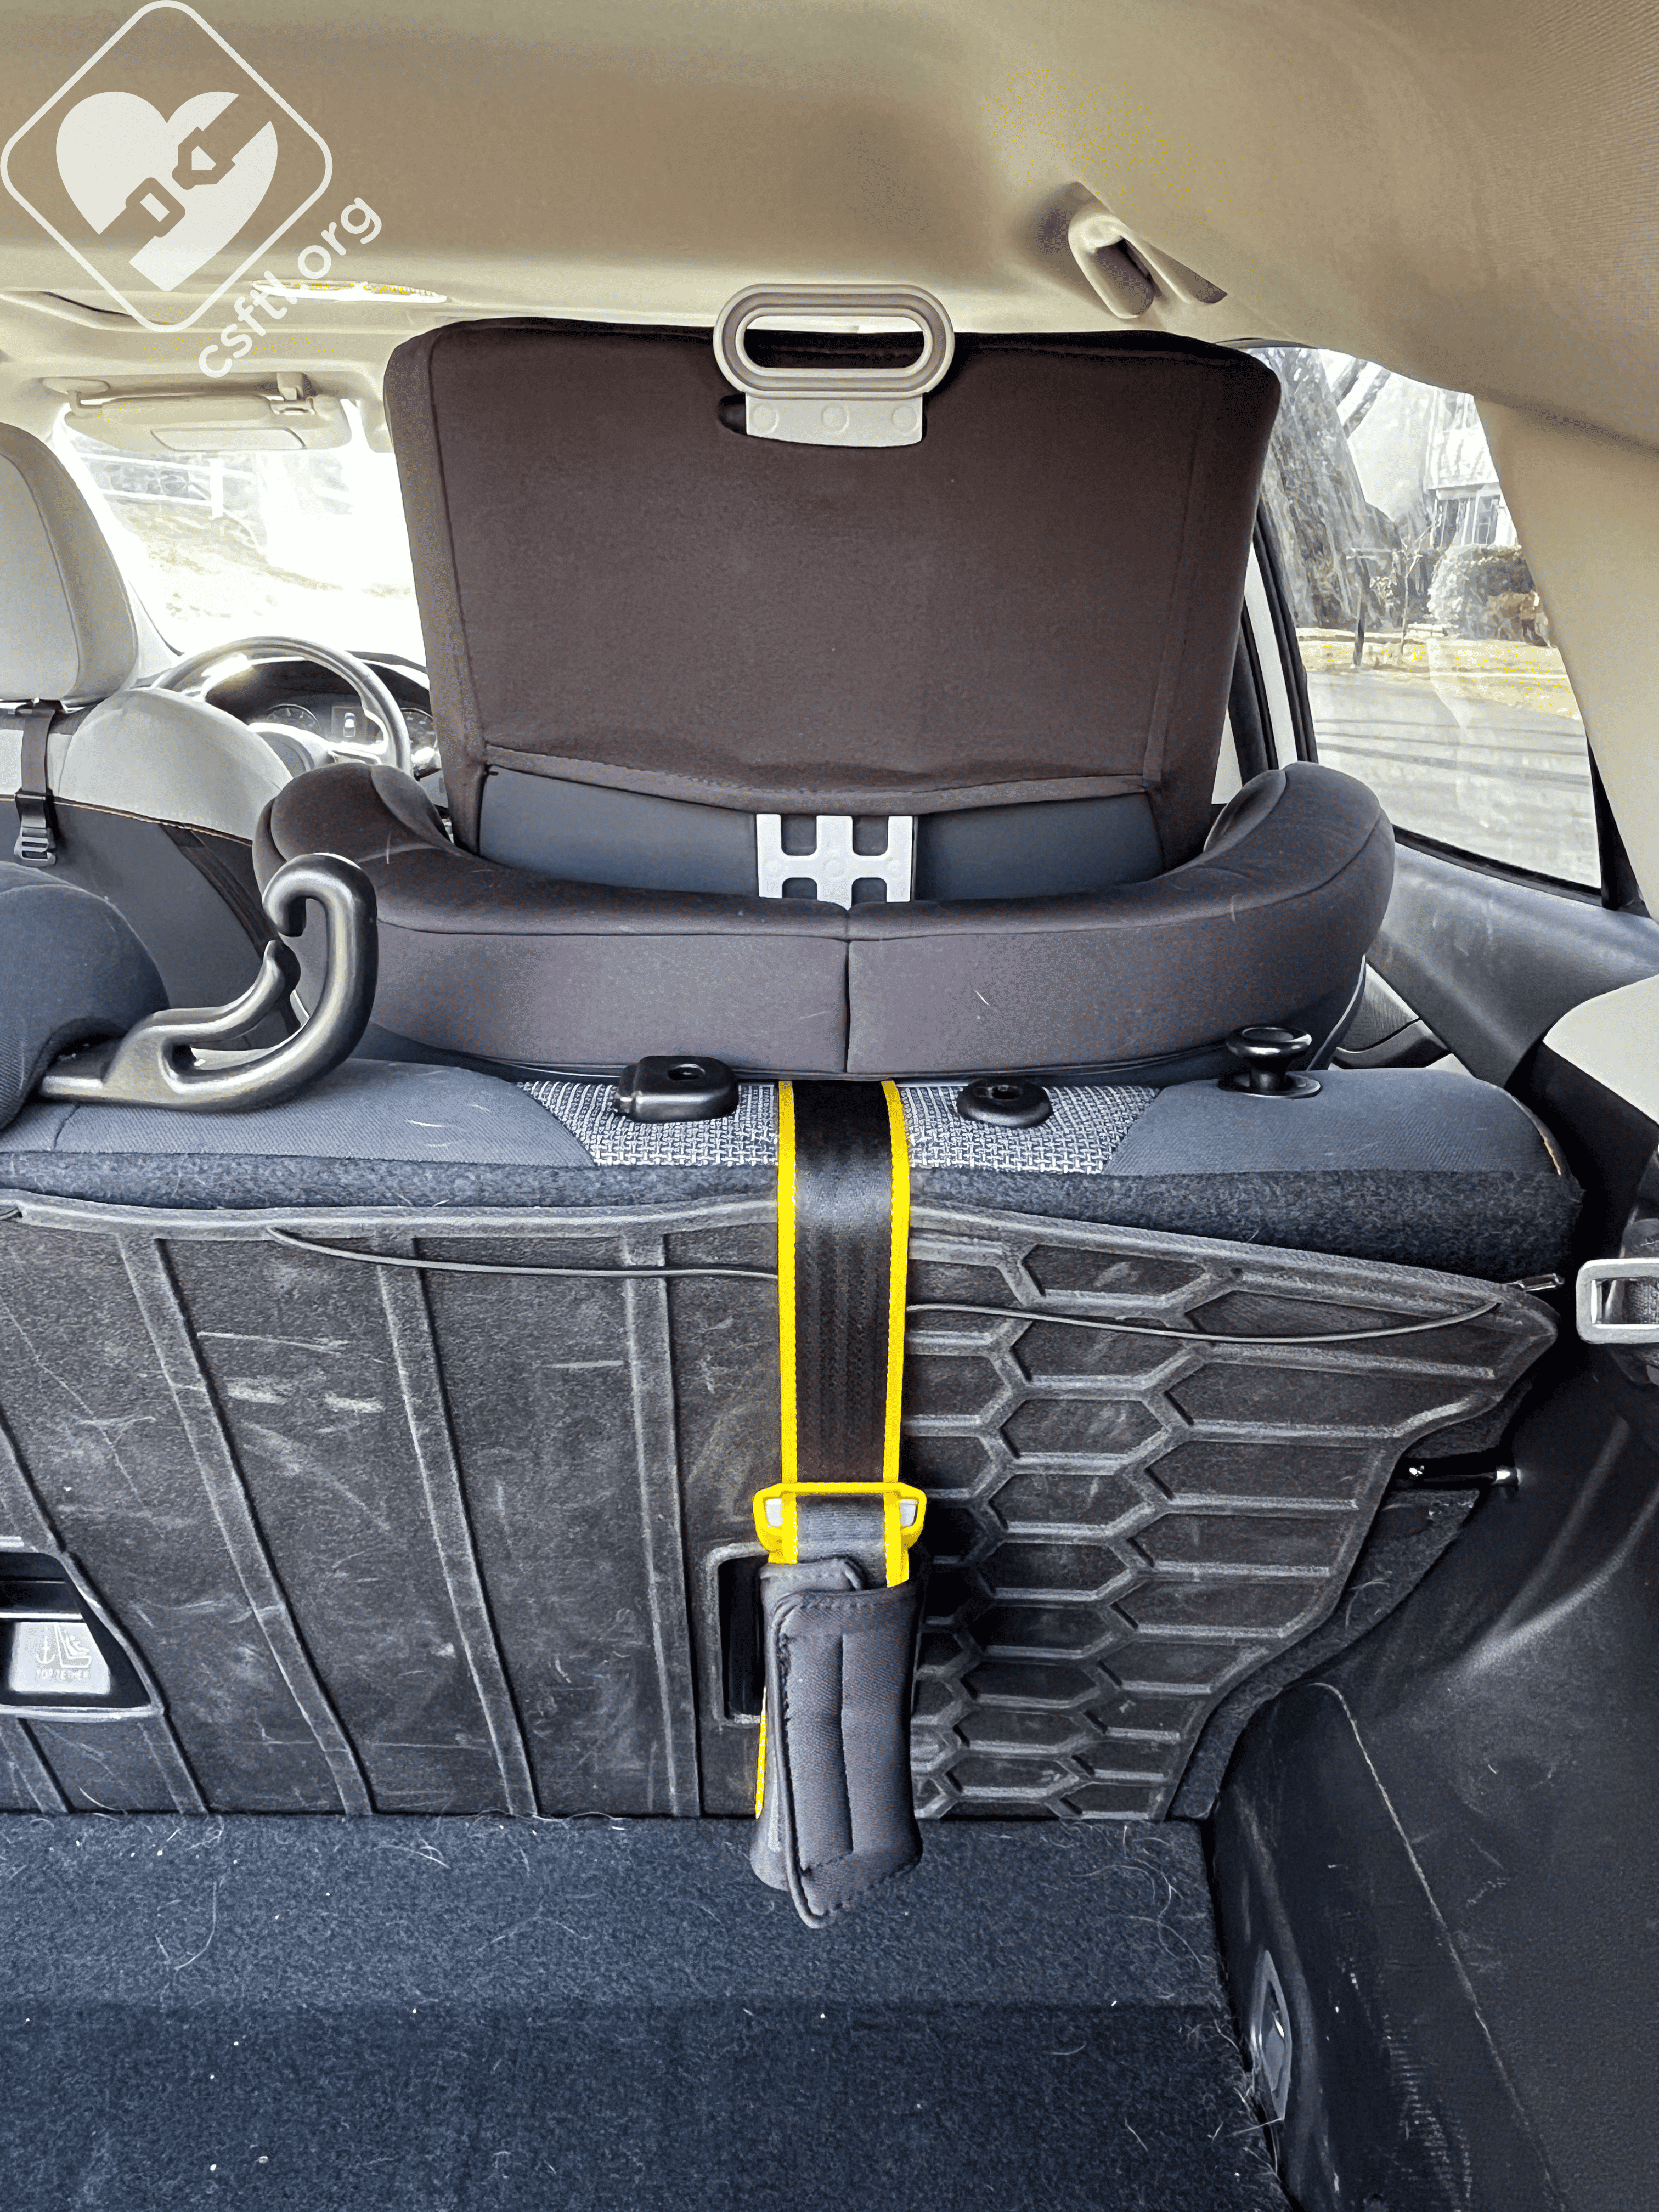
The Rove includes a top tether that’s got a unique set of attributes — it can be used in both rear and forward facing modes. The manufacturer highly recommends that caregivers use it any time the seat is installed. Using this in rear facing mode is an added safety feature that can help decrease the amount of movement the seat has during a crash. To use the top tether in rear facing mode, route the tether through the guide, around the seat and either around or through the vehicle headrest, depending on the style of your vehicle’s headrest. Check your vehicle manual for guidance on routing for your specific vehicle. Roll up and store any excess webbing within the sleeve.
UPPAbaby Rove multidirectional tether
In forward facing mode, the Rove’s top tether operates like we’d expect. To use the top tether in forward facing mode, route the webbing through or over the vehicle head restraint and secure it to the top tether anchor in the vehicle. Pull the webbing tight and you’re ready to ride!
UPPAbaby Rove headrest adjuster
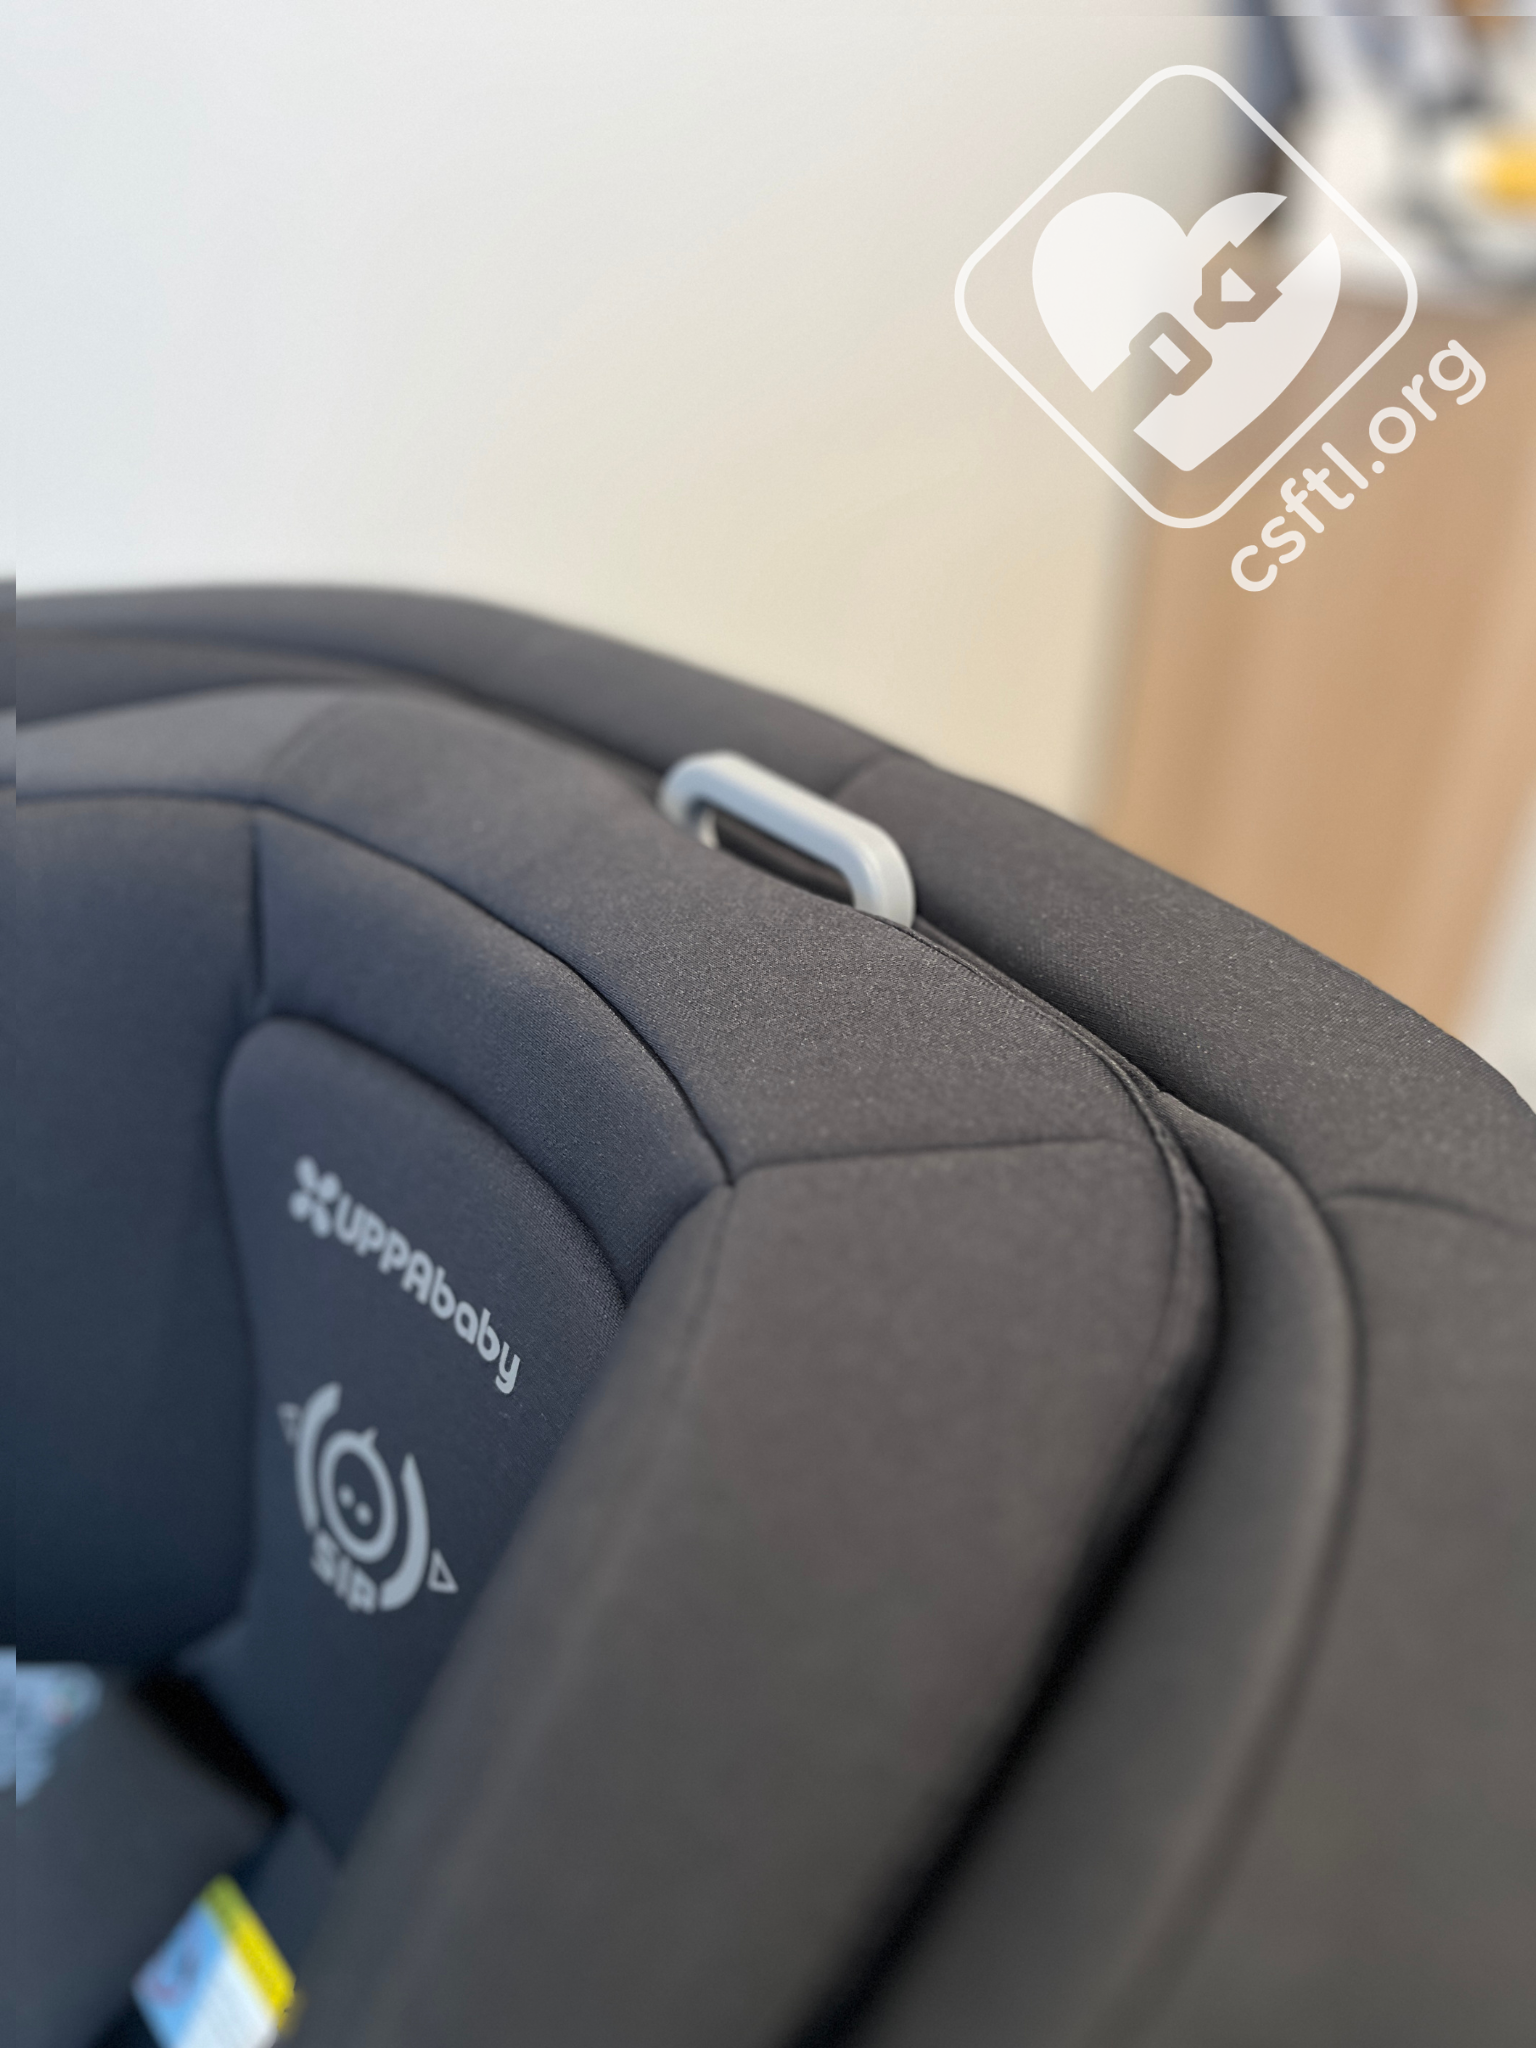
This seat also includes a no rethread harness to make adjusting as your child grows or between children easy peasy. To raise and lower the headrest you simply pull the gray tab seen here and push down or pull up depending on your needs. For rear facing, Uppababy states the straps should be at or 1-2 positions below the shoulders. For forward facing, it should be at or 1-2 positions above the shoulders. I found it easiest to adjust the headrest when the straps were loose.
UPPAbaby Rove recline handle
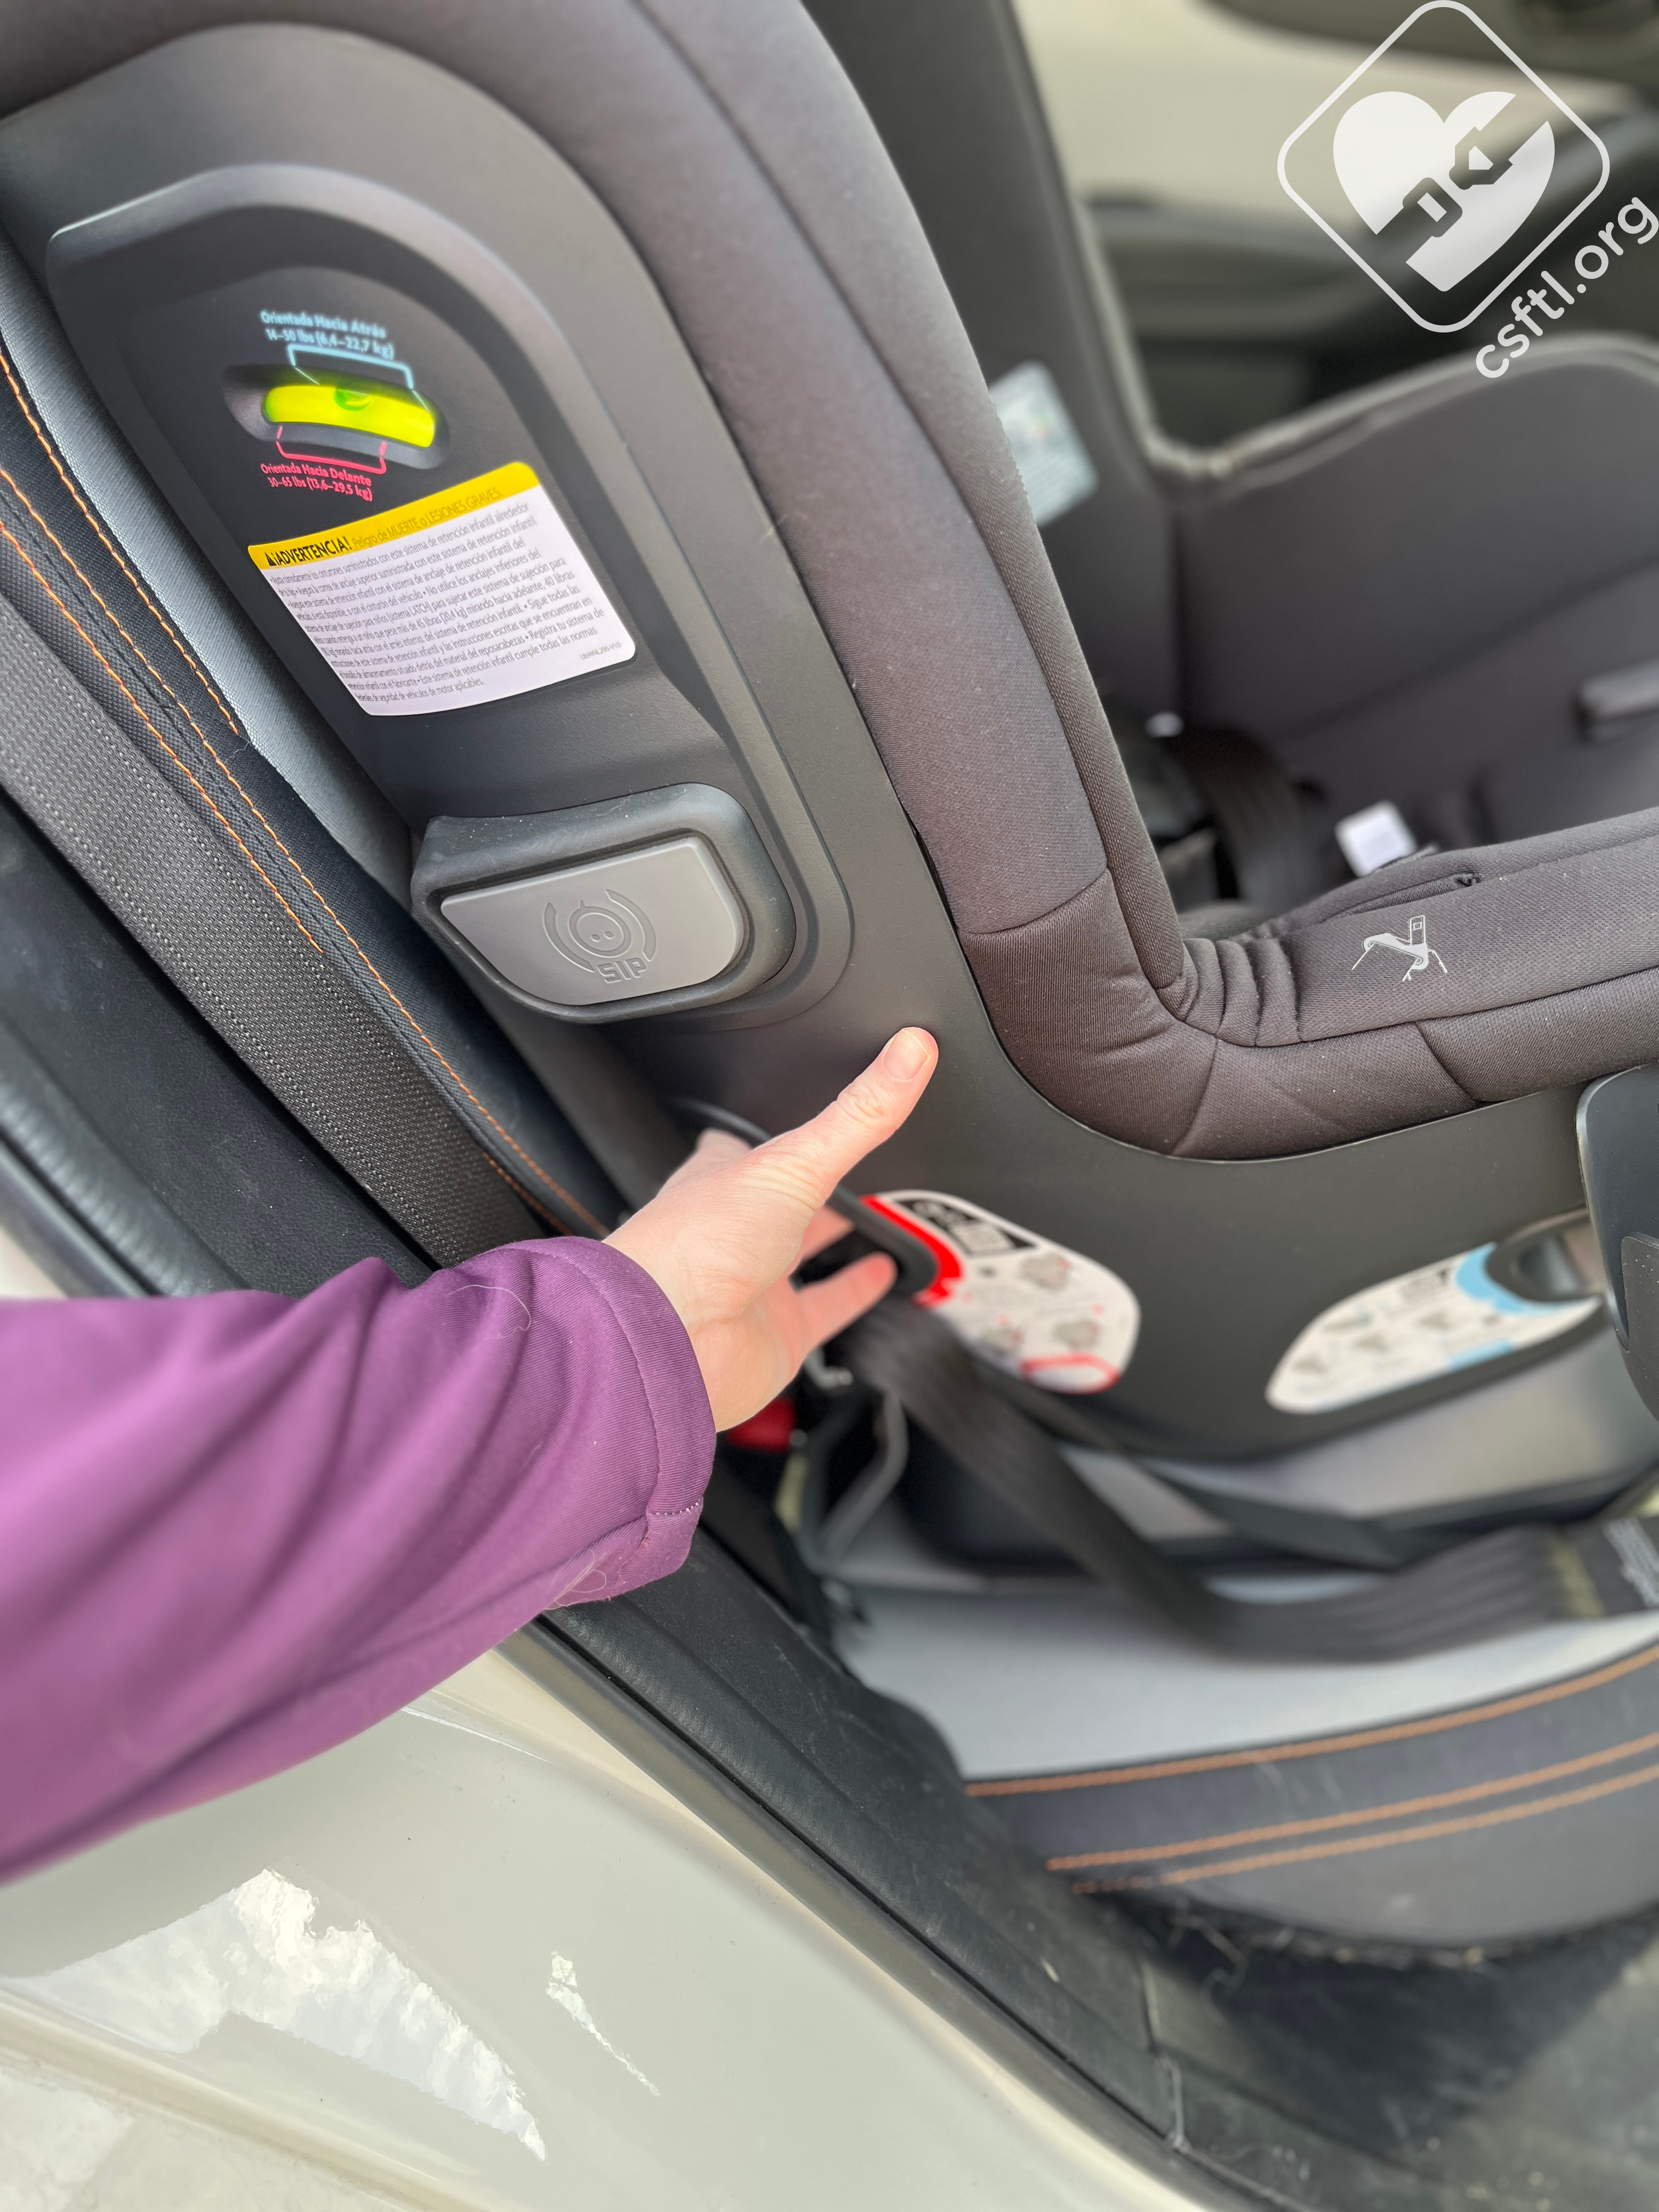
This easy to access recline handle can be found in the back of the car seat on the base. Give the handle a squeeze and lay it back or sit it up to get it in the desired recline for your rider! There are 5 recline options for this seat. For my vehicle (a Subaru Crosstrek), the most reclined position worked best for rear facing and the most upright worked best for forward facing.
Installation: Rear Facing
Vehicle Seat Belt and Top Tether

UPPAbaby Rove Rear Facing
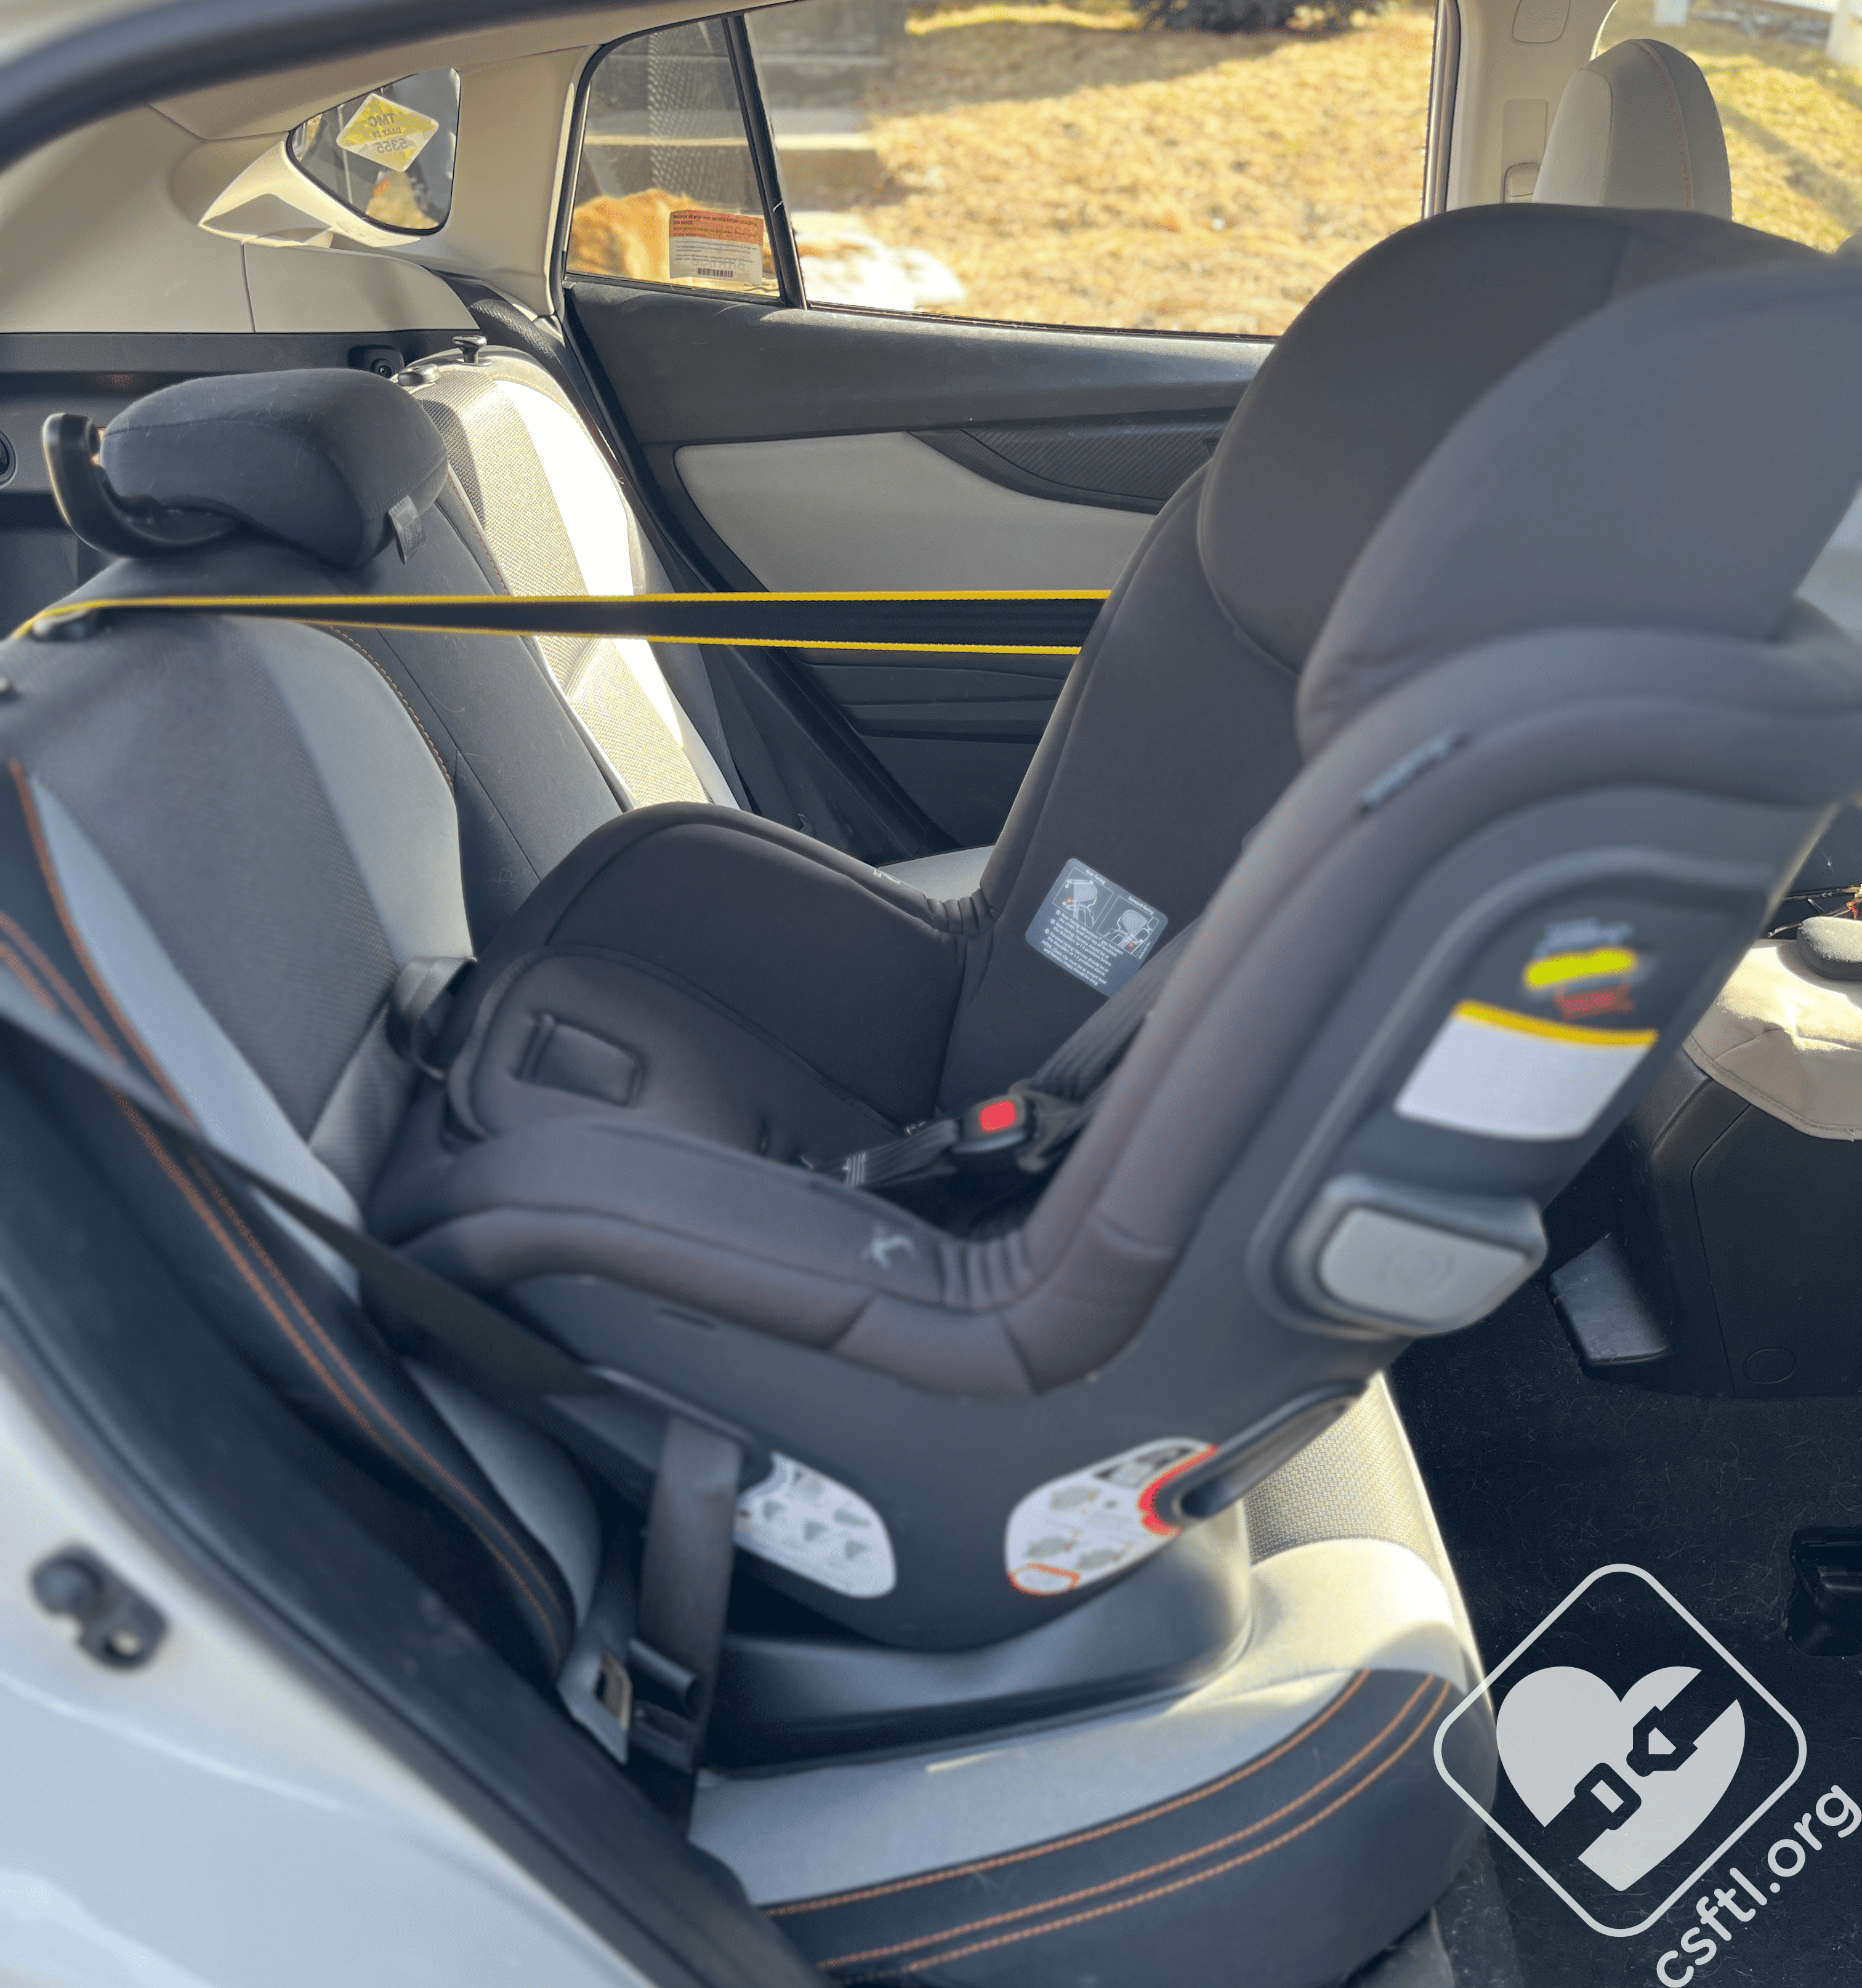
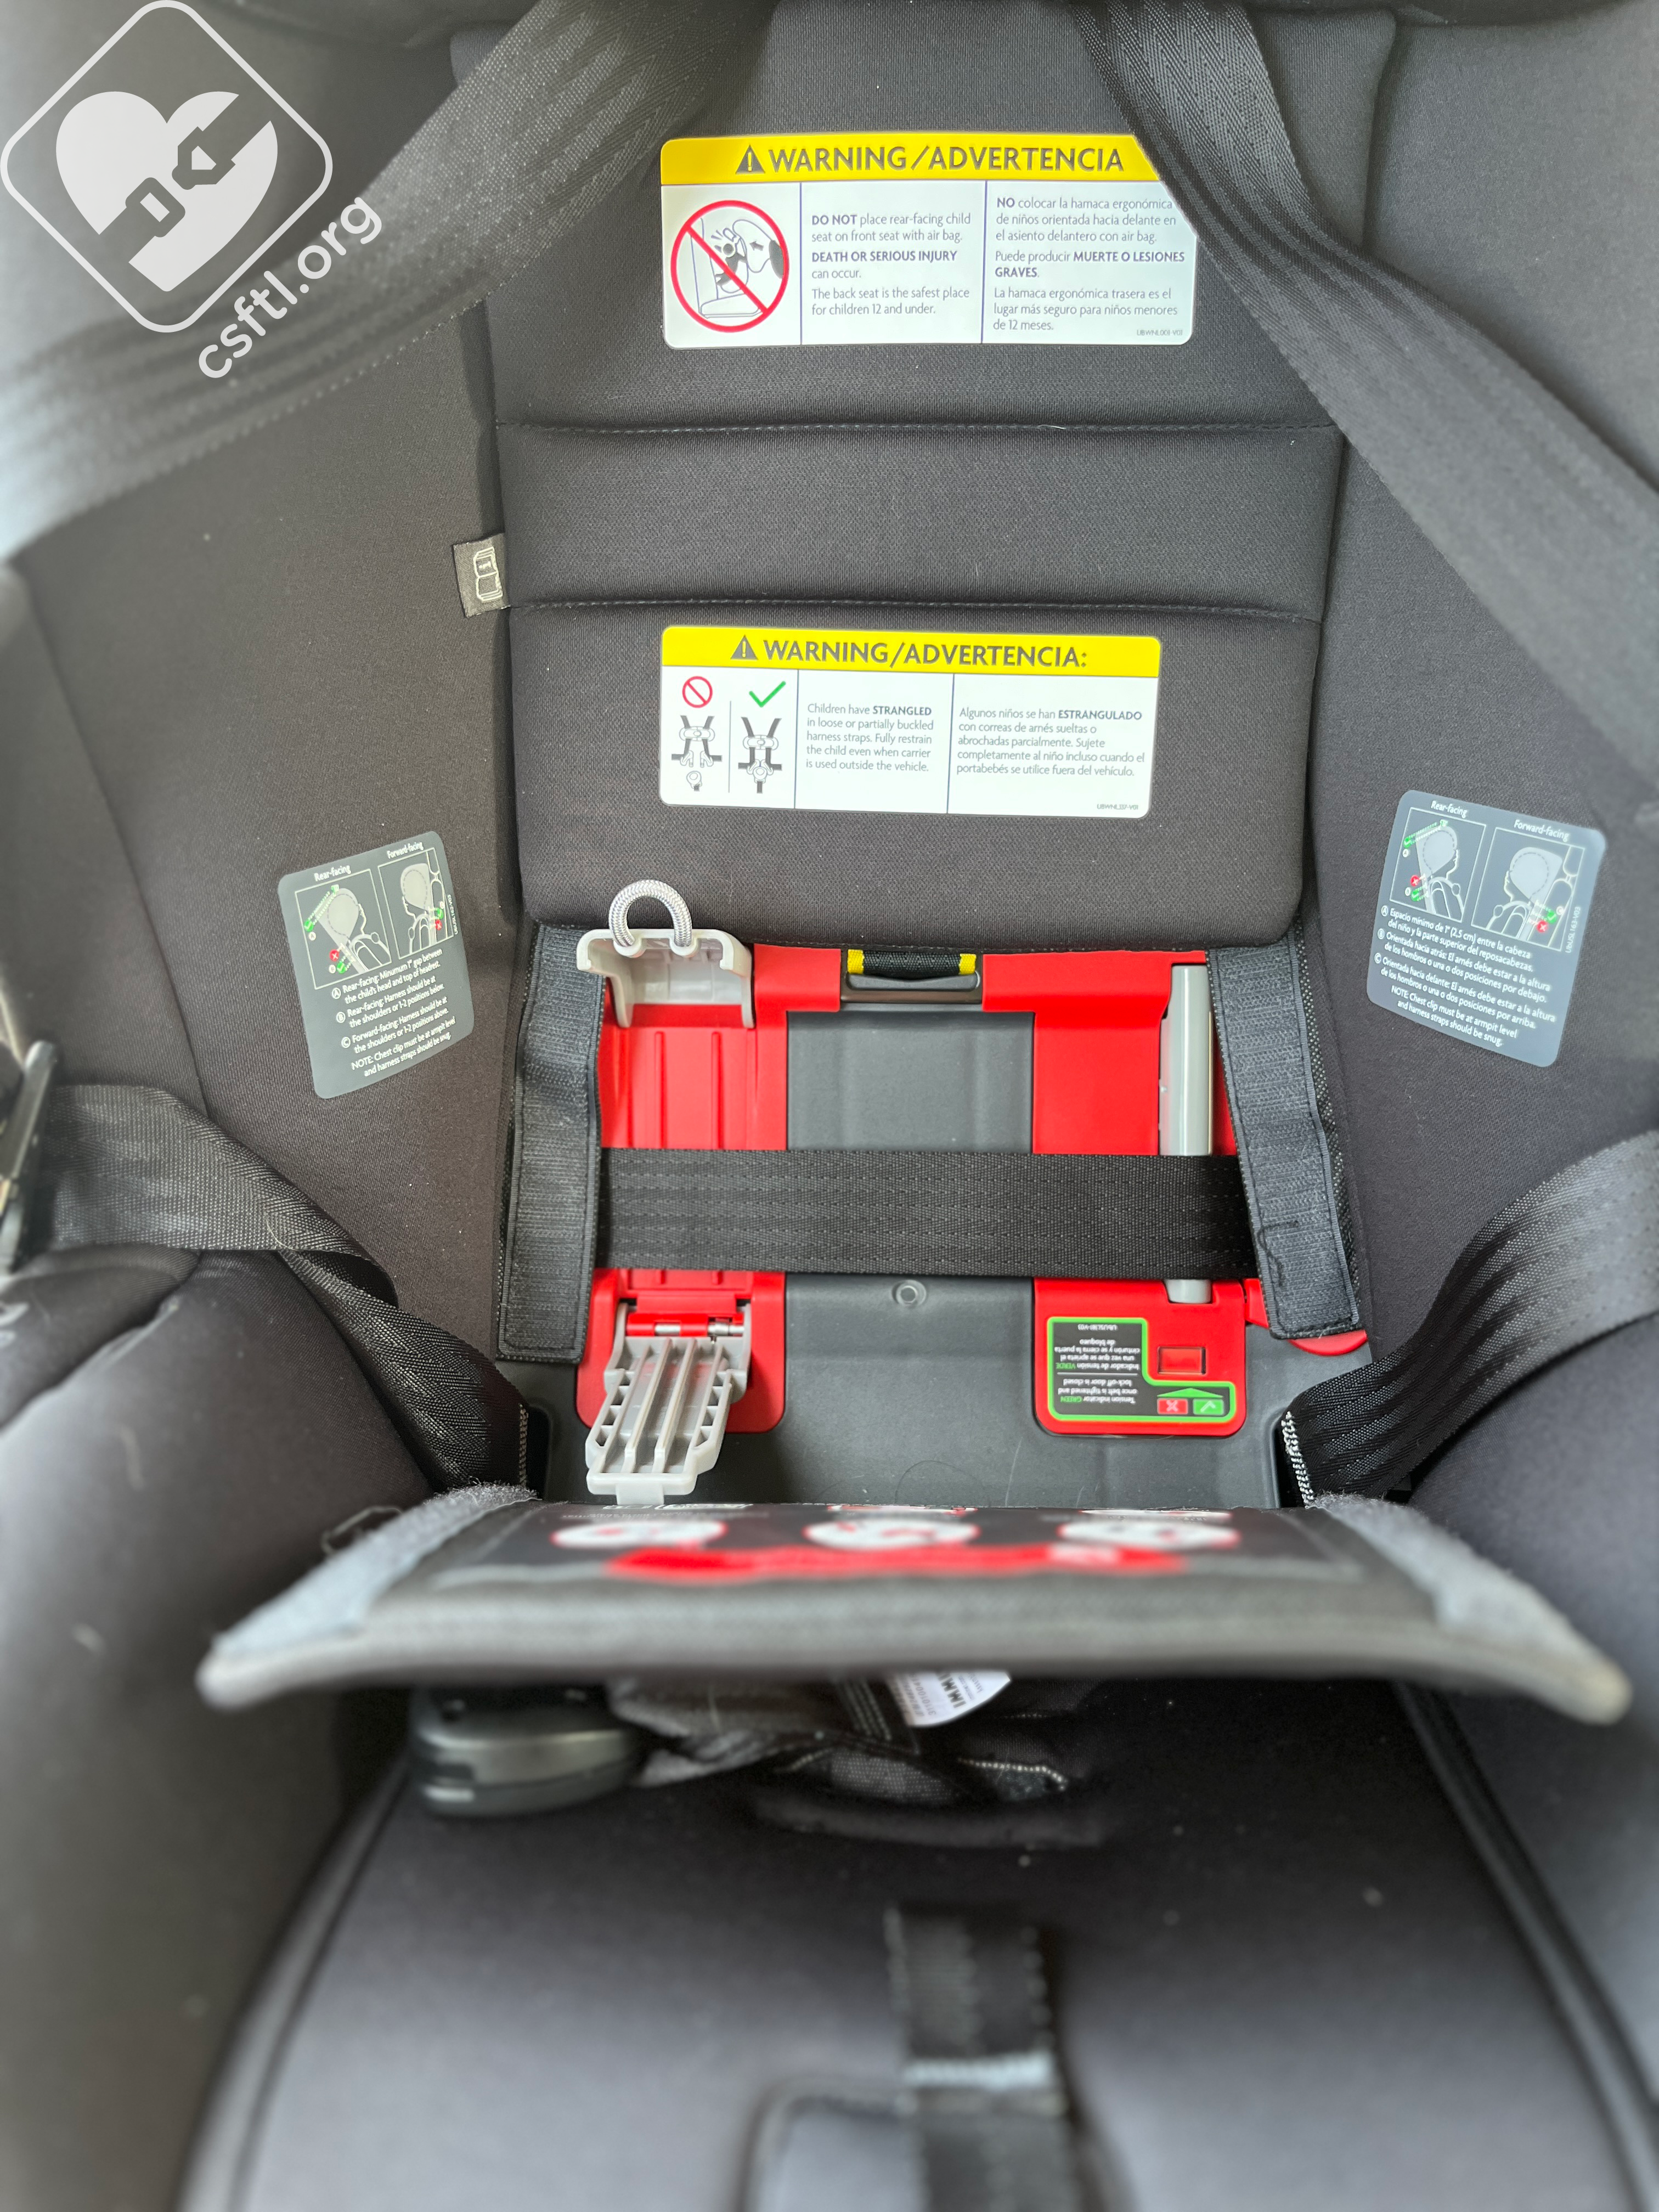
To install the Rove rear facing, place the Rove on the vehicle seat facing backwards and adjust the recline to the position that would work best for your child and your vehicle. To do this, squeeze the handle on the back of the seat base. UPPAbaby allows the use of a folded towel to adjust the recline level even further if needed. The recline bubble (seen below) needs to be in the rear facing section once installed. Unzip the seat pad to expose the rear facing belt path.
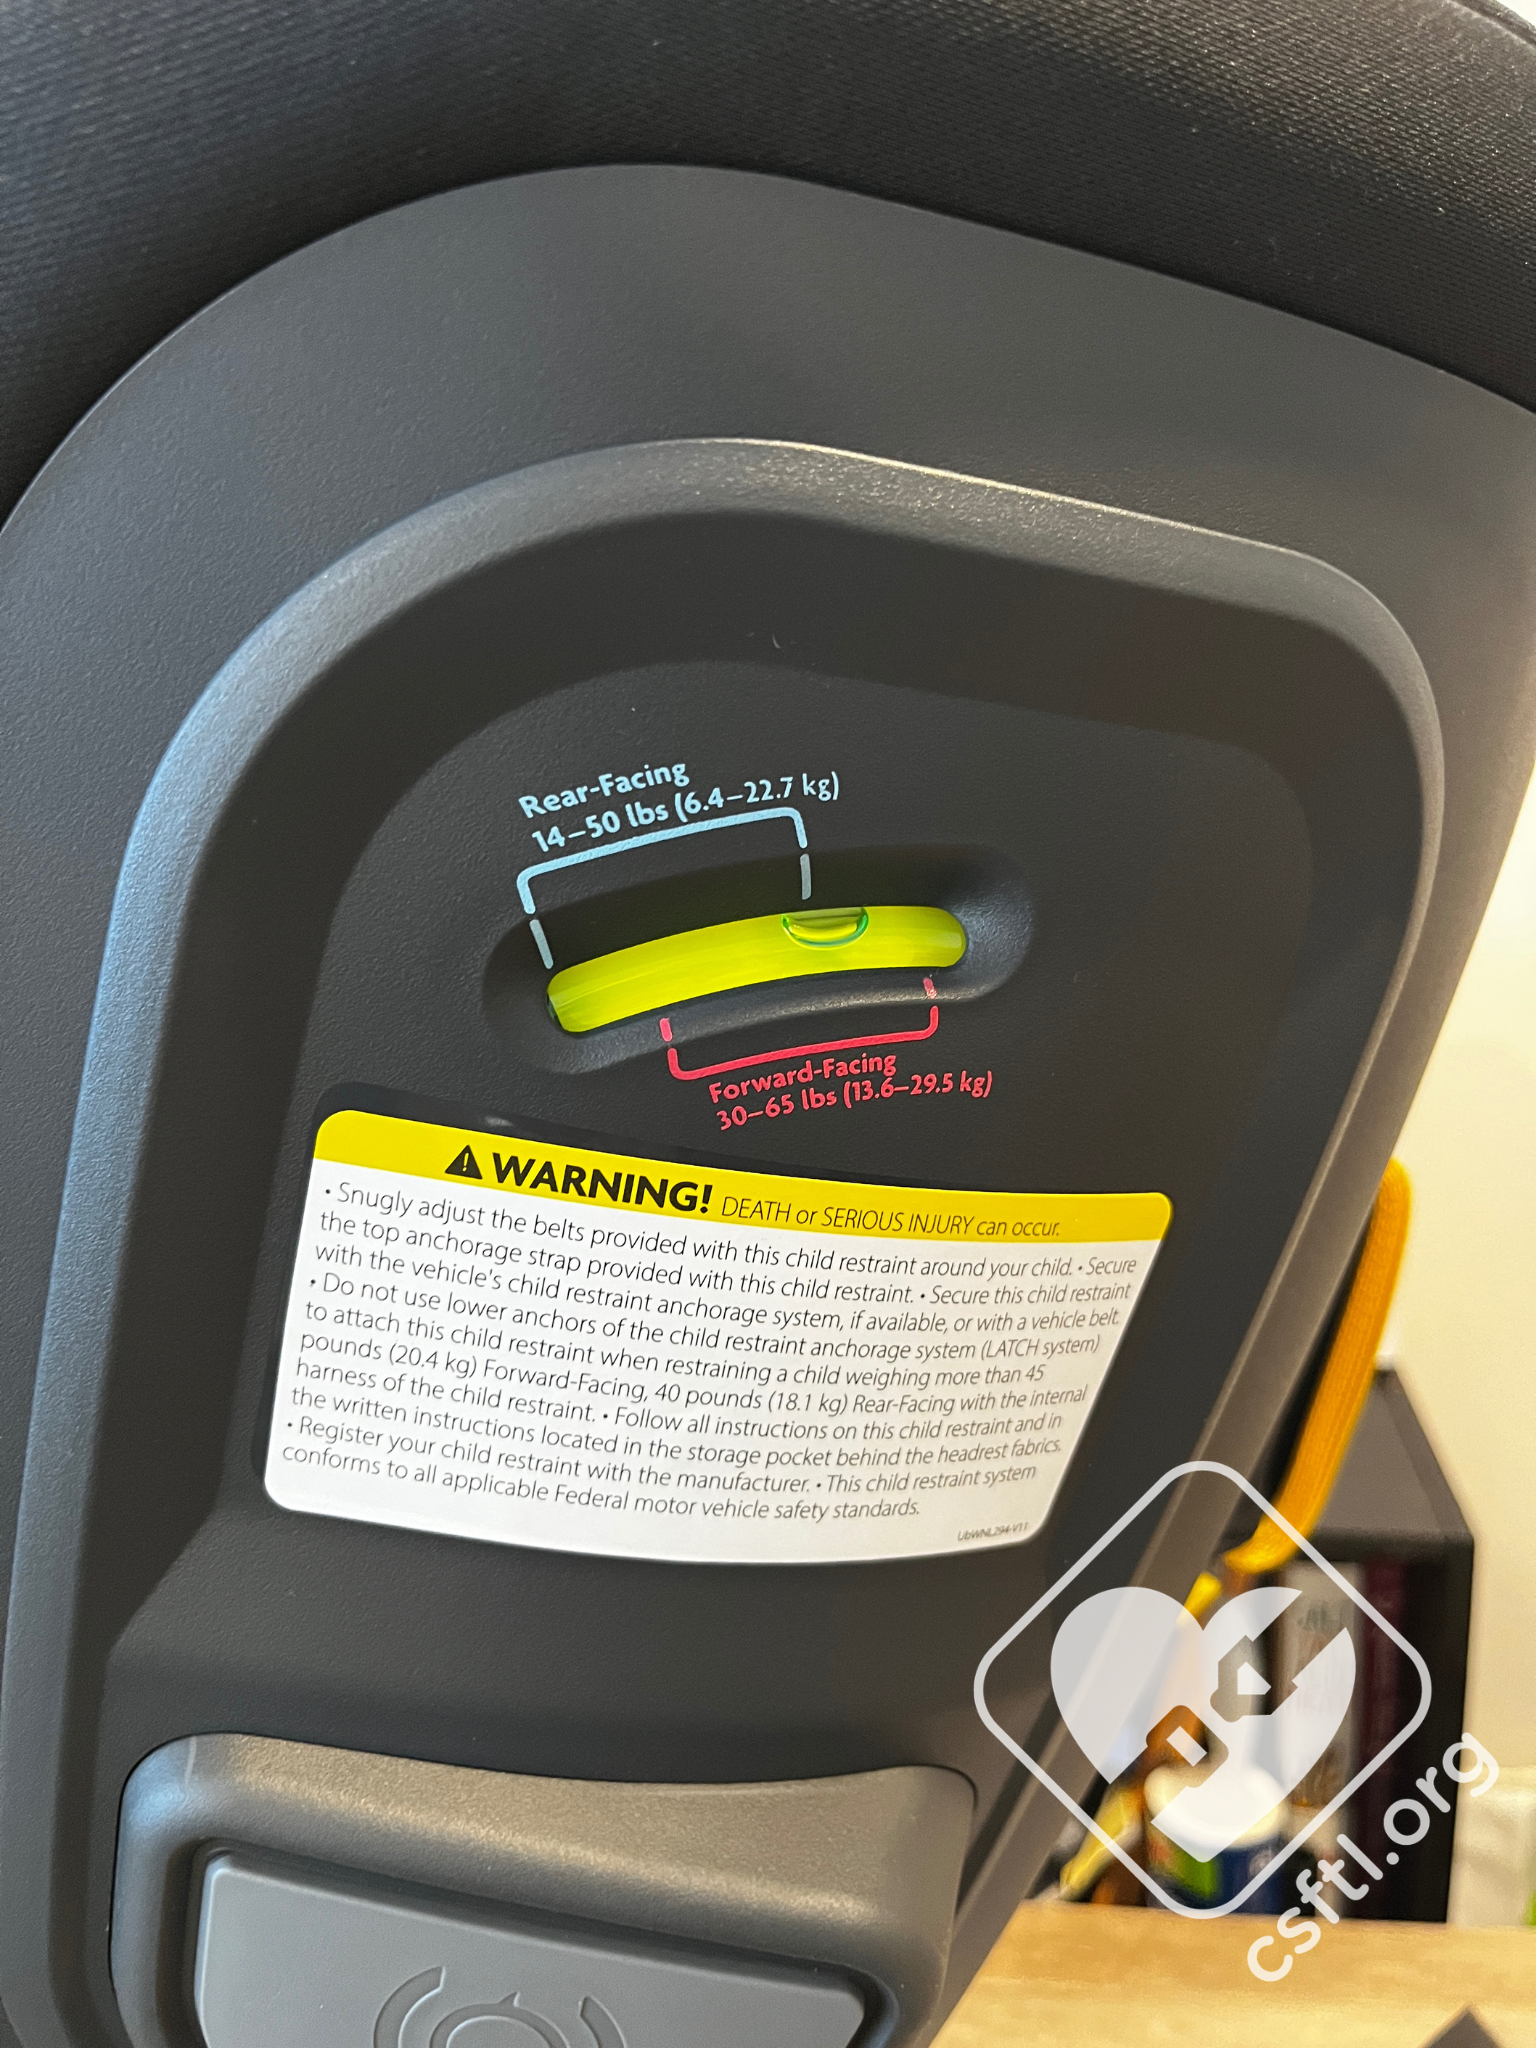
UPPAbaby Rove bubble indicator for rear facing and forward facing modes
Here is the recline indicator. For rear facing the bubble should be in between the blue lines.

UPPAbaby Rove Rear Facing Belt Path
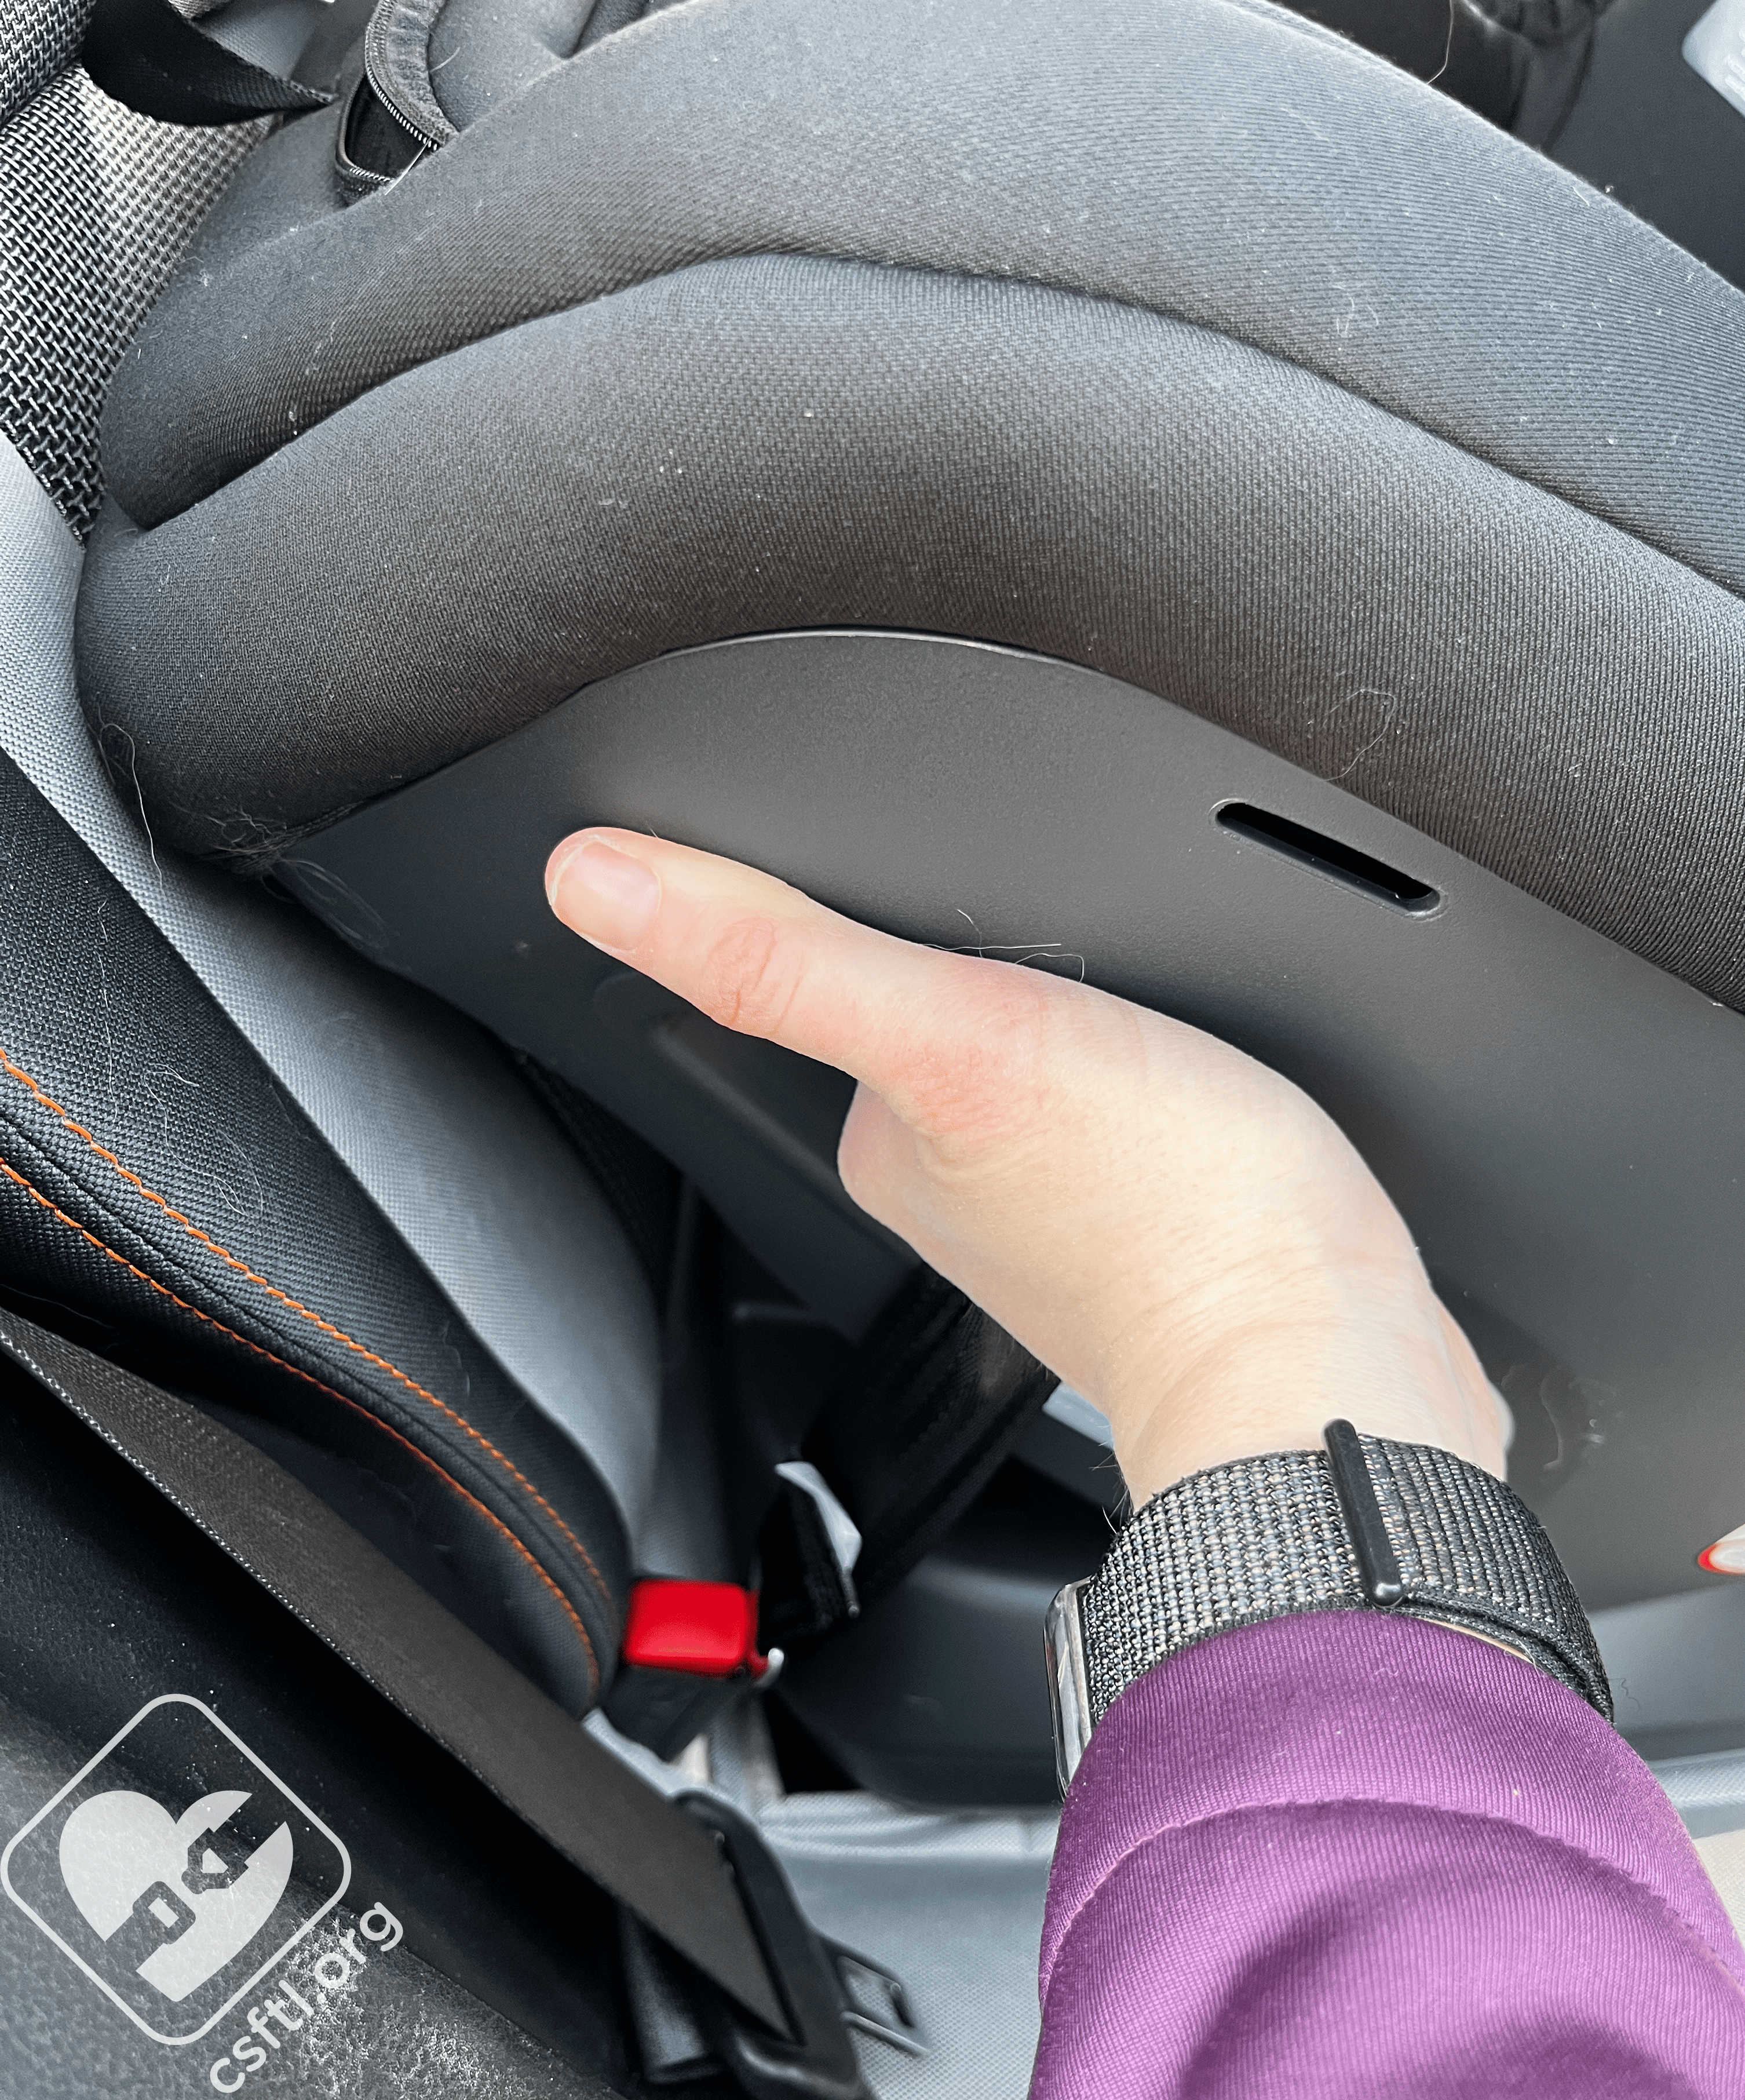
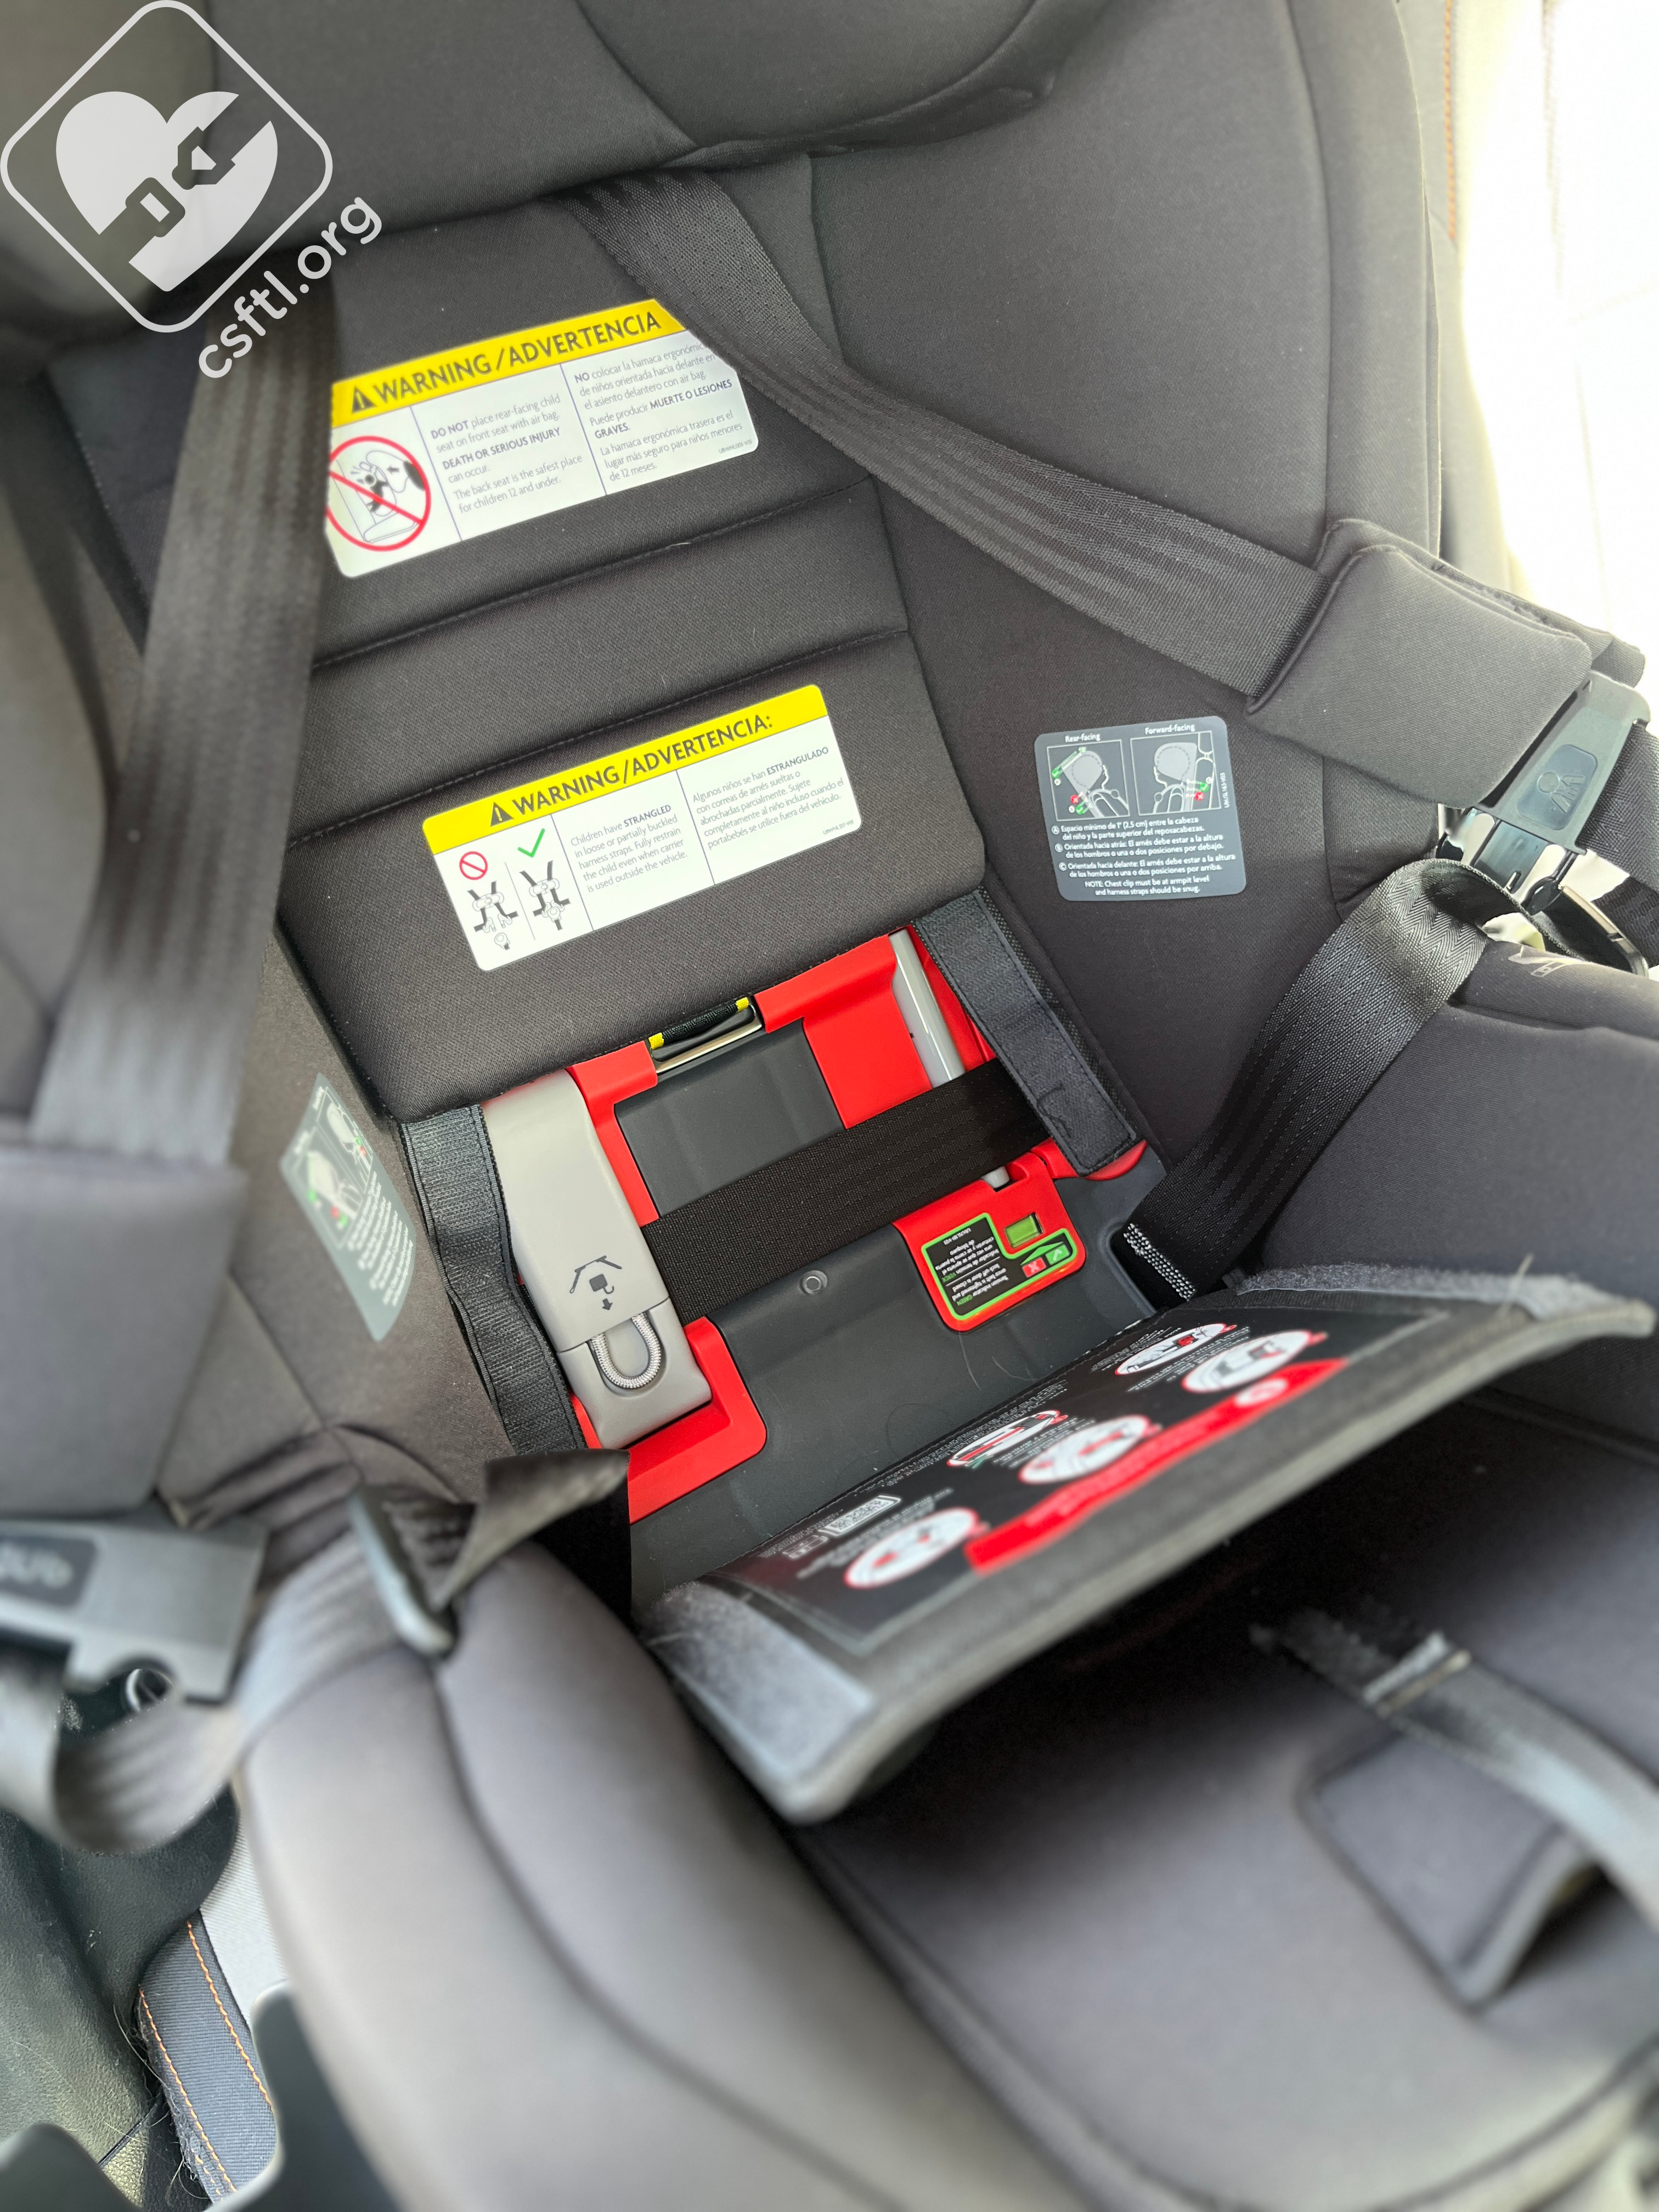
Open the lockoff and route the vehicle seat belt through the rear facing belt path under the lockoff and buckle.

UPPAbaby Rove rear facing seat belt install
Push down on the car seat with one hand while pulling up on the shoulder belt with the other to remove the slack in the seat belt. While holding tension on the seat belt, close the lockoff. While this sounds like it may take some coordination, it was pleasantly easy to achieve a tight install using this method!
Check the tension indicator on the opposite side of the lockoff to confirm that it has turned from red to green. The seat should not move more than one inch side to side or front to back when checked at the belt path with the force of a firm handshake.

UPPAbaby Rove rear facing seat belt install
Once the seat is installed, disconnect your top tether from its storage spot if you haven’t already done so and lengthen the tether. Route the top tether through the guide found on the back of the seat as seen here, wrap it around the seat and secure it to the top tether anchor in the vehicle and tighten. I opted to use the side furthest from the door but it didn’t specify that I had to in the manual. Refer to your vehicle manual for top tether routing rules but typically it will go between the posts or on the outside of the headrest on the same side that you routed the tether on the car seat. Make sure to roll up and store extra webbing once its secured. UPPAbaby recommends you always use the multidirectional tether.
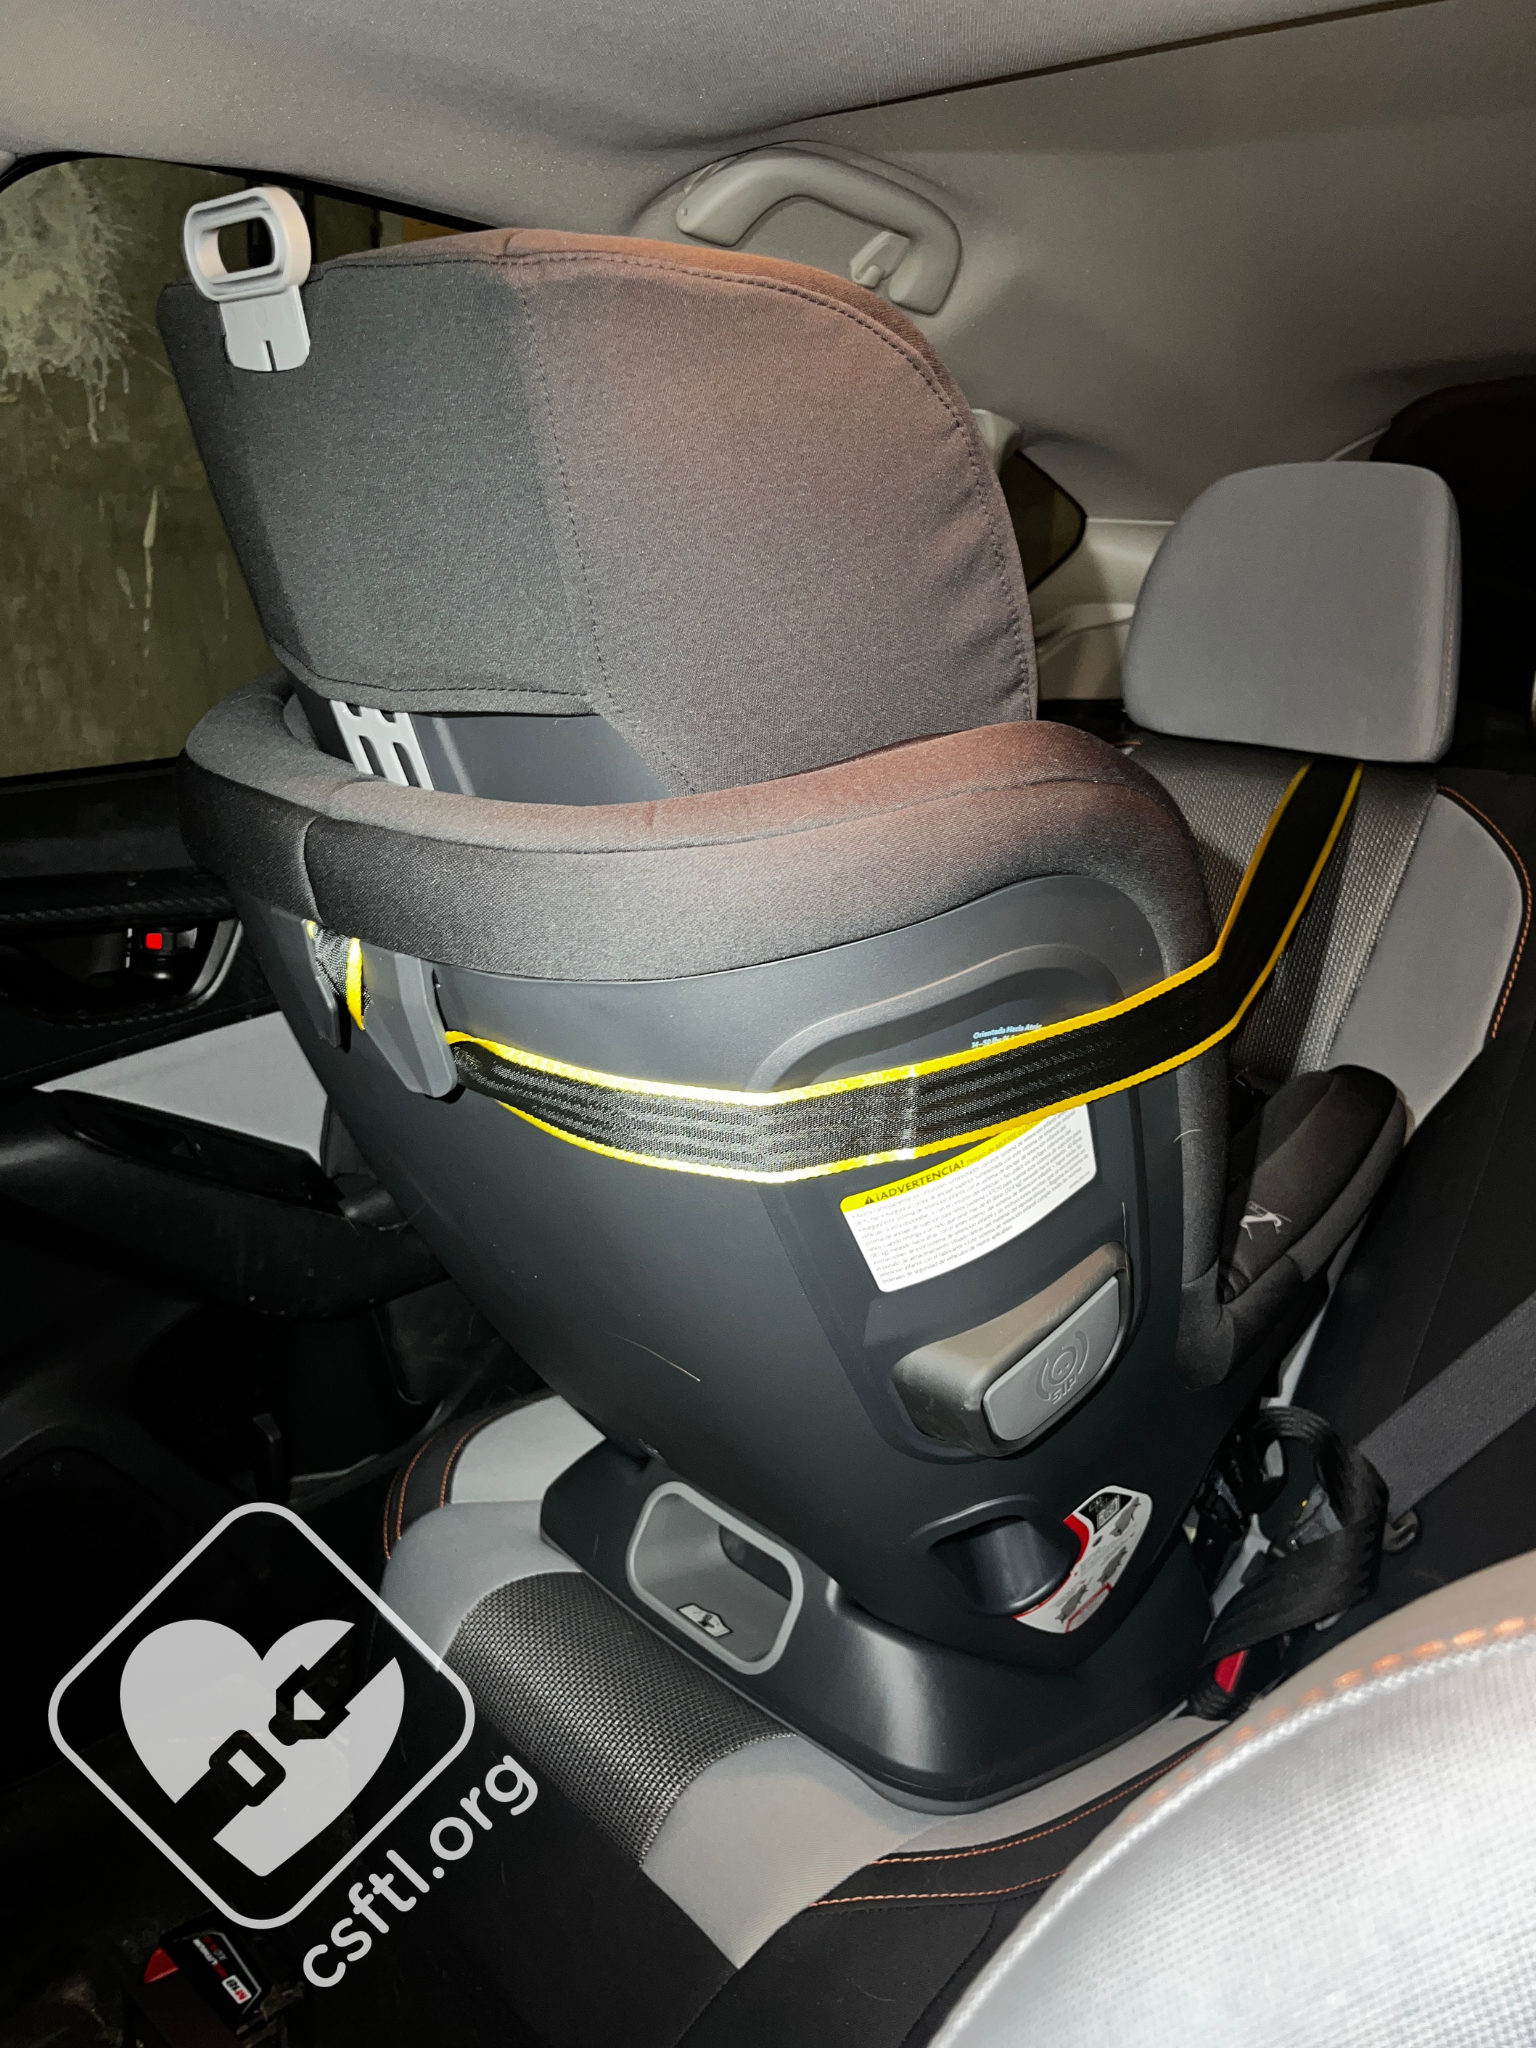
UPPAbaby Rove top tether use in rear facing mode
Lower Anchors and Top Tether
UPPAbaby Rove lower anchor storage
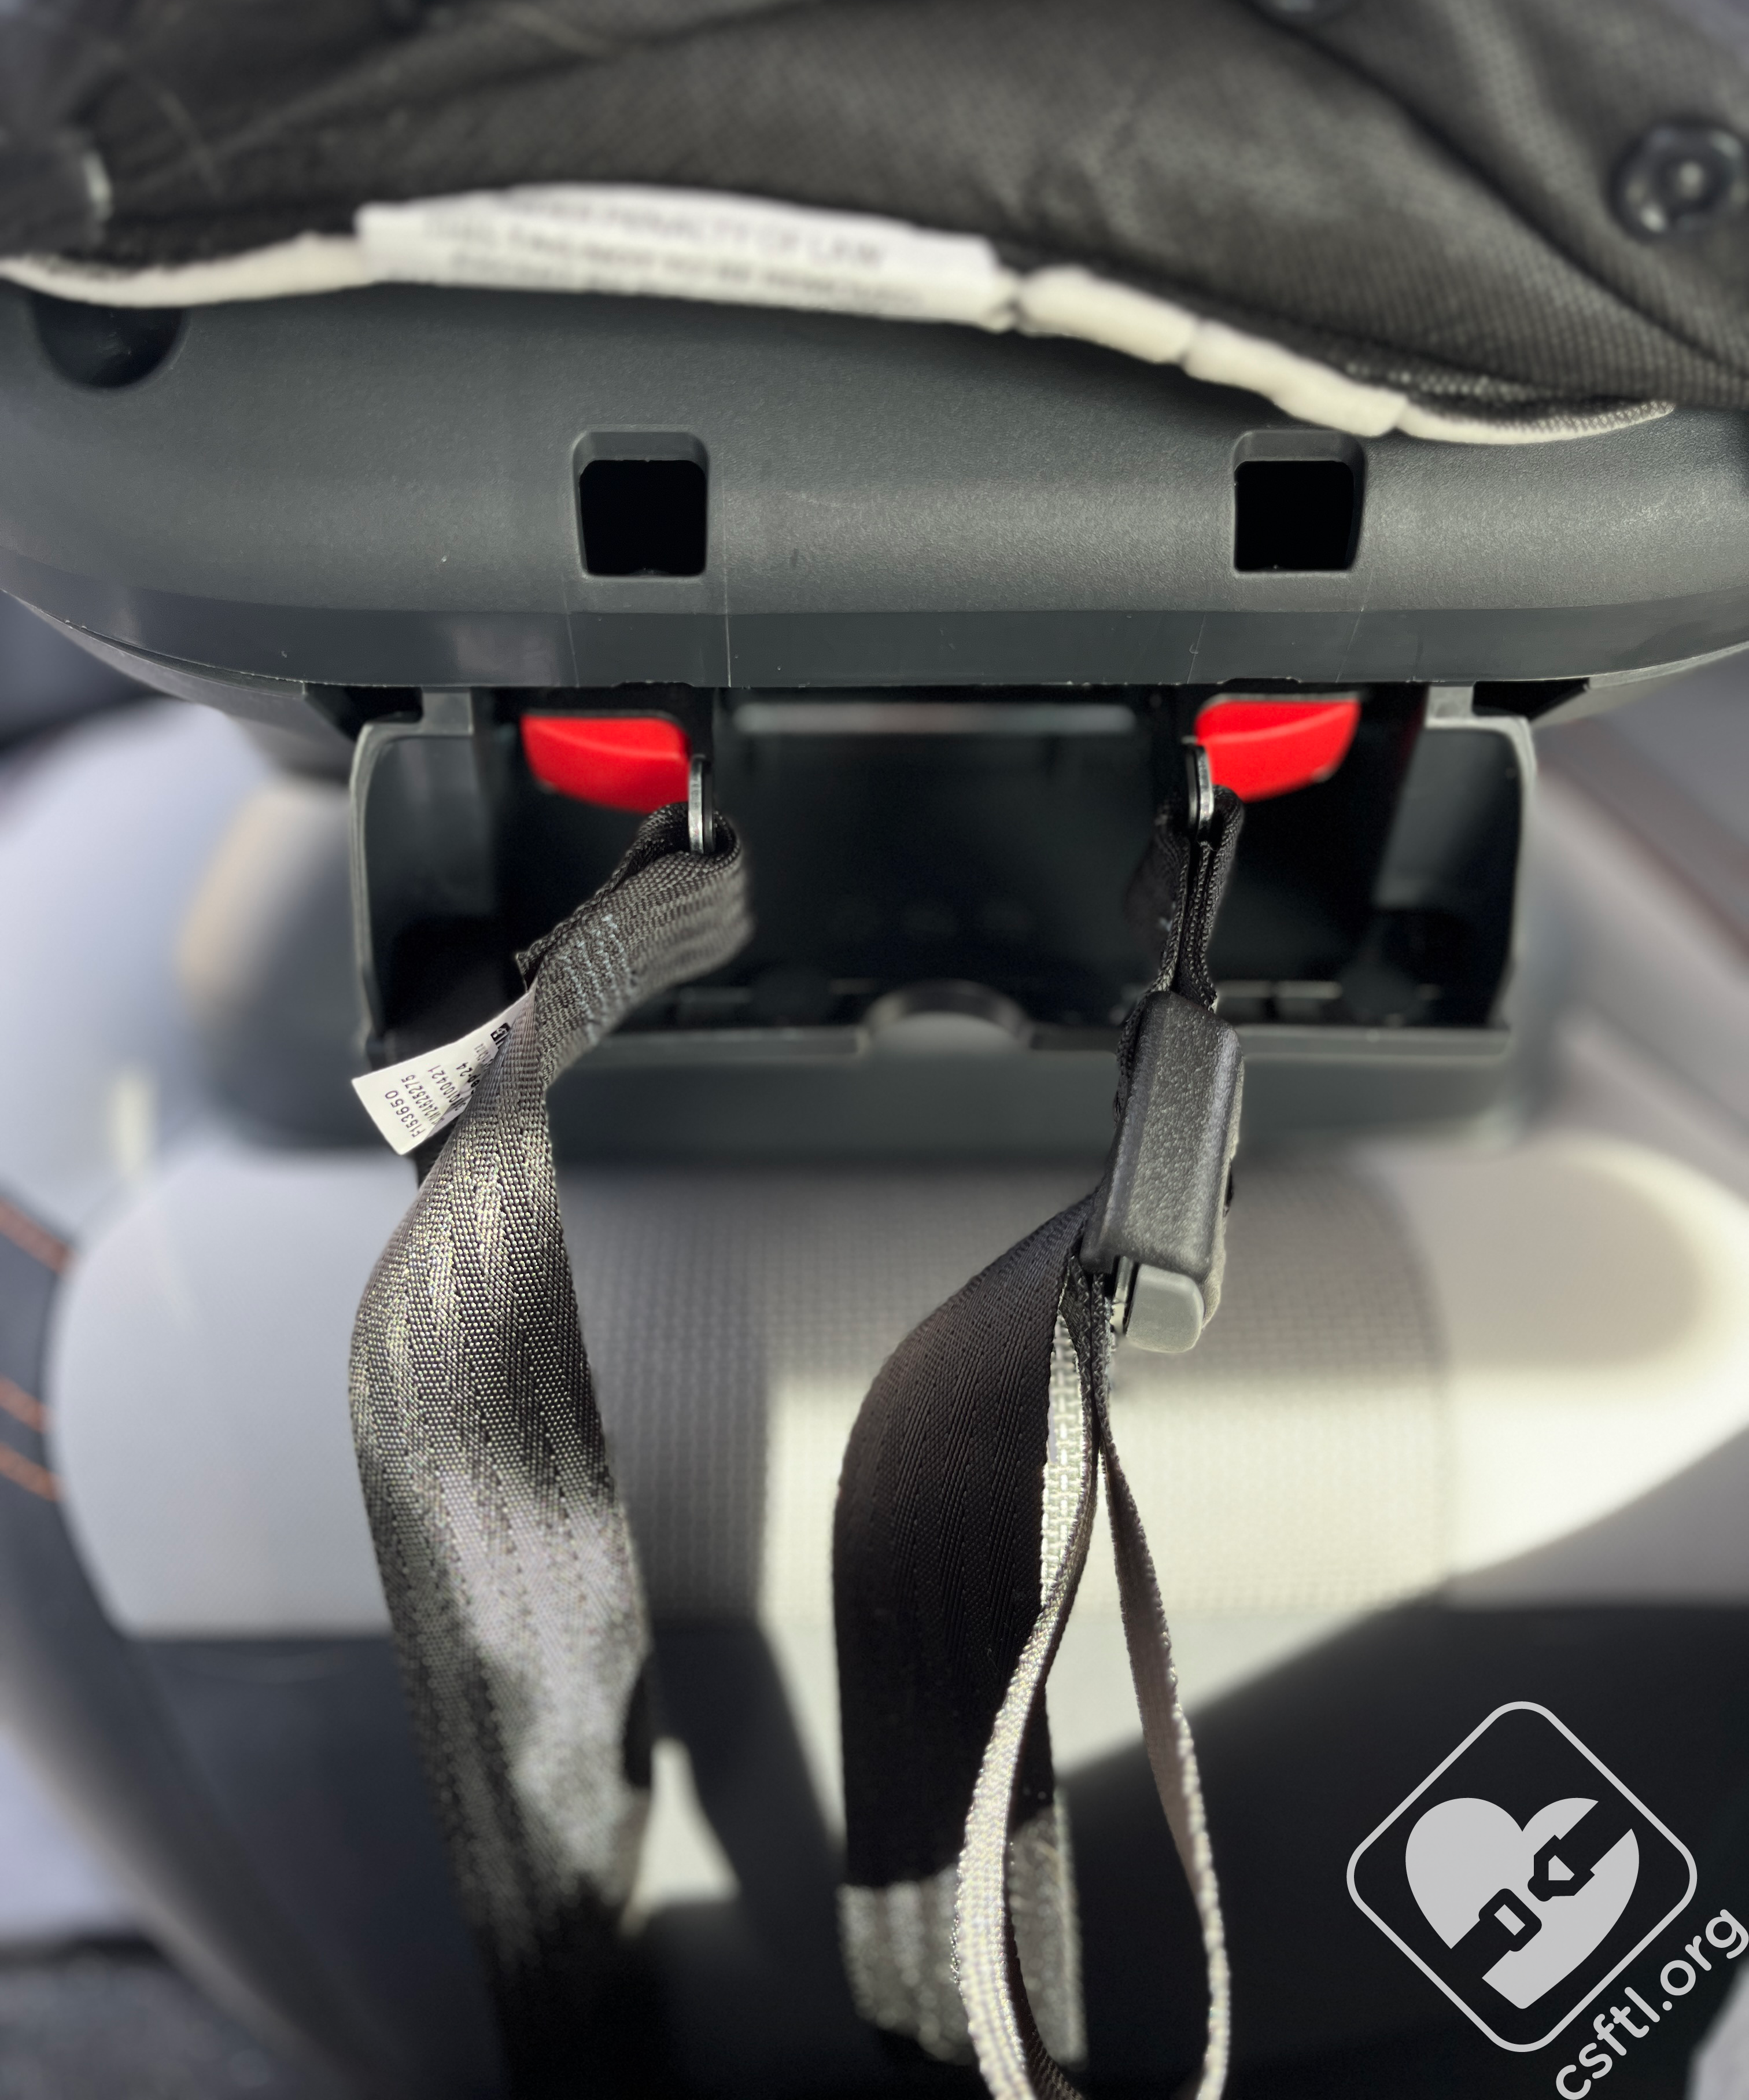
To install the Rove rear facing with the lower anchors, first remove the lower anchors from the storage compartment in the front of the car seat.
UPPAbaby Rove rear Facing Belt Path
Just like installing the Rove with the vehicle seat belt, we’ll start by setting the seat in rear facing mode. On the back of the seat at the base, squeeze the handle to set your recline. Adjust the seat to roughly the right recline position for the child and unzipping the seat pad to expose the belt path.

UPPAbaby Rove rear facing install with lower anchors
Open the lockoff and route the lower anchors through the rear facing belt path.
UPPAbaby Rove rear facing install with lower anchors
Attach the lower anchor connectors to the lower anchors in the vehicle then remove the slack from the webbing by pulling on the lower anchor tightening strap, then close the lockoff. I found this install to require a little more effort on my part than with the seatbelt installation, but still was able to get a safe installation in no time.

UPPAbaby Rove rear facing install with lower anchors
Check the tension indicator on the opposite side of the lockoff to ensure it has turned from red to green. The seat should not move more than one inch side to side or front to back when checked at the belt path with the force of a firm handshake.
UPPAbaby Rove rear facing install with lower anchors
Route and secure the top tether the same as with the seatbelt installation. As a reminder, UPPABaby recommends you always use the multidirectional tether.
Installation: Forward Facing
Vehicle Seat Belt and Top Tether
UPPAbaby Rove recline angle indicator — rear facing and forward facing modes
Remove the top tether from its storage location and route through/over the headrest. Place the Rove on the vehicle seat forward facing at roughly the right recline angle for your passenger referring to the forward facing recline range. For forward facing you’ll want the bubble between the red lines.
Adjust the headrest to the correct position for your child.
 Unfasten the fabric panel and pull it forward to expose the forward facing belt path. I found it easier to remove the seat pad as well. Open the lockoff.

UPPAbaby Rove forward facing belt path
Route the vehicle seat belt through the belt path and under the lockoff and buckle.

UPPAbaby Rove forward facing install with seat belt
Push down on the car seat with one hand while pulling up on the shoulder belt with the other to remove the slack in the seat belt. While holding tension on the seat belt, close the lockoff.

UPPAbaby Rove forward facing install with seat belt
Check the tension indicator on the opposite side of the lockoff to ensure it has turned from red to green. The seat should not move more than one inch side to side or front to back when checked at the belt path with the force of a firm handshake.

UPPAbaby Rove forward facing install with seat belt
Secure and tighten the top tether, making sure the extra webbing is secured around the fabric sleeve.
UPPAbaby Rove multidirectional tether
Remove the top tether from its storage location and route the webbing through or over the headrest, depending on the style of the headrest.
Installation: Forward Facing
Lower Anchors and Top Tether (Not the preferred method for forward facing mode)

UPPAbaby Rove lower anchor storage
Just like the seat belt, we’ll start by setting the seat in forward facing mode. Adjust the recline angle to roughly the right position for our passenger, then unfasten the fabric panel to expose the belt path.
UPPAbaby Rove forward facing belt path
Open the lockoff and route the lower anchors through the forward facing belt path.
UPPAbaby Rove forward facing lower anchor install
Attach the lower anchor connectors to the lower anchors in the vehicle and remove the slack from the webbing by pulling on the lower anchor tightening strap, then close the lockoff.
UPPAbaby Rove forward facing lower anchor install
Check the tension indicator on the opposite side of the lockoff to confirm it has turned from red to green. The seat should not move more than one inch side to side or front to back when checked at the belt path with the force of a firm handshake.
UPPAbaby Rove forward facing lower anchor install
Secure and tighten the top tether making sure the extra webbing is secured around the fabric sleeve.
UPPAbaby Rove multidirectional tether
Fit to Child
Rear Facing
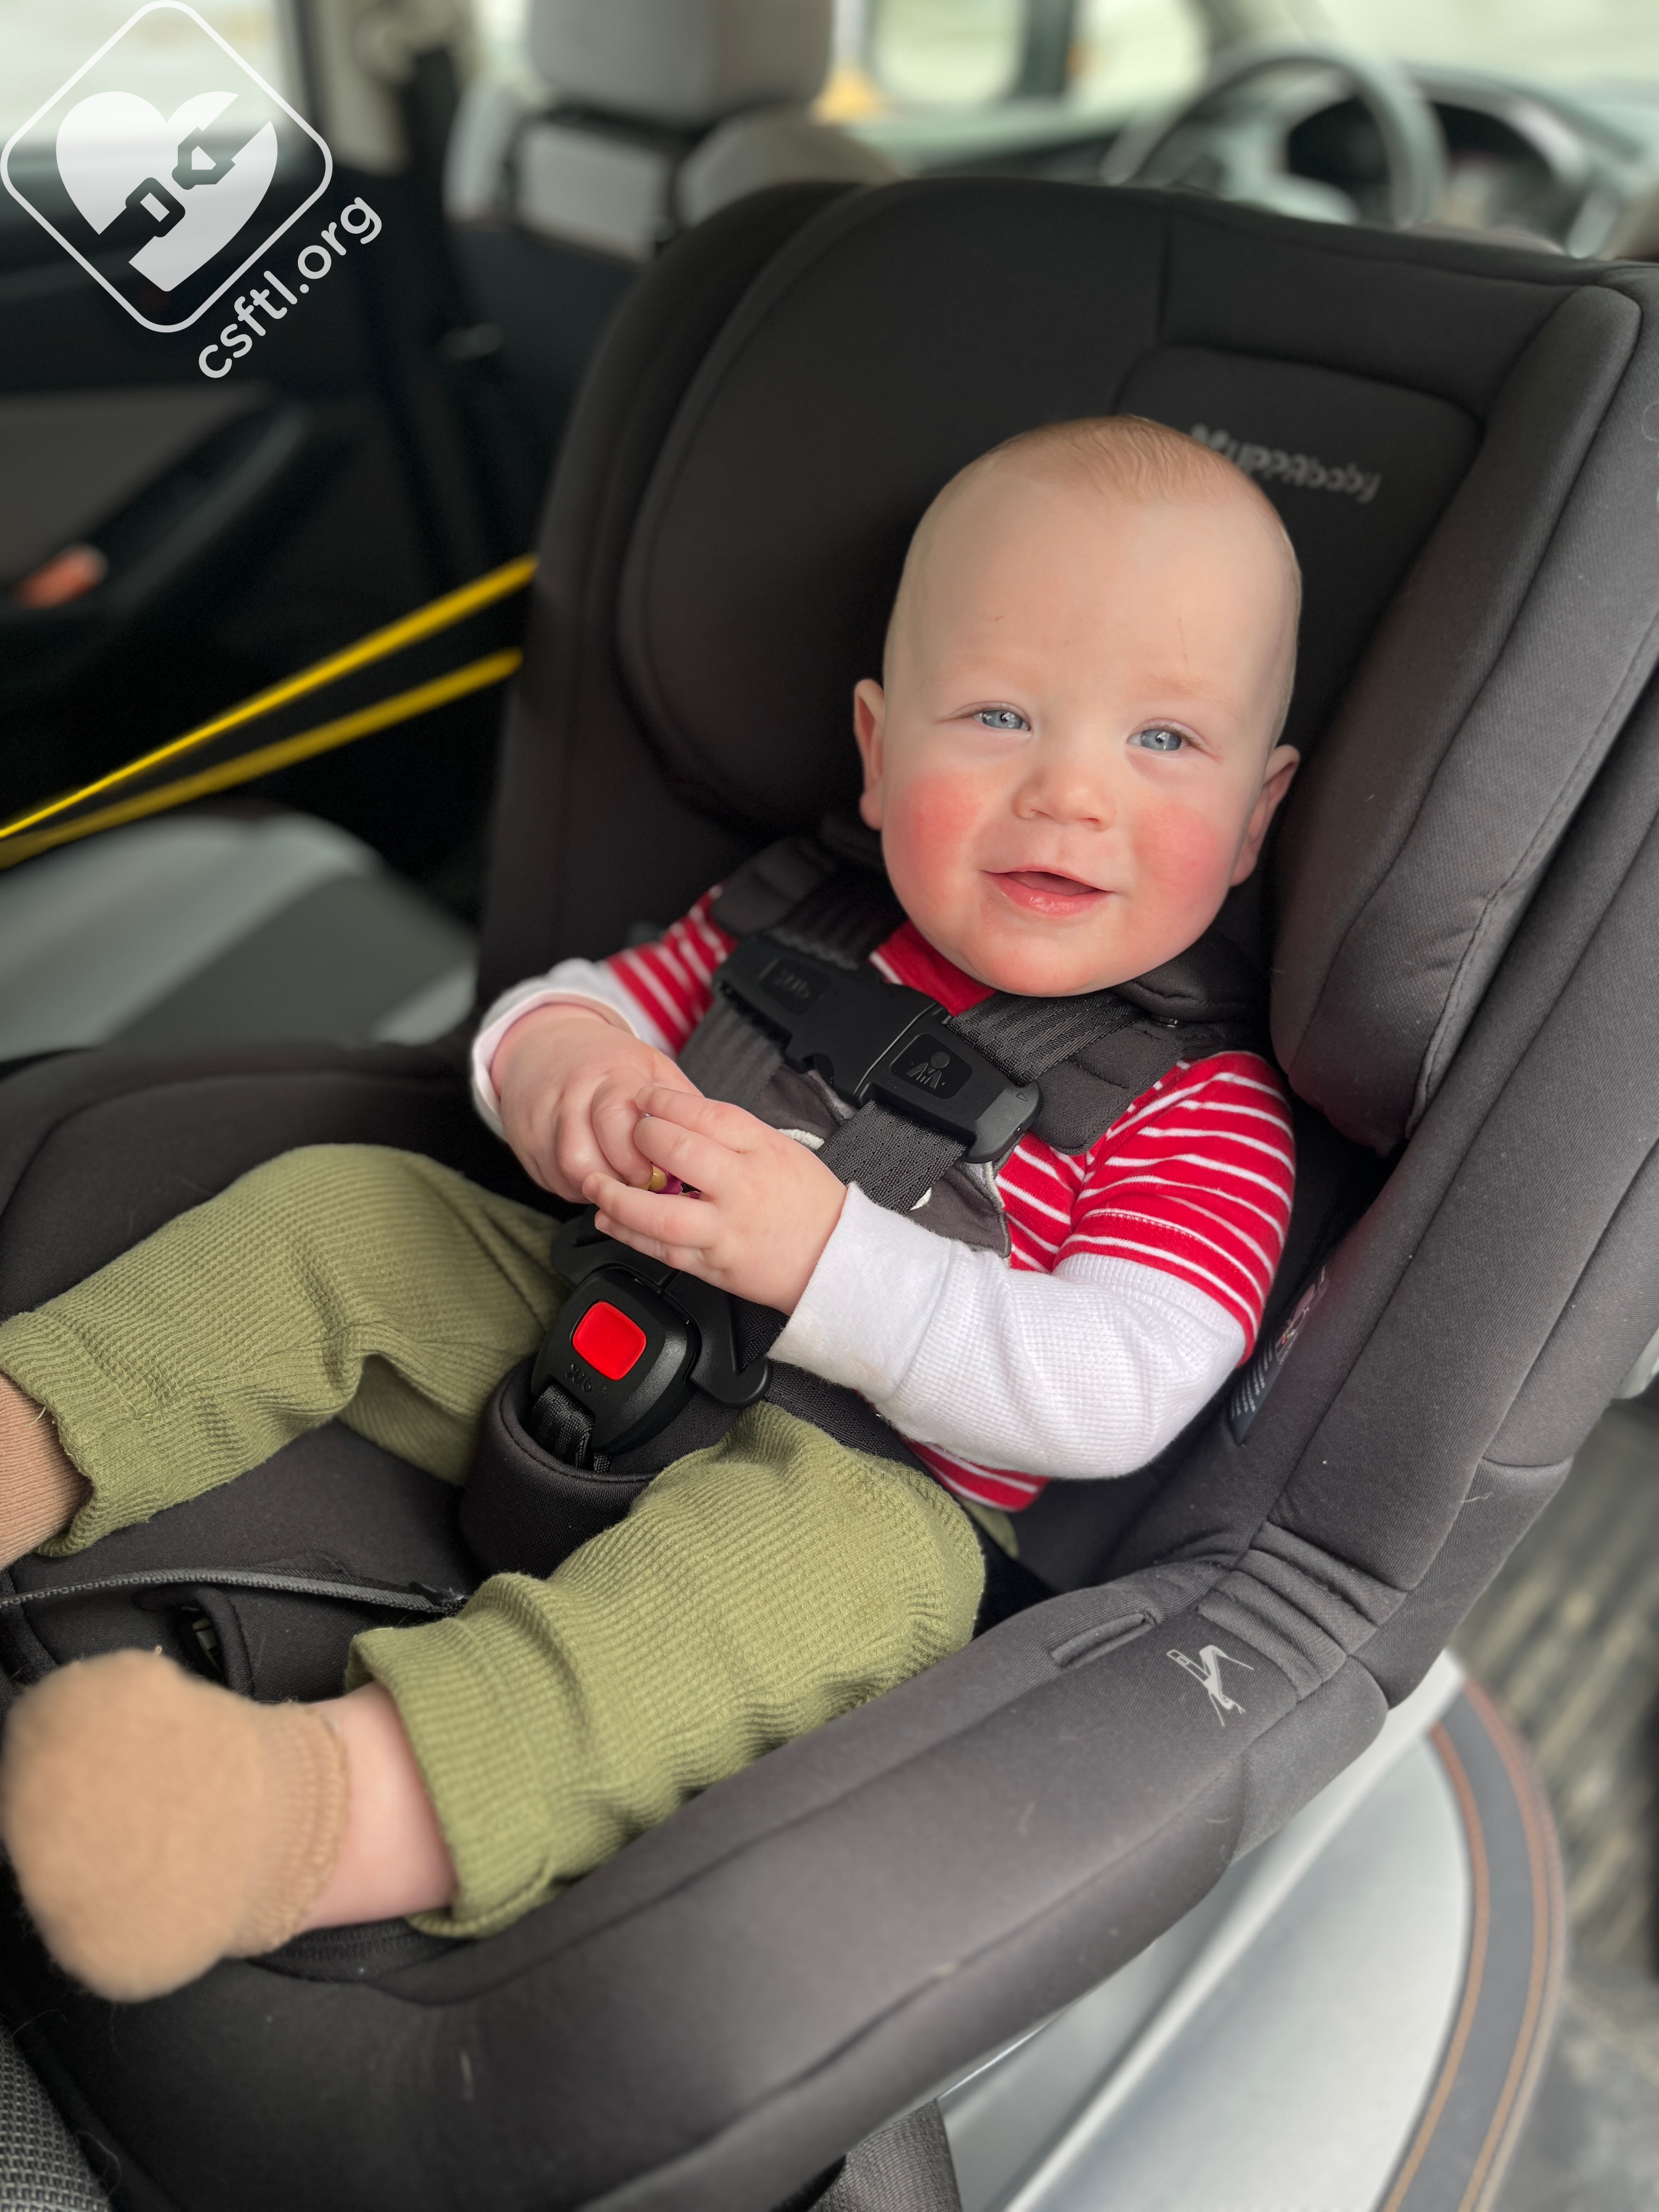
UPPAbaby Rove rear facing 10 month old
When the Rove is used rear facing, the manual specifies that the harness should be at or 1-2 positions below the child’s shoulder level. For a proper fit, there must be at least one inch of headrest above the child’s head.
10 Months Old

UPPAbaby Rove infant insert
Our model is 10 months old, weighs 20 pounds and 28.5 inches long. He was at the top of the weight limit (22 pounds) for the optional comfort inlay so we opted to not use it. If you’re familiar with UPPAbaby’s previous convertible car seat, the Knox, the rear facing comfort inlay/insert seen below is a welcomed change. The fit was great for his size and easy to adjust between him and our other two models.
18 Month Old Doll
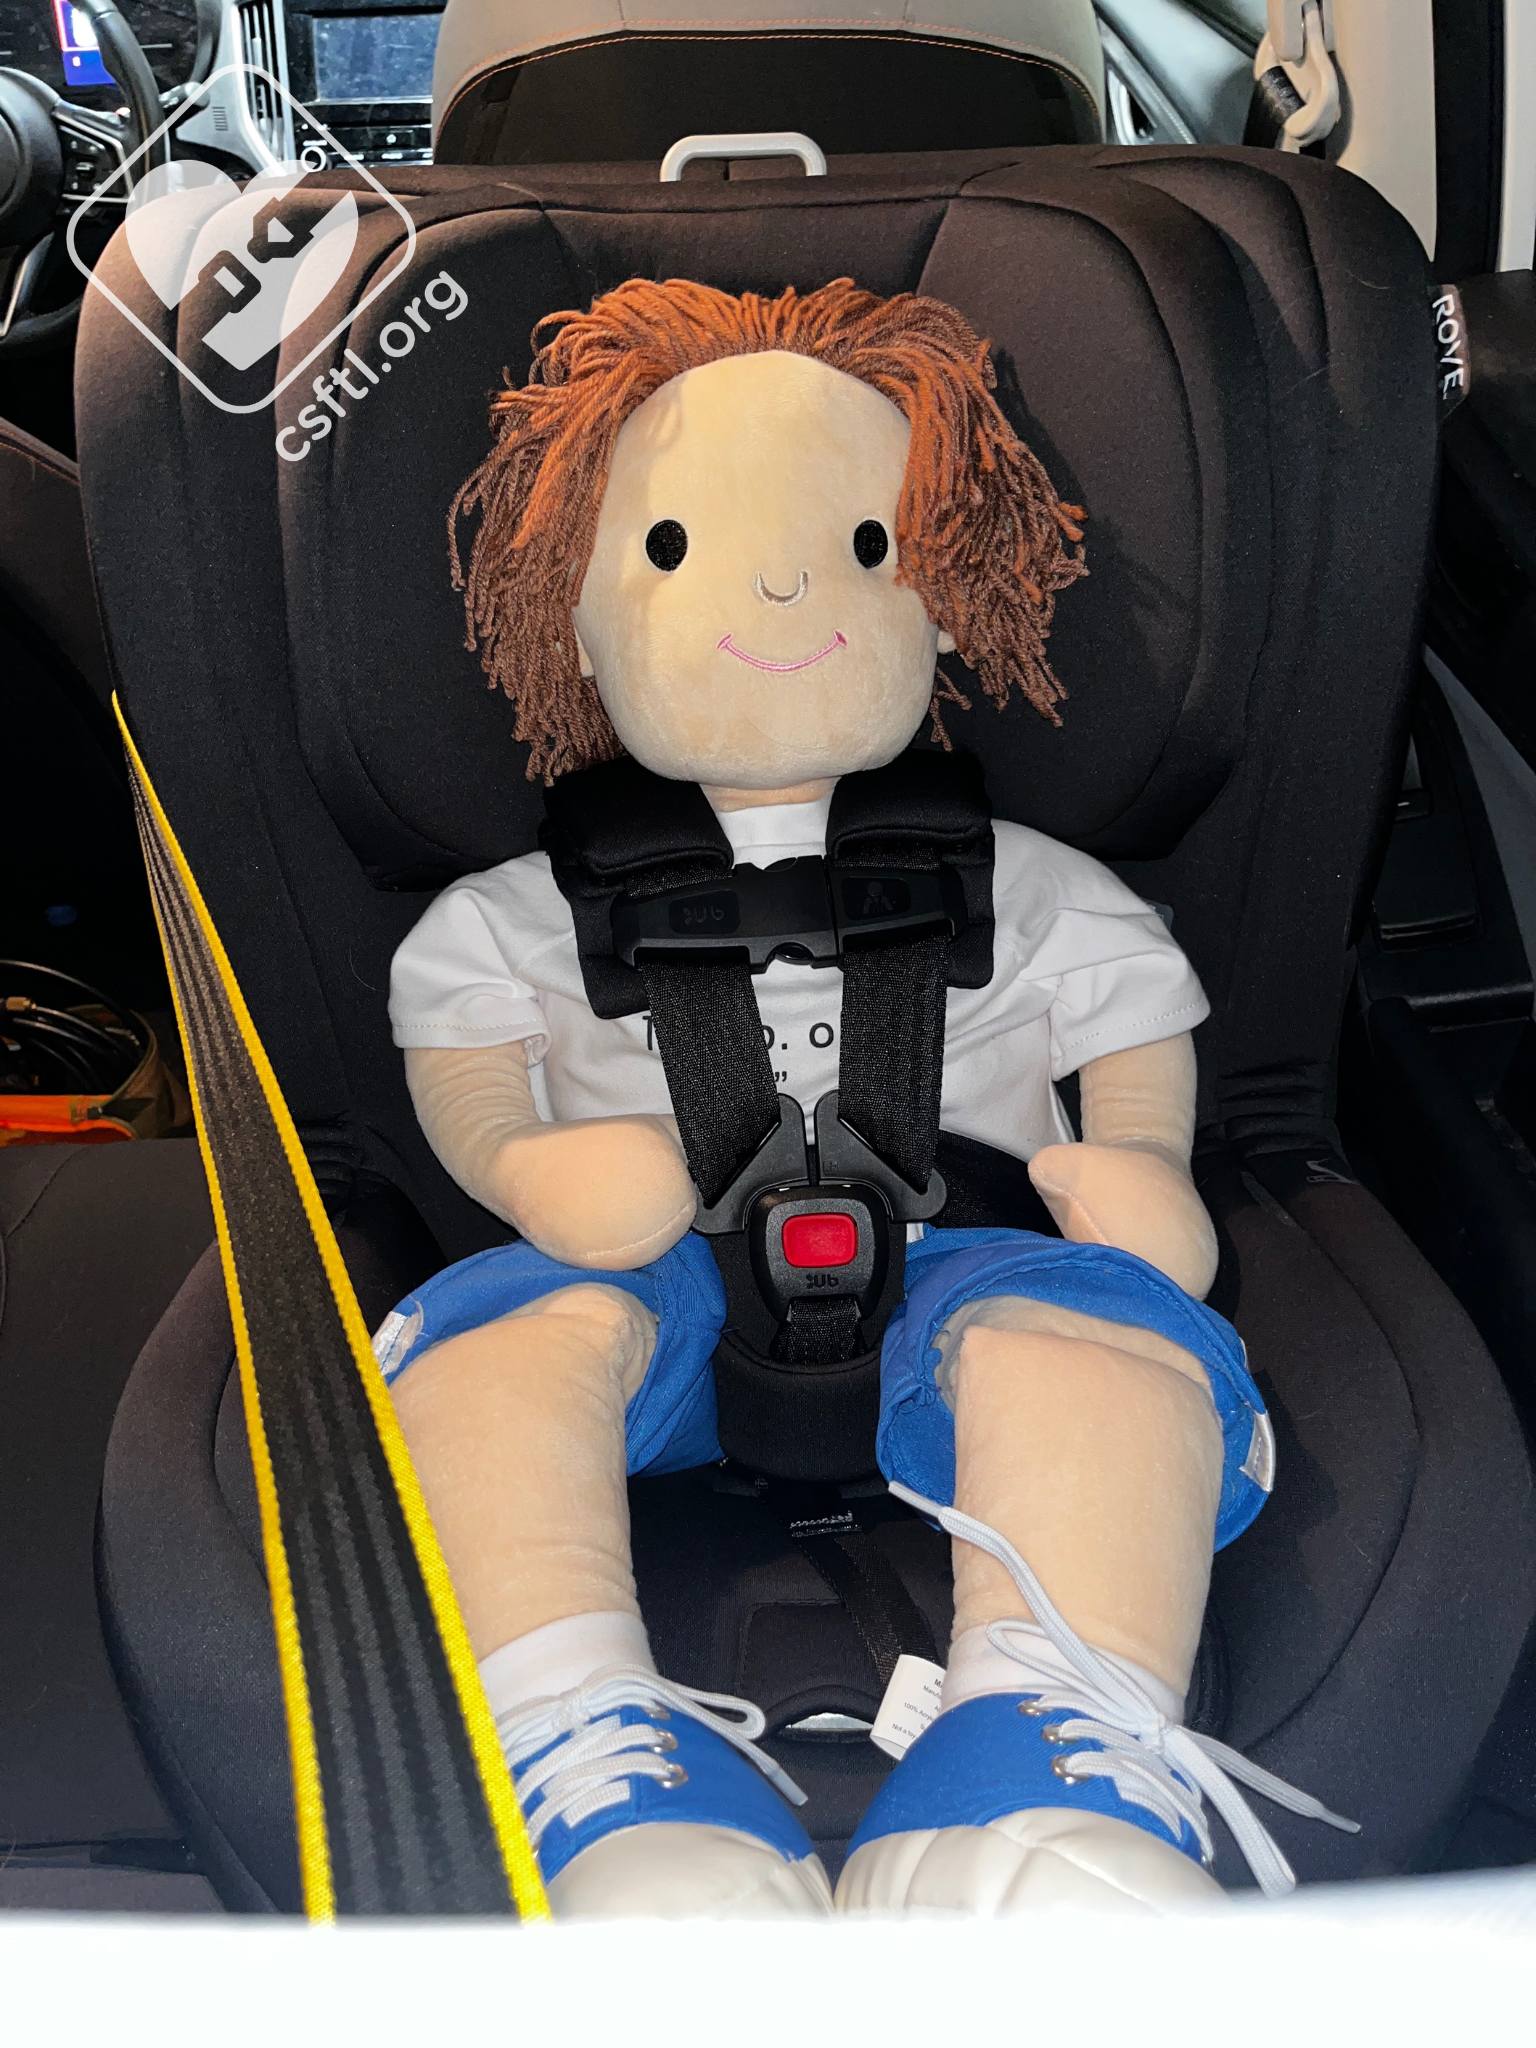
UPPAbaby Rove rear facing 18 month old doll
Our 18 month old doll is nearly weightless and 31 inches tall. Like our infant, we found that the Rove fit our doll very well.
4 Years Old
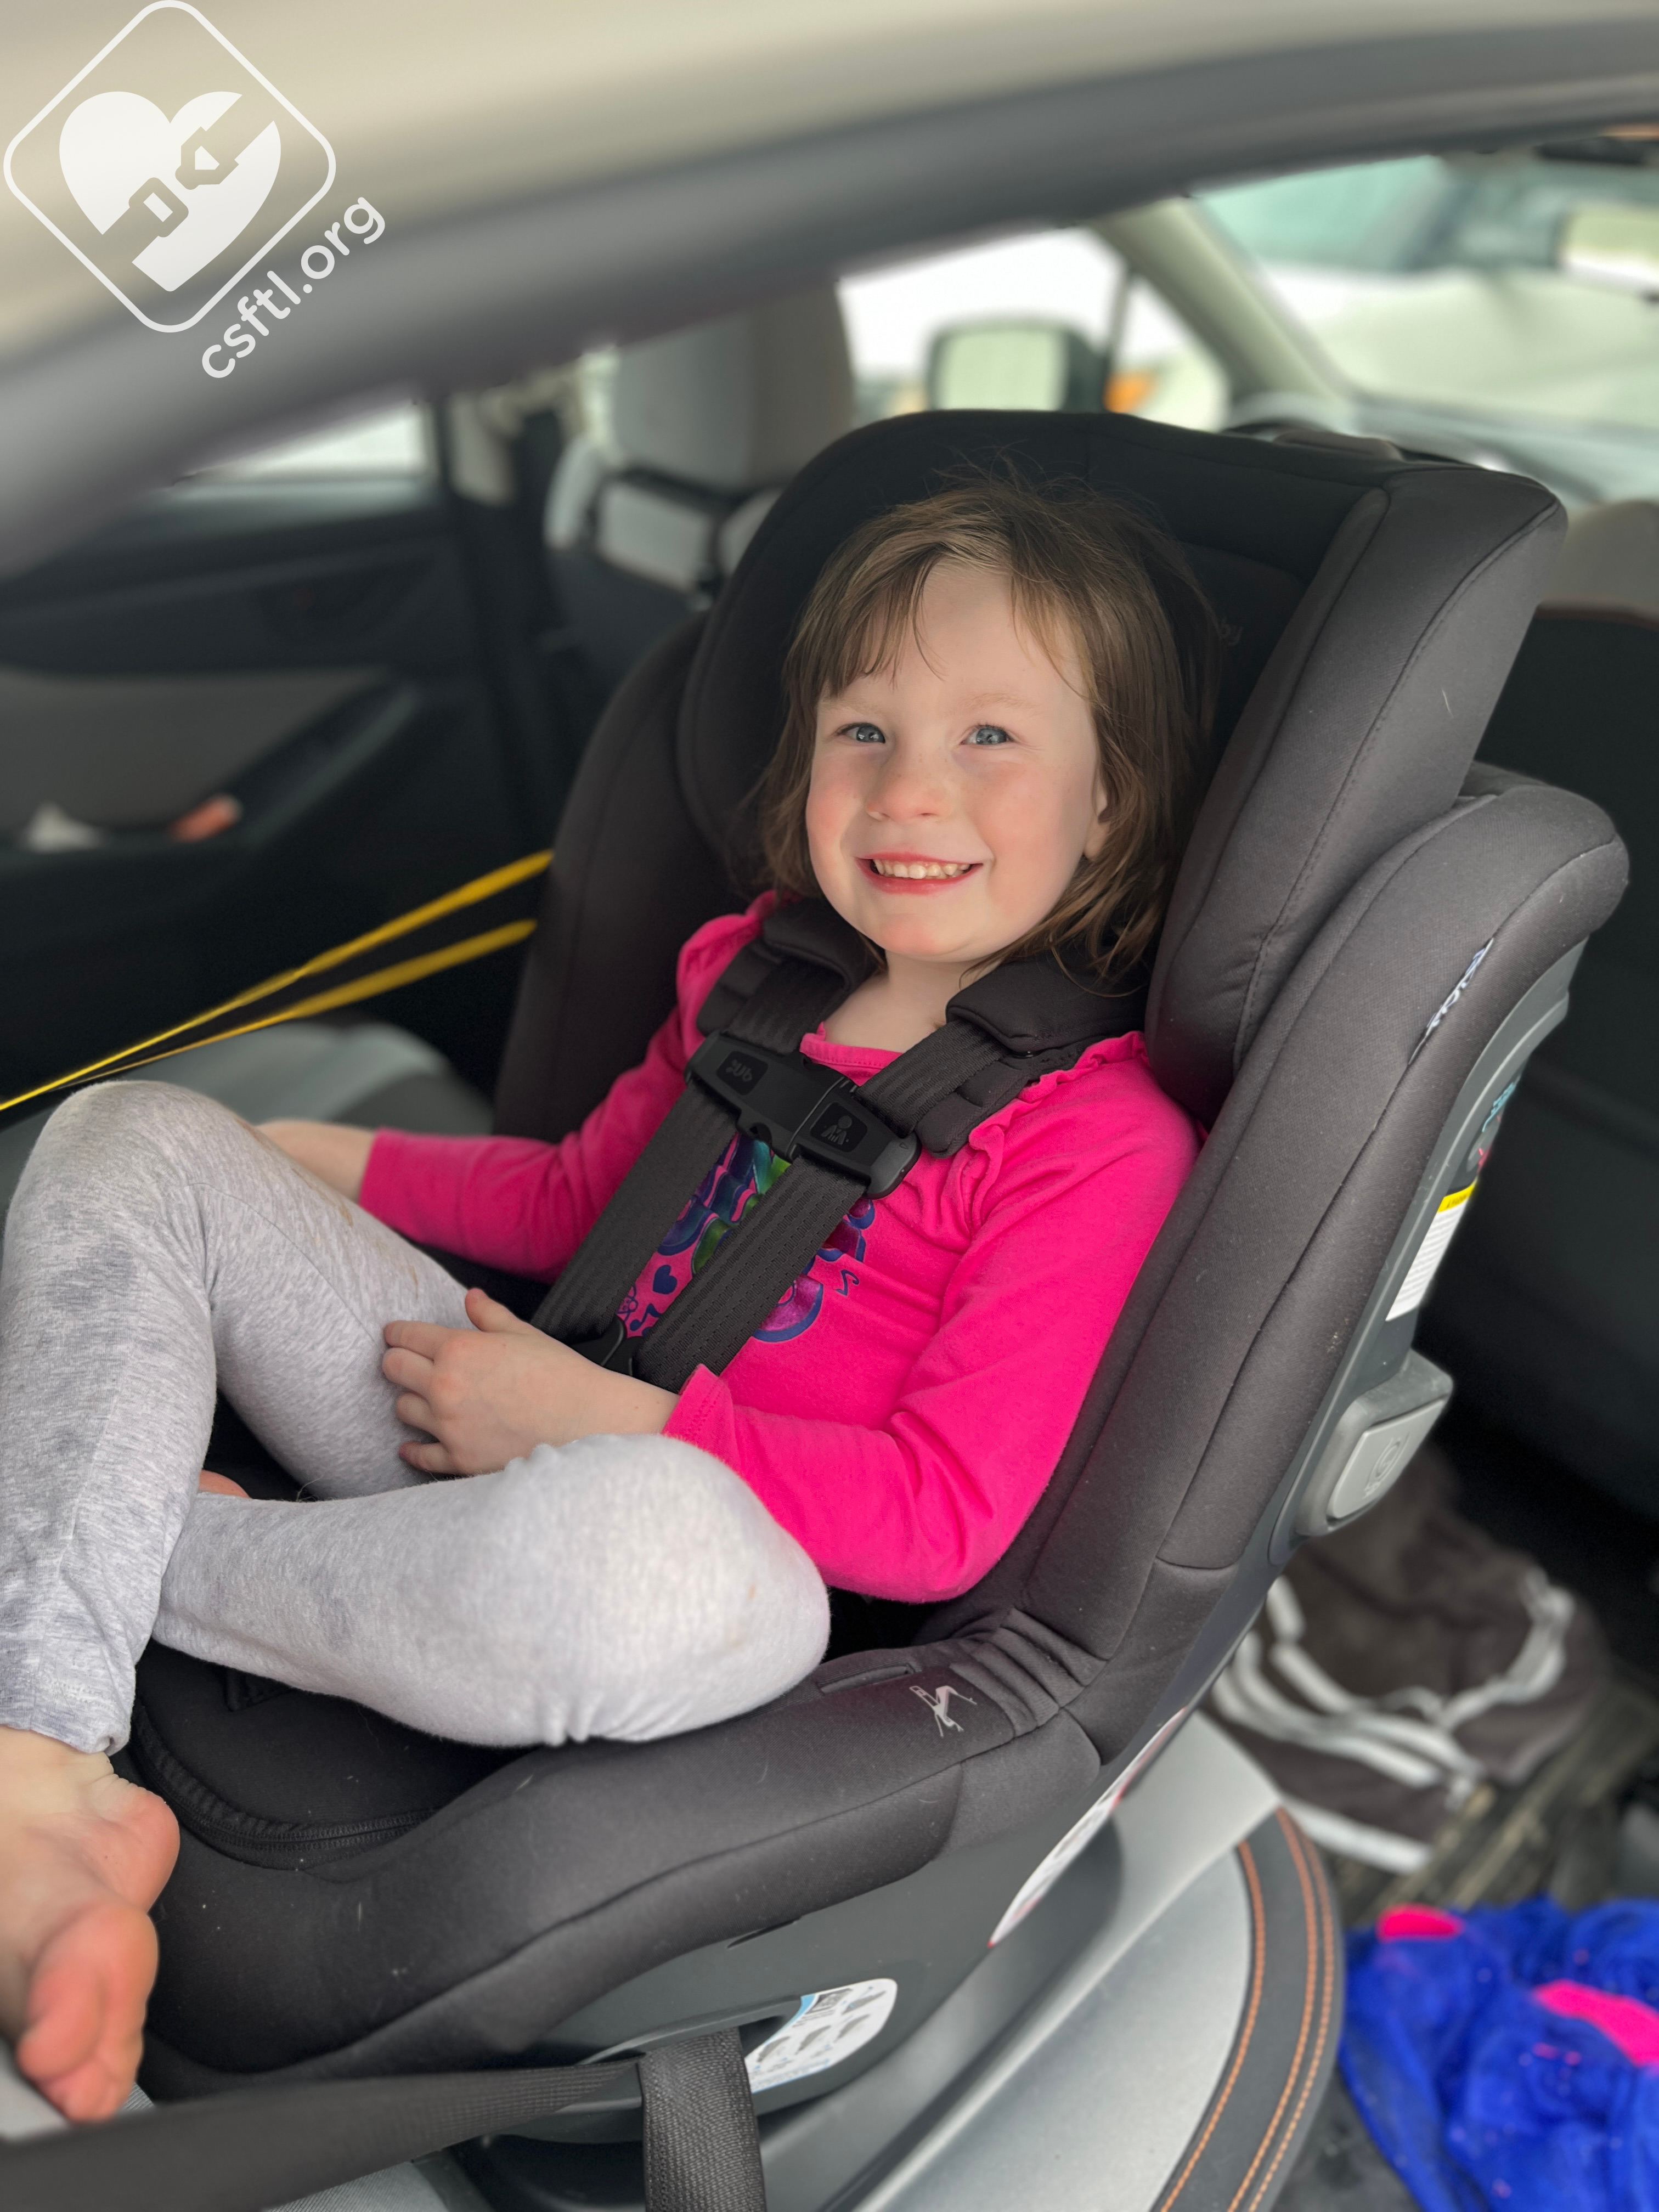
UPPAbaby Rove rear facing 4 year old
This 4 year old human weighs 38 pounds and 42 inches tall. Even though she’s nearing the end of her time in some rear facing car seats she still found this one very comfortable in rear facing mode with plenty of room to grow. The straps were comfortably at/below the shoulder level with plenty of room above her head.
Forward Facing
4 Years Old
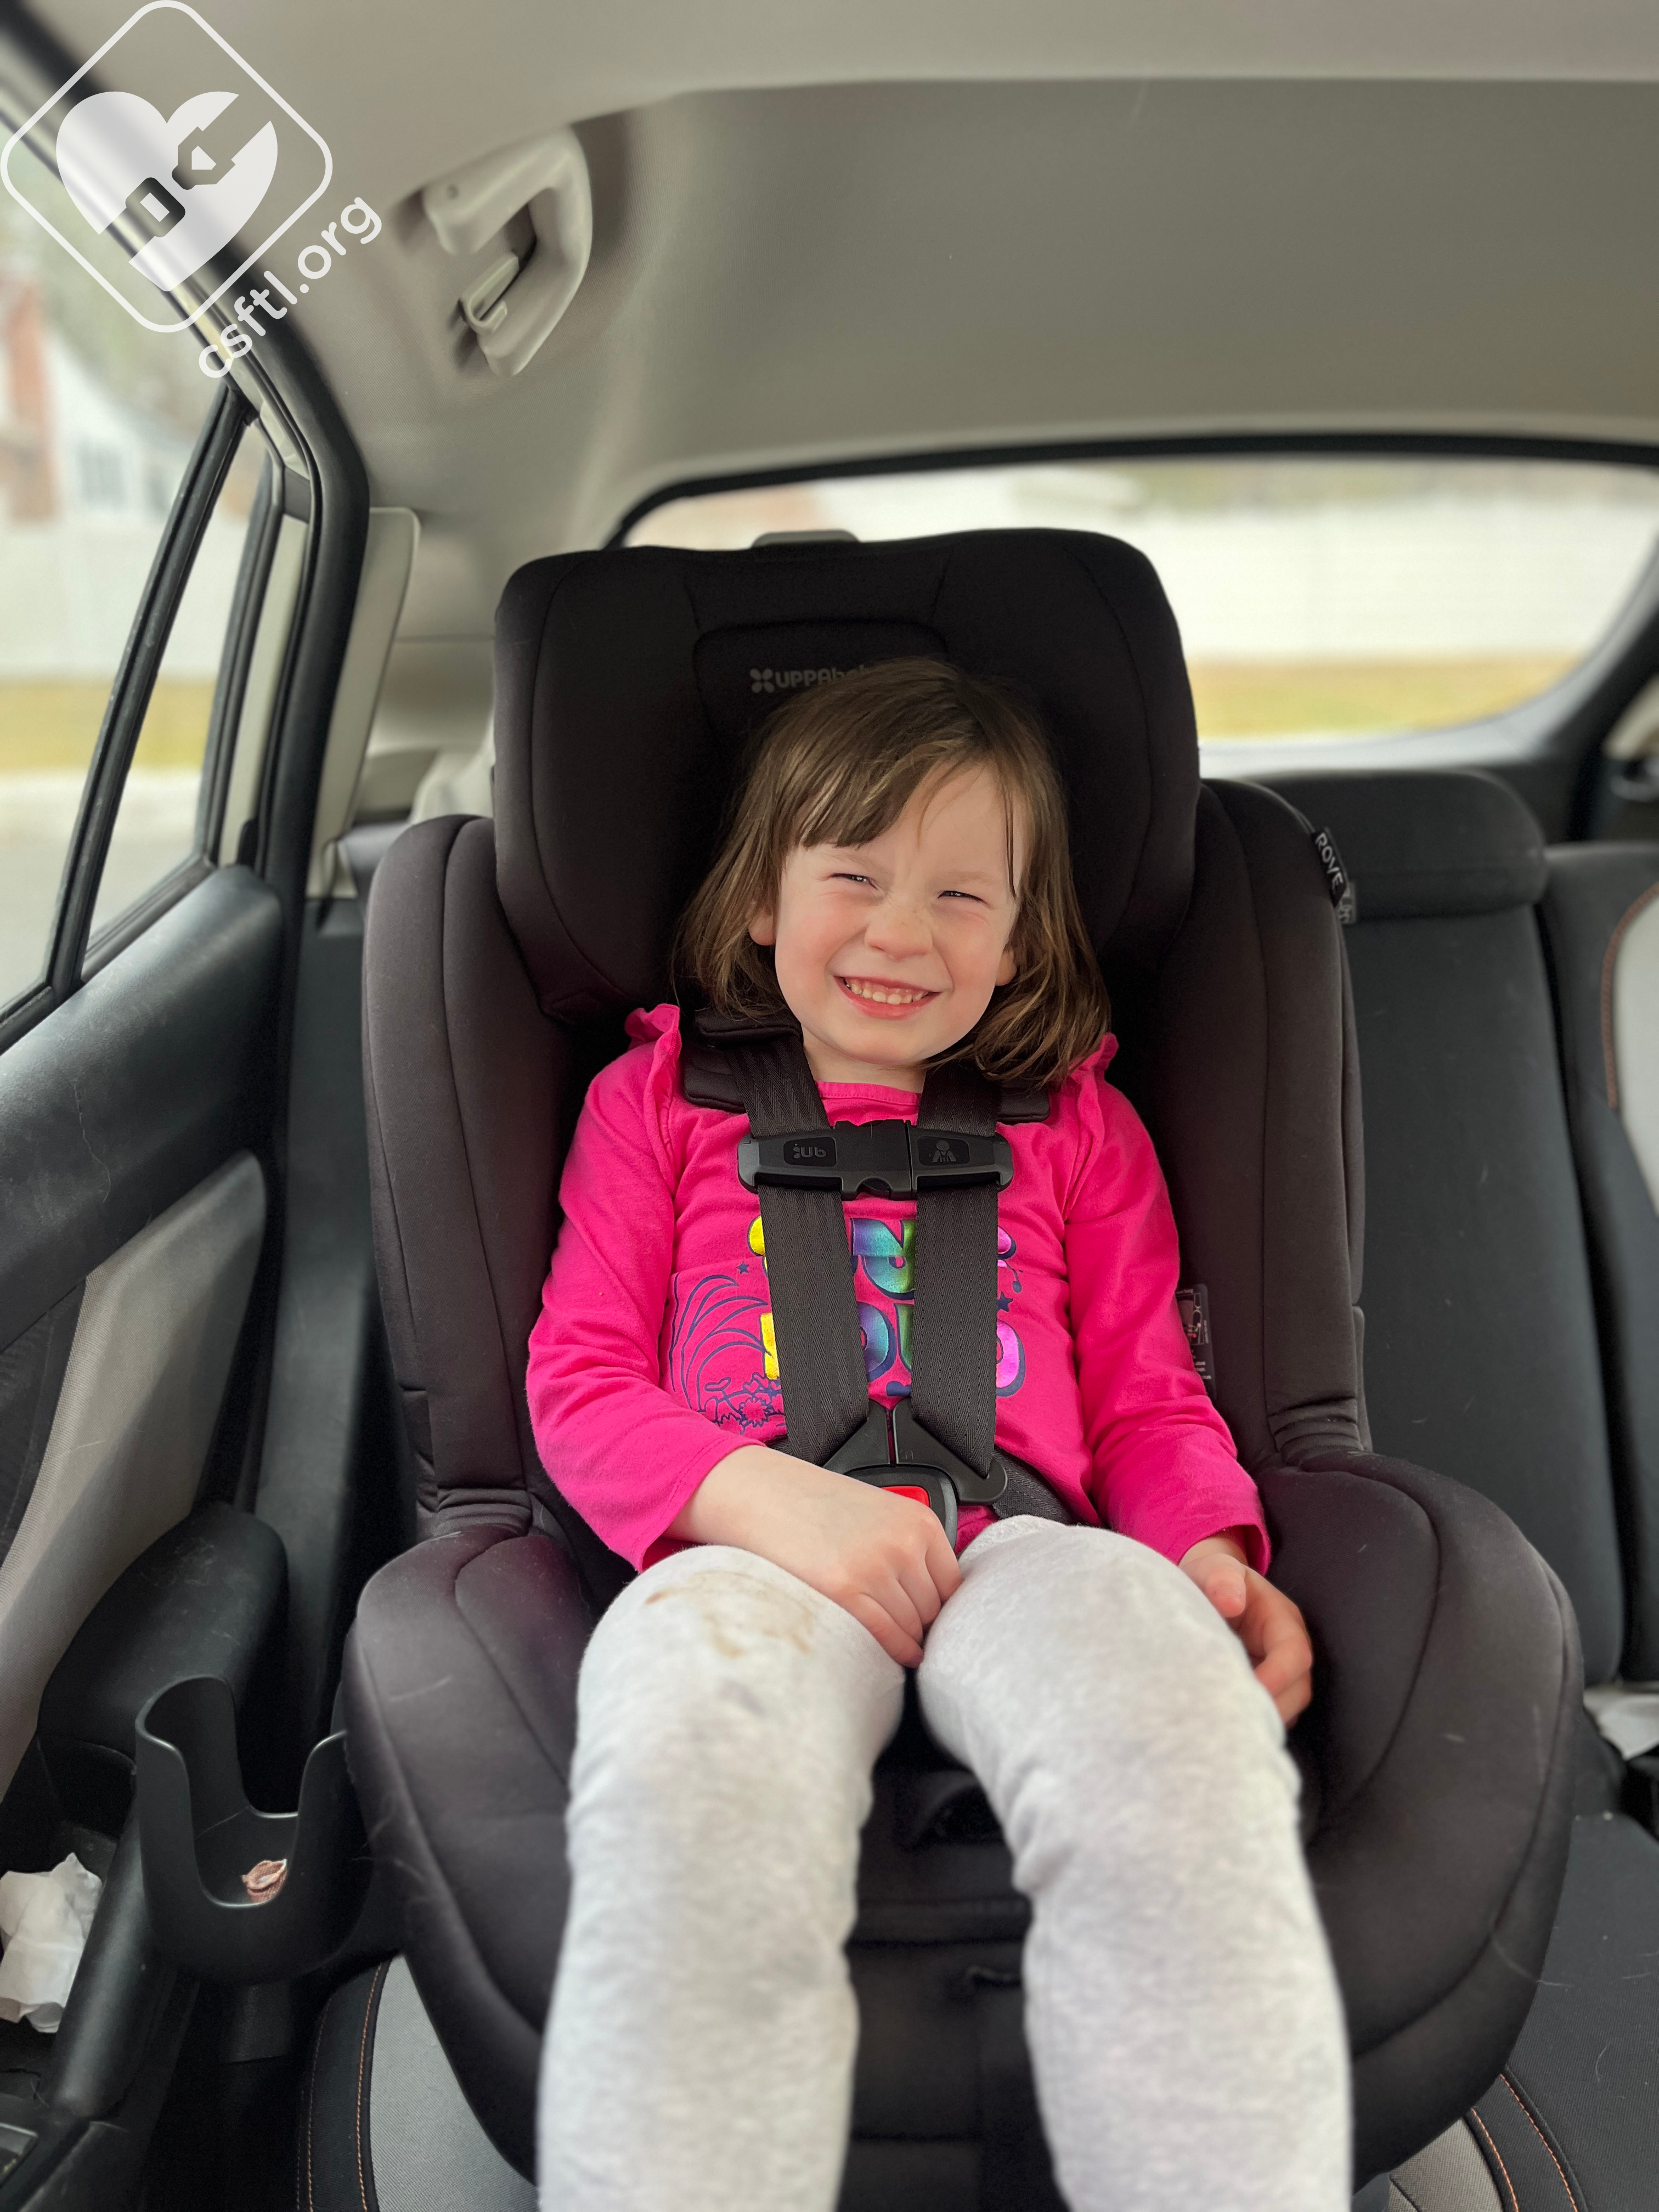
UPPAbaby Rove forward facing 4 year old
When the Rove is used forward facing, the manual specifies that the harness should be placed at or 1-2 positions above the child’s shoulder.
Our same 4 year old is still 38 pounds and 42 inches tall. Here she is in the same seat in forward facing mode with 1-2 positions left to go up on the headrest. With her current torso height, she can probably use this seat for another year or so.
Important Information: Where to Find

UPPAbaby Rove manual storage
Manual storage: the manual stores behind the back padding below the headrest.
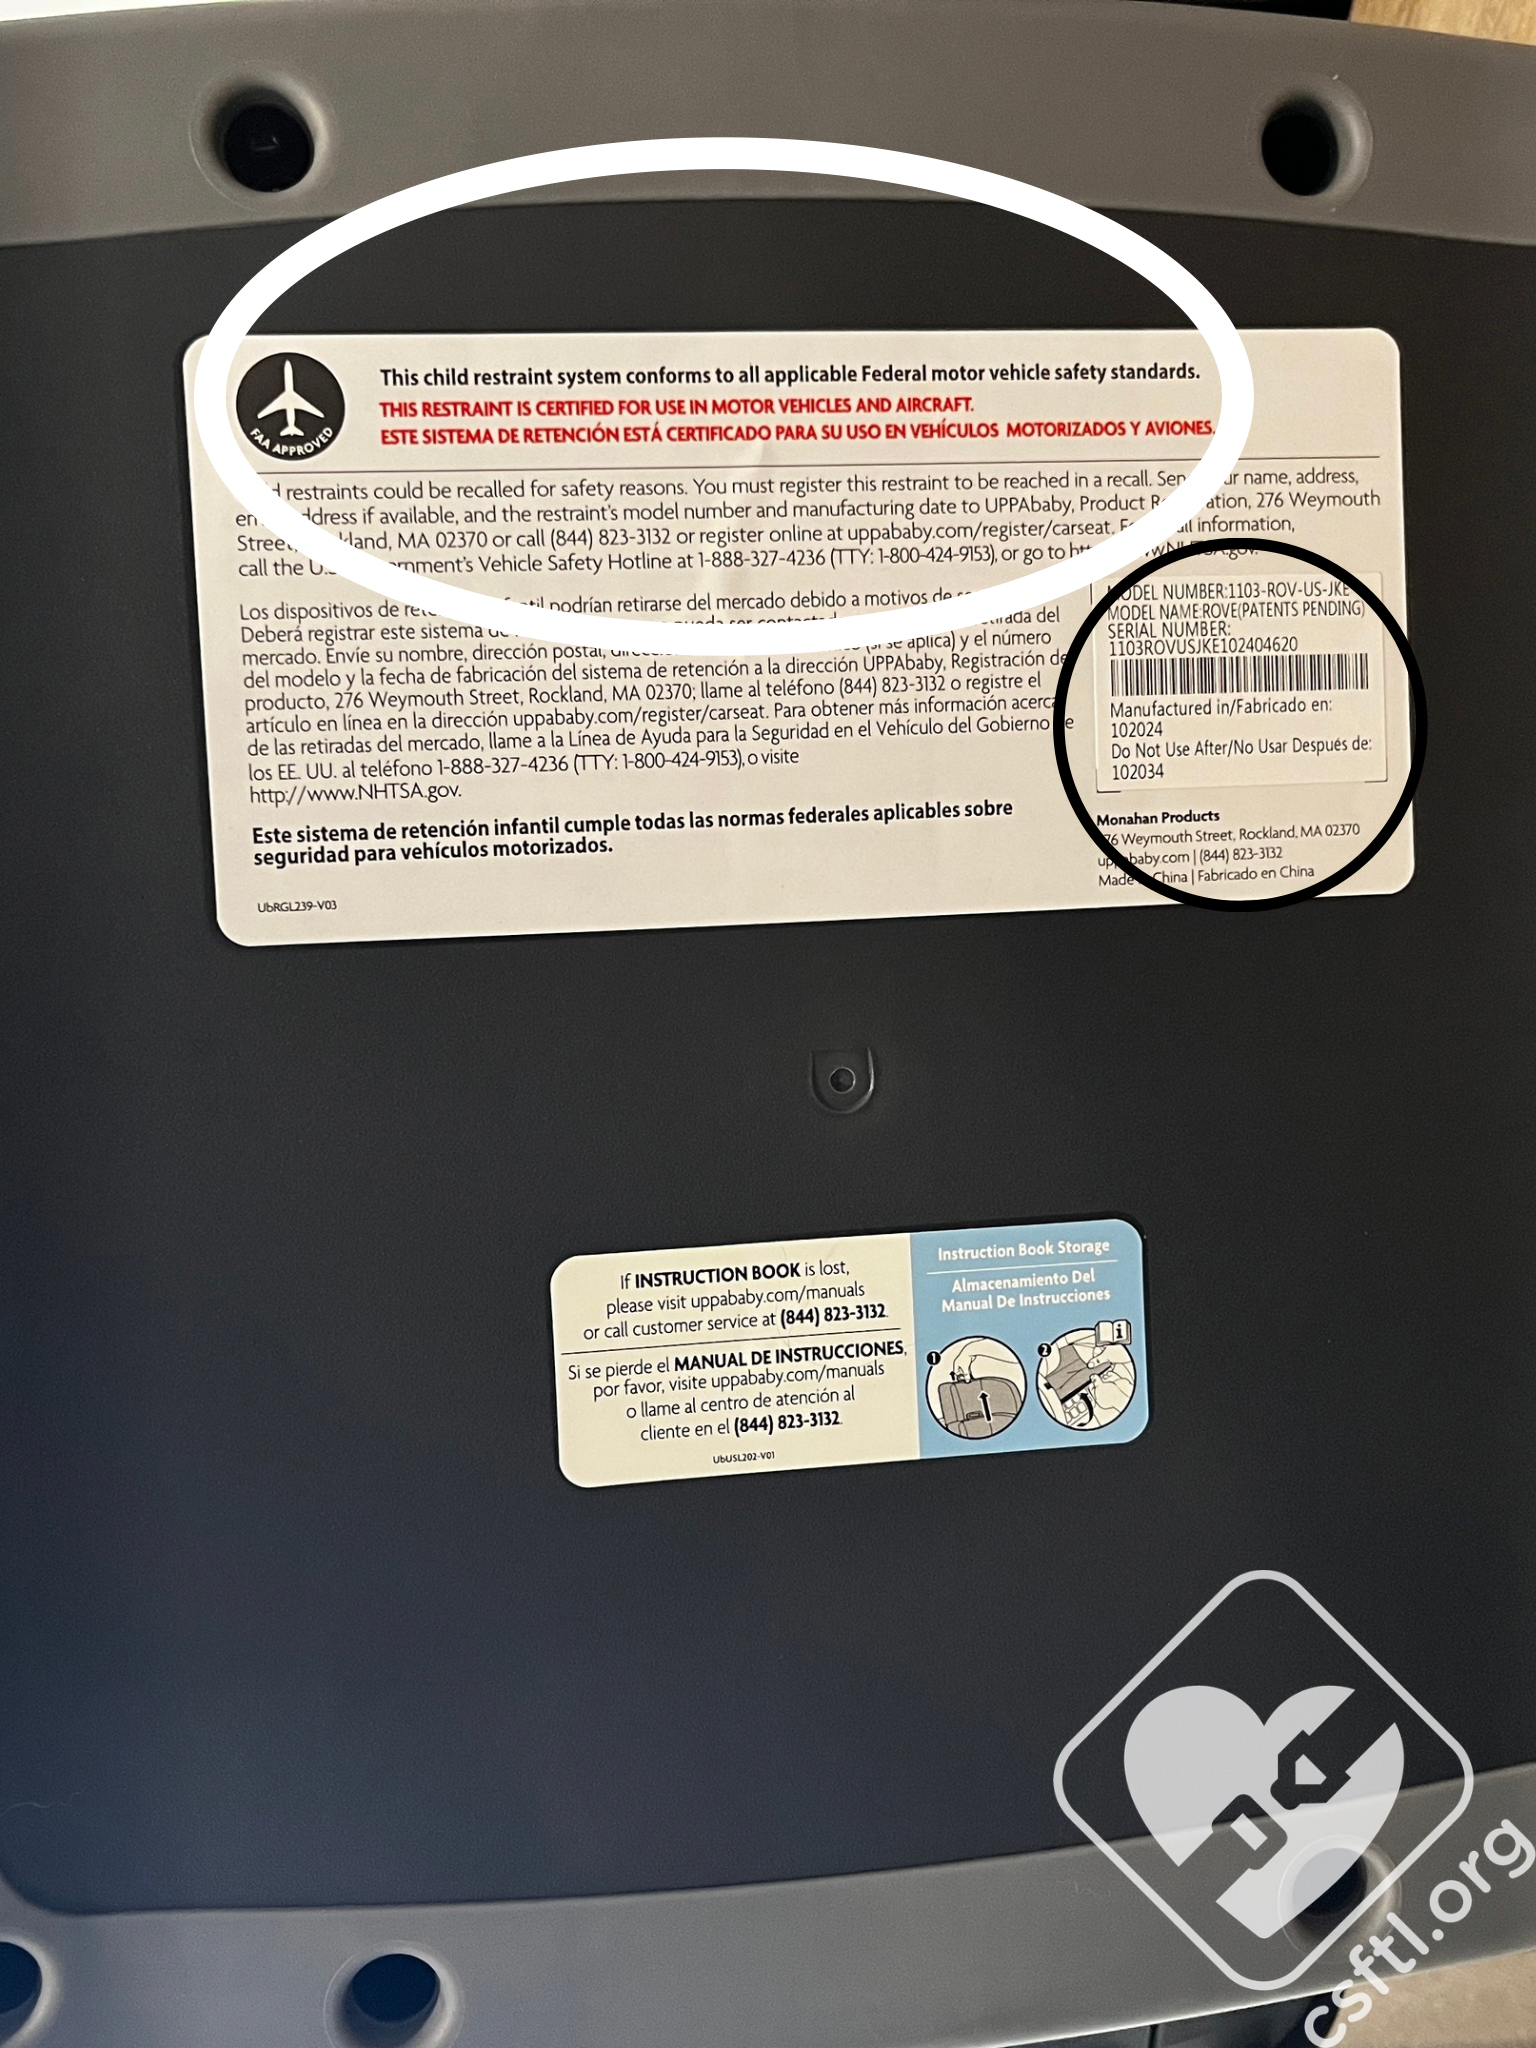
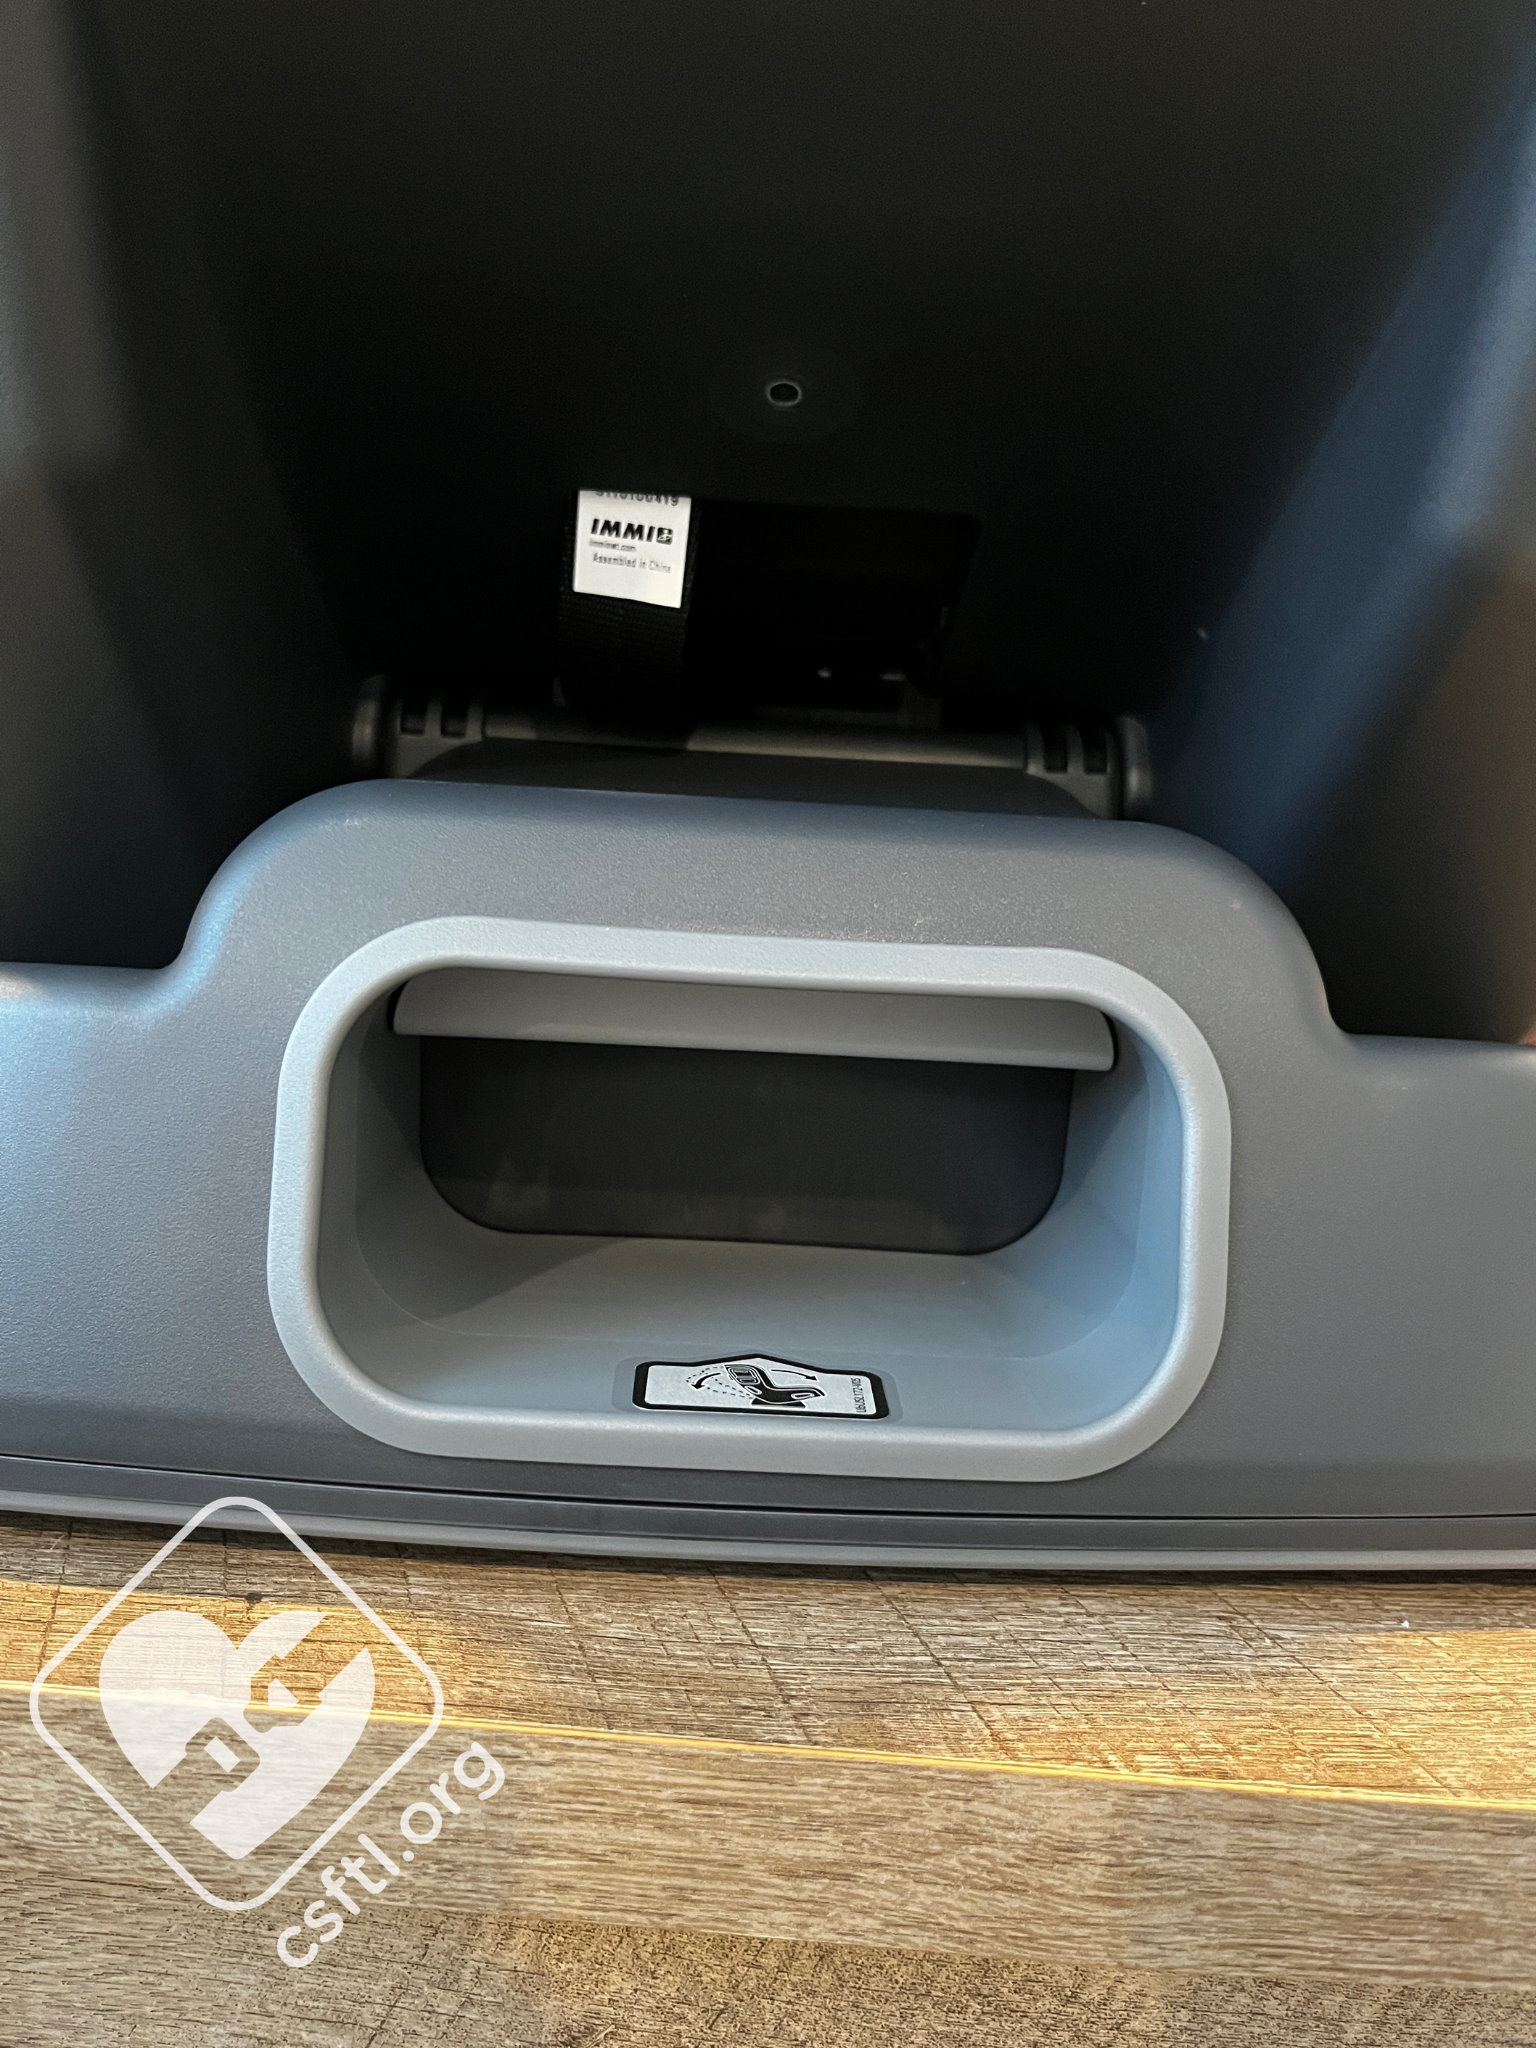
Date of manufacture label: the Rove has a 10 year expiration. The date of manufacture and expiration labels are on the bottom of the base of the car seat (black circle).
FAA approval label: the Rove is approved for use on aircraft. The label is found on the bottom of the base of the car seat (white oval).
Overall Thoughts
The Rove is a solid addition to UPPAbaby’s lineup and the convertible car seat market. I found it extremely easy to install in rear facing and forward facing modes, particularly with the seat belt and a breeze to adjust between different sized kids. While this seat has some great features of its predecessor, the Knox, we were thrilled to see all the updates they made that made the seat even more user friendly. The straightforward fit inlay was a welcomed change for the Rove, it was helpful to have multiple crotch buckle slots to ensure a great fit for the different riders.
With a top harness height of 16.5 inches, we wouldn’t suggest this seat for long-torsoed kiddos but we’d assert that the Rove will fit small to average sized kids until they are booster age. The Rove is on the larger size so we’d urge families who have small cars to consider whether or not this seat may work for them. In the end, we find that the Rove is a great option for families who are looking to stay with UPPAbaby as they transition out of their Mesa or Aria rear facing only car seats or for families who want the added safety feature of the multidirectional top tether.