
Baby Trend Hybrid high back booster mode
The Baby Trend Hybrid 3-in-1 forward facing car only combination seat has been around for some time now. Our late admin and good friend Jennifer Penick reviewed the pink zebra print version of this seat several years ago. She did a wonderful job, but since then, this seat has undergone a few changes so we’re updating our review with the latest version of the seat.
The Hybrid has several updates that we noticed right from the start. The lower anchor weight limit is high – the lower anchors can be used for the entire life of the seat, there are plenty of fun colors, and the seat is relatively lightweight. Those are the best parts of this seat.
There are also a few quirks that can make the seat difficult to use properly. We’ll explore those quirks in detail in this review.
CSFTL Quick Stats
- Forward facing weight range: 22-50 pounds
- Forward facing height range: 29-48 inches
- High back booster weight range: 40-100 pounds
- High back booster height range: 38-50 inches
- Backless booster weight range: 40-100 pounds
- Backless booster height range: 42-57 inches
- Expiration: Harness and high back portion expires 6 years from the date of manufacturer – backless booster expires 10 years from the date of manufacture
- Lower anchor weight limit: 50 pounds
- LATCH permitted in booster mode
- FAA approval: approved in harness mode only
- Cupholders required
Measurements
- Highest harness position: 17.5 inches
- Highest booster guide position: 18.5 inches
- Width at the widest point: 19.5 inches at the cupholders
- Harness mode seat weight: 15 pounds
- High back booster mode weight: 14 pounds
- Backless booster mode weight: 5 pounds
- Seat pan depth: 14 inches
- Seat pan width: 13 inches
Assembly Required
Baby Trend Hybrid assembly
The Hybrid comes in 2 parts, the backless booster portion and the back of the seat. To assemble the seat, set the booster portion on the floor. Then lay the back of the seat on the floor with the “arms” of the back overlapping the bar on the back of the booster portion. Next, rotate the back to a 90 degree angle and push the back down into the base of the booster portion.
Optional Inserts/Covers
- Head insert (optional for both harness and high back booster modes)
- Body pillow (harness mode only, cannot be used with the 3rd and 4th harness slots)
- Harness covers
- Crotch buckle cover
Features
Head Insert
The head insert is optional in both harness mode and high back booster mode. It can be removed by reaching under the head rest pad and undoing the hook and loop closure.
Body Pillow
The body pillow can be used in harness mode only, but must be removed when the child requires the harness in the 3rd from the bottom harness slot.
Harness Covers
The harness covers are optional. They are removable by removing the harness from the splitter plate at the back of the seat. Then pull the harness through the seat shell to the front of the seat and slide the harness covers off. Replace the harness.
Crotch Buckle Cover
The crotch buckle cover is optional. The crotch buckle cover did make buckling and unbuckling the crotch buckle more difficult. To remove the cover, turn the seat upside down and find the metal retainer clip for the crotch buckle. Turn the retainer clip sideways, pull up on the crotch buckle to remove it from the seat, and slide the cover over the metal retainer. Replace the crotch buckle by sliding the metal retainer through the buckle slot.
Cupholders
There are TWO cupholders, they are required for use. This made our models pretty excited!
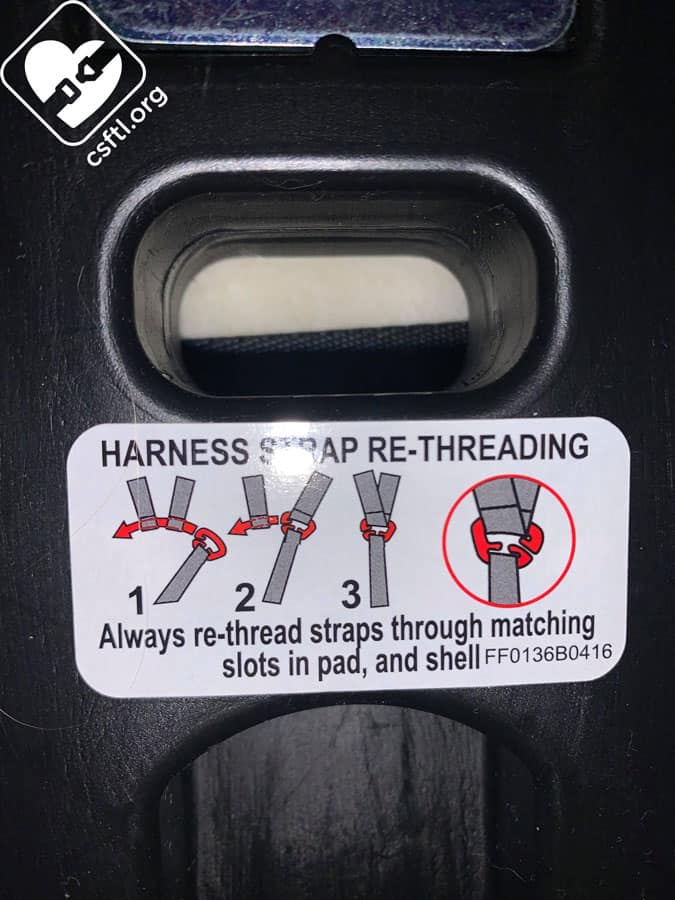
Multiple Harness Adjustment Slots

Baby Trend Hybrid high seat back
The Hybrid has 4 harness slots. The top one is a bit difficult to see. It hides just under the bottom edge of the headrest cover. One unfortunate discovery we made is that the headrest slides down easily when any small amount of pressure is put on the top of it.
LATCH Permitted in Booster Mode
The lower anchors and top tether can be used in high back booster mode. Since the lower anchors are attached to the seat back, if using the seat in backless booster mode the seat would need to be buckled in if unoccupied.
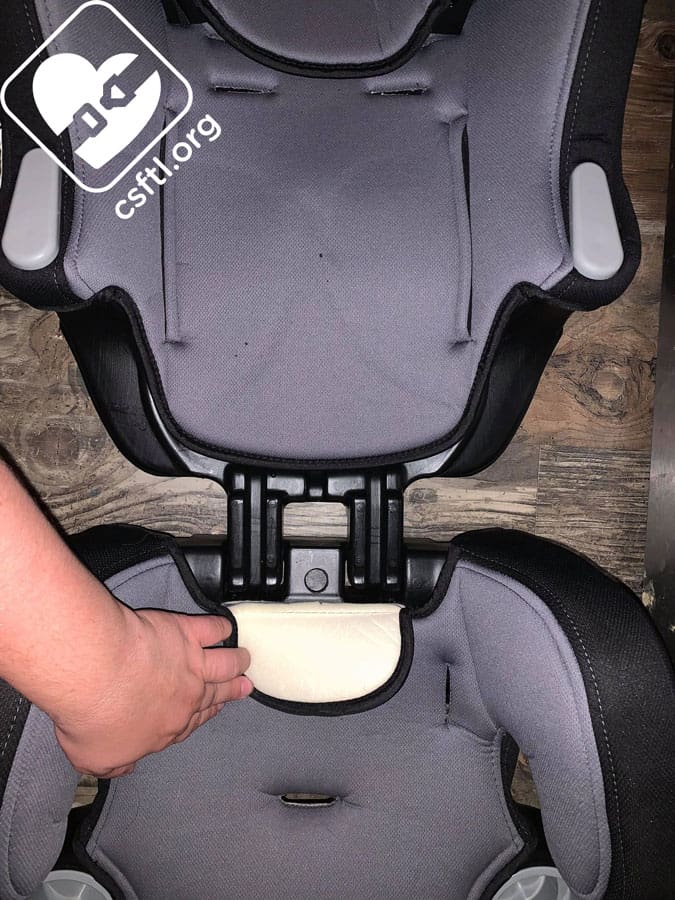
Adjustable Crotch Buckle Length
Baby Trend Hybrid crotch buckle shortening clip
The Hybrid has two buckle lengths. The seat comes with the buckle installed at the shorter length. This length is to be used until the child is 35 pounds or the buckle tongue touches the child’s thigh, whichever comes first.
To lengthen the crotch buckle, turn the car seat over to expose the underside of the base. Locate the metal buckle shortening clip and remove it from the crotch buckle webbing. Store it on the designated storage spot under the cover of the seat.
Care and Cleaning

Baby Trend Hybrid removing the cover
The cleaning instructions were difficult to find. The manual says to follow the care instructions on the tag on the cover of the seat. I searched the main cover of the seat and did not see any care tags. I turned my search to the body pillow and head insert. The care tag is located on the bottom of the body pillow. This is disappointing because the body pillow is required to be removed when the child is using the 3rd harness slot from the bottom. This leaves the potential for the insert, and the instructions, to be lost.
Removing the cover can be difficult. Some of the elastics are tied into place and must be untied to remove the cover. Other parts were just difficult to access.
Installation Quirks
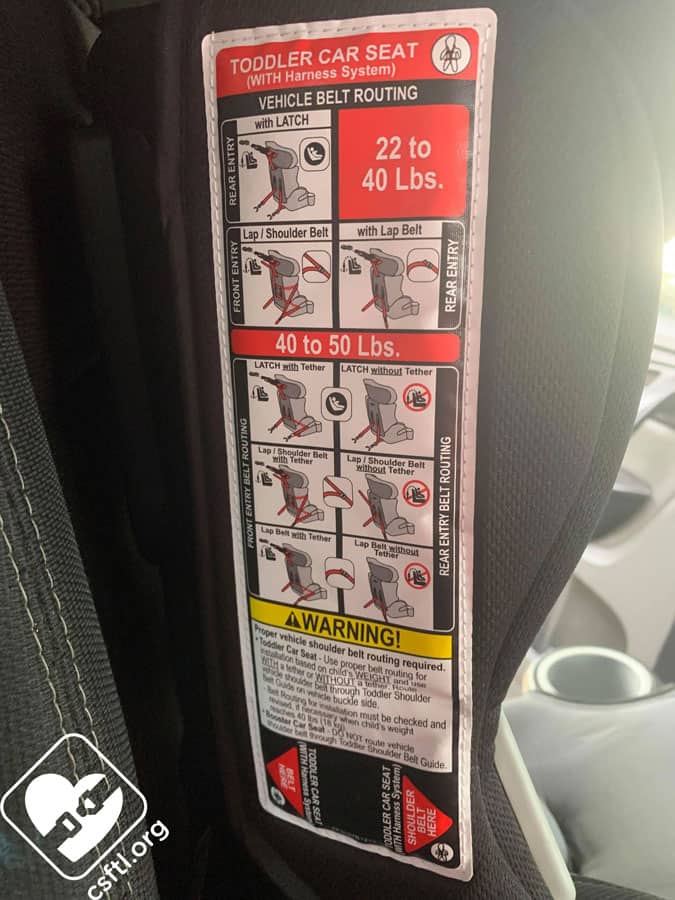
Before we delve into installation and fit, it should be noted that there are MANY install methods for the Hybrid. We know that the manufacturer developed these many methods with the well-intentioned intent of offering caregivers the chance to find the method that works the best for them. Unfortunately, we have found over these many years that these many methods lead to confusion and misuse in many cases.
These methods are based on a few different factors such as the child’s weight and the use of the top tether — some of the methods do not require or explicitly prohibit the use of the top tether. This gives us a bit of pause because we always recommend the use of the top tether because it reduces head excursion by quite a bit.
One potential workaround is to install the Hybrid using the lower anchors — the seat can be installed with lower anchors for the full weight range, so it’s possible to install it with lower anchors and use the top tether anytime the lower anchors are used.

Baby Trend Hybrid installation chart
This chart found in the manual can help a caregiver decide the proper install method based on the child’s weight.
There is also a graphic on the side of the seat shell with the installation methods. We’re still not convinced that this makes using the seat properly any easier.
Baby Trend Hybrid installation methods
Pro tip: always use the manual that came with your specific seat. There have been several versions of the Hybrid over the years and the rules and install methods vary between them.
There are two different belt entry methods for both the lower anchors and the vehicle seat belt – front and rear entry. The front entry method is how most forward facing harnessed car seats are installed, with the belt routed directly through the forward facing belt path. The rear entry method (sometimes called the long belt path) is entirely different and can be difficult to master.
Installation
Forward Facing Harness Mode
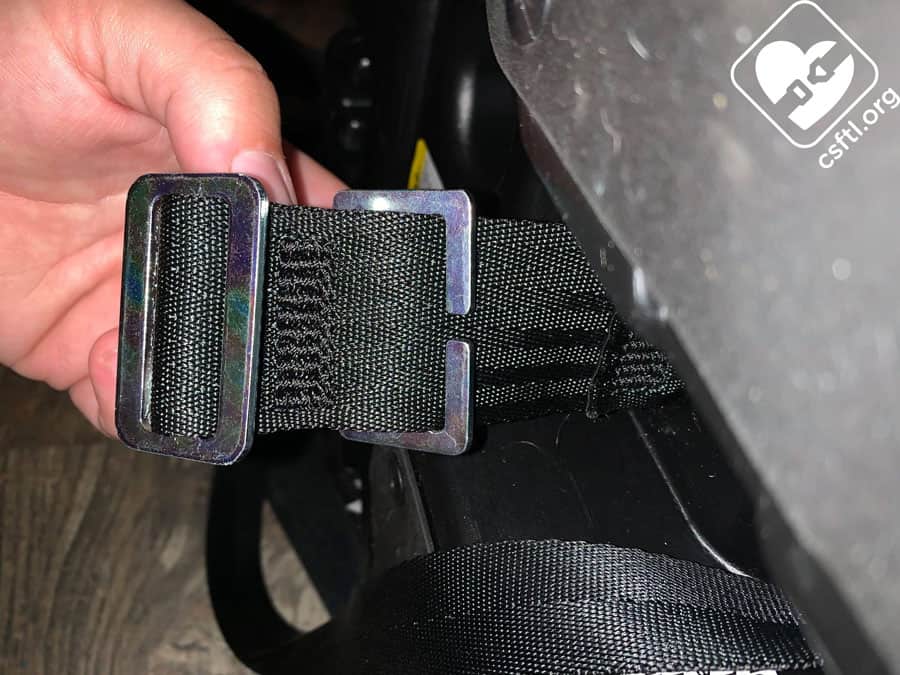
Lower Anchors
Rear Entry Method
Rear entry method with lower anchors
Remove the lower anchors from their storage location on the seat shell. Place the Hybrid on the vehicle seat with the harness facing the front of the vehicle seat. Route the lower anchors through the belt path. Attach the lower anchor connectors to the lower anchor bars in the vehicle seat. Press down on the seat pan while removing the slack from the lower anchor webbing.
Check Your Work

Baby Trend Hybrid belt path
After the seat is installed, give it a firm handshake at the belt path, make sure the seat moves less than an inch at the belt path.
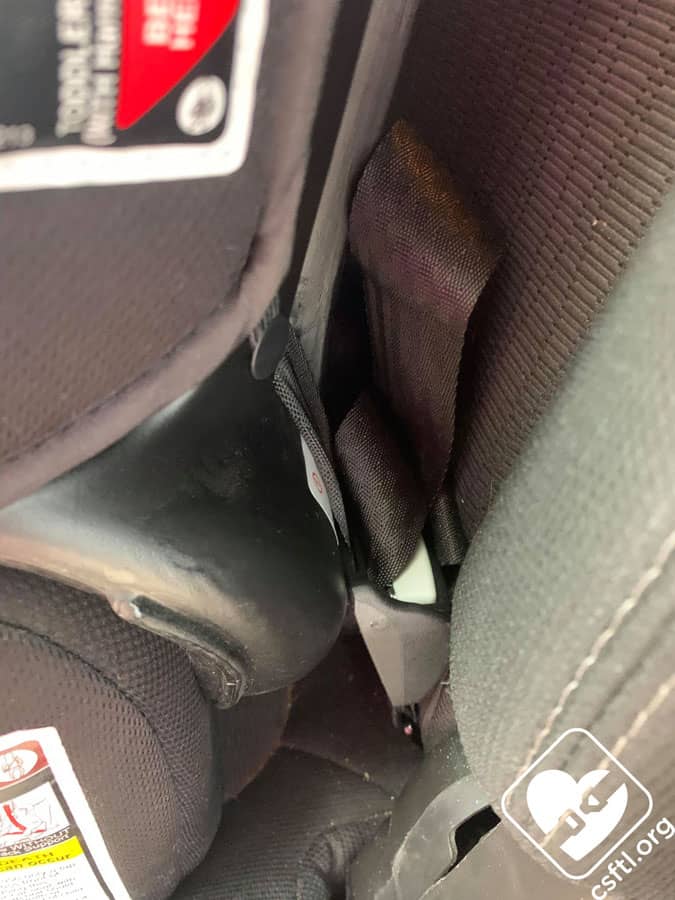
Front Entry Method

Baby Trend Hybrid belt path
Start by removing the lower anchor connectors from their storage spots on the seat shell. Set the car seat on the vehicle seat with the harness facing the front of the vehicle. Starting on one side of the seat, connect one lower anchor hook to the lower anchor bar in the vehicle seat. Route the lower anchor belt in front of the arm rest on the car seat, through the slot in the seat shell on that side (from the front side), behind the seat shell, through the slot in the other side of the seat shell (from the back side), and around the other arm rest, connecting the loose lower anchor to the anchor bar in the vehicle seat.

Baby Trend Hybrid installed with lower anchors
Slack likes to hide in the lower anchor webbing when installing with the front entry method. To remove it, work the slack toward the side with the lower anchor adjuster. Then push down in the seat pan while removing the slack from the lower anchors. Remove the slack from the top tether anchor webbing.
Check Your Work
Once the seat is installed, give it a firm handshake at the belt path, make sure the seat moves less than an inch at the belt path.
Vehicle Seat Belt
Rear Entry Method

Baby Trend Hybrid belt path
Place the Hybrid on the vehicle seat with the harness facing the front of the vehicle. Route the vehicle seat belt through the forward facing belt path and buckle the vehicle seat belt. Consult the vehicle manual on how to lock the vehicle seat belt. Lock the vehicle seat belt and remove the slack while pressing down in the seat pan of the car seat.
Check Your Work
Once the seat is installed, give it a firm handshake at the belt path, make sure the seat moves less than an inch at the belt path.
Front Entry Method

Baby Trend Hybrid front entry
Disclaimer: This method is incredibly hard to remove from the vehicle once it is installed. This install method uses up almost the entire length of the vehicle seat belt webbing, leaving very little slack to remove the seat.

Baby Trend Hybrid front entry
Here’s how to install the Hybrid via this method: set the car seat on the vehicle seat with the harness facing the front of the vehicle. Route the vehicle seat belt route the lap and shoulder belt in front of the arm rest, through the slot in the seat shell on the same side (from the front), behind the seat shell, through the shell on the opposite side (from the back), and around the front of the arm rest.

Baby Trend Hybrid front entry
The shoulder portion of the vehicle seat belt goes over the armrest, while the lap portion goes under the armrest. Buckle the seat belt. Consult the vehicle manual on how to lock the vehicle seat belt. Lock the vehicle seat belt (if it hasn’t locked itself already) and remove the slack while pushing down on the seat pan.
Check Your Work
Once the seat is installed, give it a firm handshake at the belt path, make sure the seat moves less than an inch at the belt path.

Baby Trend Hybrid front entry
Fit to Child
Forward Facing
5 Years Old

Baby Trend Hybrid 5 years old
Our newly 5 year old model weighs 49 pounds and is 44 inches tall. He wasn’t keen on getting out of his jammies, but he was ready to model! He is only 1 pound away from the weight limit on the harness for this seat. He is not mature enough to ride in abooster seat just yet so a different combination seat would be in his immediate future.
He did find the seat comfortable but wasn’t a fan of the crotch buckle cover. The harness sits just above his shoulder and the crotch buckle has been lengthened. The harness was easy to tighten and loosen. One perk we found is that there is a cover over the cam lock that makes it more difficult to access for little hands.
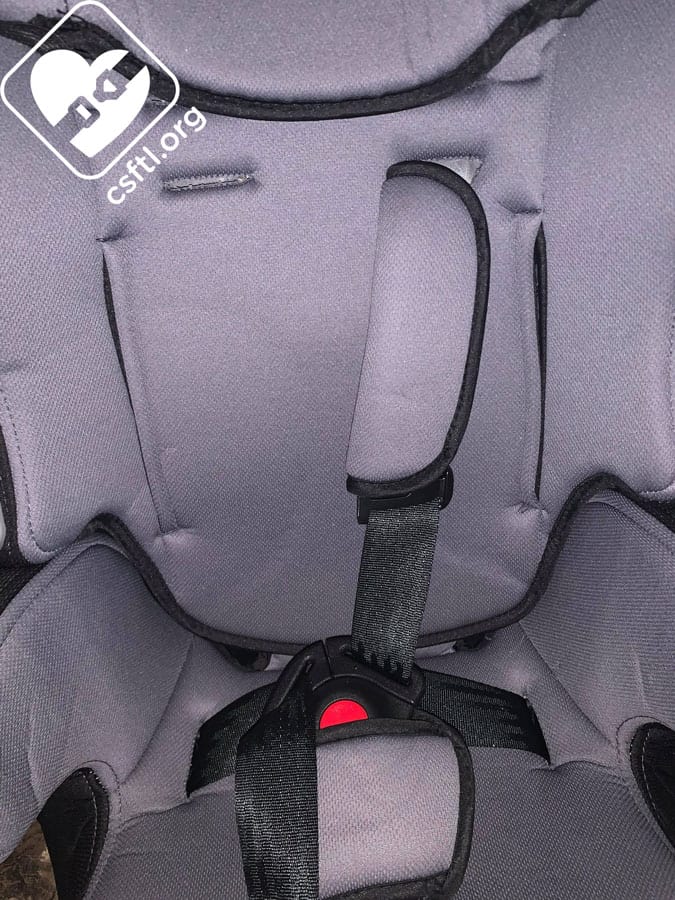
Splitter Plates
Baby Trend Hybrid splitter plate
Another thing that makes the Hybrid unique is the splitter plate — it’s two plates that are sewn together. To convert the seat to and from booster mode, remove the harness from both sets of splitter plates. When the harness is put back on, the harness loops must be attached to both of the plates.
Converting to High Back Booster Mode
Baby Trend Hybrid converting to booster mode
Converting this seat to booster mode basically entails removing the harness and storing it in a location you’ll remember.
To convert the seat to high back booster mode, unhook the harness from the splitter plate and pull the harness through the front of the seat. Turn the seat over to expose the crotch buckle retainer clip. Turn the retainer clip sideways and lift the crotch buckle off the seat base. While the seat is turned over, locate the metal harness retainer clips on the bottom of the seat base. Turn each one sideways and pull the harness up out of the seat base.
Store all the components in a safe place for future use. We recommend a resealable bag, labeled with the seat name.
Booster Mode Setup

Baby Trend Hybrid shoulder belt guide
Once the seat is converted to booster mode, set the Hybrid on the vehicle seat with the cup holders facing the front of the vehicle. Thread the vehicle seat belt through the belt guide. This was no easy task. The belt guide consists of two plastic slots. The vehicle seat belt must rest inside the inner slot. This took practice and our models were unable to do this themselves, unlike many other high back boosters in our collection.
High Back Booster Mode
7 Years Old
Baby Trend Hybrid booster mode 7 years old
This model is 7 years old and weighs 57 pounds and is 49 inches tall. He said “I really like this seat” when I first pulled it out of the box. His opinion didn’t change much when he was finally able to put his bum in it. The seat’s wide base meant that he wasn’t able to reach the buckle to secure himself in the seat — we had to help him each time. Once he was in the seat, we were pleased by the fit — the shoulder belt sits center over his collarbone and the lap belt is low on the hips, touching the tops of the thighs.
Converting to Backless Booster Mode
This process has a few steps to it and involves a bit of manual labor. First. place the Hybrid on the floor and lightly place a knee into the base of the seat. Grab the seat back on either side of the shoulder area. Gently wiggle the seat back side to side while lifting up. Once the seat back is all the way out of the seat base, rotate the seat back toward the ground and separate it from the seat base.
Fit to Child
Backless Booster Mode
10 Years Old

Baby Trend Hybrid 10 years old booster mode
Our 10 year old model weighs 63 pounds and is 53 inches tall. The lap belt is nice and low on the hips, touching the tops of the thighs. His shoulder belt is centered nicely over his collarbone. This model was able to buckle his seat belt on his own.
Important Information: Where to Find
Date of Manufacture
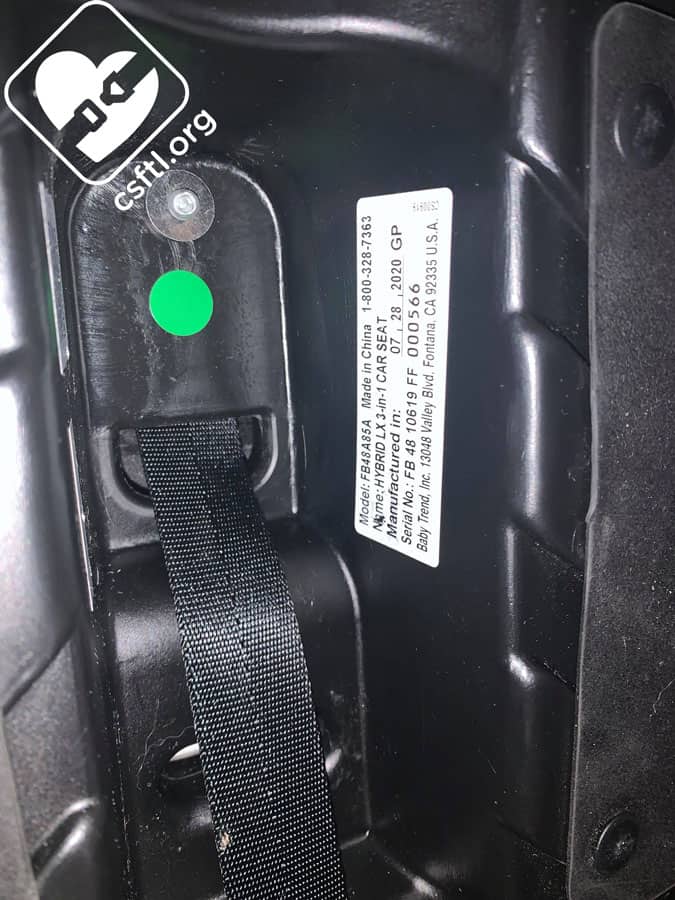
Baby Trend Hybrid date of manufacture label
The date of manufacture is located on the underside of the bottom of the seat base. The manual states the harness and seat back expire 6 years after the date of manufacture, the seat base expires 10 years after the date of manufacture.
Lower Anchor Storage

Baby Trend Hybrid lower anchor and top tether storage
The lower anchors store on the back, bottom of the seat base. They are a bit difficult to keep in place.
Top Tether Anchor Storage
The top tether anchor stores on the back, bottom of the seat base along with the lower anchors. It’s a pretty crowded little storage area!
Manual Storage
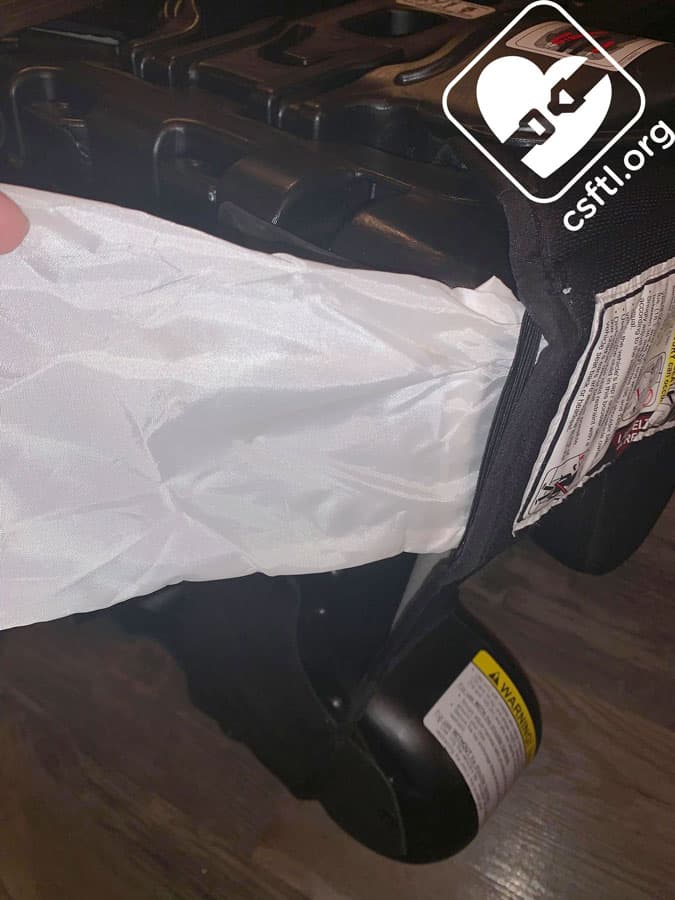
Baby Trend Hybrid manual storage
The manual storage pocket is located under the cover of the seat base, near the child’s hip. A large portion of the cover needs to be removed to access it. The belt shortening clip also stores here, on a small elastic band.
FAA Approval

Baby Trend Hybrid FAA approval label
The FAA approval label is located on the bottom of the seat base.
*The Hybrid is FAA approved in harness mode ONLY.
Overall Thoughts
The Hybrid is a mix of pros and cons. It’s very budget-friendly, which we always applaud. However, the front entry installation method can confuse even the most seasoned CPSTs and the harness weight limit of 50 pounds means some kids won’t be booster ready before they outgrow the harness. While the Hybrid is well-priced and comes in a variety of interesting colors, we worry that the challenges that the install presents mean that this seat is pretty tough to install and use correctly on every ride.
The good news is that booster mode fits a variety of kids well and the models loved the fun color. It is lightweight and the wider seat interior is nice for wider built children.
We’d primarily suggest this seat for budget-conscious families who are willing to invest the time required to install and use the seat properly.