Chicco Fit4
Chicco’s product line already includes some solid choices — the Key Fit and Fit2 rear facing only car seats, the NextFit convertible car seat, the MyFit combination, plus some well-liked booster seats. The Fit4 joins that lineup to add a multimode seat that rear faces, forward faces, then converts to a fairly tall booster seat!
There are a handful of multimode car seats on the market that claim to fit children from birth through booster age. Some of those seats live up to that claim, while others fall a bit short (usually at either end of the age range — with the tiniest of babies or with a short-lived booster ). So when the Chicco Fit4 arrived with a claim that it fits from day one through year ten, we were eager to put that claim to the test. Read on to see how our 4 week old and 10 year old models fit in the Fit4!
CSFTL Quick Stats
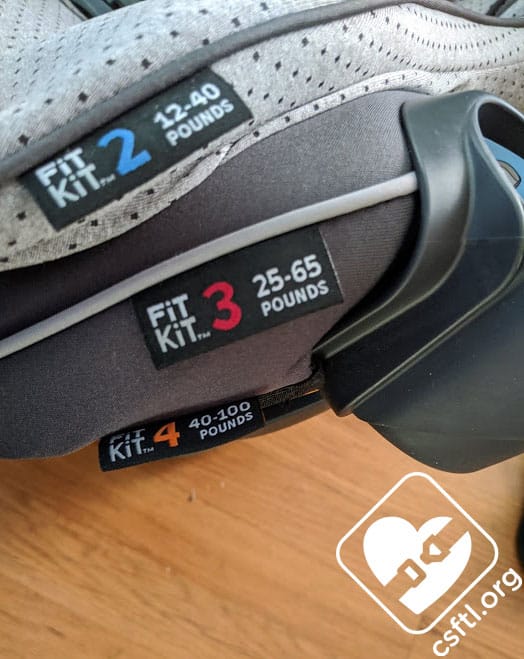
- Rear facing weight range:
- Stage 1 – 4-16 pounds
- Stage 2 – 12-40 pounds
- Rear facing height range: Less than 43 inches tall
- Forward facing weight range: 25-65 pounds
- Forward facing height range: Less than 54 inches tall
- High back booster weight range: 40-100 pounds. CSFTL recommends that children be at least 5 years old before moving to a booster seat.
- High back booster height range: 38-57 inches
- Lower anchor weight limit:
- 35 pounds rear facing
- 40 pounds forward facing
- Chicco requires replacement after any crash
Measurements
- Crotch buckle positions: 4.5 inches and 6.5 inches from the back of the seat pan
- Lowest harness position: 6.5 inches with FitKit Stage 1 positioner in place
- Highest harness position: 18.5 inches
- Highest booster belt guide position: 21 inches
- Width at widest point (cupholders folded):19.5 inches at the side wings
- Width at widest point (cupholders unfolded): 21.5 inches at the cupfolders
- Seat weight: 25.6 pounds
- Seat pan depth: 15 inches
- Expiration: 10 years from the date of manufacture
Convertible?
There are a few names for this type of seat on the market — “All in one” “4 in 1” “5 in 1” “multimode,” and others that I’m sure we’re forgetting. While there’s not any kind of consistency around this naming convention across brands, there was (until now) some type of consistency in terms of those names meaning “car seat that does a bunch of stuff.” The Fit4 describes itself as a “4-in-1 convertible car seat,” which we found a bit confusing. In this case, the 4 stages mean rear facing for infants (Stage 1), rear facing for toddlers (Stage 2), forward facing (Stage 3), and booster mode (Stage 4).
Unique Features
The Fit4 has a number of things that make it unique.
QR Assist Website
Chicco Fit4 QR code
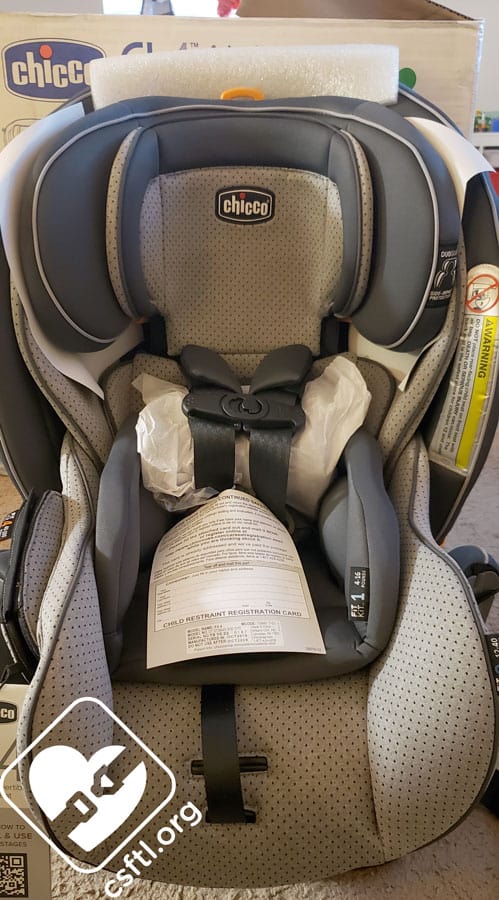
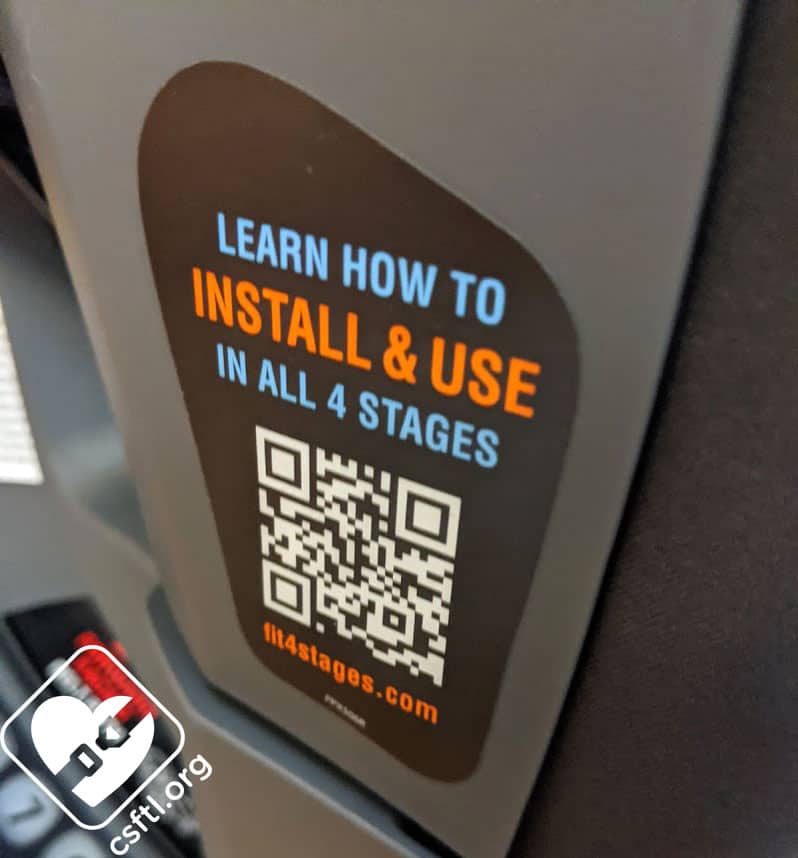
Chicco is offering a new program with the Fit4 — the QR Assist Website — that provides information and installation videos to assist caregivers with using their Chicco Fit4 properly in each stage! When caregivers first open their Fit4, they’ll see a tag on the seat advertising the Fit4Stages.com website – along with the QR code that can be scanned to access the website. The same QR code is on a label on the side of the seat, as well as on the back of the user manual.
We think that means they REALLY want you to use that code!
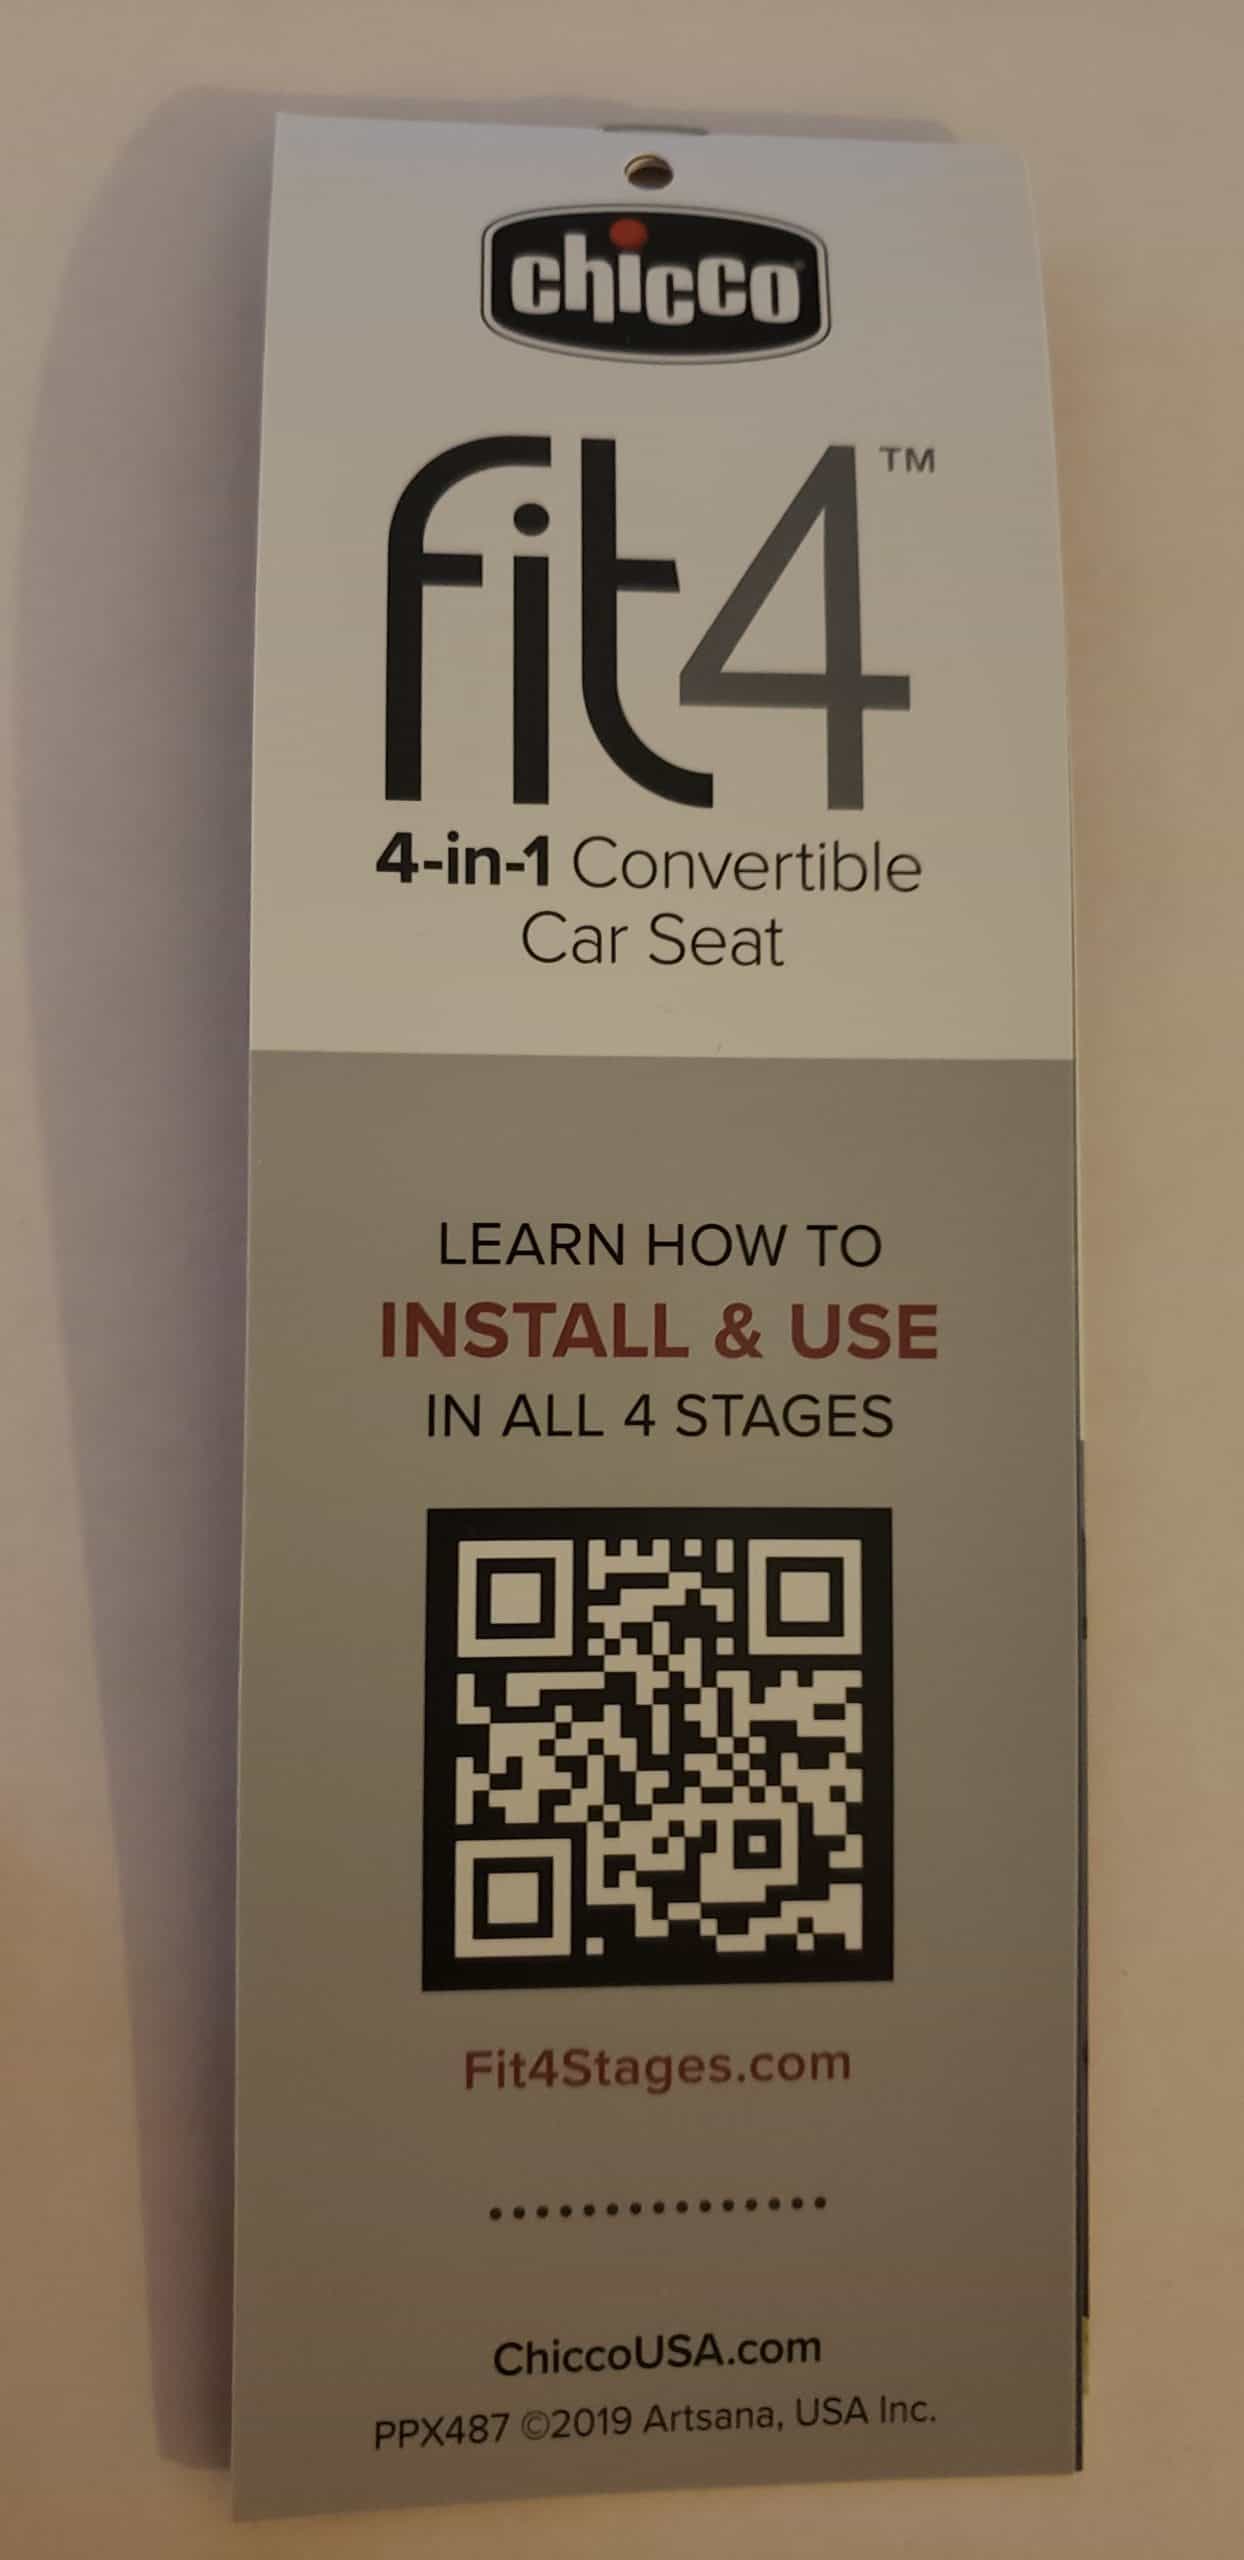 We’ve visited that website and found that it’s quite a resource. From simple installation instructions to longer videos, it explains how to use the seat correctly in every one of the Stages. It also includes a video on how to remove the cover for cleaning. If you’ve ever removed a car seat’s cover, then wondered how the heck to get the thing back on, we understand your frustration and urge you to check out the Fit4 video.One of the most important things about using a child restraint is to use properly on every single ride. We applaud Chicco for taking the time to create an online space that is dedicated to helping caregivers use their child’s car seat properly!
Color-Coded Labels and Manual
Chicco Fit4 recline angle indicator
Both the seat’s manual and the seat itself are color-coded to represent the different modes. This consistency is easy to follow and we hope it leads to caregivers using the Fit4 correctly on every ride!
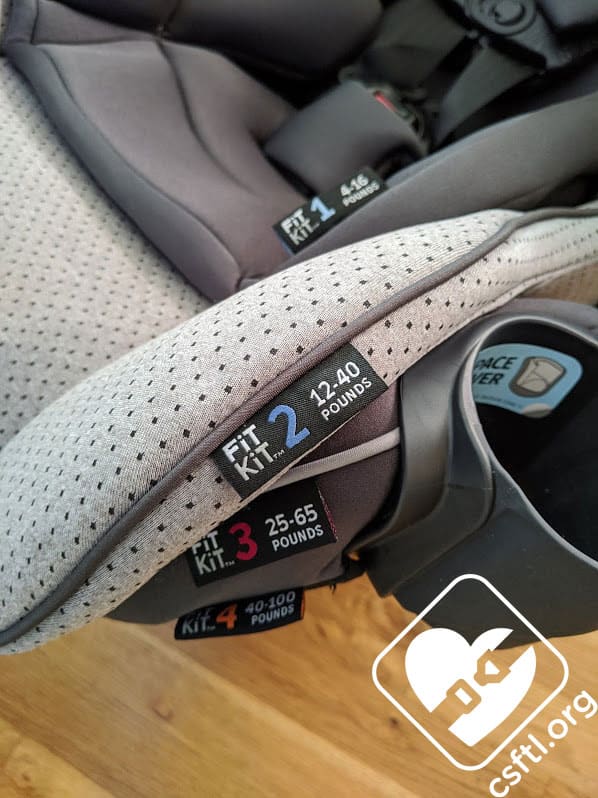
FitKit
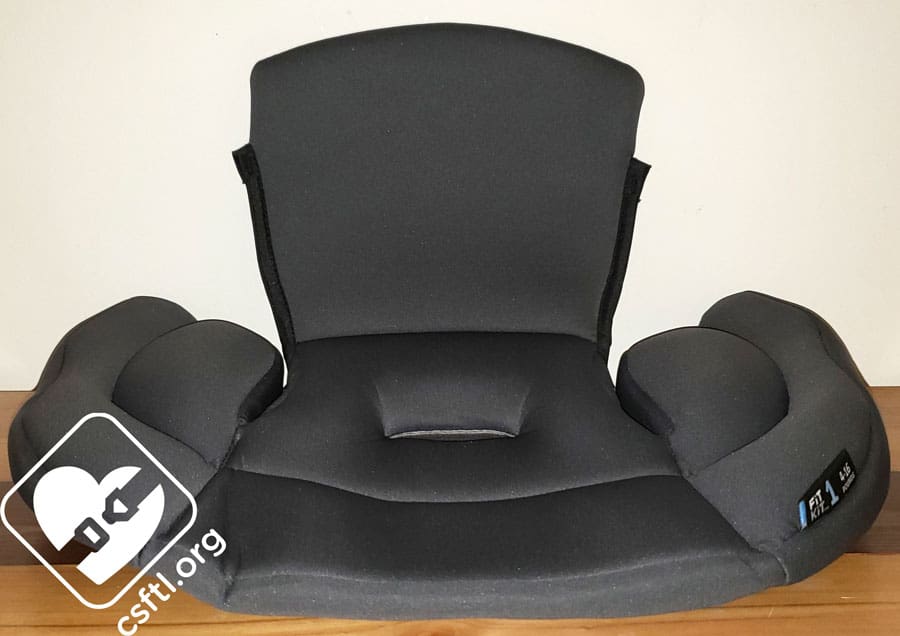
Chicco Fit4 Stage 1 FitKit
The seat also includes 2 sets of padding that Chicco has named the FitKit. This padding set includes a Stage 1 rear facing positioner, Stage 2 rear facing positioner, Stage 1 and 2 headrest, and an optional Stage 4 belt pad for use in booster mode.
The guidelines for using the FitKit are as follows:
- The Stage 1 positioner is required when the seat is installed rear facing for children who weigh between 4 pounds and 12 pounds. It is optional between 12 pounds and 16 pounds.
- The Stage 2 positioner is required when the seat is installed rear facing for children who weigh between 12 and 40 pounds.
- The Stage 1 and 2 headrest is required when the seat is installed rear facing in Stage 1 and Stage 2.
- The Stage 4 belt pad is optional while the seat is in Stage 4 mode – used as a belt positioning booster.
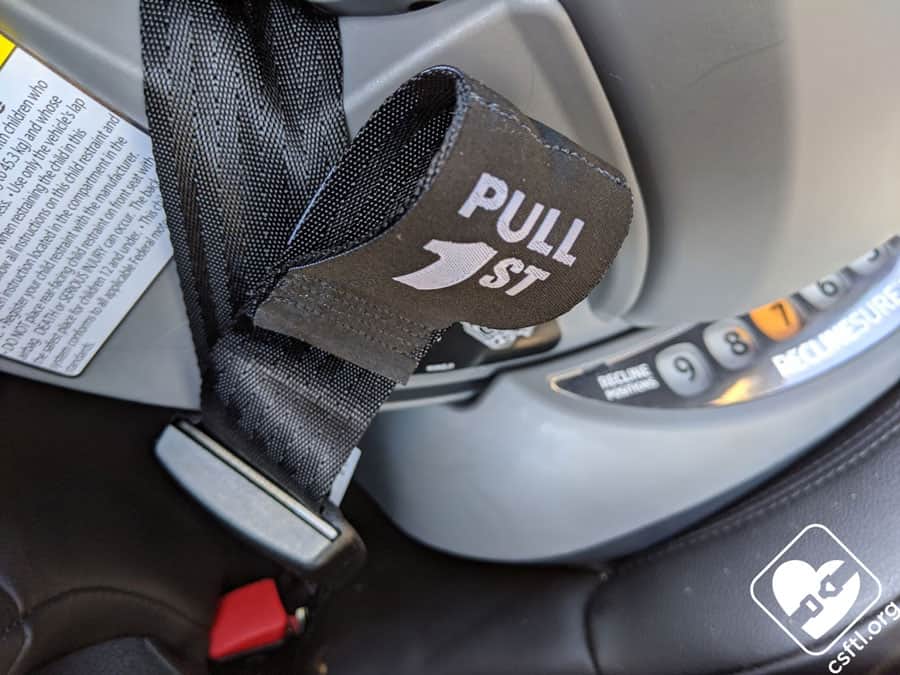
SuperCinch Lower Anchors
The Chicco Fit4 includes the same SuperCinch technology for lower anchor installation that is found on many other Chicco car seats. This two-sided system consists of clear markings on either side of the lower anchor webbing. One side says Pull 1st, the other says Pull 2nd. Guess which one you pull first? The SuperCinch tightener is one of our favorite parts of some other Chicco car seats, so we were excited to see that it has been included on the Fit4 as well!
Pro Tip: when installing the seat via this method, pull more slack out of the Pull 1st side than you might expect. The Pull 2nd side cinches up and can quickly run out of slack to remove if the Pull 1st side’s webbing is too long.
Cupfolders — Assembly Required, Usage Optional

Chicco Fit4 cupfolders, harness pads, crotch buckle, and seat pad
The cupholders that are included with the Chicco Fit4 – also known as CupFolders – are the same style that is found on the Chicco MyFit combination car seat, the KidFit high back booster, and the GoFit backless booster seats.
These foldable cupholders are very convenient because they fold in to allow more room for fitting seats side by side.
To install the cupholders, locate the “R” or “L” on the bottom of each one to determine which belongs on the right side and which belongs on the left side. Make sure the fabric is tucked in along the lip of the child restraint to prevent interference, and then line up the pin and two guides on the cupholder with the openings on the child restraint. Push down firmly on the cupholder until it clicks into place.
To remove the cupholders, press the button on the bottom of the cupholder and pull up on the cupholder. The cupholders can be placed on the top rack of a dishwasher to clean.
The seat can be used without the CupFolders.
Two Position Chest Clip
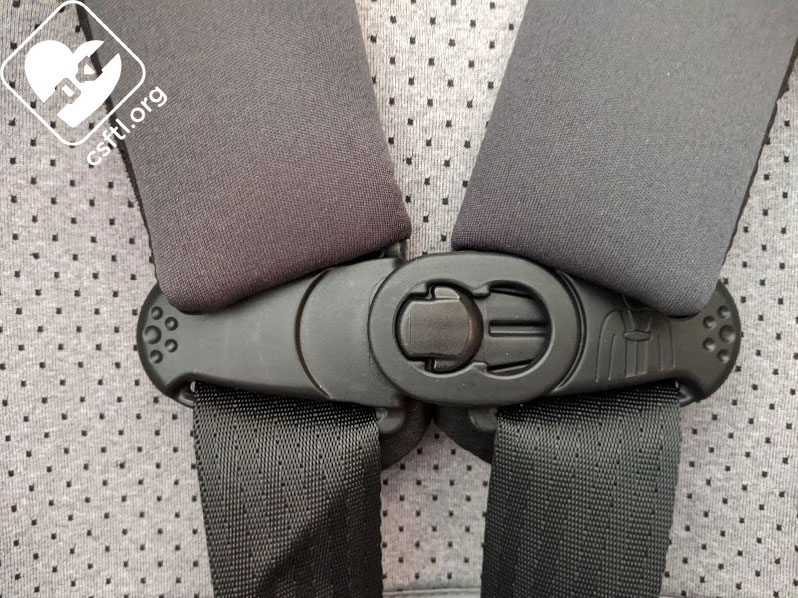
Chicco Fit4 chest clip
The Chicco Fit4 brings back the two position chest clip that we have seen on previous NextFit models. There are no restrictions on when either position can be used in harness mode, though Chicco did suggest during the course of this review that the smaller position provides a better fit for Stage 1, and the larger position provides a better fit for Stage 2 and Stage 3.
While this two position chest clip does position the harness straps well on babies and small children, our review team found that it causes the harness to be a little more narrow for our older models.
Crotch Buckle Pad
The FitKit set of padding includes a crotch buckle pad that’s a bit different than the typical version that’s found on other Chicco car seats. Unlike the NextFit’s crotch buckle pad, which includes a teeny tiny tab that I have never once been able to attach properly, the Fit4’s slides on and off with ease. This is a small thing but like all of those small things, it adds up to a car seat that’s got a lot going for it.
Deep Seat Pan
The Fit4’s seat pan (the area under the child’s thighs) is roughly 15 inches from the front to back. This makes for a good amount of legroom for growing rear facers and offers a lot of thigh support for forward facers. For comparison, the original NextFit’s seat pan is roughly 13 inches deep and the NextFit Max’s seat pan is 16 inches deep. This seat falls roughly in the middle of those depths.
Note: we say roughly because the seat pan is oddly difficult to measure.
Top Tether Storage
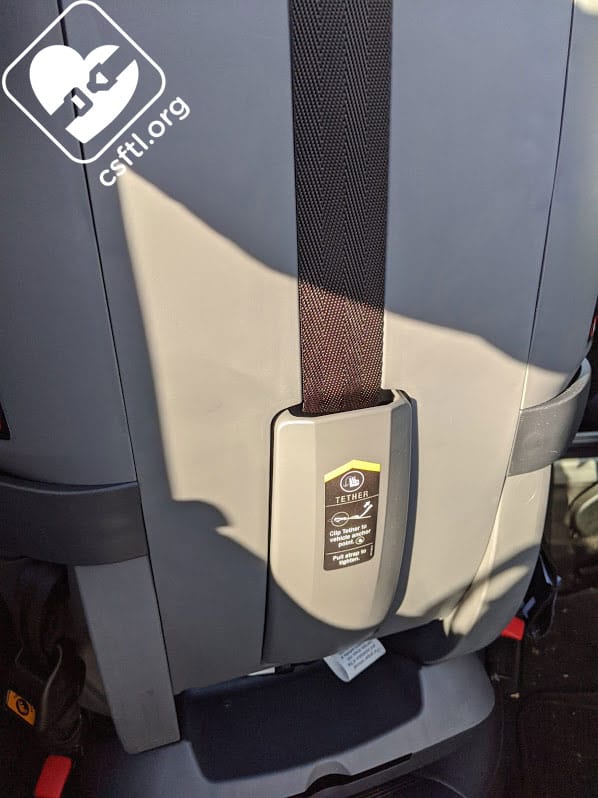
Chicco Fit4 top tether storage
The Fit4 has the same convenient type of top tether storage that we’ve seen on other Chicco car seats. It’s very tidy — an actual compartment on the back of the seat’s shell. It’s so tidy that we worry about caregivers overlooking this critical piece of your child’s car seat. We’ve urged Chicco to consider making this storage area a bit more pronounced or changing the webbing’s color.
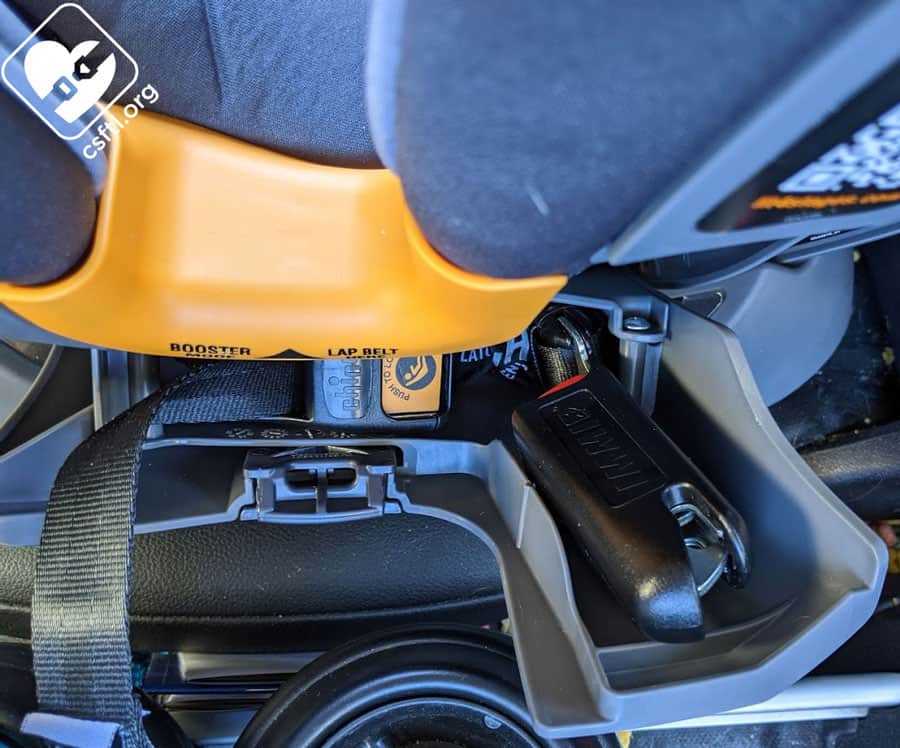
Inflatable Seat Belts — Not Allowed in Harness Mode
The Fit4 cannot be installed with an inflatable seat belt when it’s in harness mode. If it must be installed in a seating position with an inflatable seat belt, lower anchors plus the top tether would be the only acceptable installation method, assuming that the child weighs less than the 40 pound lower anchor weight limit.
Inflatable Seat Belts — Allowed in Booster Mode
In booster mode ONLY, the Fit4 can be used with inflatable seat belts if the vehicle manual permits it.
Preparing for Installation
Stage Setup
The first step to preparing the Chicco Fit4 for installation is to ensure that it is set up properly for the child’s weight.

Chicco Fit4 Stage 1 and 2 FitKit headrest attachment
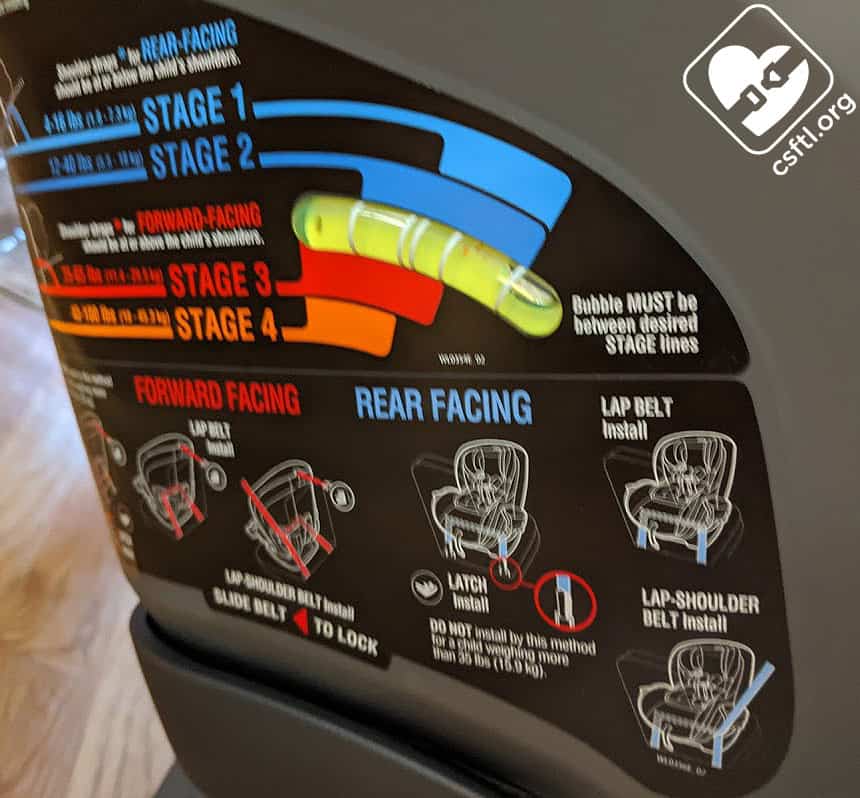
Stage 1: Rear facing infant (4-16 pounds) – The Stage 1 positioner, Stage 2 positioner, and headrest should be in place. Recline the seat until the bubble on the recline indicator is in the light blue range.
If installing on a sloped surface, the blue rear facing recline line should be level with the ground.

Chicco Fit4 Stage 2 FitKit
- Stage 2: Rear facing toddler (12-40 pounds) – Remove the Stage 1 positioner, leaving behind the required Stage 2 positioner and optional stage 1 and 2 headrest if desired. The back pad on the headrest has to go behind the Stage2 padding
The seat should be reclined until the bubble on the recline indicator is in the dark blue range.
Chicco Fit4 Stage 2 FitKit attachment
The Stage 2 FitKit is secured in a number of places via a number of easy-to-remove snaps and two elastic loops on the end of the seat pan so it doesn’t slide around. It also reaches high enough behind the child’s back to contain the vast majority of toddler messes. We did have a bit of a struggle putting the bottom portion of the Stage 2 positioner on — we had to fully recline the seat to expose the two plastic hooks on the underide of the seat.
- Stage 3: Forward facing preschooler (25-65 pounds) – Remove the Stage 1 positioner, Stage 2 positioner, and Stage ½ headrest.
The seat should be reclined until the bubble on the recline indicator is in the red range. If installing on a slope, the seat should be set to recline positions 8 or 9 only.
- Stage 4: Booster mode: Big Kid (40-100 pounds) – Remove Stage 1 positioner, Stage 2 positioner, and Stage ½ headrest. Add the optional seat belt pad if desired.
The seat should be reclined until the bubble on the recline indicator is in the orange range. If installing on a slope, the seat should be set to recline positions 8 or 9 only.
Moving and Storing the Lower Anchors
Chicco Fit4 lower anchor storage
The Fit4 ships with the lower anchors between the belt paths and the lower anchor connectors stored in their handy compartments on the outside of the seat’s shell.
To move the lower anchors from one belt path to another, open the two storage compartments on either side of the seat. Hold one lower anchor connector, and gently slide the lower anchor webbing along the path above the open storage compartment until it is in the desired belt path. Repeat on the other side, then close the storage compartments.
We found that moving the lower anchor connectors to the forward facing belt path had a bit of a trick at the end. We had to move the connectors out of the storage compartment, then up just a bit more until they were all the way in the belt path.
The lower anchors store between the belt paths, in small compartments on either side of the seat’s shell when not in use. We had some trouble figuring out exactly how to place them in the compartment for storage. The manual doesn’t have instructions for this but Chicco has a handy video that does show the exact configuration of twisting and turning required to store them.
Crotch Buckle Position
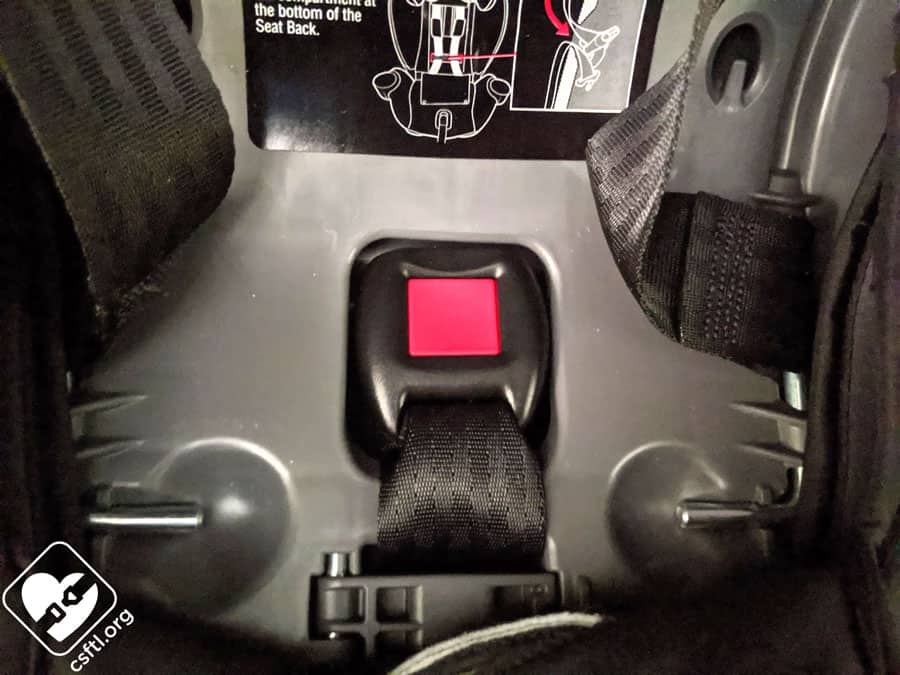
Chicco Fit2 crotch buckle
The Chicco Fit4 has two crotch buckle positions with a couple of rules:
- While the seat is installed rear facing, the crotch buckle should be in the closest position to the child without the child sitting on the buckle strap.
- While the seat is installed forward facing, the crotch buckle must be in the outermost position.
To move the crotch buckle, pull back the cover from the front of the seat and slide the buckle through the slot in the cover. Open the crotch buckle door by using the orange button on the side, then move the crotch buckle to the desired position. Close the crotch buckle door, then thread the crotch buckle back through the appropriate slot in the cover and replace the cover on the seat’s shell.
We found that the space provided by the cover for this task was a bit lacking — we were able to access the crotch buckle but we had to really work to keep the cover out of the way. We’ve suggested that the seat pad’s opening be extended by just a bit to expose the crotch buckle a little better.
Stage 1 – Rear Facing Setup
Chicco Fit4 Stage 1 FitKit
To use the seat rear facing in Stage 1 for an infant who weighs between 4-16 pounds, make sure that the Stage 1 positioner, Stage 2 positioner, and Stage 1 and 2 headrest are in place. If installing on level ground, the seat should be reclined until the bubble on the recline indicator is in the light blue range.
Stage 2 – Rear Facing Setup
Chicco Fit4 Stage 2 FitKit
To use the seat rear facing for an older infant or toddler who weighs between 12-40 pounds, make sure that the Stage 1 positioner is removed, leaving behind the required Stage 2 positioner and optional Stage 1 and 2 headrest.
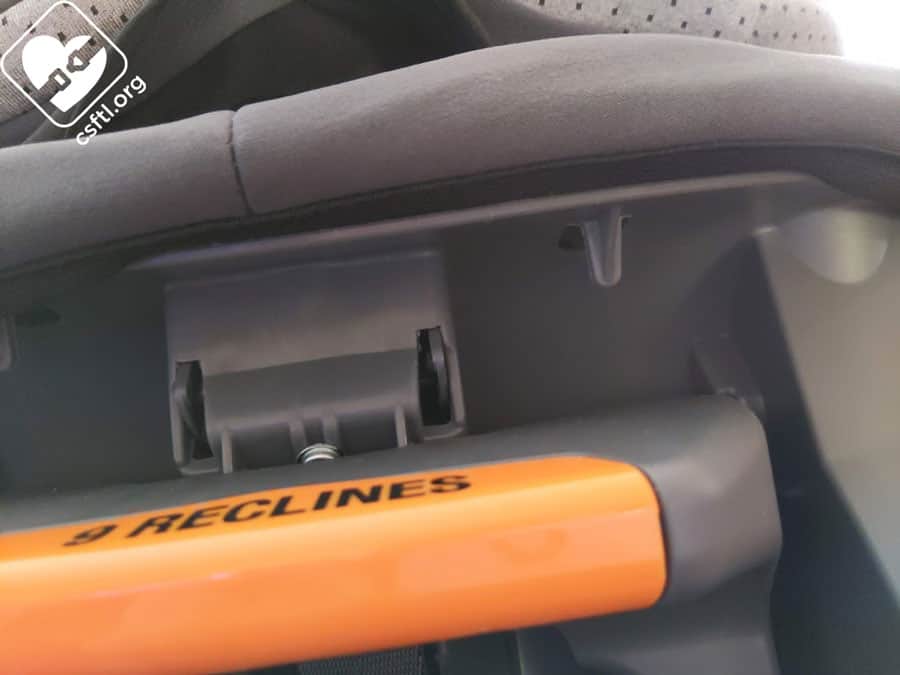
Recline Angle Indicator

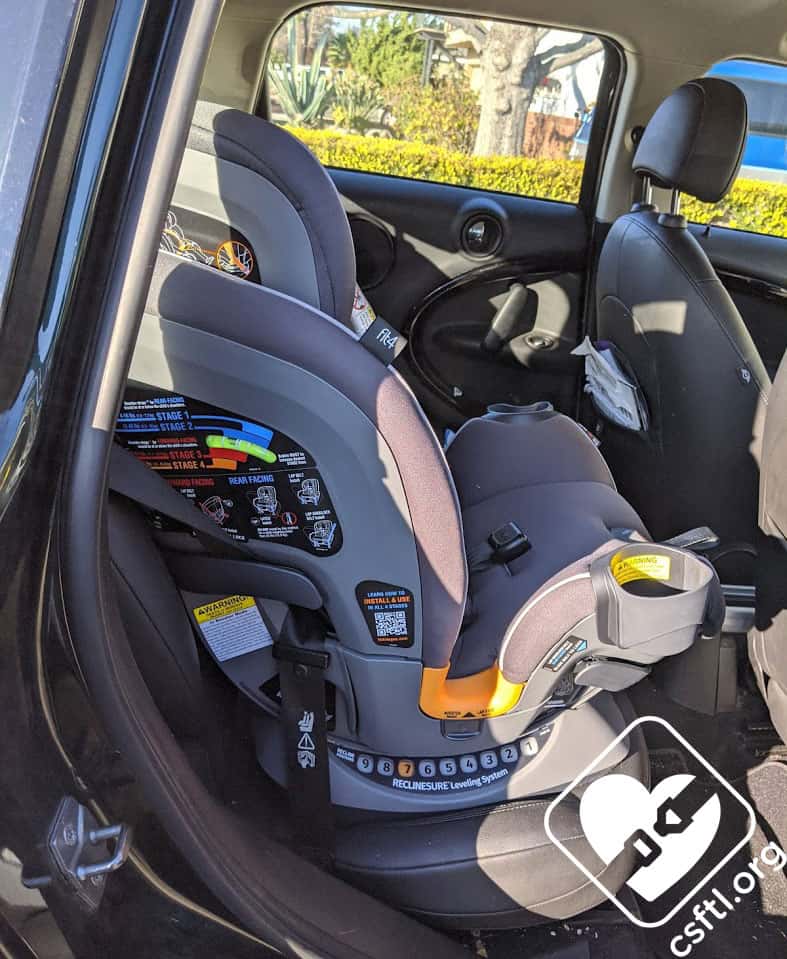
Chicco Fit4 recline angle indicator
Our version of the seat has 5 lines on the recline angle indicator but moving forward, the Fit4 will only have 4 lines. This makes the seat a little easier to use.
Chicco Fit4 recline angle indicator
The Chicco Fit4 has two separate areas on the recline angle indicator that are appropriate for rear facing installations when installing on level ground.
- The Stage 1 recline area is marked by light blue and should be used for children who weigh between 4 pounds and 16 pounds.
- The Stage 2 recline area is marked by dark blue and should be used for children who weigh between 12 pounds and 40 pounds.
- In addition to the recline angle indicator, there is a level line near the rear facing belt path that can be used as a backup
Lower Anchor Installation
Chicco Fit4 SuperCinch lower anchors
The SuperCinch tightener that is included on the Chicco Fit4 goes a long way in simplifying the lower anchor installation.To install rear facing with the lower anchors, start by placing the car seat on the vehicle seat facing towards the back of the vehicle. Adjust the recline setting until the recline indicator is appropriate for the stage in which the seat will be used. Open both storage compartments, remove the lower anchor connectors, then slide them along the path above the storage compartments until they are in the rear facing belt path. Close the storage compartments. Locate the lower anchor connectors in the vehicle, and firmly attach each lower anchor connector on to the corresponding lower anchor connector.
Apply firm pressure straight down into the seat pan area of the Fit4 while pulling each of the lower anchor connector straps – starting with the side marked Pull 1st, then moving on to the side marked Pull 2nd. Confirm that the recline indicator is still in the appropriate area, and check that the seat moves less than 1 inch at the belt path.
Pro tip: pull one extra bit of slack out of the Pull 1st side before moving onto the Pull 2nd side.
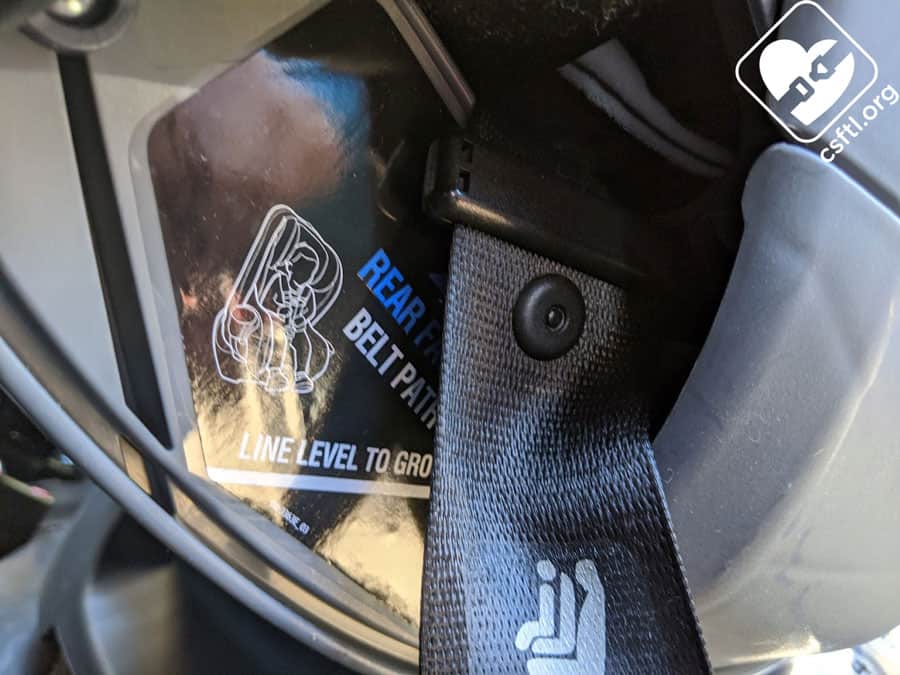
Vehicle Seat Belt Installation
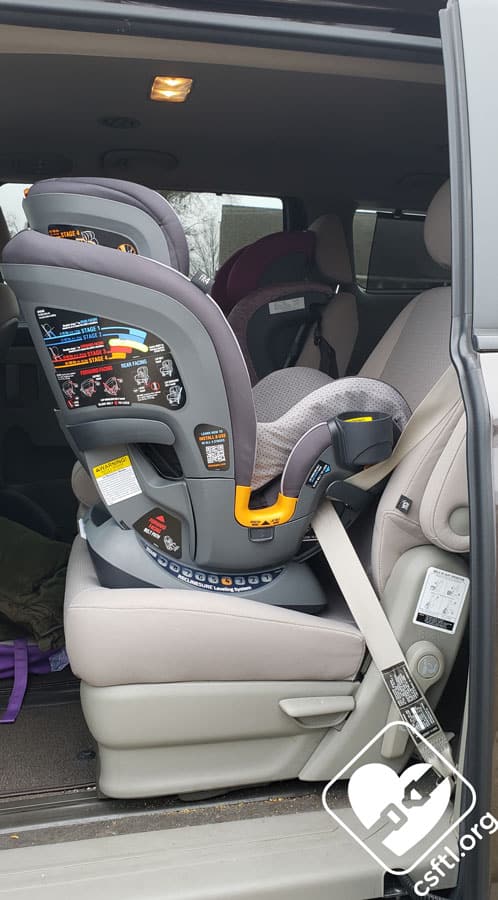
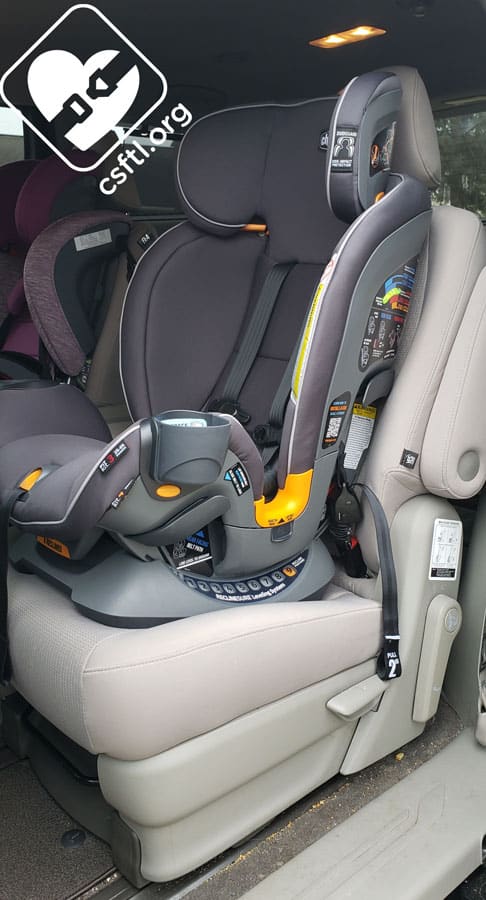
Chicco Fit4 rear facing installation
The Fit4 includes an easy-to-use, textured set of lockoffs for use with vehicle seat belt installations. These lockoffs will lock the vehicle seat belt in place — you don’t need to lock the vehicle seat belt at the car’s retractor when using these handy devices! A bonus use for a lockoff is when you’re working with older vehicles that may not have locking seat belts or travelling internationally.
To install this seat rear facing with the vehicle seat belt, place the car seat on the vehicle seat facing the rear of the vehicle. Adjust the recline setting until the recline indicator is in the appropriate area for the appropriate stage for the child’s weight.
Locate the rear facing belt path at the front of the car seat, then thread the vehicle seat belt through the belt path and buckle the seat belt. Apply firm pressure straight down into the seat pan area of the Fit4 while pulling the shoulder portion of the vehicle seat belt to remove all slack.
Once the vehicle seat belt is pulled tight, slide the shoulder portion of the vehicle seat belt into the rear facing lockoff. Confirm that the recline angle indicator is still correct, and test for tightness by ensuring that the seat moves less than 1 inch at the belt path.
Rear Facing Installation Challenges
Chicco Fit4 rear facing with a convenience button in the way
One of the vehicles we tried for this review — a 2016 Kia Sedona — presented no challenges with the rear facing installation.However, the 2011 Mini Countryman that we also tried presented a pretty unique set of challenges. That vehicle has both a convenience button that’s mounted on the seat belt and a convenience bar in roughly the same location. This vehicle’s fixed position buckle stalks also presented a challenge since the seat belt started to fold through the latchplate.
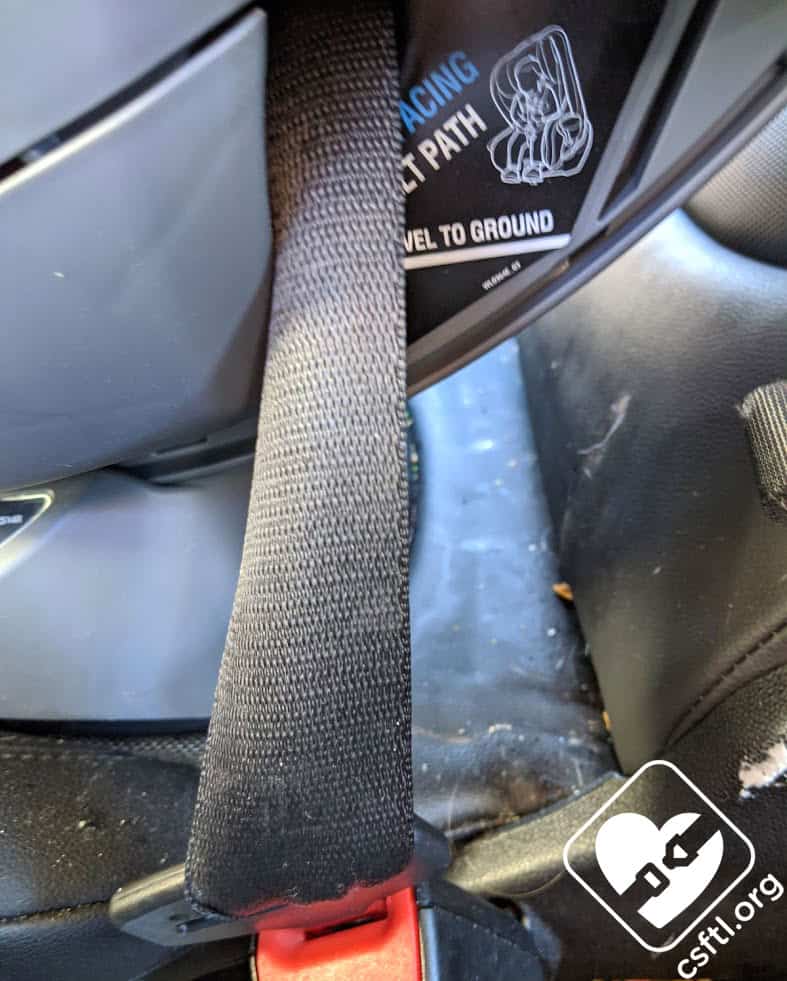
Chicco Fit4 rear facing with a convenience button in the way
We found that the convenience button absolutely got in the way while we installed the Fit4 rear facing in recline positions 8 and 9 with the vehicle seat belt and we weren’t able to get a secure installation with the lockoff. We were also unable to remove the cover from the front of the seat to access the belt path in this particular vehicle. The good news is that installing the seat with the lower anchors went just fine so if we were to use the Fit4 for a rear facing child in this vehicle, we’d use the lower anchors.
We spoke with Chicco about this unique situation. They mirrored our suggestion to use the lower anchors for this type of install but also offered some helpful tips. The cupfolders can be removed to expose a couple of anchor points for the cover. We removed the cupfolders and removed the elastic loops from the anchor points to expose more of the belt path during installation. This helped quite a bit when we installed the Fit4 more upright, using this method we were able to install the seat without too much issue. For this vehicle, we’d recommend a rear facing lower anchor installation for newborns or children who needed the seat as reclined as possible.
Installation Method Recommendations
Speaking of installing this seat with the lower anchors….Chicco has designed this seat to be as easy to install as possible. For the most part, we found that to be pretty true. Along with that design, they shared with us that the intention is that caregivers install the seat rear facing using the lower anchors, then switch to a vehicle seat belt install for a forward facing installation since the child should be at the max weight for lower anchor use when they turn forward facing. Chicco considers those methods the easiest ones for those particular directions.
Fit to Child
Rear Facing
Preemie Doll
Chicco Fit4 preemie doll
Our preemie size Huggable Images doll weighs 4 pounds and is 17 inches long. Our doll is modeling the Chicco Fit4 in Stage 1 using the Stage 1 and Stage 2 body inserts, plus the Stage 1/2 head insert. We left the optional harness covers and crotch buckle cover off for this model.
The fit for this doll was very close — the harness was just barely at the doll’s shoulders, but it did fit properly with the harness just at the shoulders in the lowest position.
Please note that while our doll mimics the proportions and size of a preemie, actual human babies tend to fit a bit differently and we’ve found that actual preemies fit well in many seats where our doll had a questionable fit.
Newborn Doll
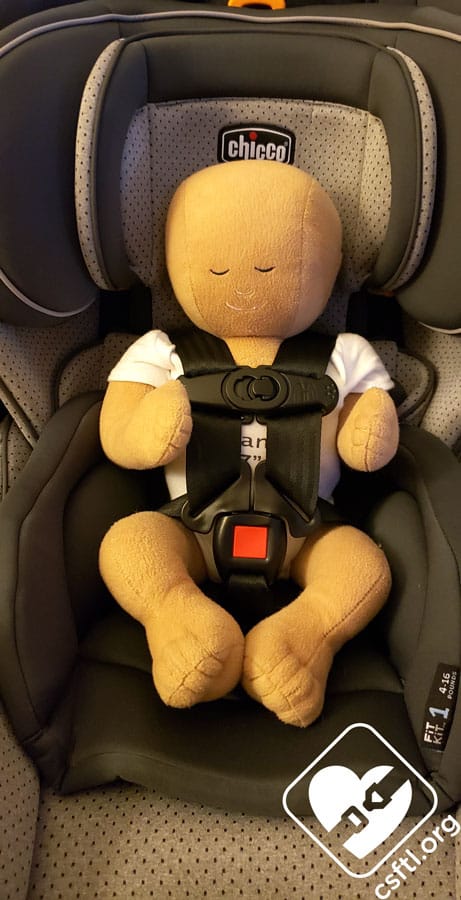
Chicco Fit4 newborn doll
Here we see the newborn size Huggable Images doll. This doll weighs 7 pounds and is 17 inches long. Here, the FitKit inserts are in use and we’ve left off the optional harness and crotch buckle covers. The seat fit the doll well with the headrest on the second to lowest position and the harness below the shoulders. The two position chest clip was helpful with positioning the harness properly on the inner setting.
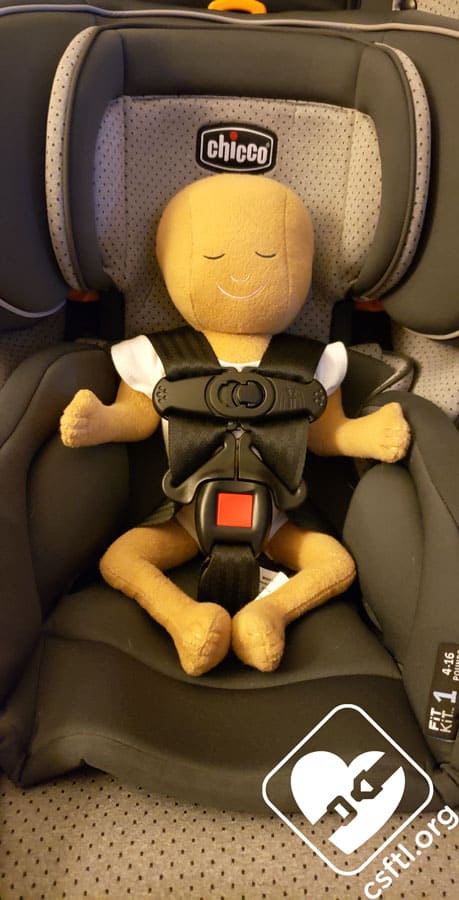
4 Weeks Old

Chicco Fit4 4 weeks old
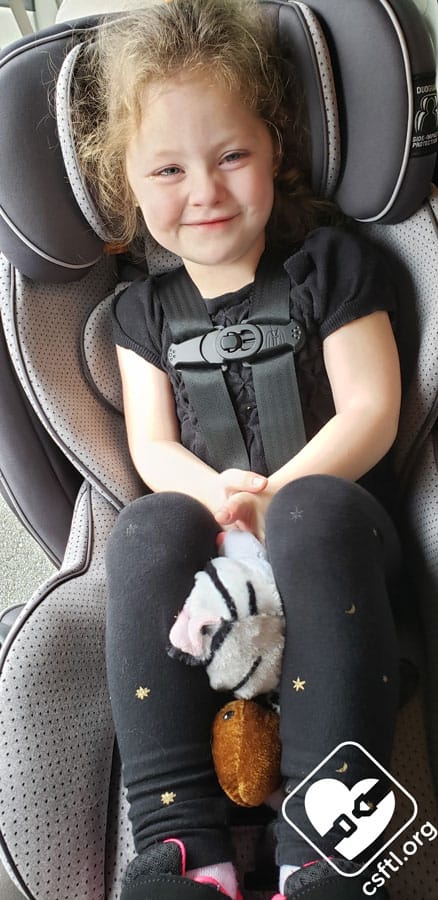
This tiny baby is 4 weeks old, 10 pounds, and is 21 inches long. Although she is small, the Fit4 fit her well when both the Stage 1 and Stage 2 positioners were used (that combination is required for her size). We were able to install the seat at a very reclined angle to ensure that her positioning was safe to avoid any potential airway concerns.
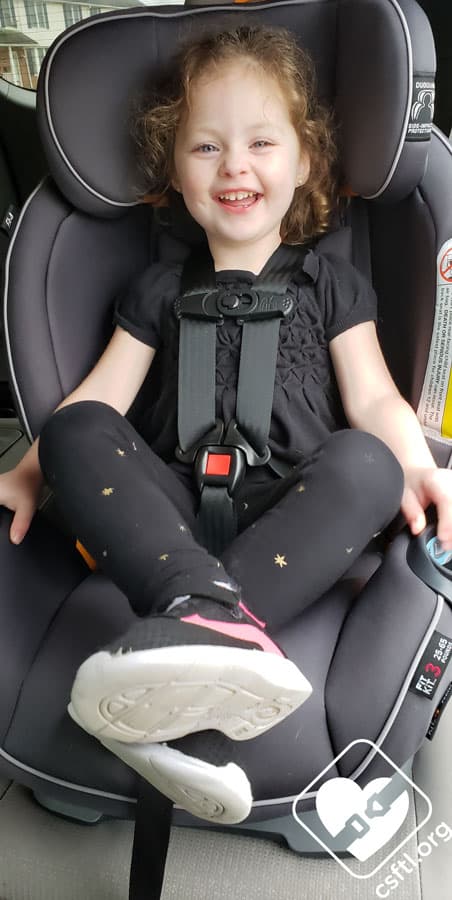
3.5 Years Old
Chicco Fit4 3.5 years old rear facing
This model is 3.5 years old, weighs 35 pounds, and is 39 inches tall. She was very excited to test out this new seat and – as she has quite a bit of experience with various car seats – she has become very vocal with her opinions. Since she’s towards the top of the rear facing height range for the Fit4, the seat was in Stage 2 for her. This placed the seat a little more upright, and removed one layer of padding beneath her.
She found the recline of the seat to be comfortable, and she enjoyed the cushion of the Stage 2 insert and seat cover. However, she did complain about the narrow harness rubbing on her neck. She is not a fan of extra padding, so didn’t find the optional harness covers the right choice for her.
Stage 3 – Forward Facing Installation
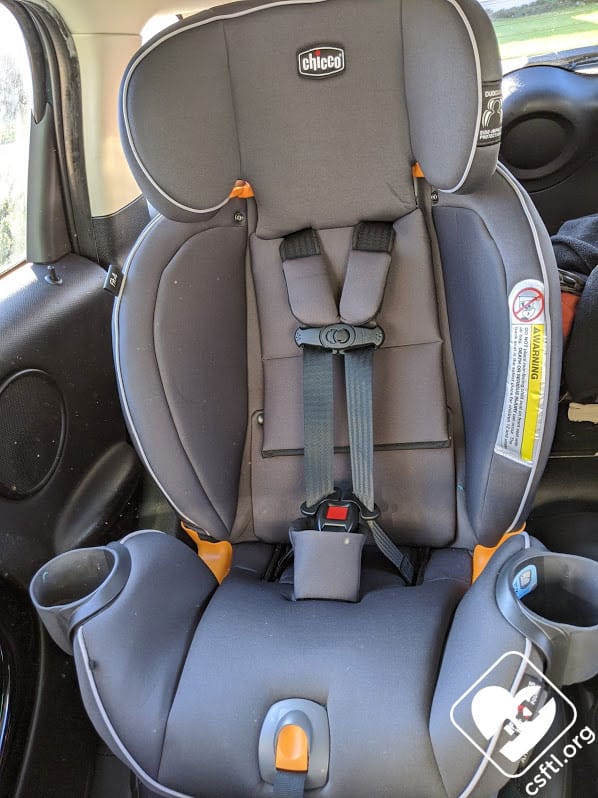
Chicco Fit4 forward facing
To use the seat forward facing, (Stage 3), for a child who weighs between 25-65 pounds, remove the Stage 1 positioner, Stage 2 positioner, and the Stage 1 and 2 headrest.
Recline Angle Indicator
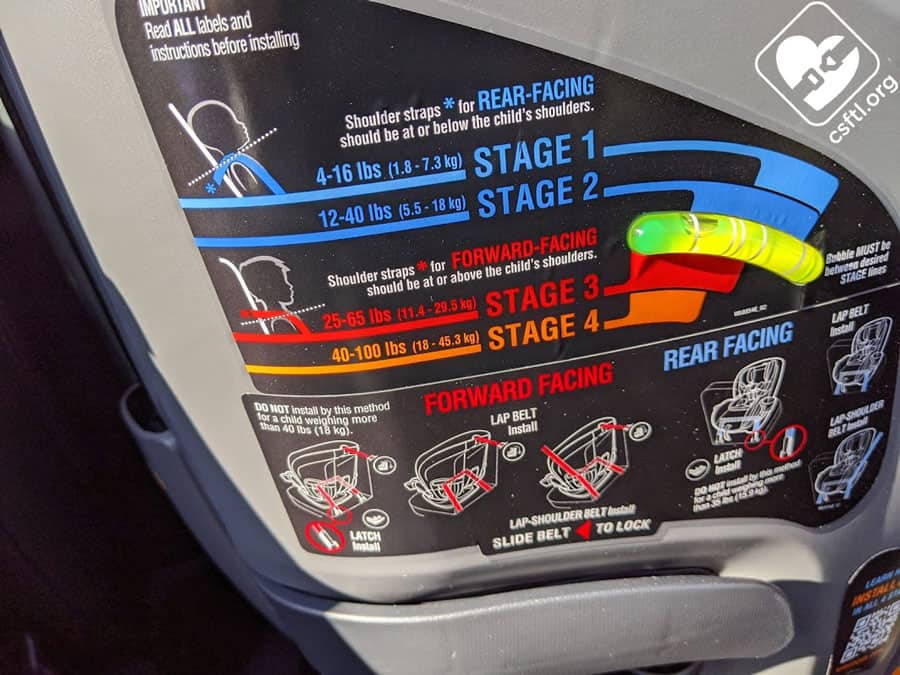
Chicco has kind of a rare thing on the Fit 4 — a recline angle indicator for forward facing installations. The recline angle indicator is located on the side of the seat’s shell and it’s surrounded by A LOT of information on a well-designed panel.
The Stage 3 (forward facing) area is indicated by the color red. When installing the seat while parked on level ground, the bubble on the recline indicator should be fully in the red Stage 3 area. If a family is installing on unlevel ground, the seat must be set to recline position 8 or 9 only.
Lower Anchor Installation
Chicco Fit4 forward facing lower anchor installation
To install the Chicco Fit4 forward facing with the lower anchors, start by placing the car seat on the vehicle seat facing towards the front of the vehicle. Place the top tether strap over the back of the vehicle seat for easy access later in the installation process.
Then, adjust the recline setting until the recline angle indicator is in the appropriate position for a Stage 3 installation. Next, open the two lower anchor storage compartments on either side of the seat, and slide the lower anchor connectors along the path on top of the compartments until they reach the forward facing belt path.
Locate the lower anchor connectors in the vehicle, and attach each lower anchor connector to the corresponding lower anchor connector. Apply firm pressure straight down into the seat, and pull each side of the lower anchor webbing – starting with the Pull 1st side and moving on to the Pull 2nd side.
Pro tip: pull one extra bit of slack out of the Pull 1st side before moving onto the Pull 2nd side.
Confirm that the recline angle is correct and that the seat moves less than 1 inch at the belt path. Finally, attach the top tether to the vehicle’s tether anchor and pull the tail to remove all slack.
Vehicle Seat Belt Installation
Chicco Fit4 forward facing vehicle seat belt
To install the Chicco Fit4 forward facing with the vehicle seat belt, place the car seat on the vehicle seat facing towards the front of the vehicle, and drape the tether strap over the back of the vehicle seat for easy access later in the installation process. Adjust the recline setting until the recline angle is appropriate for the Stage 3 installation.
Thread the vehicle seat belt through the forward facing belt path and buckle the seat belt. Next, apply firm pressure straight down on the car seat while pulling the shoulder portion of the seat belt to tighten. Once the vehicle seat belt is tight, it’s time to lock the seat belt using the lockoff on the car seat. Slide the shoulder portion of the vehicle seat belt into the forward facing lockoff on the side of the seat. Confirm that the recline is correct and that the seat moves less than 1 inch at the belt path. Finally, attach the top tether to the vehicle’s tether anchor and pull the tail to remove all slack.
Fit to Child
Forward Facing
3.5 Years Old
Chicco Fit4 3 years old forward facing
Here we see our 3.5 year old model again. She is still 35 pounds and 39 inches tall. She fit very well in the Chicco Fit4, and enjoyed riding in this seat forward facing. Since the harness is on the narrow side, she complained about the harness rubbing against her neck and refused the optional harness covers.
6 Years Old
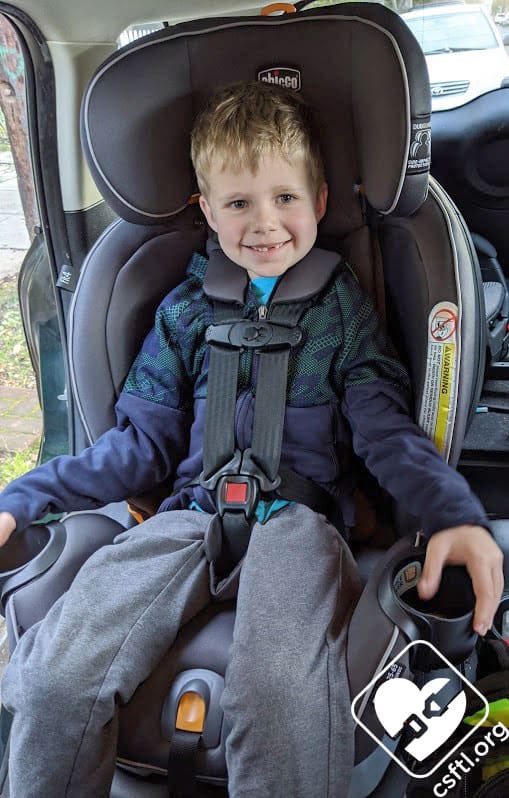
Chicco Fit4 6 years old
This kiddo has been helping the CSFTL team with reviews for some time. Even when he’s not feeling his best, he’s ready to test out a seat and share his thoughts. He’s 6 years old, 44 inches tall, and weighs 46 pounds. The Fit4 fit him well in harness mode, though like our 3.5 year old model, he felt that the harness was a bit narrow. He was able to buckle himself into the seat and unbuckle himself as well. He’s also mature enough to do that unbuckling at the appropriate times so for him, that’s a plus!
Booster Mode
Converting to Booster Mode
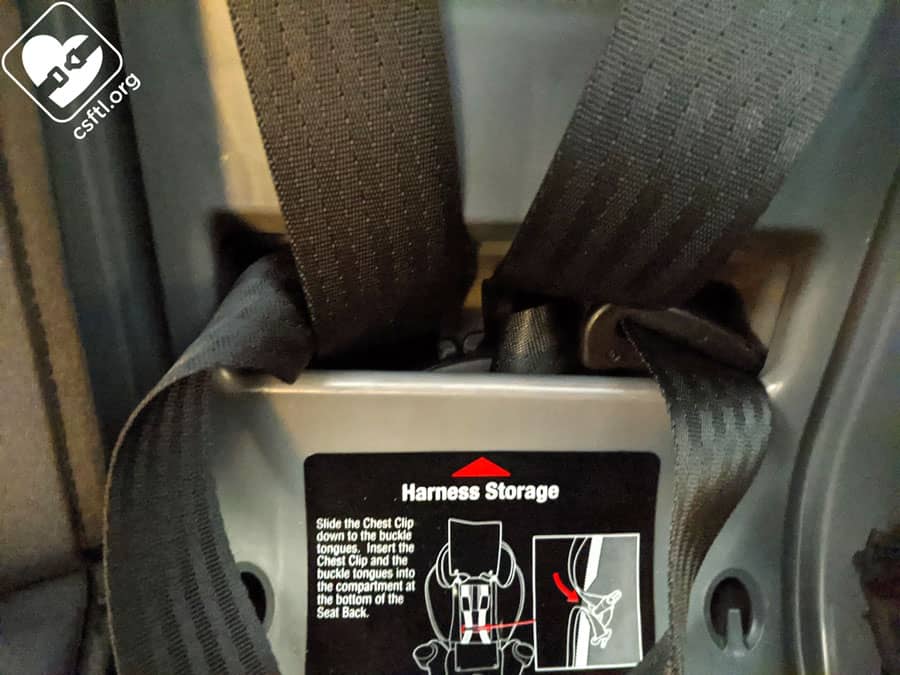
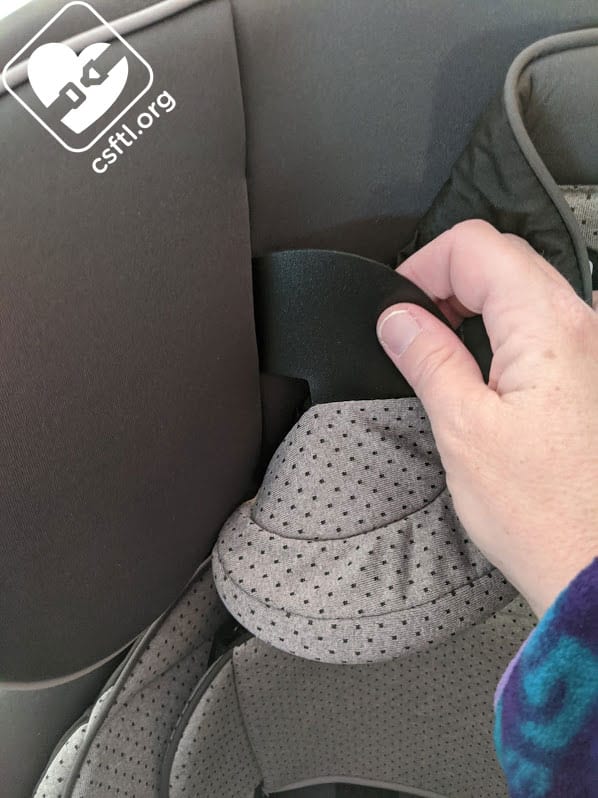
Chicco Fit4 harness storage
I’ll start this section off with some great news — the harness AND crotch buckle both store right on the seat when the Fit4 is in booster mode. The shoulder pads can also be tucked into that location! That means it’s impossible to lose them, we always find onboard storage a bonus.
The process of converting the Fit4 from harness to booster is about as straightforward as you can get. First, loosen the harness all the way, then raise the headrest as high as it can go. Fold up the cover to expose the belt path. Buckle the chest clip and slide it down to the harness storage compartment behind the child’s lower back. Store the chest clip and buckle tongues in that compartment, then open the lower part of the cover to expose the crotch buckle. Slide the orange tab over to expose the full storage compartment and tuck the crotch buckle right in.
Stage Positioner Rules
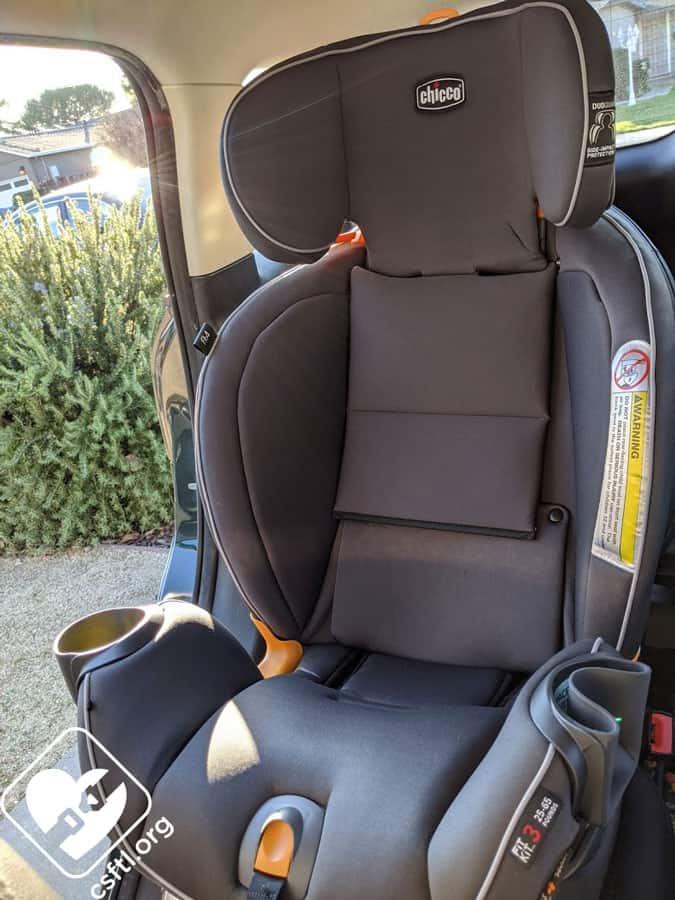
Chicco Fit4 booster mode
Before using the Fit4 in booster mode, remove the Stage 1 positioner, Stage 2 positioner, plus the Stage 1 and 2 headrest. Add the optional seat belt pad if desired.
Fit to Child
6 Years Old

Chicco Fit4 6 years old
Here’s our 6 year old model again, this time he’s showing the seat in booster mode. He rides in a harnessed car seat most of the time, but does ride in a booster seat for carpooling so he’s well-versed in both modes. He’s 6 years old, 44 inches tall, and weighs 46 pounds. The Fit4 fits him well in booster mode — the shoulder portion of the belt is across the middle of his shoulder and the lap portion of the belt is across the tops of his thighs. We did notice some issues with the vehicle seat belt retracting properly when the headrest was in the correct position for him. This is a totally normal and sort of annoying thing about combination and multimode car seats — unless the child is tall enough for the shoulder belt guide to be completely above the car seat’s shell, this may happen.
10 Years Old
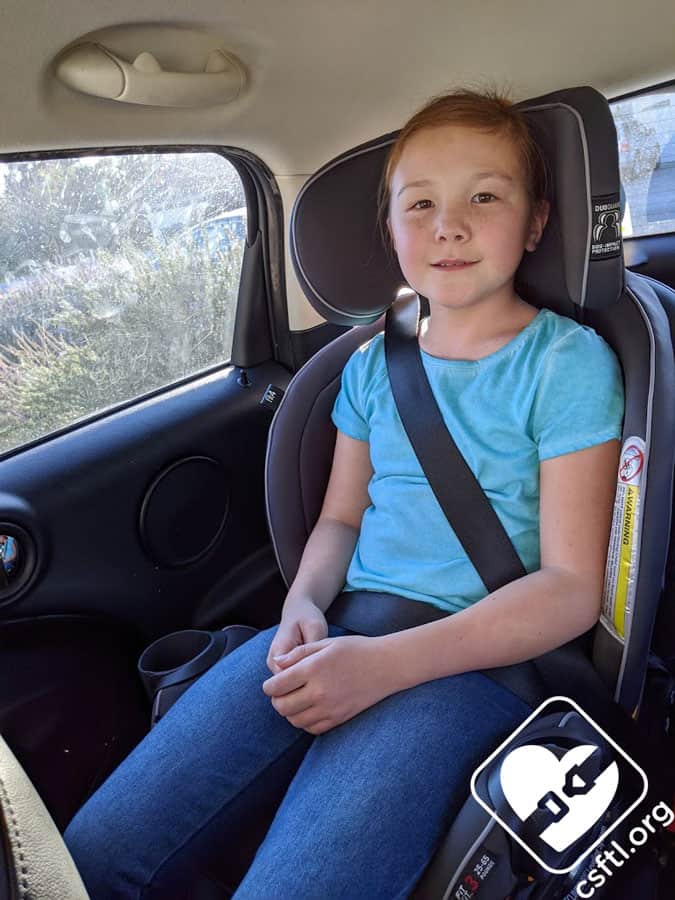
Chicco Fit4 10 years old
This model is a longtime CSFTL reviewer who’s at the end of her tenure as a review model since she’s mere moments away from passing the Five Step Test. She’s 10 years old, 4 feet, 7.75 inches tall –again, mere MOMENTS away from passing the Five Step Test — and wears a size 12 clothes. Given her height, we were SHOCKED, SHOCKED, I tell you, to discover that she actually fits in the Fit4. She’s at the very top end of the height limit for the seat but…as advertised, the Fit4 fits a 10 year old!
She liked how padded the seat is but didn’t like how open the sides felt to her. She’s used to riding in a backless booster seat so this was a bit of a change on all fronts.
Important Information: Where to Find
FAA Approval: In harness mode, this seat is approved for use on aircraft. The FAA approval label is located on the bottom of the seat.
Like all booster seats, the Fit4 is not approved for use on aircraft in booster mode. That’s because airplane seats only have lap belts and booster seats require lap/shoulder belts.
Date of Manufacture Label: The Fit4 has a 10 year lifespan. This is listed on the date of manufacture label that’s located on the bottom of the seat.
Manual Storage: the manual stores on the base, on the back seat of the seat.
Overall Thoughts
The Fit4 is a well-featured car seat that truly fit our models from day 1 through year 10. That’s the starting point for our overall thoughts — that the Fit4 fit children as advertised!
We found it pretty easy to install in all modes (in most vehicles and truly, we think the challenges with the Countryman were a bit of an outlier) and were shocked that our oldest booster model still fit in the seat. Many seats make this type of claim but it’s entirely possible that the Fit4 could fit the same child from birth through booster age.
Chicco’s attention to detail when it comes to ease of installation and ease of use makes for a long-lasting car seat that we found pretty easy to use correctly.
Giveaway
Our friends at Chicco are giving away THREE Fit4s to readers in the United States. Please read our Terms & Conditions, then enter below for your chance to win:
a Rafflecopter giveaway
a Rafflecopter giveaway
a Rafflecopter giveaway