Raising children is a tough job, full of difficult choices. Should we use cloth or disposable diapers? Should my child get dessert or not? Does my child need a nap? Do I need a nap? (Yes, by the way, the answer to a nap is always yes.) Making decisions is not always easy, but is a necessary chore. One big decision plaguing many caregivers who visit our Facebook group is deciding when it’s time to turn their child’s car seat forward facing. When the child is at least two years old, and has outgrown the rear facing height or weight limits on their convertible car seat, the decision has been made for us, and it’s time to convert the car seat to forward facing mode.
Remember that both the National Highway Traffic Safety Administration (NHTSA) and the American Academy of Pediatrics (AAP) recommend that children remain rear facing until a minimum of two years of age, or until they outgrow the rear facing limits of the seat they ride in. Why? Because riding rear facing is simply safer for them.
Though many caregivers consider moving their child’s car seat to the next stage a rite of passage, delaying the transition from rear facing to forward facing as long as possible helps keeps your Littles safer.
At some point, often after age three, all children will grow to the point where their car seat needs to be forward facing because they have reached the height or weight limit of the seat. Making this transition requires some adjustments to the car seat. First things first.
Required Tools
Your child’s car seat, the car seat’s manual, your vehicle manual, a quiet space, a few minutes, and an adult beverage. Well, maybe not the adult beverage, but definitely the other stuff. Once you’ve gathered all your supplies, find and read the section in the manual that talks about how to adjust the car seat for forward facing mode.
As you are making the adjustments, please feel free to visit our Facebook group or find a local CPST if you need help with any step of the installation process.
Follow These Steps
While all car seats are different and have their own specific rules, there are a few things to keep in mind when converting the convertible car seat from rear facing to forward facing:
- Locate all of the pertinent parts on the seat itself. This includes:
- The forward facing belt path
- The tether
- The lower anchor straps (if your child fits within the weight limits for using lower anchors)
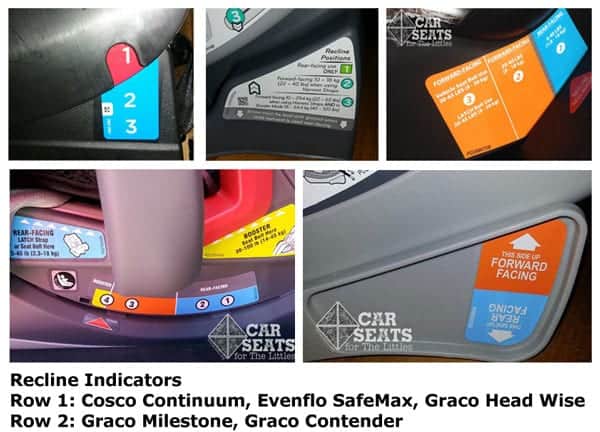
- Any recline mechanism the seat uses. This mechanism differs between manufacturers and between seats. Here is a sample of recline indicators for some popular car seats:
- The harness strap adjuster if the seat has a no rethread harness or the splitter plate if the harness height is adjusted manually.
- Read your manual for information about harness covers or other padding that is required for forward facing use. For some car seats harness covers or extra padding is optional, and for other seats it’s not.
- Look in the car seat’s manual to learn where the crotch strap should be placed for forward facing. Typically it should be in front of the child, not underneath.
- Place your child in the seat and adjust the harness straps. The harness straps should come from right at or above the shoulders – NOT below.
- Pay attention to the lower anchor weight limits of both your car seat and your vehicle to determine the best method of installation. When children are forward facing, they are often older and heavier than their rear facing counterparts, and it’s more likely they will be too heavy to use the lower anchors while forward facing. Safely store the lower anchors if you use the seat belt to install the car seat.
- Locate the tether on your child’s car seat and locate the tether anchors in your vehicle (the vehicle manual will tell you where to find them). Using the tether is an added safety measure and should be considered non-negotiable as it greatly reduces risk of injury.
- Older vehicles may not have tether anchors installed but some vehicle manufacturers still have the parts to add them. Feel free to contact our page or our Facebook group and ask for the retrofit information.
- Install the car seat. A secure installation results in less than an inch of movement in any direction at the belt path.
- If you install the seat with lower anchors, simply pull the strap tight. If you use the seat belt, either lock the vehicle seat belt, or use the car seat’s built in lock off (if it has one).
- Attach the tether to the anchor and remove the slack; it doesn’t need to be so tight it indents the vehicle seat.
Going Forward
Keep an eye on the weight limit AND the height limit for your child’s seat. When your child hits either limit, the seat is outgrown and they will need a new one. In some cases, the next step would be a high back booster, in others, it would be a forward facing only combination car seat.
Final Thoughts
The starting point for anything concerning your car seat is the car seat’s manual, especially converting a convertible car seat to forward facing mode. Though there are other pieces of the process, the manual will contain all of the unique features and requirements of your seat. You can always contact CSFTL, a CPST in your area, or the car seat manufacturer with any questions you may still have.
Once you’ve consulted your manual (and maybe our Facebook group or a local CPST), made the necessary adjustments to your child’s seat, and installed it properly, your child is ready to see the world in a whole new way – forward facing.
