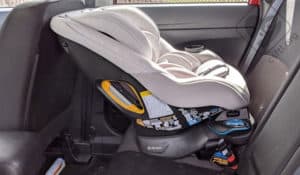
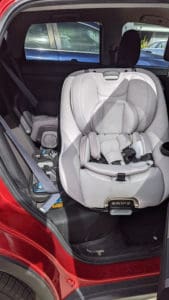
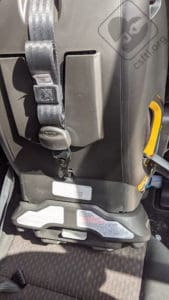
The newest trend (if you can call a handful of car seats a trend, and I guess we can!) in convertible/multimode car seats is seats that swivel for easier loading and unloading of the young passengers. This unique feature adds to the price point for all of these seats but in return, this type of seat offers an easier way to load the child in rear facing mode. The Baby Jogger City Turn is the newest addition to the swivel seat lineup.
We applaud anything that helps caregivers use their seats correctly so we look forward to seeing how well the City Turn works.
Having a hard time keeping track of all the rotating seats? Check out our handy chart of rotating car seats, which has been upgraded to its own post.
CSFTL Quick Stats
- Rear facing weight range: 4-50 pounds
- Rear facing height range, United States: Until the child’s head is 1 inch below the adjuster handle on the headrest when fully extended
- Forward facing weight range: 22-65 pounds
- Forward facing height range: less than 49 inches tall
- Seat weight: 28 pounds
- 2 crotch buckle positions (must be in the position closest to the child without being underneath them)
- Lowest harness position: 6 inches with infant insert
- Highest harness position: 17 inches
- Lower anchor weight limit: 35 pounds rear facing, forward facing 40 pounds
Measurements
- Lowest harness height with insert: 6 inches
- Lowest harness height without insert: 7 inches
- Highest harness height: 17 inches
- Width at widest point (cupholder): 19 inches
- Front-to-back: 29 inches with the headrest fully retracted, 32 inches with the headrest fully extended. Note: this measurement is taken with the car seat sitting a flat surface and should only be used as a guideline since the measurement will vary when the seat is installed in a vehicle.
- Expiration: 10 years
Features
- The seat rotates in rear facing mode to load the child easier
- Multi-layered infant supports
- RAPIDLOCK belt-tensioner
- Premium lower anchor connectors
- 10-position no-rethread harness
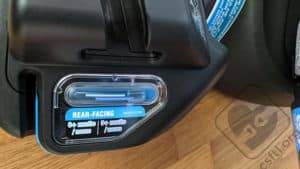
- 5-position recline block (3 rear-facing, 2 forward-facing. Note: the line indicating position 1 is almost impossible to see, even in the brightest of light.)
- Color-coded belt paths
- Dual bubble recline angle indicators
- EPP energy-absorbing foam
- Steel-reinforced frame
- COOLMAX® moisture-wicking fabrics
- Plush padding, removable infant insert and buckle covers
- Dishwasher-safe cup holder (required!)
Comparison of Rotating Car Seats
Now that there are a number of car seats that swivel, we’ve developed a handy chart to help you keep track of some of the primary differences between them.
| Car Seats that Swivel: a Guide | ||||||||
| Car Seat Name | Rear Facing Weight Range | Rear Facing Height Range | Rear Facing lower anchor weight limit | Forward Facing Weight Range | Tether Use | Forward Facing Height Range | Forward Facing lower anchor weight limit | MSRP |
| Evenflo Revolve | 4 – 40 pounds | 17 – 40 inches tall or until the child’s head is within 1 inch of the top of the headrest or backrest, whichever is higher | 35 pounds | 22 – 65 pounds | Required in both modes, stays out of the way and can stay attached | 28 – 49 inches tall and the top of the child’s ears are below the top of the headrest | 40 pounds | $379 |
| Graco Turn2Me | 4 – 40 pounds | Child’s head must be at least 1 inch below the headrest adjustment handle | 35 pounds | 22 – 65 pounds | Required in forward facing mode, stays out of the way and can stay attached since the seat doesn’t swivel in forward facing mode | 28 – 49 inches tall and the top of the child’s ears are below the top of the headrest | 40 pounds | $449 |
| Cybex Sirona S | 5-50 pounds | 17 – 49 inches tall | 30 pounds | 22-65 pounds | Required for forward facing in Canada, optional for forward facing in the US, must be attached every time the seat swivels for forward facing | 28 – 49 inches tall and the top of the child’s ears are below the top of the headrest | 35 pounds | $500 |
| Baby Jogger City Turn | 4-50 pounds | Until the child’s head is 1 inch below the adjuster handle on the headrest when fully extended | 35 pounds | 22-65 pounds | Required in forward facing mode, stays out of the way and can stay attached since the seat doesn’t swivel in forward facing mode | less than 49 inches tall | 40 pounds | $500 |
| NUNA REVV | 5-40 pounds | 43 inches tall max | 30 pounds | 5-40 pounds | Required in both directions, stays out of the way and can stay attached | 43 inches tall | 30 pounds | $599 |
Rotation
Obviously, this seat’s biggest draw is the rotation. The City Turn swivels with just one hand, leaving your other hand free to wrangle your child into the seat. We certainly applaud anything that gives caregivers an extra hand so we’re pretty excited about this feature. I not only found that we could rotate the seat with one hand, but I could also uninstall the seat while holding 3 year old Huggable Images doll in the other hand!
We do want to note right away that the seat only rotates in rear facing mode. While this is handy for rear facing kiddos, in forward facing mode, the City Turn is more like a conventional convertible car seat where it doesn’t swivel and has a forward facing belt path.
One really nice thing about the swivel is the very audible click when the seat is rotated into the right position for safe travel.
But…Two Belt Paths
I’d fully expected the City Turn to be configured like the other swivel seats on the market — with one belt path for installation. Those other seats install one way, then swivel to lock in either rear or forward facing modes.
The City Turn does not do that. It has a separate belt path for each direction, the seat only swivels in rear facing mode.
Three Across
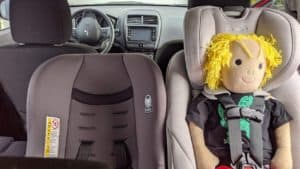
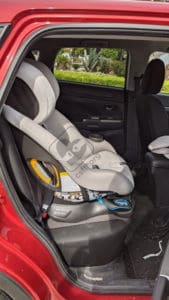
Since the City Turn is 19 inches at the widest point, I wasn’t optimistic that it would be a great option for tight spaces. Wow, was I wrong about that (at least with our two other fairly narrow seats, I’m convinced that they were the key to our 3 across success)!
I grabbed two of the convertible car seats that I had in stock and headed out to my trusty 2019 Mitsubishi Outlander. It’s not the largest car on the market but it’s not tiny either so I’ve had some luck with getting different seats in there together. Today, I had a Nuna EXEC multimode car seat and a Cosco Scenera convertible car seat. I realize that the City Turn and the EXEC are among the two most expensive seats on the market and the Scenera is about the least expensive so this is an unlikely combination in real life but — the EXEC and the Scenera are pretty narrow (17 inches at the widest point) so I was hopeful that they might balance out the 19 inch width of the City Turn.
I WAS CORRECT! I had to try a few configurations, which is par for the course when it comes to getting car seats and booster seats next to each other. Eventually, I found a couple of options that worked, but all required the City Turn to be on the passenger side because that cupholder protrudes a bit. I can’t see the City Turn working well in a tight space if that cupholder was next to another car seat.
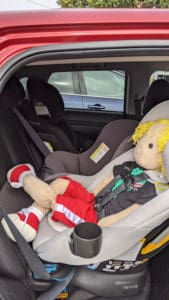
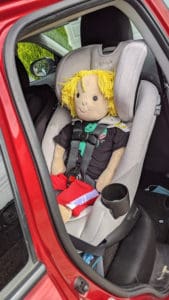
What made the City Turn a wonderful part of this setup was the ability to turn it to load our stuffed passenger. There was no fighting to fit a child (or in my case, the doll) into a very tight space, I had the entirety of the space around my vehicle’s door to work with. Loading the doll was a piece of cake and rotating the seat back into place was also no problem. This section is pretty high up in the review because it’s an area where the City Turn shines!
RAPIDLOCK Belt Tensioning System
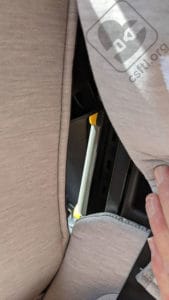
This is Baby Jogger’s version of SnugLock, an installation method that we are quite fond of. Adding this easy-to-use method to a swivel seat is pure genius. In the case of the City Turn, the RAPIDLOCK is in two places — the rear facing belt path on the base of the seat and in the forward facing belt path.
We did find that with the vehicle seat belt, we needed to leave a little slack in the belt before closing the RAPIDLOCK but when it came to installing with lower anchors, I almost had to install the seat as if there wasn’t a lockoff, then close it in order to get a secure installation.
Recline Position Rules
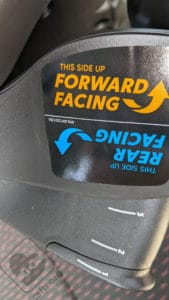
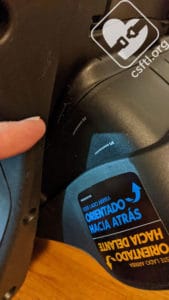
The recline angle adjuster is unlike any I’ve ever seen. And I’ve seen quite a few over of the years. It’s a piece that flips out from the underside of the seat, there’s a clear label that shows both Rear Facing and Forward Facing. Setting it up is a two-step process. First, flip it to the right position for the seat’s direction (once it’s in the right position, the words are right-side up), then adjust the adjuster’s height to the correct position. Here are the rules for that adjuster:
- Recline position 1 (rear facing, child over 40 pounds)
- Recline position 1 (forward facing children who weigh between 40-65 pounds)
- Recline position 3 (forward facing children who weigh under 40 pounds)
These positions are indicated by lines on the side of the recline foot. I found the line for position 1 almost impossible to see when the block is in that position.
Position 2 is not mentioned in the manual but our friends at Baby Jogger let us know that it’s for rear facing only. We’d like to see this added to the manual since that’s always our primary reference point.
Cupholder Required
A dishwasher-safe cupholder ships with the seat but isn’t attached to the seat. It is, however required for use. Page 20 of the manual includes the phrase: “Cup holder MUST be installed,” and instructions for installation.
Infant Inserts
The infant inserts that came with our seat do not mention a weight limit. Seats made after the seat we used in this review include instructions that mention a 15 pound weight limit, please confirm these limits for your particular seat.
The additional lumbar support in our review seat can be used in forward facing mode until the child weighs 25 pounds. Each of these inserts is clearly labeled with the weight limit (if there is one) and usage instructions, which leaves the primary challenge keeping track of which car seat they belong to. We suggest that caregivers use fabric tape to write the seat’s name on any insert that gets removed.
Harness Covers
The (frankly, kind of bulky) harness covers are required in forward facing mode. They are optional for rear facing mode, depending on whether or not they help the harness fit better. The manual suggests that these covers may be too large for newborns.
Chest Clip
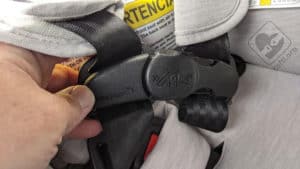
There’s a handy diagram on the chest clip (this is true of many car seats but it’s really easy to overlook!) that shows exactly where it should be placed on the child’s body.
COOLMAX Fabrics
This material can help to cool the child down. My kiddos tended to overheat in their car seats so I very much see the value in cooling fabrics! That’s the kind of premium feature that makes a big difference in a child’s overall comfort.
Available Colors
The City Turn is available in three attractive shades of gray. These are indeed attractive (and quite plush!!) but we still long for the days when car seats came in a variety of colors and patterns. When my kids were in car seats, we had all kinds of flowers, cows, zebras, super heroes, and fun patterns. While I don’t really miss the ‘dealing with a car seat on the daily’ portion of parenthood, I do miss those fun colors and patterns.
Our review seat is in a very very light shade of gray that makes me really nervous about spills or dirt. One thing I never talk about is the fact that my hands are often very dry and they start to crack or bleed when installing car seats with unfinished sharp plastic edges. I got VERY concerned about bleeding on the seat as soon as I saw this light color (but please know that the edges on the City Turn’s belt paths are quite smooth!). So far, so good, the edges are mostly smooth on the City Turn, but it’s a concern.
Infant/Toddler Adjacency
The marketing materials boast that this seat brings the child 10 inches closer to you when loading. While we can see the advantage in this, we also worry that having an angry toddler who doesn’t want to get into that car seat closer isn’t always a good thing. I did pose for you here to show how close the seat is to the adult who is doing the heavy lifting when the City Turn is swiveled into the loading position.
We can also see how helpful this feature is to caregivers who may be in wheelchairs or have other mobility struggles. We’re fans of anything that makes using a car seat correctly.
New Safety Standards
This seat was tested to Baby Jogger’s True Test Plus safety standards — this is a new standard that Baby Jogger seems to have developed for their own use. Since it’s not part of the FMVSS regulations, we can’t speak to whether or not it’s valid but we wanted to point this out. Baby Jogger let us know that these standards meet or exceed FVMSS (that’s something we’d expect anytime a manufacturer makes their own standards!), but there’s no way to confirm that since the actual specs aren’t shared publicly.
Steel-reinforced Frame
This type of frame is another feature that isn’t part of the FVMSS 213 federal safety standard so all we can do is note that this seat has one and suggest that it might contribute to the seat’s 28 pound weight.
Recline Angle Indicators on Both Sides
This might sound like a small thing, but it’s kind of big. With recline angle indicators on both sides of the seat, caregivers can always see if the recline angle is correct. When there’s only one of these indicators, it’s inevitable that I wind up on the opposite side of the indicator and have to get out of the car (since I’m looking after the car seat is installed), then walk around to the other side, get back in, and THEN finally look at the angle indicator.
The City Turn’s indicators are both on the base and they’re kind of close together so I’m not sure they’re as advantageous as dual indicators mounted on the seat’s shell might be.
Installation: Rear Facing
Vehicle Seat Belt
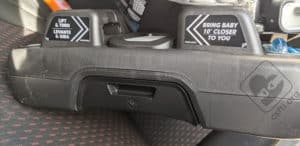
A couple of things stumped me about installing the City Turn rear facing. First off, it’s hard to tell which way the base should face. Unlike many rear facing only car seat bases that have some kind of an indicator, the City Turn has none. There’s a logo “City Turn >>>” on the back of the base but no “point the base this way for rear facing only installations” label on the base, though the pretty brochure that was attached to the seat did have a closeup picture showing the base..
It also wasn’t obvious that the recline foot needed to be flipped for a rear facing install. It tucks nicely away into the bottom of the base, thus obscuring the words “rear facing” and “forward facing” on the label. They do seem quite obvious now.
Once I acknowledged that this seat was an intelligence test and I was failing, I referred to the manual and got the seat set up properly.
Note: I review a lot of car seats. Sometimes I read the manual before attempting to install, sometimes after because I like to replicate the different ways caregivers approach installing their seats. This seat was one of those after times and I kind of regret it. Enough things are unique about the City Turn that I highly recommend caregivers read that manual first.
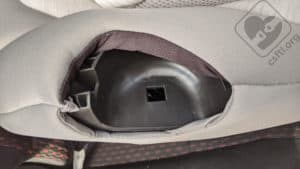
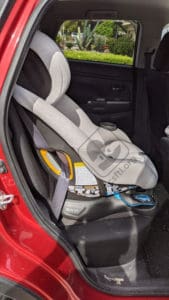
The rear facing belt path is marked in blue. It sort of curves around the front of the base. There’s also a groove in the top of the base where you might expect to thread a seat belt or lower anchors but that’s not the case. I did try this for you before reading the manual, which says “DO NOT route the lap and shoulder belt through the “T” shaped seat rotation channels. So I guess the thing that looks a lot like a belt path is a rotation channel.
When I loaded our doll into the seat, the doll’s foot caught underneath the vehicle seat belt as the seat turned. That alone may be enough of an annoyance that installing the City Turn rear facing with lower anchors is a better option.
Lower Anchors
The lower anchors store in a tidy compartment at the front of the base. Open the compartment to expose them, then remove them by pressing the red buttons to release them from their handy storage locations. Open the RAPIDLOCK, then thread the webbing through the rear facing belt path and pull to tighten. I found that even with RAPIDLOCK, I needed to remove almost all of the slack from the webbing before closing the RAPIDLOCK (please know that I’m shouting this every time I write it since it’s in all caps) if I wanted a secure install.
Loading the Child
Here’s the moment we’ve all been waiting for — what’s it like to actually load a child into the City Turn by swiveling the seat? I have to say, the one hand turn is pretty darn fabulous. Just squeeze the handle on the seat’s base, then turn the base. I’ve spent some time with the other swivel seats on the market, it’s my assertion that the City Turn turns the easiest!
One thing I noticed while installing the seat was that the seat would swivel back into my workspace a lot — I’d encountered something similar with other seats and found that temporarily placing a hand weight into the seat would stop the spin. This totally makes sense since that mimicks the weight of a child. I can absolutely see how this feature is a game changer for all kinds of families who struggle to get their kiddos loaded safely.
Fit to Child
Somehow, we’re nearly two years into this pandemic and it’s still here so I’m stuck with my very cooperative Huggable Images dolls for this portion of the program. Foster dog Kamo (2022 update: he was adopted by the very best family ever and is living his best life!) and resident review dog Benson got a little too emotionally invested in my dolls so I had to get them out of his access quite quickly!
Tour of Inserts
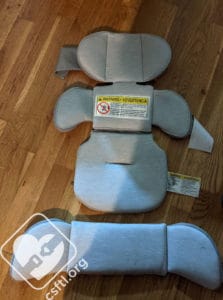
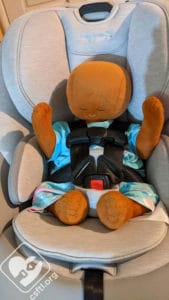
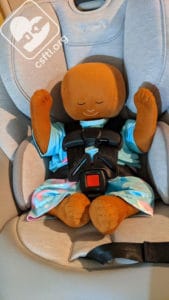
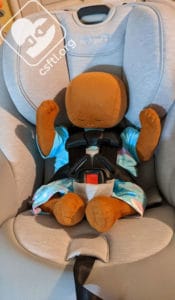
The City Turn includes a robust set of infant inserts that can be used separately or together. Our newborn Huggable Images doll (7 pounds and 17 inches long) was happy to model all of the configurations. In our experience, convertible car seats don’t always fit newborns as well as we’d like so we took the opportunity to show all configurations of the padding with our doll.
As always, we’d suggest checking the fit on any infant in a car seat, then adjusting the padding accordingly (or, in some rare cases, using a different car seat that fits the child better) before heading out for a drive.
There are 3 pieces of padding included with the seat. All of these pieces are for rear facing use only, none are required. The lumbar support can be used until the child weighs 25 pounds. The other pieces don’t include any weight restrictions.
- The head/body insert — the head removes from this section so they can be used independently
- The lumbar support (25 pound maximum)
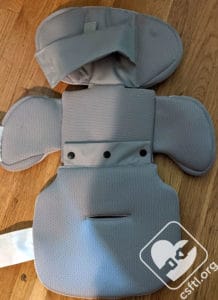
These inserts are quite plush and they all include a fairly elegant way to attach them to each other and to the car seat. This picture shows both the snaps that attach the pieces to each other and the flaps with velcro that attach the inserts to the seat itself.
Newborn Doll
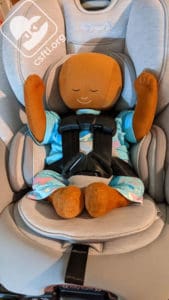
First, I tasked our doll with modelling the City Turn with all of the inserts in place. They are so robust that there was hardly any slack left in the harness when I tightened it. Check out that little tiny bit of harness webbing below the doll’s feet!
The harness fit was pretty decent here.
Next, I removed the head support. Here’s where the fit started to change. Our doll’s head is now slumped forward quite a bit, which isn’t ideal and could be problematic for some tiny passengers.
Here’s our baby with only the lumbar support. The head slump situation is even worse here.
…so we removed the support and used no padding at all. This caused the worst head slump in all of the configurations. We continue to suggest that caregivers check the fit on any newborn before heading out.
16 Month Old Doll
Our 16 month old doll is 31 inches tall and weighs very little — stuffing is pretty light, after all! The doll had plenty of legroom and plenty of room to grow, height-wise. I was able to load the doll into the seat by rotating the seat, then enjoy the very satisfying click when the seat rotated into place. I did notice that the doll seemed a bit cramped in terms of width.
3 Year Old Child
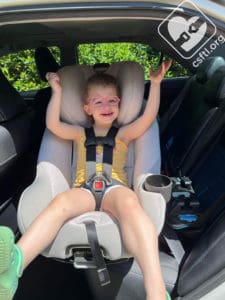
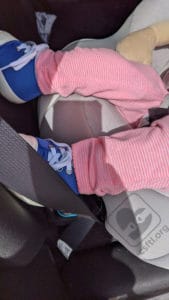
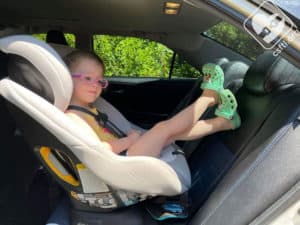
Our 3 year old model weighs 31 pounds and is 38 inches tall. She’s a big fan of this seat she likes to mention that it’s very comfortable! She’s got a bit of room to grow and as you can see, she has no issue with finding a place to put her legs while she’s riding in the seat!
3 Year Old Doll
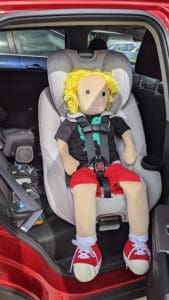
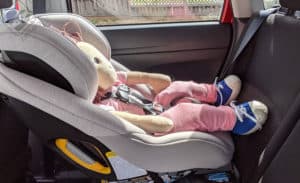
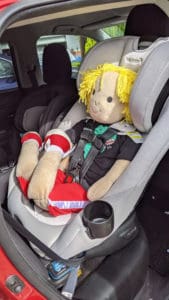
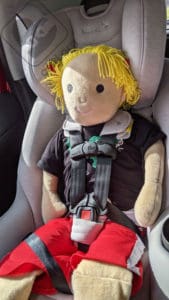
Our 3 year old Huggable Images doll weighs almost nothing thanks to being stuffed with fluff and is 38 inches tall. The headrest is extended most of the way but the doll has some room to grow yet. Since the seat is rated to 50 pounds rear facing, we’re glad to see that extra room here.
We had the same issue with the doll’s legs getting caught on the vehicle seat belt while turning the seat into position. The solution that I used — folding the doll in half — wouldn’t work for most children.
Forward Facing
Vehicle Seat Belt
I’ll say this again: the City Turn has two belt paths, like a conventional convertible car seat would. To set up the seat for forward facing, make sure the lower anchors are stored in that tidy compartment, then turn the entire seat (base and all) so the harness is facing the front of the vehicle. Remove the top tether from its very tidy storage spot on the back of the seat’s shell and loosely attach it to the vehicle’s tether anchor. We’ll return to this piece later as a final step.
Note: the City Turn does not turn in forward facing mode. Between the belt path and the recline foot, this mode reminded me a lot of the Graco Contender, which was a big hit in our family for a very long time but had a much lower price point than this seat!
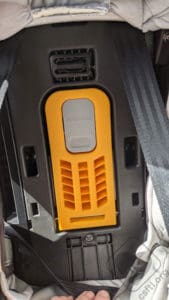
To install the City Turn forward facing with the vehicle seat belt, confirm that the recline foot is in the Forward Facing position and the seat is on the vehicle seat with the harness facing the front of the vehicle. Raise the headrest all the way to expose the belt path and yellow RAPIDLOCK. Release the lever on the RAPIDLOCK to open it, thread the vehicle seat belt through the belt path, then remove most of the tension from the seat belt. Close the RAPIDLOCK and give the seat a firm handshake at the belt path to confirm that it’s installed securely.
Return your attention to our top tether — pull it until it’s snug and your installation is complete.
Lower Anchors
The City Turn has a 40 pound lower anchor weight limit in forward facing mode. The seat belt can be used regardless of the child’s weight (assuming said child weighs less than the 65 pound weight limit for the seat!). Remove the top tether from its very tidy storage spot on the back of the seat’s shell and loosely attach it to the vehicle’s tether anchor so it doesn’t get lost.
First, move the lower anchors to the forward facing belt path. They’re attached to the seat via a piece of webbing on the bottom of the seat’s shell. Confirm that the recline foot is facing in the right direction (the words Forward Facing will be right-side up), and make sure the seat is on the vehicle seat with the harness facing the front of the vehicle. Raise the headrest all the way to expose the belt path and yellow RAPIDLOCK. Release the lever on the RAPIDLOCK to open it, thread the lower anchor webbing through the belt path, then remove most of the tension from the webbing. The belt paths are quite open and easy to access, this made removing the slack from the lower anchors quite easy. I did find that I needed to install the seat as if RAPIDLOCK wasn’t there, then close the RAPIDLOCK to complete the install. If I left too much slack in the webbing, my install was too loose.
Once the slack was removed and the door was closed, I gave the seat a firm handshake at the belt path to confirm that it’s installed securely.
The final step: pull the top tether webbing it until it’s snug and the installation is complete.
Fit to Child
Three Year Old Doll
Our 3 year old doll is 39 inches tall and weighs very little. I found that the seat’s sides were a little close on the doll but the harness fit well. The harness adjuster wasn’t as smooth as I would have expected for a well-featured seat at this price point.
Important Information: Where to Find
Note: the labels on our City Turn have started peeling off of the seat. If you have a City Turn, keep an eye on your labels and reach out to Baby Jogger if this happens to your seat.
Date of Manufacture/Expiration: the City Turn has a very robust 10 year expiration. The label is found on the back of the seat’s shell.
Manual Storage: the manual tucks into a compartment on the back of the seat’s shell.
FAA Approval: the seat is approved for use on aircraft in forward facing mode only. That is a different rule than every other car seat on the market so please make note of this. The approval label is found on the back of the seat’s shell. The seat also weighs 28 pounds so it’s not exactly portable. We don’t anticipate too many families choosing this seat as a travel seat.
Overall Thoughts
The City Turn has a lot to offer — it’s a well-padded seat with a lot of nice features and it worked pretty well in our 3 across selection of slim seats. Rotating the seat to load the child is the number one feature, and that’s something the City Turn does really well.
I am disappointed that it only rotates in one mode, though when you get right down to it, most families don’t have a need to rotate to load a forward facing child since many children can climb in on their own at that point. There’s definitely a learning curve with this seat (read those manuals first, learn from my mistakes!), but the convenience of the swivel in rear facing mode may be a huge win.
