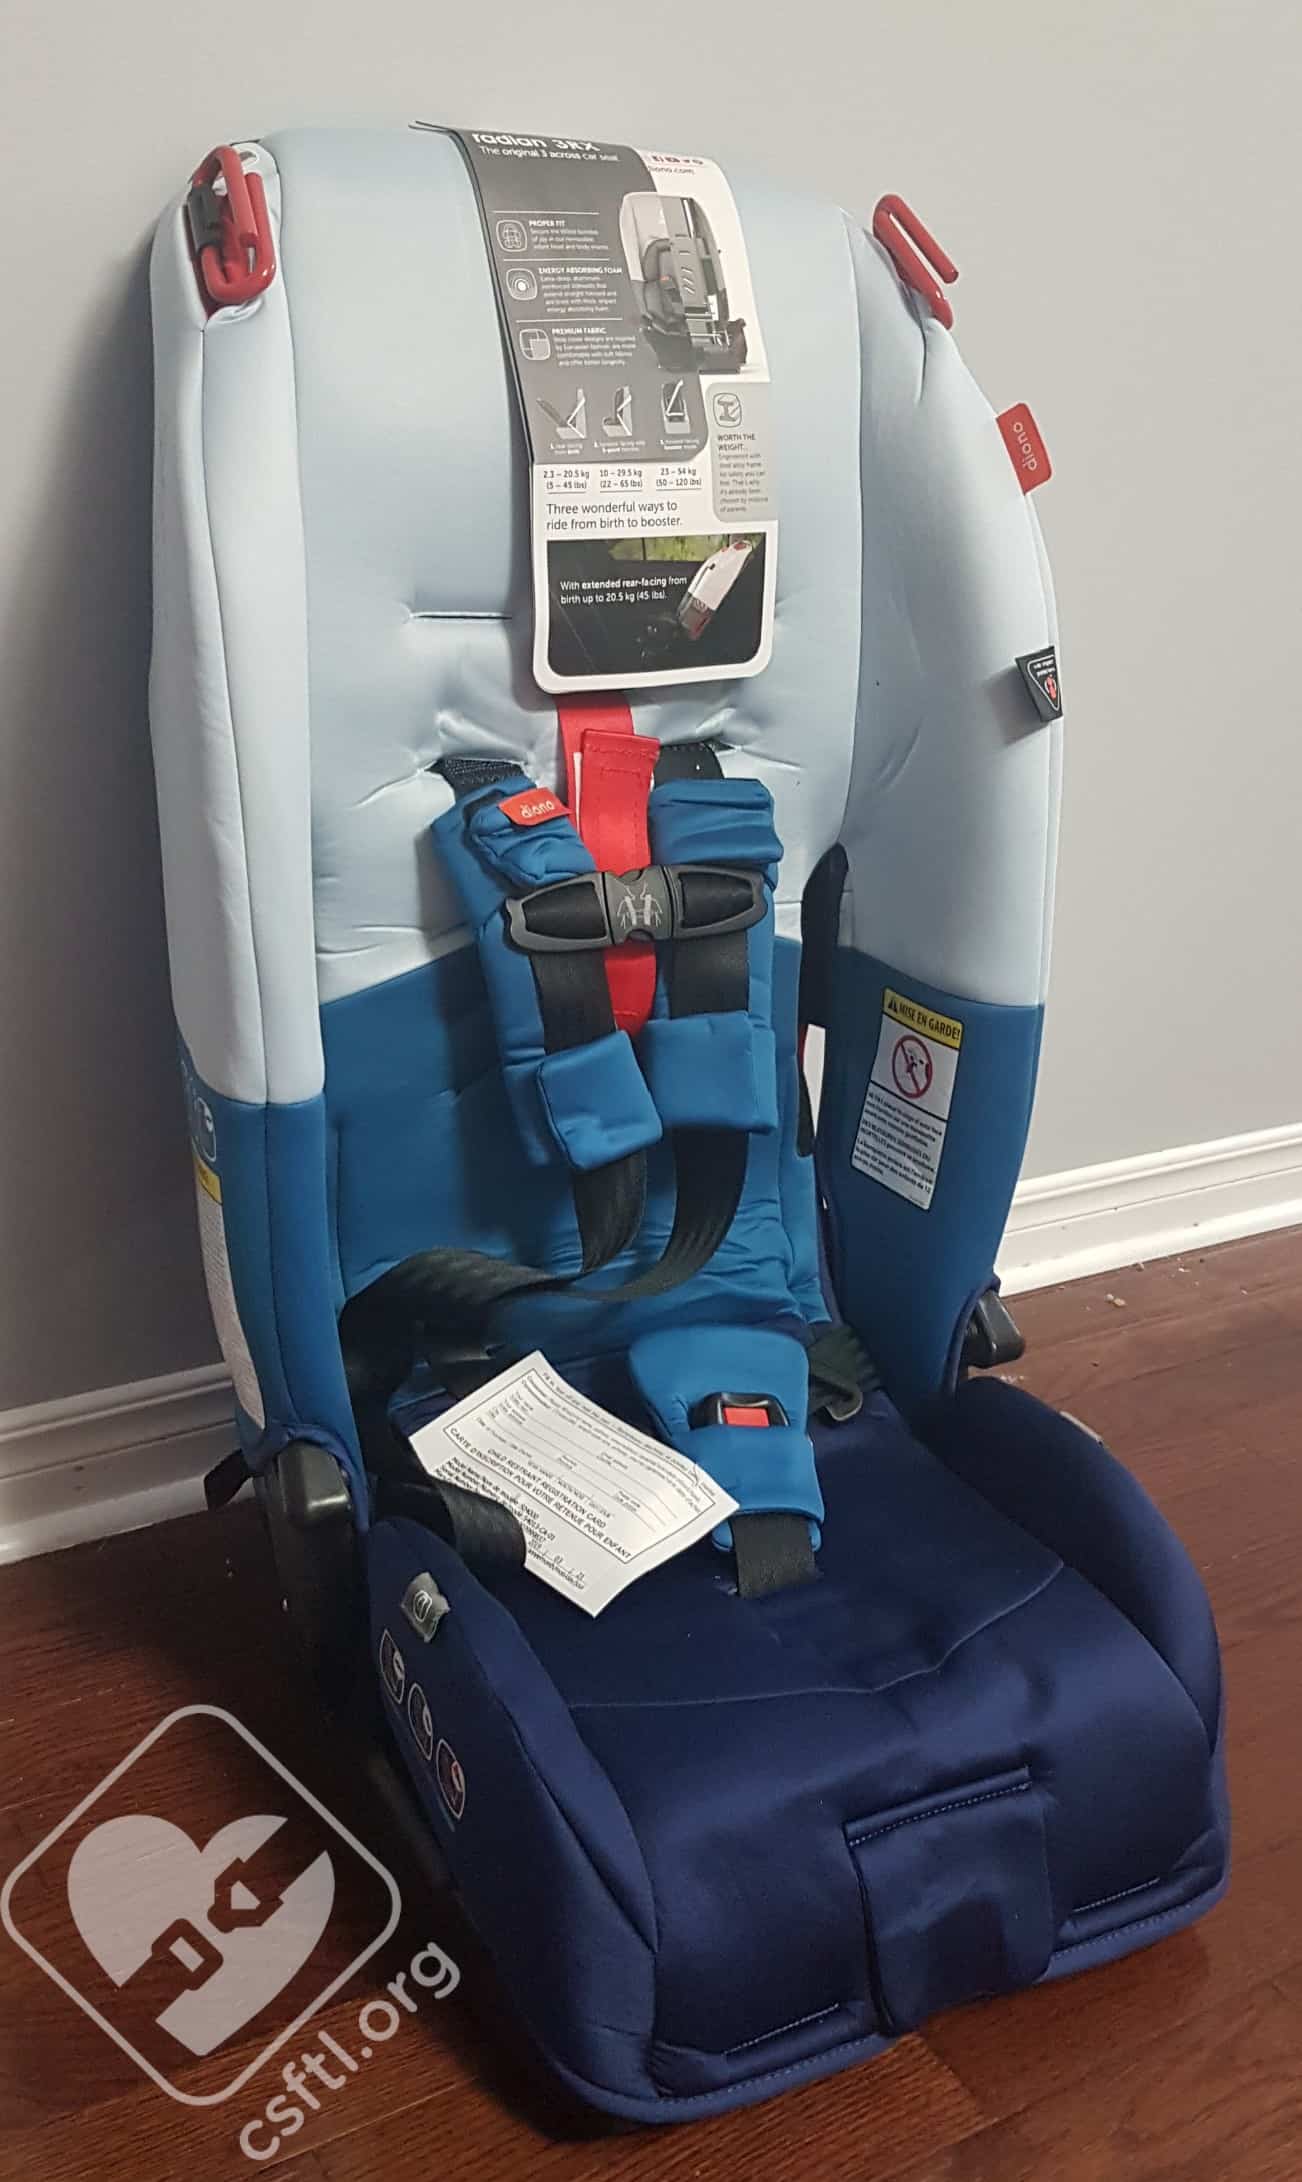
Unfolded Diono radian 3RX
Diono’s multimode car seats were originally released as convertible car seats under the Sunshine Kids name in November 2005 and had a lot to offer because they were narrow and could fit in some tight spaces! The seat itself has not changed much in the past 13 years, though a short-lived booster mode has been added. Diono has also updated some of the height and weight limits, usage restrictions, and the soft goods on the newest versions of these seats.
Let’s take a closer look at the 2019 Canadian versions of their new radian 3R series. For this review, we are using the radian 3RX, and we will mention any and all differences between it and the radian 3R and 3RXT models. Note: this review covers the 2019 version of the seat. The 2020 version is expected to have some differences.
CSFTL Quick Stats
- Rear facing 5-40 pounds installed with vehicle lap/shoulder seat belt
- Rear facing 5-45 pounds installed with vehicle lap-only seat belt or LUAS (radian 3RX)
- Rear facing 5-50 pounds installed with vehicle lap-only seat belt or LUAS (radian 3RXT)
- Rear facing 18-44 inches
- Rear facing top of head must be at least 1.5 inches below the top of the headrest
- Forward facing 22-40 pounds with Safe Stop
- Forward facing 40-65 pounds without Safe Stop
- Forward facing 30-57 inches
- Forward facing the ears must be contained within the shell and straps must be at or above the shoulders
- Booster mode 50-120 pounds
- Booster mode 40-57 inches
- Booster mode requires that the child’s shoulders are positioned at the 4th slot
- Expiration: 10 years from manufacture date
Features
- Premium LUAS
- Colour-coded belt paths (blue for rear facing, red for forward facing)
- Optional cup holder
- Narrow for 3-across scenarios
- Adjusting expandable side wings
- Allows installation with Ford inflatable seat belts
Measurements
- Lowest harness position: 8 inches (7 inches with insert). Measured from the highest point of the slanted harness slot
- Highest Harness position: 16.25 inches
- Shoulder belt guide for booster mode (fixed on the 3R and 3RX models): 22 inches
- Width at widest point (across the back): 17 inches
- Crotch buckle positions at 3, 5, and 7 inches from the back of the seat
- Seat pan depth (inner): 7.5 inches
- Seat weight: 23.8 pounds
Manual Highlights
We echo the FAA and Transport Canada’s recommendations that children fly safely in their car seats while on commercial flights and applaud diono for including the following early on in the radian 3RX manual:
“Diono strongly urges you to secure your child in a child restraint system (CRS) or device for the duration of your flight. Please contact the airline for specific policies.”
Diono also echoes our recommendations for rear facing:
“Diono recommends that children be rear-facing until the age of 2 or until they reach the maximum rear-facing height and weight.”
Initial Setup
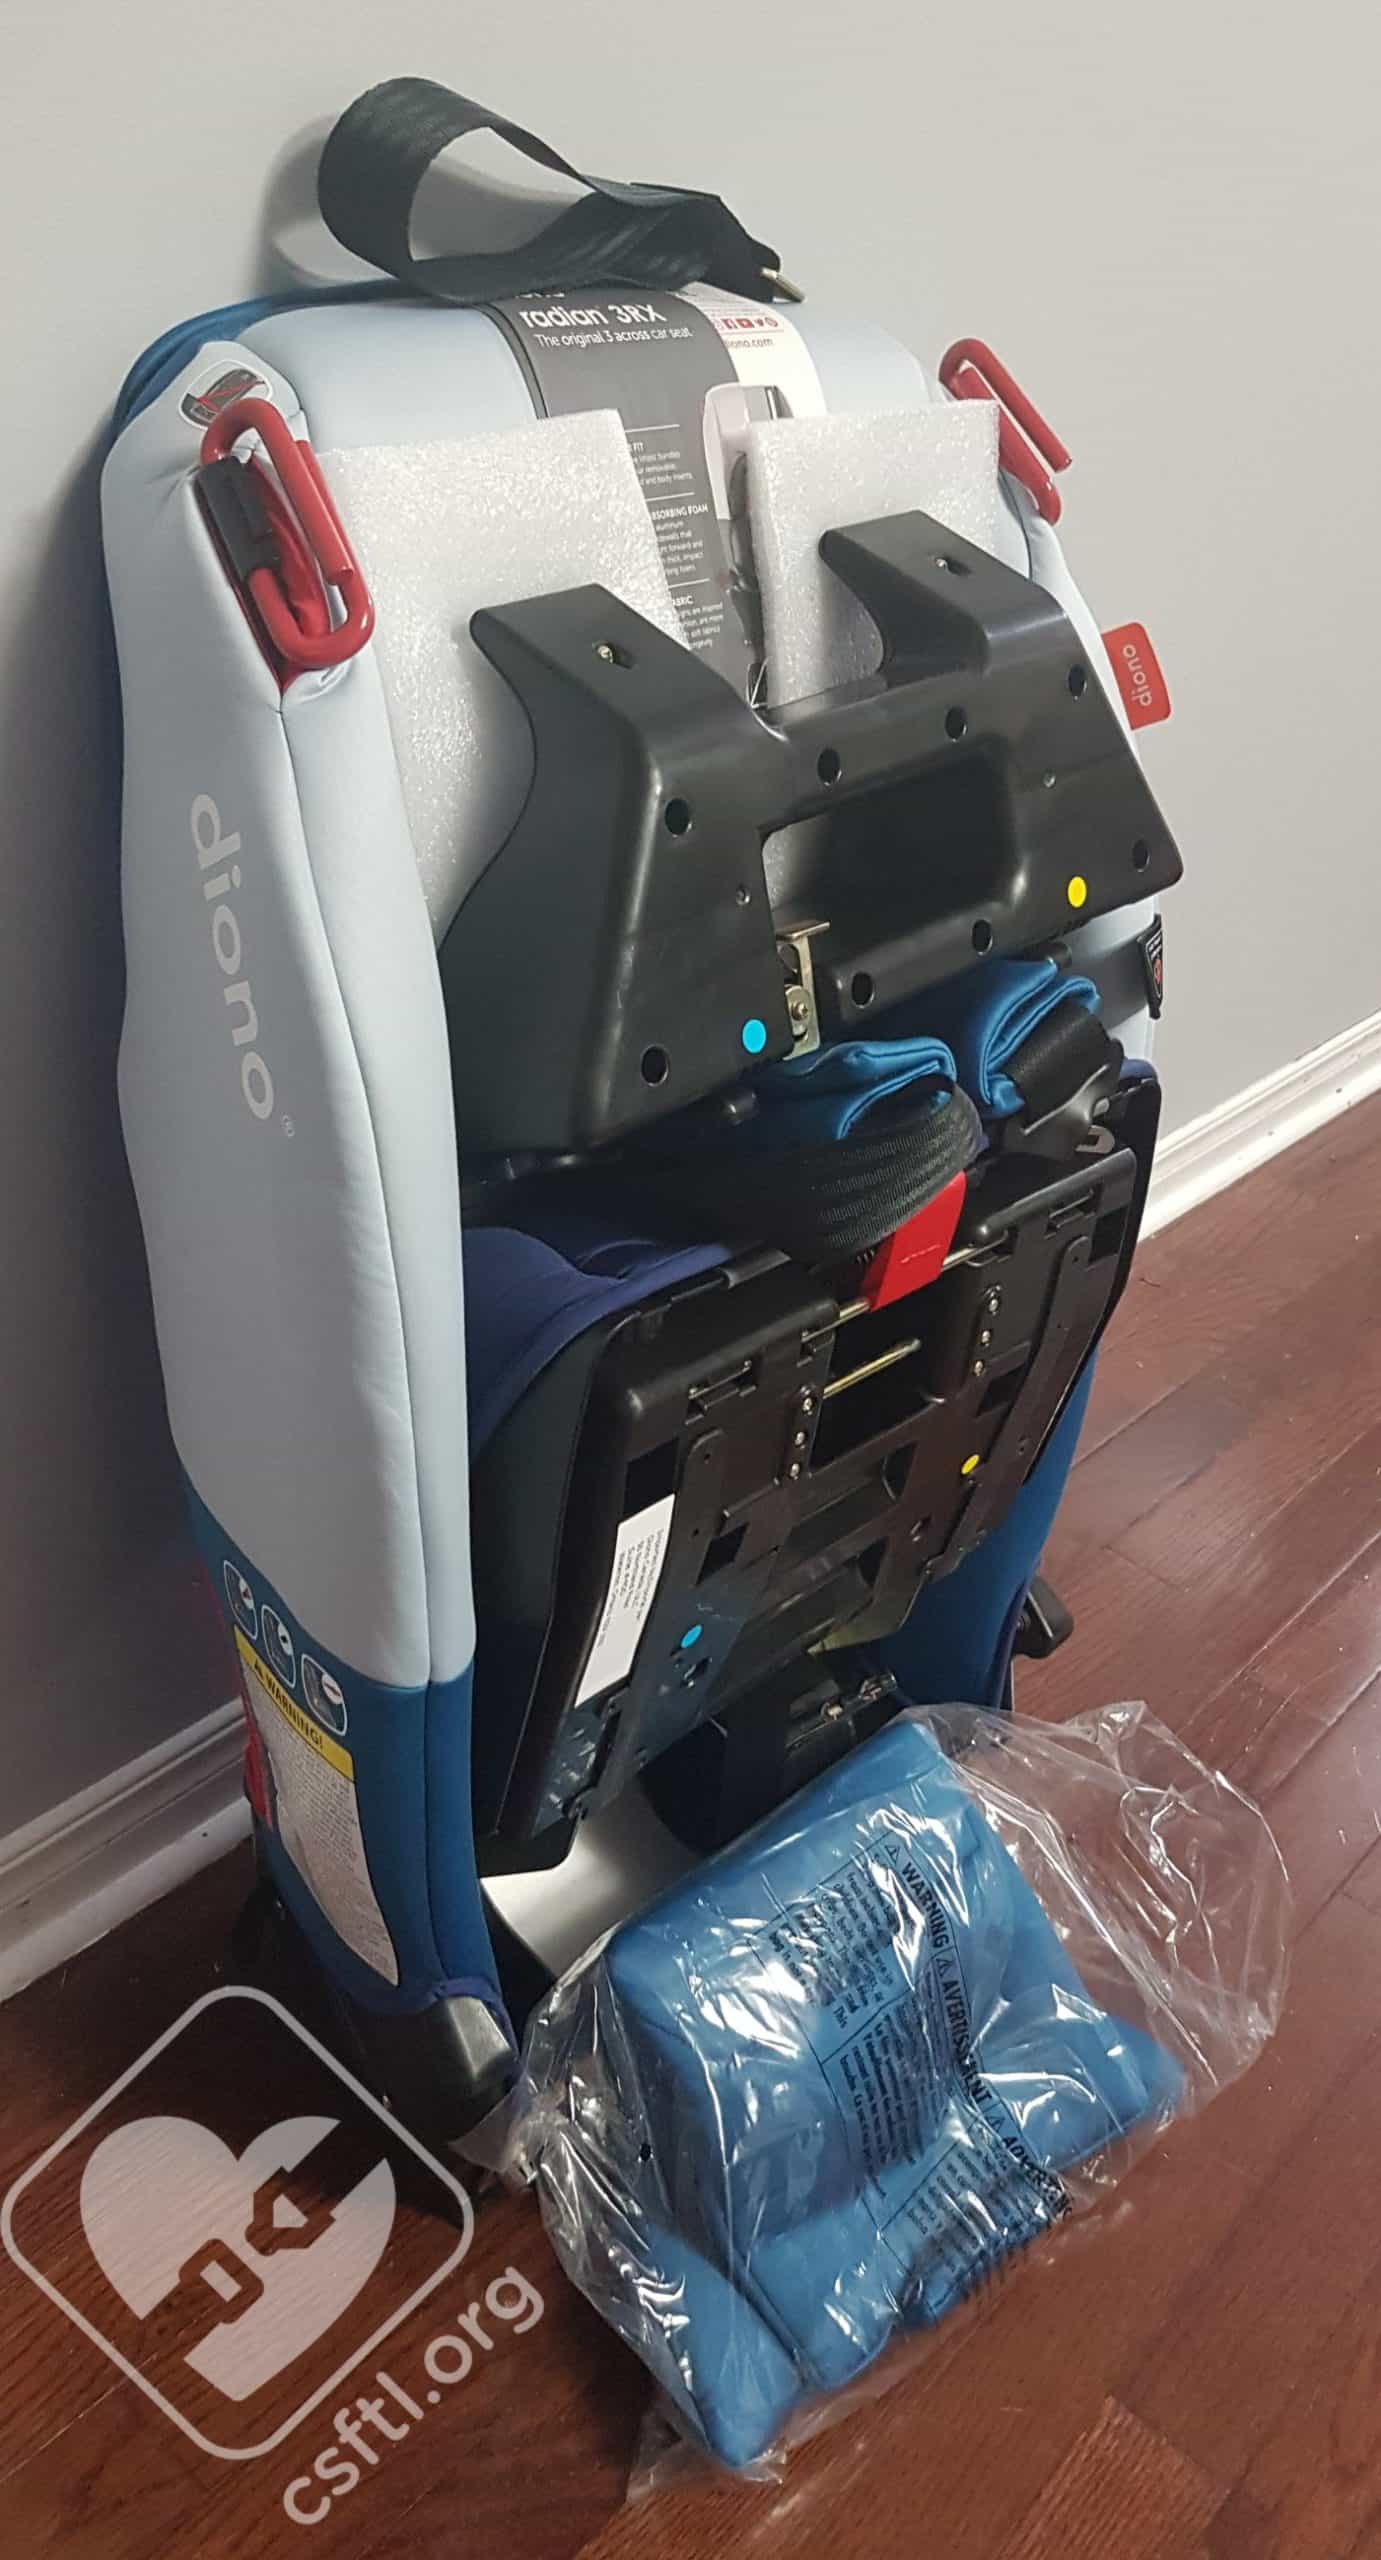
Folded Diono radian 3RX
The radian 3RX arrives folded in the box. Here’s how to unfold the radian 3RX and prepare it for use:
- Place the car seat on its back on a flat surface and unfasten the red carry strap from the bottom.
- Rotate the bottom until you hear it ‘click’. This confirms that the car seat is locked and ready for use.
- Check that the harness slides freely by pulling on the adjuster strap. If it does not tighten freely, check that it is not caught in the seat’s shell.
- Tuck the red carry strap through the harness slot and behind the cover.
Unfolded Diono radian 3RX

Diono 3RX release lever
To fold: release the lever at the bottom of the seat (there are two lever and either can be used), fold the seat pan, then secure the seat pan with red carry strap.
Crotch Buckle Rules
Rear Facing:
- 5-22 pounds may use any crotch buckle slot
- 22-30 pounds MUST use the middle slot
- 30 pounds and over MUST use the outer slot (Note: the manual states 33 pounds and up in two separate places but a warning label on the side of the seat says “Do not use the rear or middle buckle slot when forward facing for children weighing above 13.6kg (30lbs)). We reached out to Diono’s Customer Service about the wording in the manual and were told that “between the weight of 30 to 33lbs you may used either the middle of the outer slot.”

radian 3RX crotch buckle restrictions on label
Since the labels on the seat itself indicate that the outer slot must be used when the seat is installed forward facing for children who weigh over 30 pounds, we’d recommend following that guideline.
Forward Facing:
- Children weighing between 22-30 pounds MUST use the middle slot
- Children weighing 30 pounds and over MUST use the outer slot
Harness Adjustment
The previous versions of the Diono multi-mode seats had a ratcheting harness adjuster. That means when you tightened the harness by pulling on the adjuster strap, you tightened with a “tug tug tug” motion. The radian 3RX has a smooth adjustment system, which makes tightening the harness MUCH easier than previous versions of the seat. This is a change we were VERY happy to see!
Cleaning Instructions
We don’t tend to mention cleaning instructions in our reviews, but the Diono 3RX has some pretty specific warnings, so we thought we would draw your attention to them.
The fabric items (cover, infant insert, buckle pad, and strap covers) can be machine washed on the gentle cycle with mild detergent and then laid flat to dry. Diono warns NOT to dry these in direct sunlight and not to use bleach or iron or dry clean the soft goods.
Installation: Rear Facing
Rear Facing Tether
Diono recommends the use of the top tether anchor in the Swedish-style of tethering on this child restraint when installed rear-facing. In Canada, most vehicle manufacturers prohibit this type of tethering. If you would like to tether your Diono convertible rear facing, we would recommend reaching out to your vehicle manufacturer to ask if Swedish-style tethering is permitted, and, if so, where to anchor the tether in your vehicle.
Rear Facing Recline Angle Level Lines
The manual and the seat itself don’t match with regards to the level lines, which is unfortunate.
The manual indicates that there are two level lines:
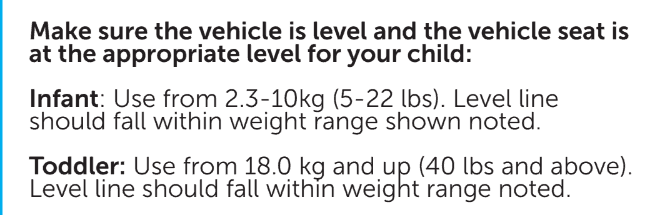
radian 3RX manual wording for recline lines
Infant: level line should be level with the ground; use until child can hold his head upright
Toddler: Level line should be level with the ground; use once child can hold his or her head upright.
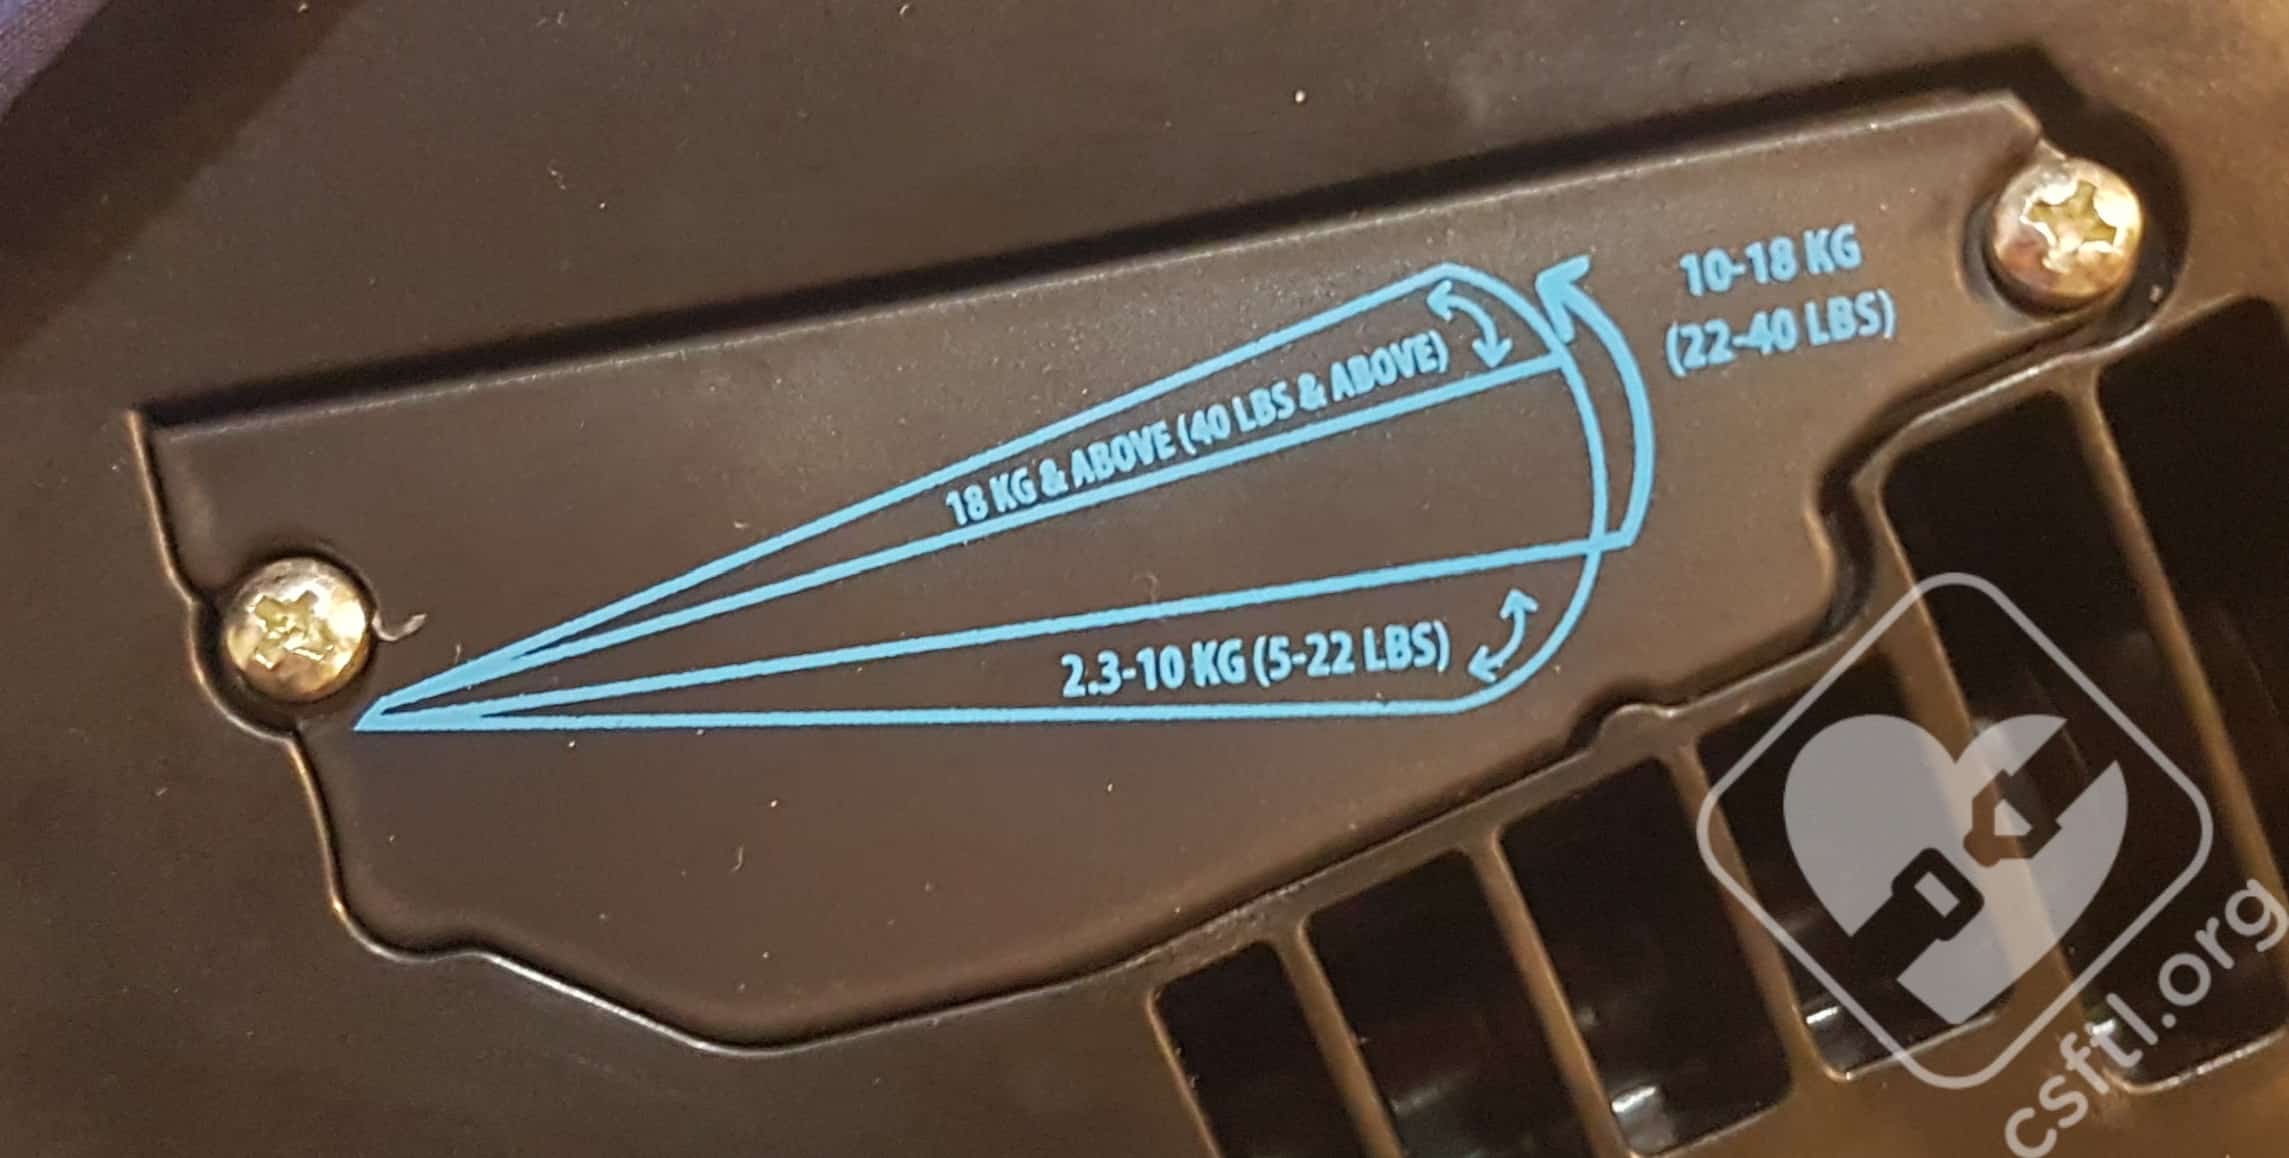
radian 3RX recline lines on seat
But the seat itself has 3 different recline lines and ranges:
- The most reclined level line range is for use rear facing for children who weigh between 5-22 pounds
- The middle recline range is for use rear facing for children who weigh between 22-40 pounds
- The most upright recline range is for use rear facing with children who weigh 40 pounds and above
We reached out to Diono’s Customer Service about this discrepancy as well. They advised that caregivers should follow the weight-based recline ranges on the actual seat, indicating that “the manual is more general information, which in this case is not reflected by the seat itself.”
Since the CPST community considers the car seat’s manual the final word on seat usage, we very much hope to see a future version of the manual in which Diono updates the instruction manual to match the weight-based recline ranges on the seat itself.
Detachable Rear Base
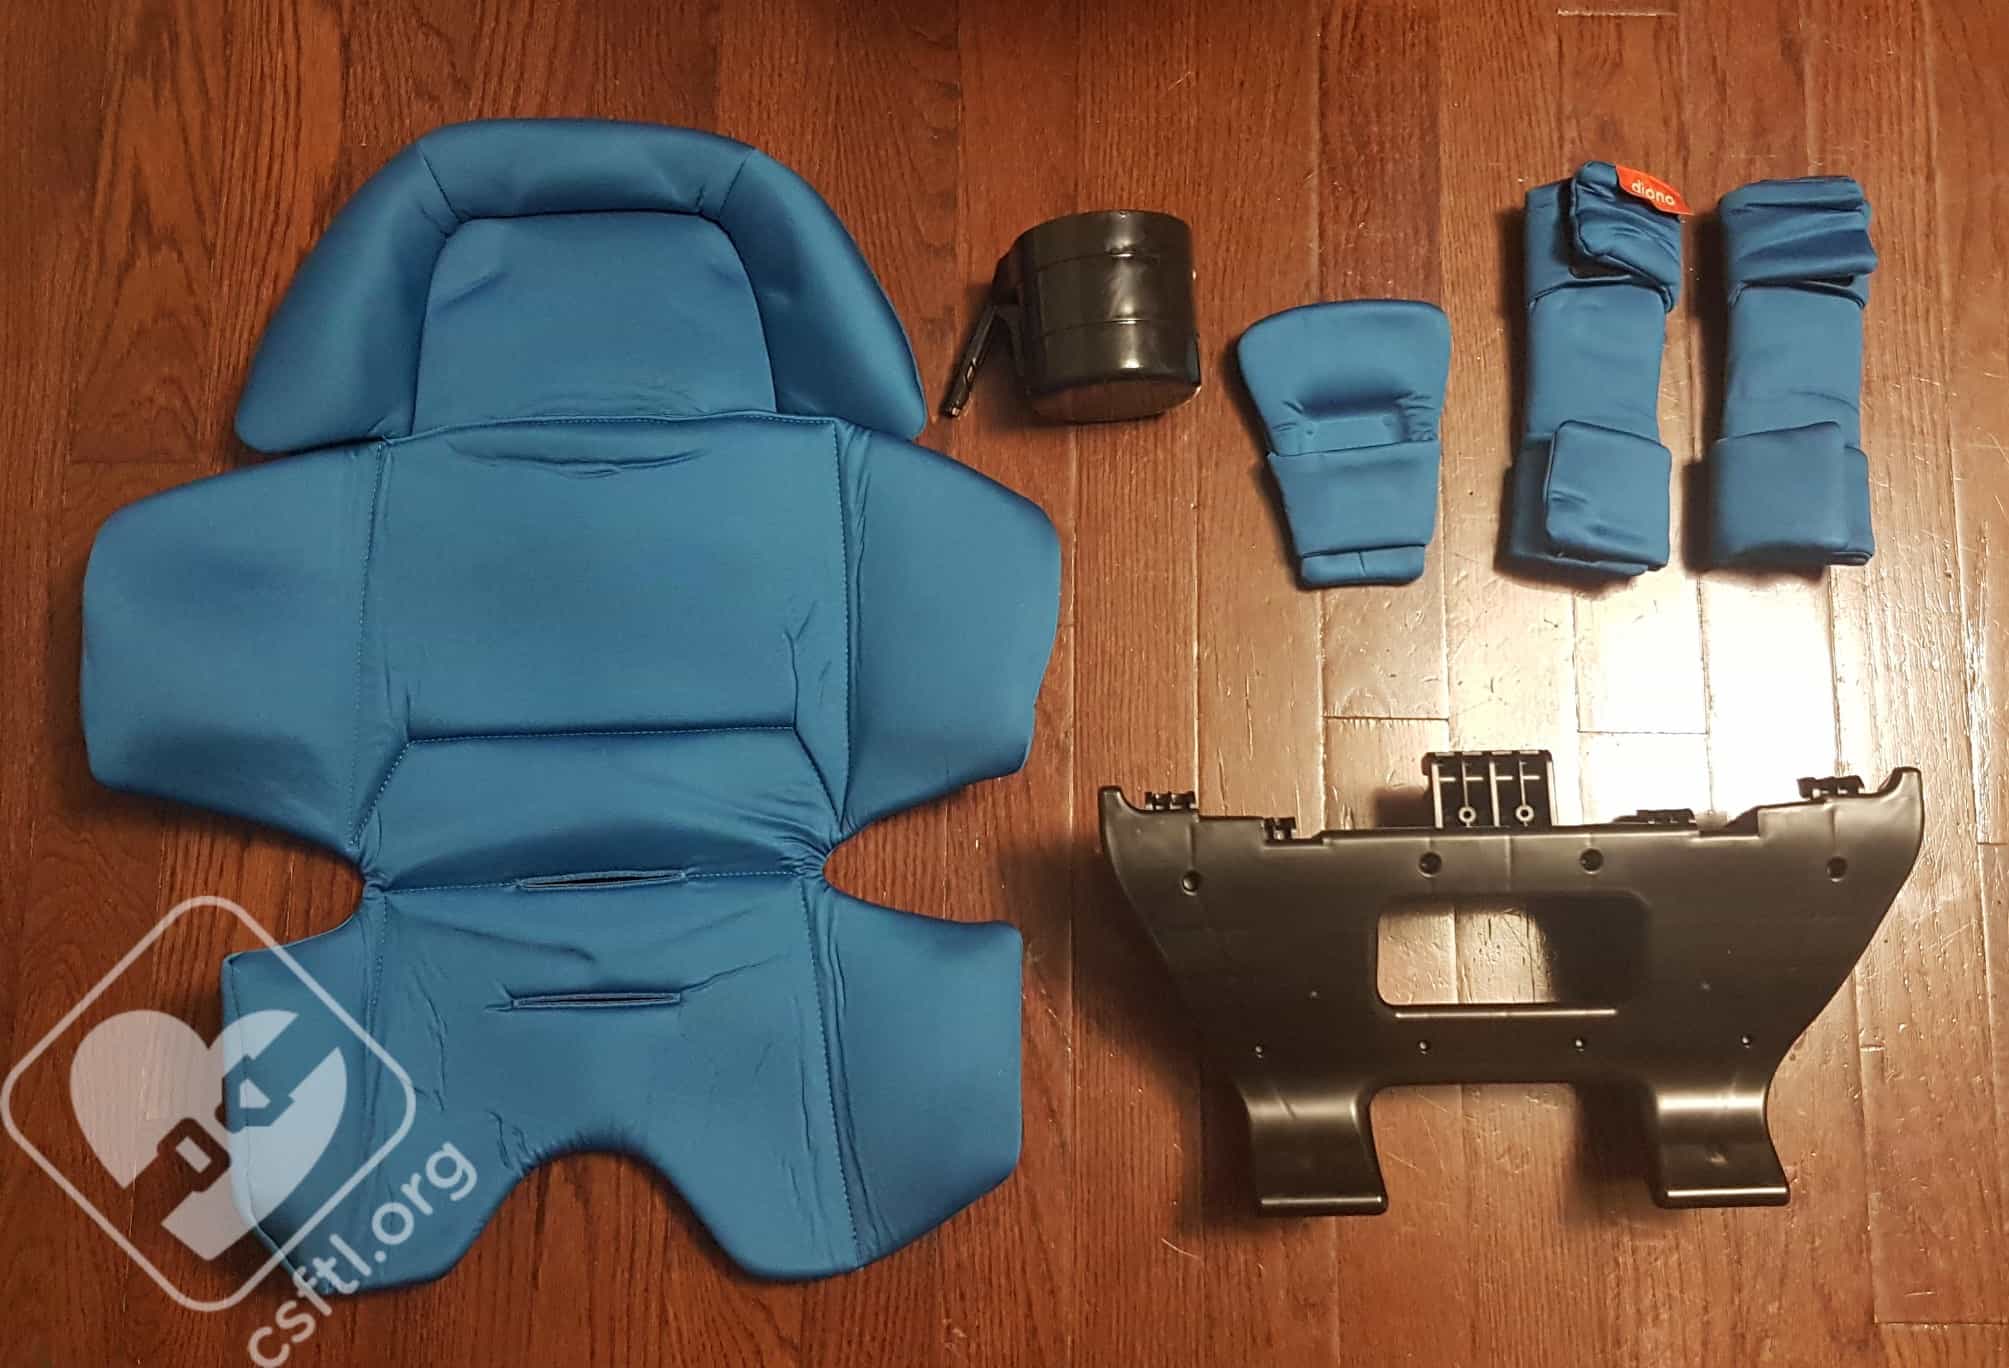
radian 3RX Accessories
The Detachable Rear Base is a separate black plastic piece that attaches to the bottom of the seat when it’s installed rear facing. This piece must be installed on the radian 3RX when using the seat rear facing.

align the colour-coded dots on the bottom of the car seat to the dots on the Detachable Rear Base
To install the detachable rear base: align the colour-coded dots on the bottom of the car seat to the dots on the Detachable Rear Base, blue to blue and yellow to yellow. Once those dots are aligned, press the detachable rear base into the bottom of the radian 3RX to engage. Confirm the base is locked into the seat by checking if it moves.
Angle Adjuster
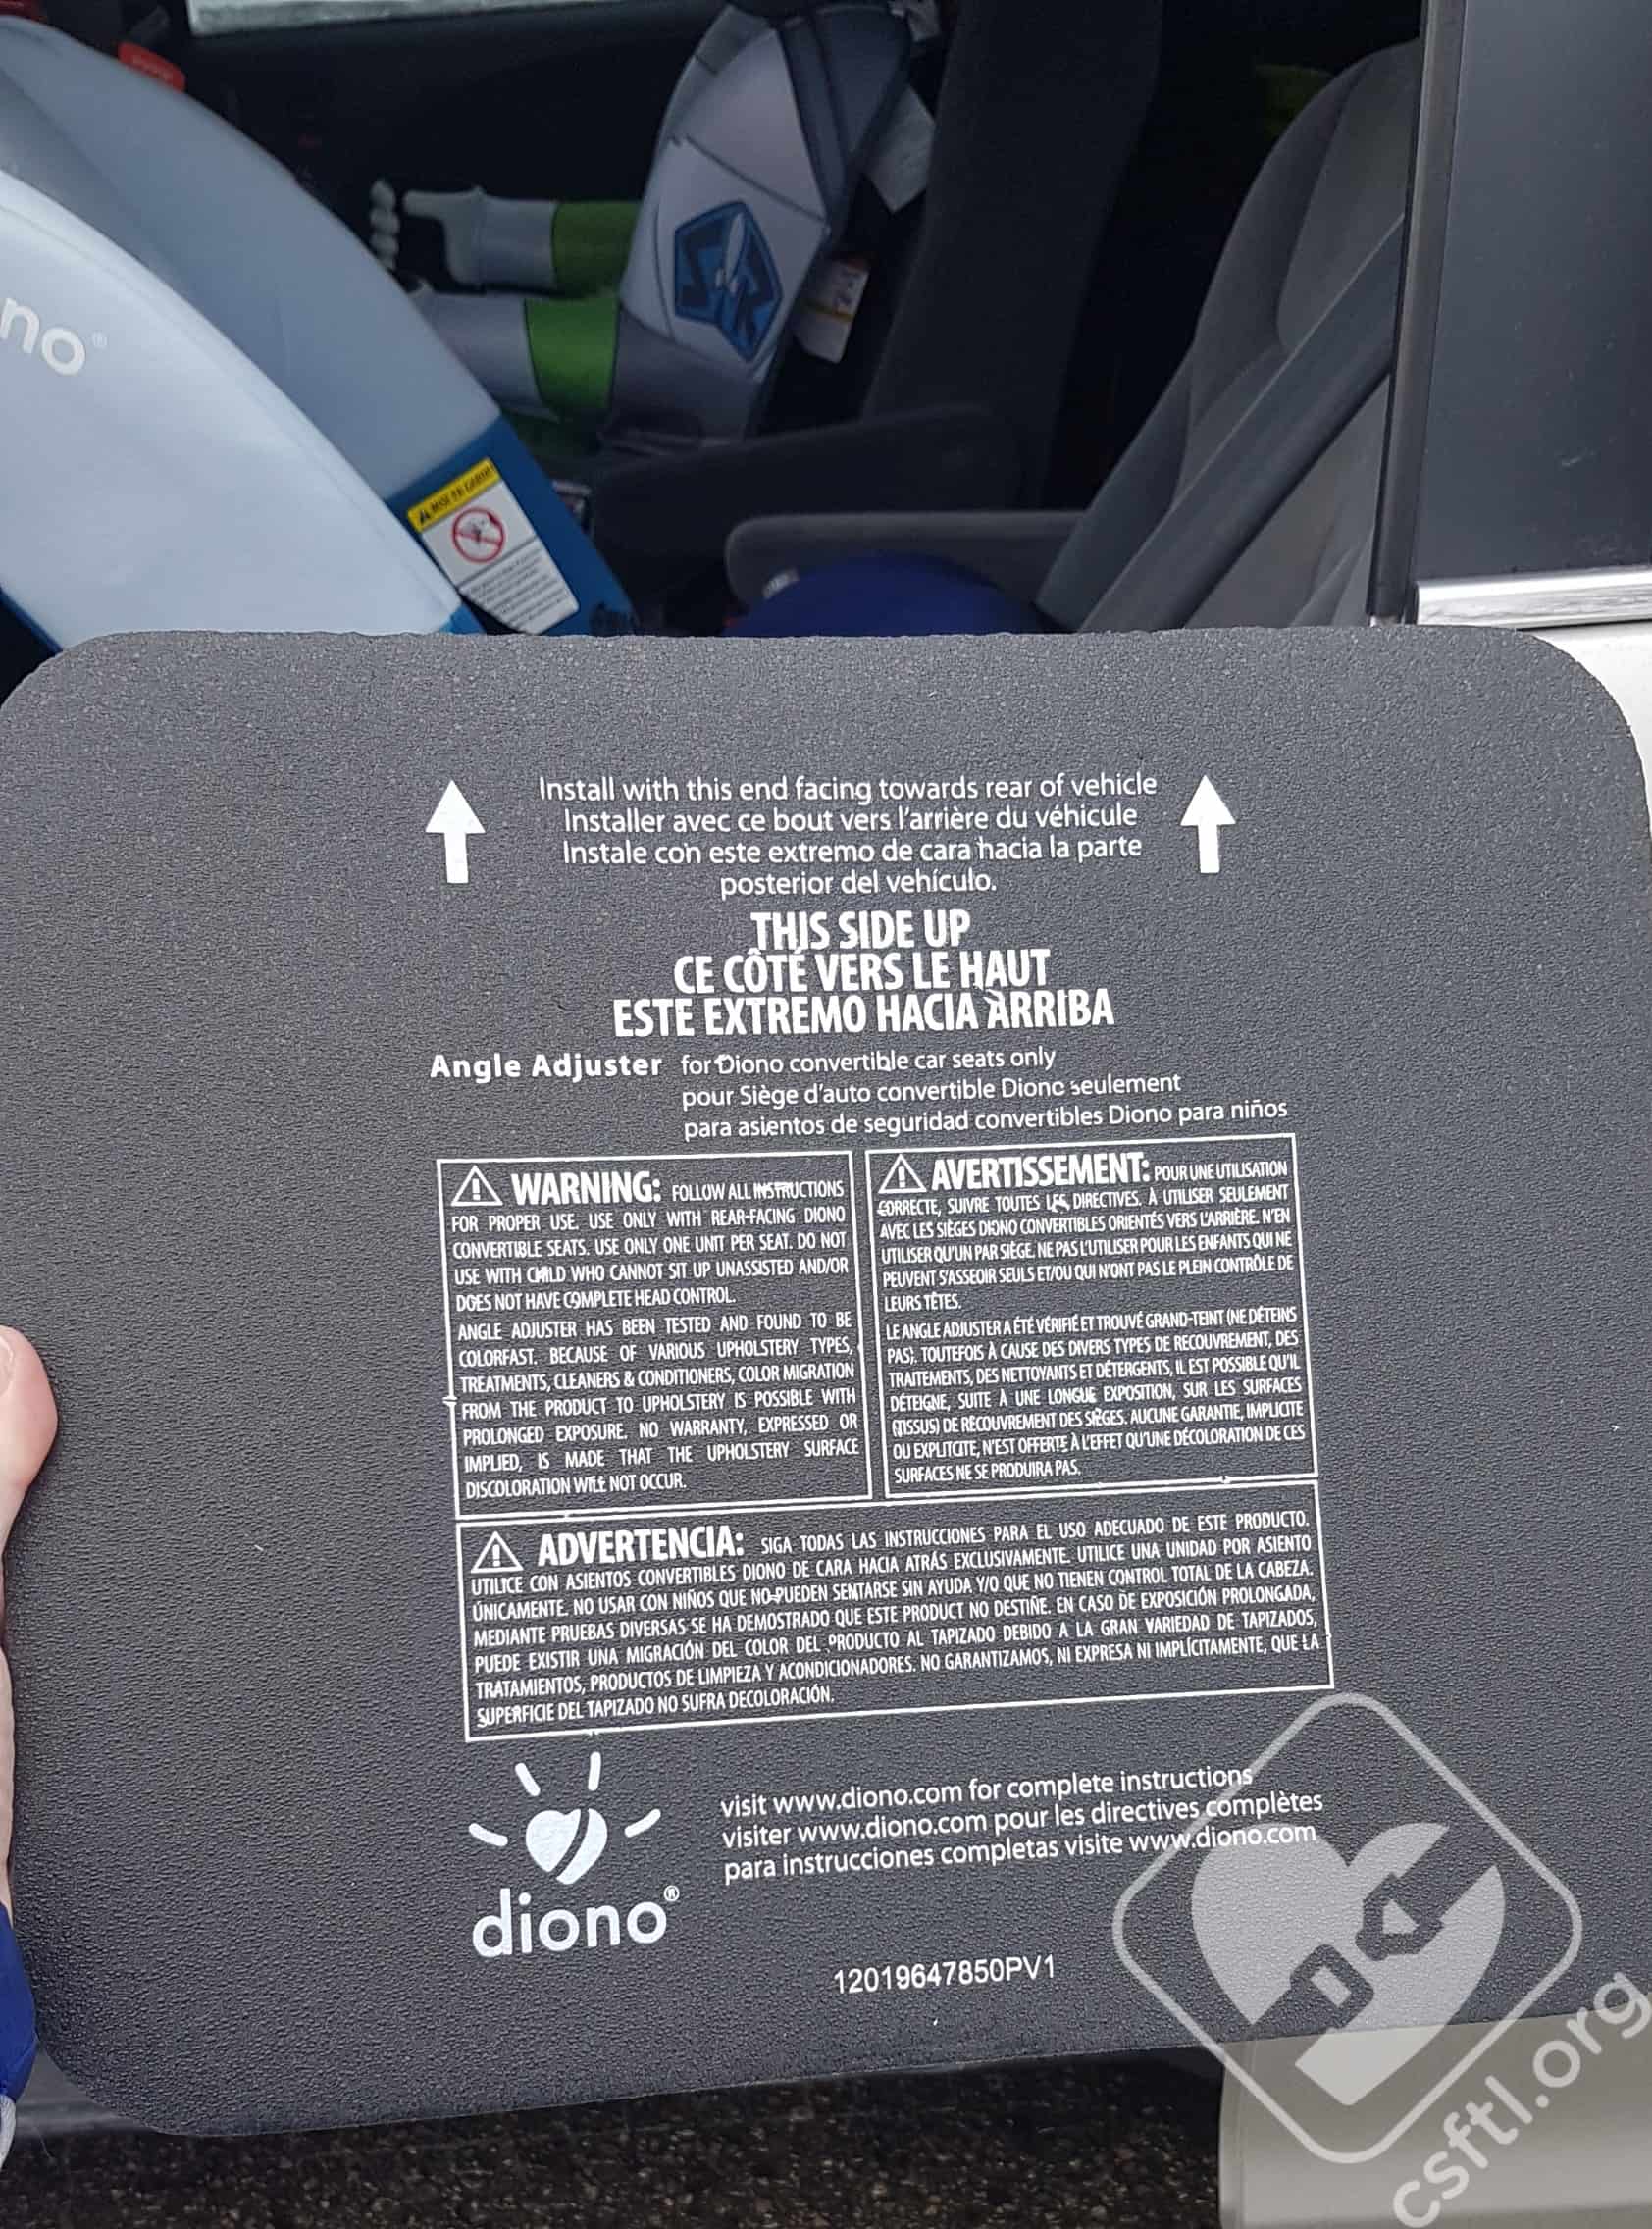
Diono Angle Adjuster
The Diono Angle Adjuster is an additional item that is purchased separately and can be used to make all the Diono multimode seats more upright when rear facing. It cannot be used until the child is sitting unassisted.
With the recline angles being weight-based, and the angle adjuster requiring the child to sit up unassisted, there may be scenarios where the radian 3RX requires a more upright angle rear facing because the child weighs over 22 pounds (this install is only possible with the help of an angle adjuster) but the angle adjuster cannot be used because the child is not sitting unassisted. Or there may be lightweight older children who would prefer the more upright angle which can be achieved with the angle adjuster, but since they don’t weigh 22 pounds or more yet, the seat cannot be installed more upright for them.
Installation with LUAS (Lower Anchors)

radian 3RX LUAS
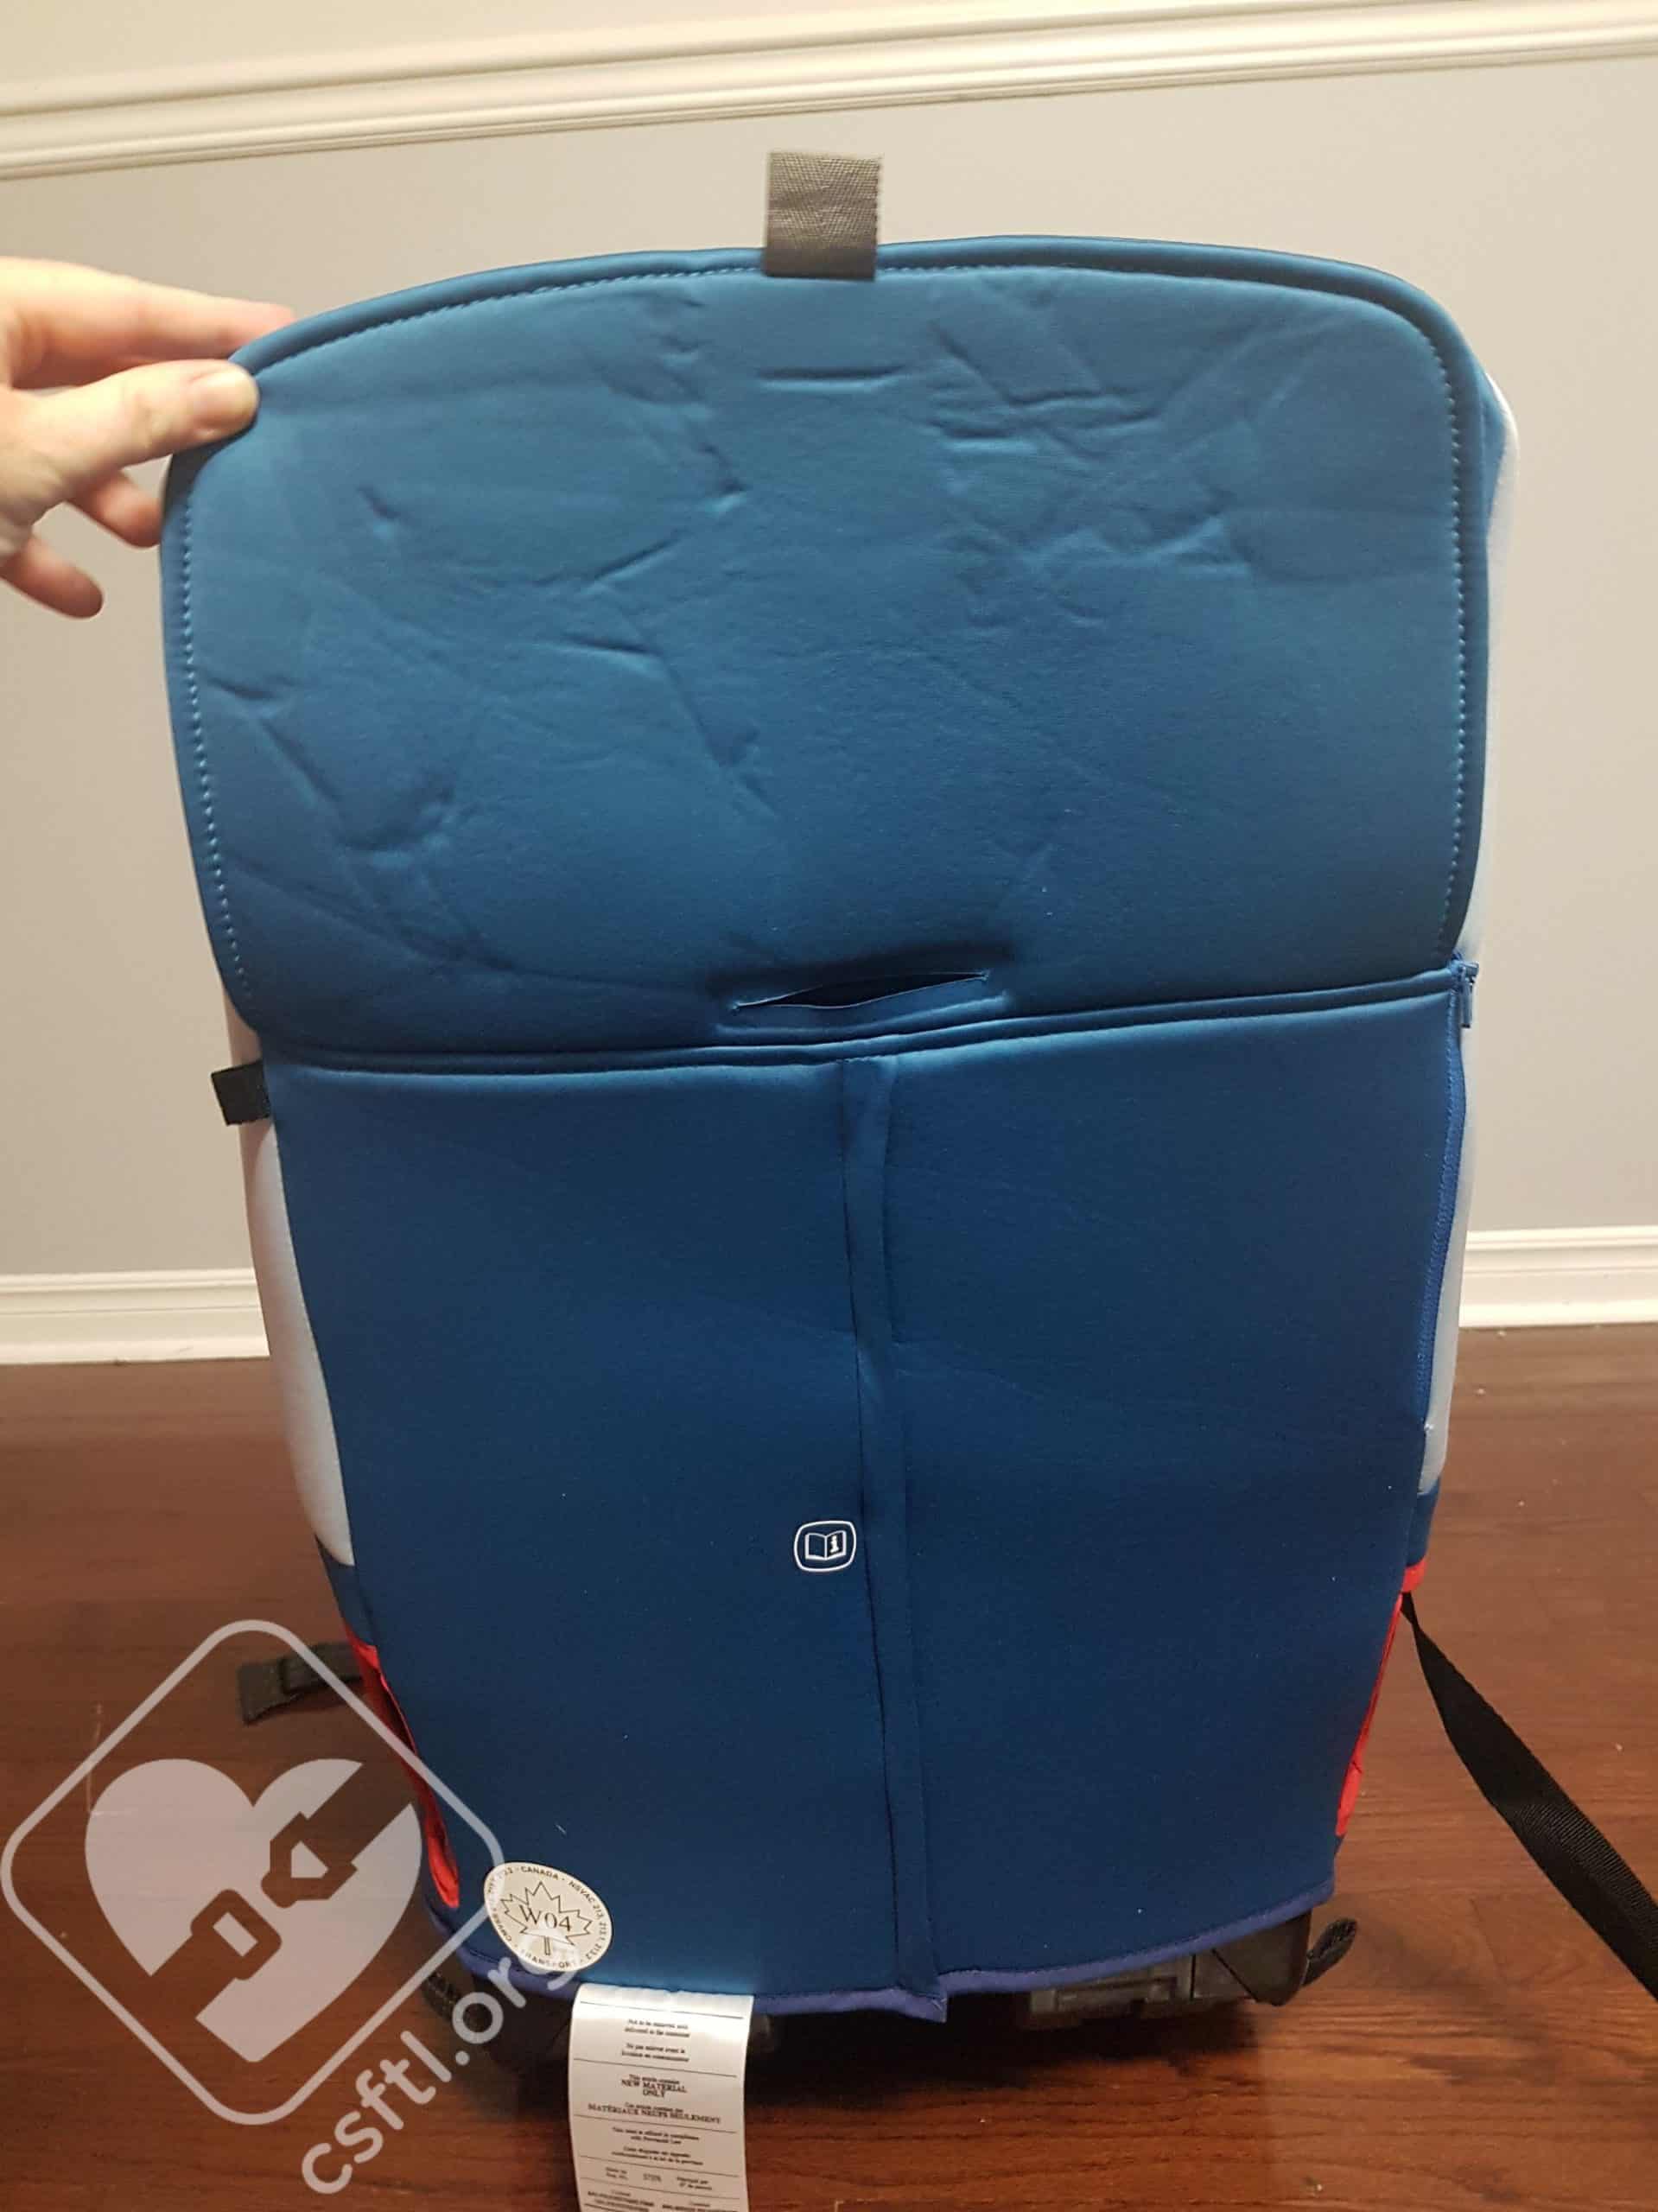
To install the radian 3RX rear facing with LUAS, fold down the cover on the back of the seat to reveal the LUAS storage location. Push the red buttons to release them from their storage locations.
Extend the LUAS webbing by pressing on the adjuster button and pulling on the strap. Unzip the pocket to the right side of the LUAS storage area, which will allow you to move the strap down to the rear-facing belt path. Feed the LUAS through the cover and out the forward facing belt path hole in the cover of the seat to then feed the anchor strap through the rear facing belt path (marked with a blue label). Zip the cover back up when you are finished routing the LUAS through the rear facing belt path.
Place the car seat rear facing on the vehicle seat and connect the LUAS to the vehicle’s lower anchors. Press down firmly on the car seat with one hand while pulling on the tail of the LUAS webbing with the other hand until the slack is removed.

Radian 3RX rear facing with LUAS in a 2007 Honda Odyssey
Once the seat is installed, check to ensure that the recline is correct for the child’s weight and that the seat moves less than 1 inch at the belt path when checked side to side and front to back.
Installation with Vehicle Lap/Shoulder Belt
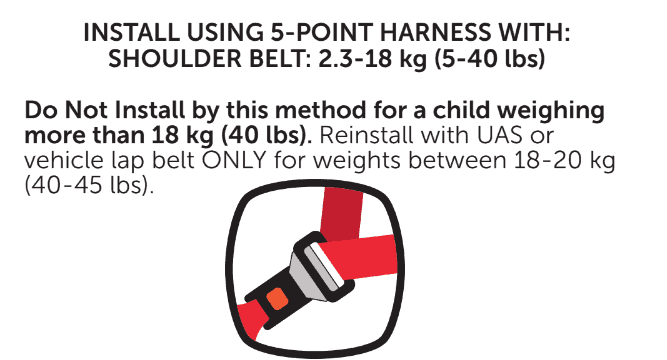
radian 3RX rear facing lap/shoulder belt restriction from the manual
Do not use this installation method for a child who weighs more than 40 pounds.
Although the radian 3RX is advertised as allowing children to ride rear facing until they weigh 45 pounds, (and the 3RXT to 50 pounds), we found that almost impossible to achieve in real life. That’s because the seat has the following limitations:
- The vehicle must not state a maximum lower anchor weight limit
- The vehicle must allow lower anchor usage for a seat + child that weighs over 73 pounds together
- The vehicle has a lap-only seatbelt in a rear seating position.
NOTE: The warning “Do Not Install by this method for a child weighing more than 18kg (40 pounds)” is written in bold in the manual on page 36 where the lap/shoulder belt installation instructions begin, but is not mentioned anywhere else in the manual, nor is it mentioned on the seat itself.
The Motor Vehicle Restraint Systems and Booster Seat Regulations SOR/2010-90 218(1)(e)(iii) states “Every child restraint system must have stitched onto it, indelibly moulded into or onto it, or indelibly printed on a label affixed to it in a permanent manner, the following information:…if the restraint system is not designed to be used at certain adjustment positions, that those adjustment positions must not be used.” That means that any installation restrictions must be noted on the seat itself. Not allowing a rear facing lap/shoulder belt installation rear facing for a child over 40 pounds when the 3RX and 3RXT allow rear facing beyond 40 pounds is a major restriction that must be noted on the seat by law. We have reported this discrepancy to Transport Canada and hope there is a solution in the future.
Diono does not state a lower anchor weight limit on their Canadian convertible car seats and advertises that they can be installed with lower anchors up to their 65 pound weight limit for the harness.
To install the radian 3RX rear facing with the vehicle lap/shoulder seat belt, route the vehicle seat belt through the rear-facing belt path (marked with a blue label) and buckle it. Determine how your vehicle seat belts lock, and engage the locking mechanism. Press down firmly in the centre of the car seat and tighten the vehicle belt.
Once the seat is installed, check to ensure that the recline is correct for the child’s weight and that the seat moves less than 1 inch at the belt path when checked side to side and front to back.
Installation with Vehicle Lap-Only Seat Belt
To install the radian 3RX rear facing with the vehicle lap-only seat belt, route the vehicle seat belt through the rear-facing belt path (marked with a blue label) and buckle it. Determine how your vehicle seat belts lock, and engage the locking mechanism. Press down firmly in the centre of the car seat and tighten the vehicle belt.
Once the seat is installed, check to ensure that the recline angle is correct for the child’s weight and that the seat moves less than 1 inch at the belt path when checked side to side and front to back.
Fit to Vehicle: Rear Facing
We don’t normally spend a lot of time explaining the different types of vehicles we use while reviewing a car seat, mostly because we try to keep our reviews as general as possible. However, these car seats present some unique installation challenges so we wanted to include the make/models of the vehicles we used in case that helps caregivers in their purchasing journey.
2015 Volkswagen Jetta
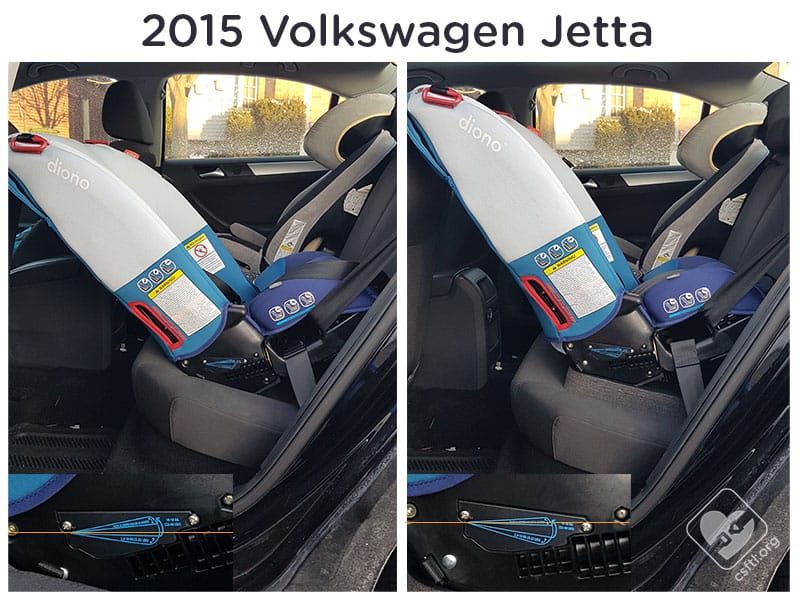
radian 3RX installed in a 2015 Volkswagen Jetta
Here we have installed the radian 3RX rear facing in this 2015 Volkswagen Jetta. Without the angle adjuster, the seat installed at the lower end of the 22-40 pound rear facing recline range. Unfortunately, in this vehicle, no adult passenger could sit safely in front of the radian 3RX, since the front seat must be pushed all the way up, positioning the passenger/driver much too close to the airbag to travel safely.
With the angle adjuster added, the seat installed at the upper end of the 40 pounds and over rear facing range and the front seat is two positions from fully pushed back. Since the Jetta is not a large vehicle, this unfortunately may also be uncomfortable or unsafe for the front seat passenger or driver, depending on their height.
2007 Honda Odyssey

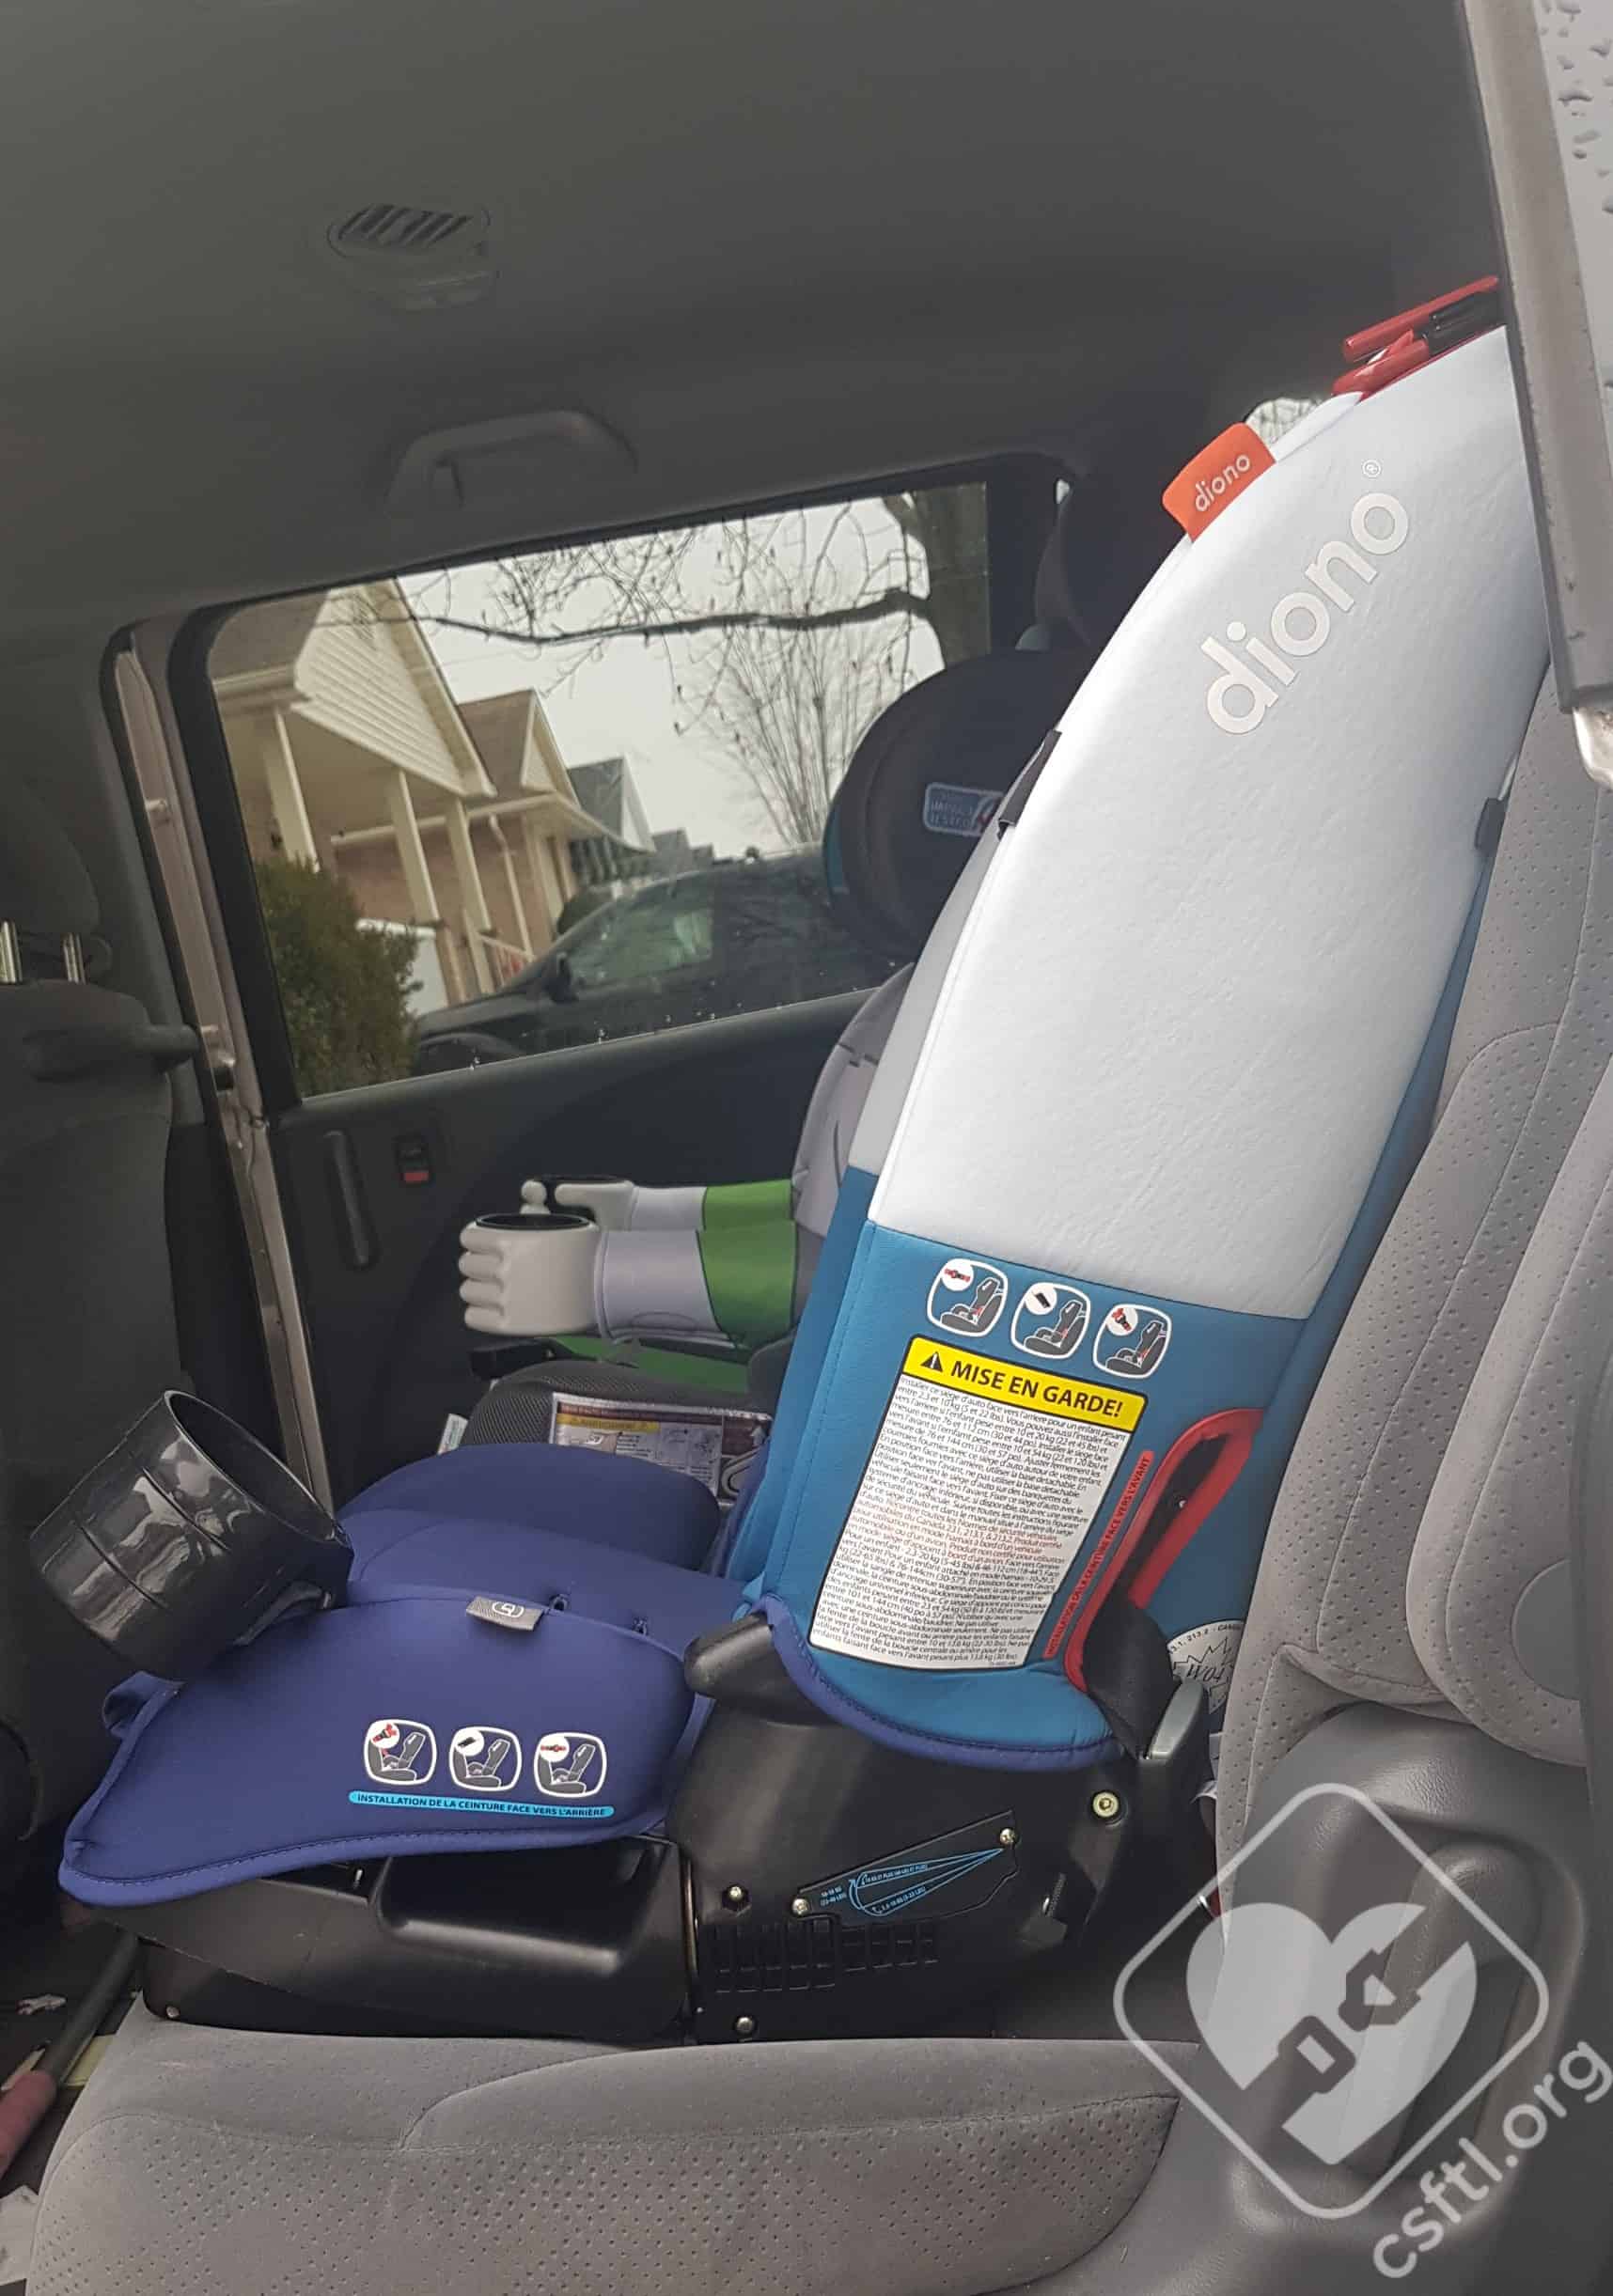
radian 3RX in a 2007 Honda Odyssey
Here we have installed the radian 3RX rear facing in a 2007 Honda Odyssey’s captain’s chair. Without the angle adjuster, the seat installed within the 22-40 pounds rear facing recline range.
With the angle adjuster added, the seat installed with the upper line of the 22-40 pounds recline range parallel to the ground.
Because there is no way to recline the seat, we are doubtful that the radian 3RX would be suitable for a child who weighs less than 22 pounds in this vehicle and seating position since we’re unable to install the seat within the required recline range for a child who weighs between 5-22 pounds.
2000 Chrysler Cirrus
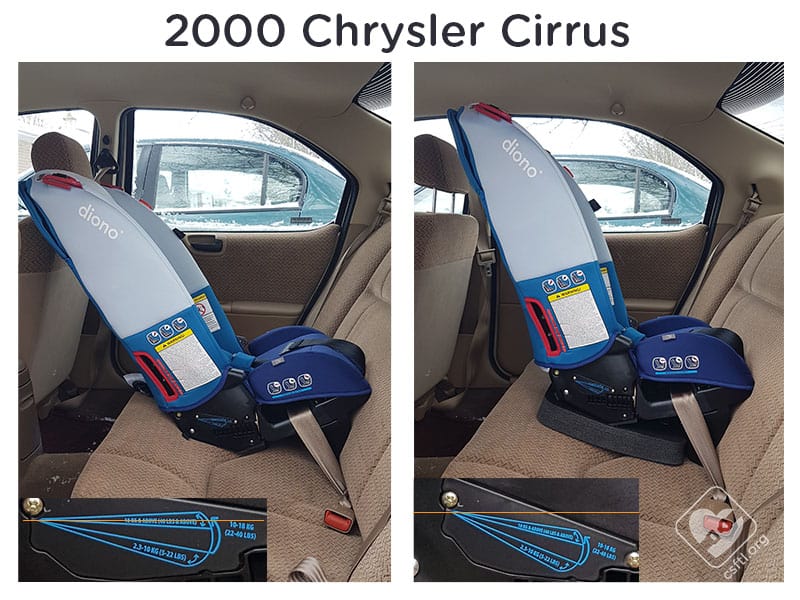
Here we have installed the radian 3RX rear facing with the centre lap-only vehicle seat belt in a 2000 Chrysler Cirrus. Without the angle adjuster, the seat installed within the 40 pounds and over recline range. With the angle adjuster the radian 3RX was much too upright. Because there is no way to recline the seat, we are doubtful that the radian 3RX would be suitable rear facing in this vehicle for a child who weighs less than 40 pounds.
1998 Chevrolet Malibu
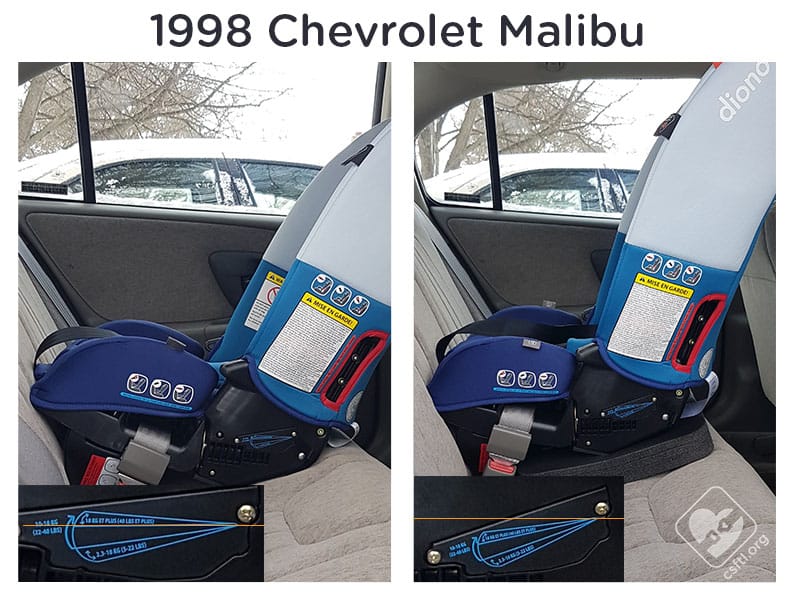
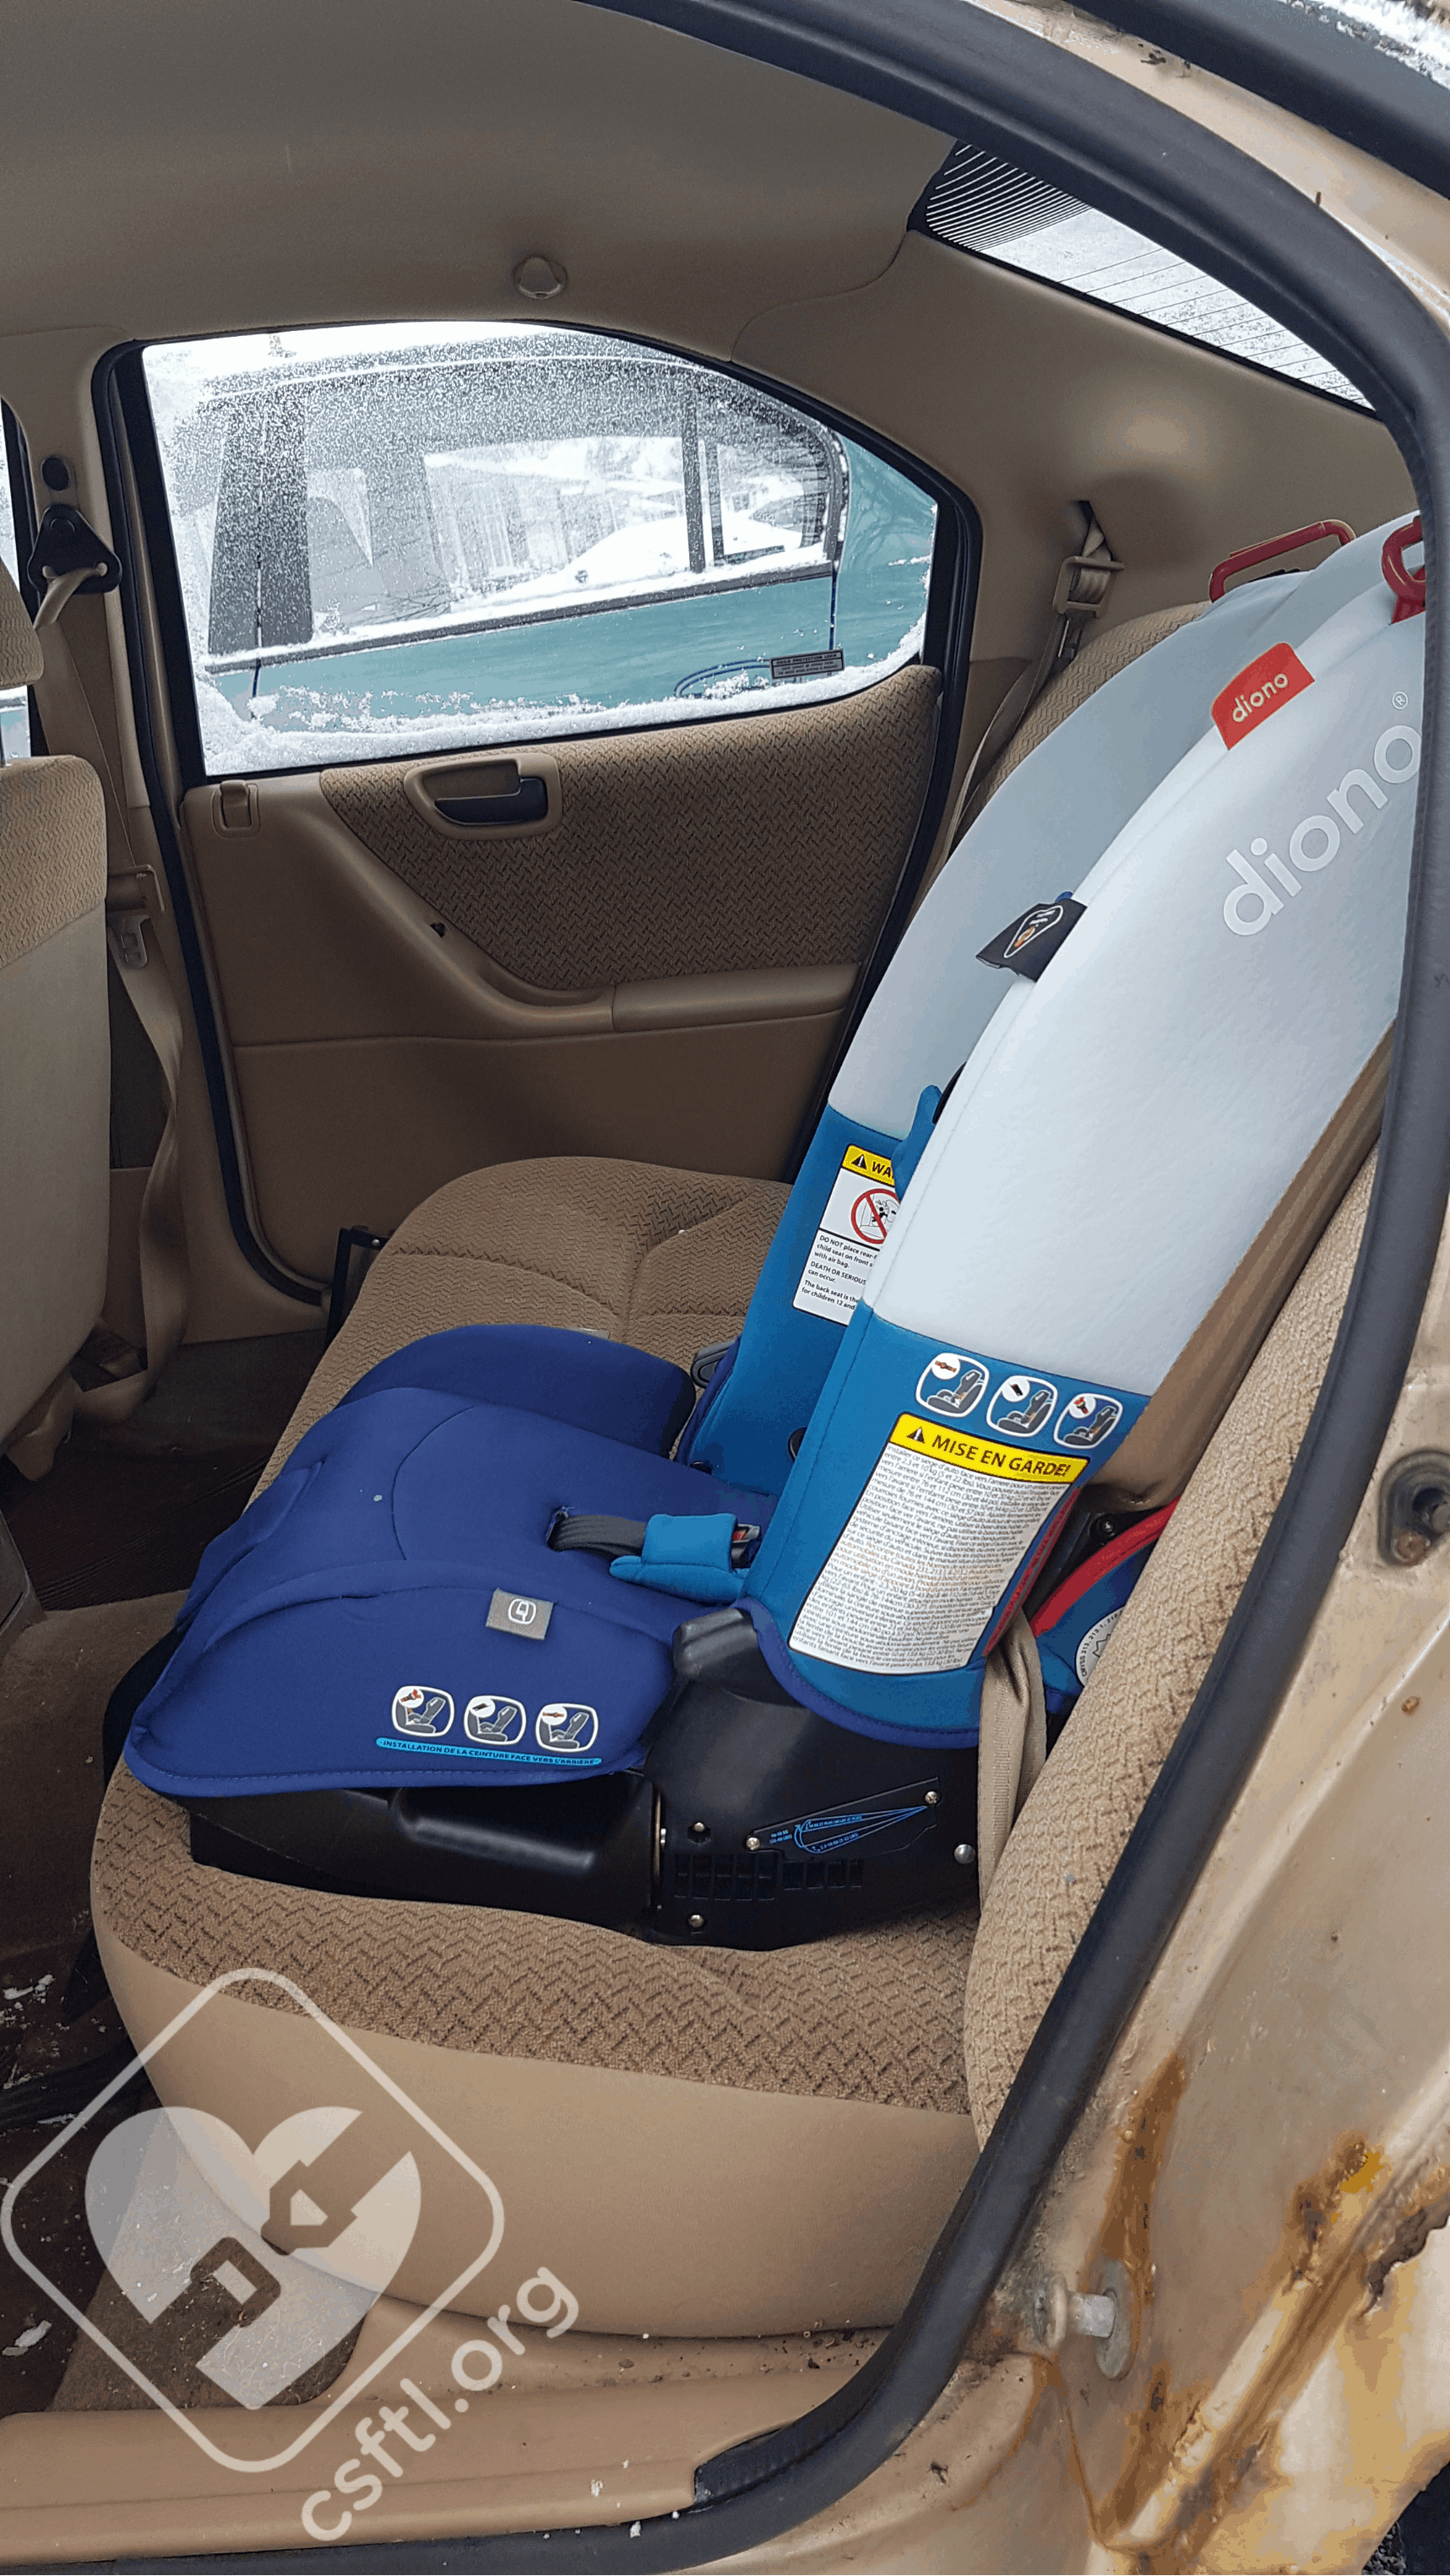
radian 3RX in a 1998 Chevrolet Malibu
Here we have installed the radian 3RX rear facing with the centre lap-only vehicle seat belt in a 1999 Chevrolet Malibu. Without the angle adjuster, the seat installed with upper line of the 22-40 pounds recline range parallel to the ground. We tried with the angle adjuster, but that resulted in the seat much too upright and unusable. The good news about this installation is that, since this vehicle does not have any top tether anchors, the radian 3RX/3RXT would be usable rear facing in this seating position until the seat is outgrown because it features a lap-only vehicle seat belt.
Fit to Child: Rear Facing
Infant Insert
To ensure a better fit for small infants, Diono recommends using the infant head and body support. Use of this padding is optional.
One Month Old

radian 3RX – one month old with harness pads
Our first newborn model is one month old, weighs 8 pounds, and is 20 inches long. We have tried her out in the seat with both the infant insert and head pad, and took photos of her in the seat both with and without the harness pads.

radian 3RX – one month old without harness pads
The harness pads overwhelmed this little one, so we much prefer the fit without the pads. The harness provides her a good fit, she would be able to ride in the radian 3RX provided the seat can be installed in the vehicle at an appropriate recline angle.
12 Weeks Old/Newborn
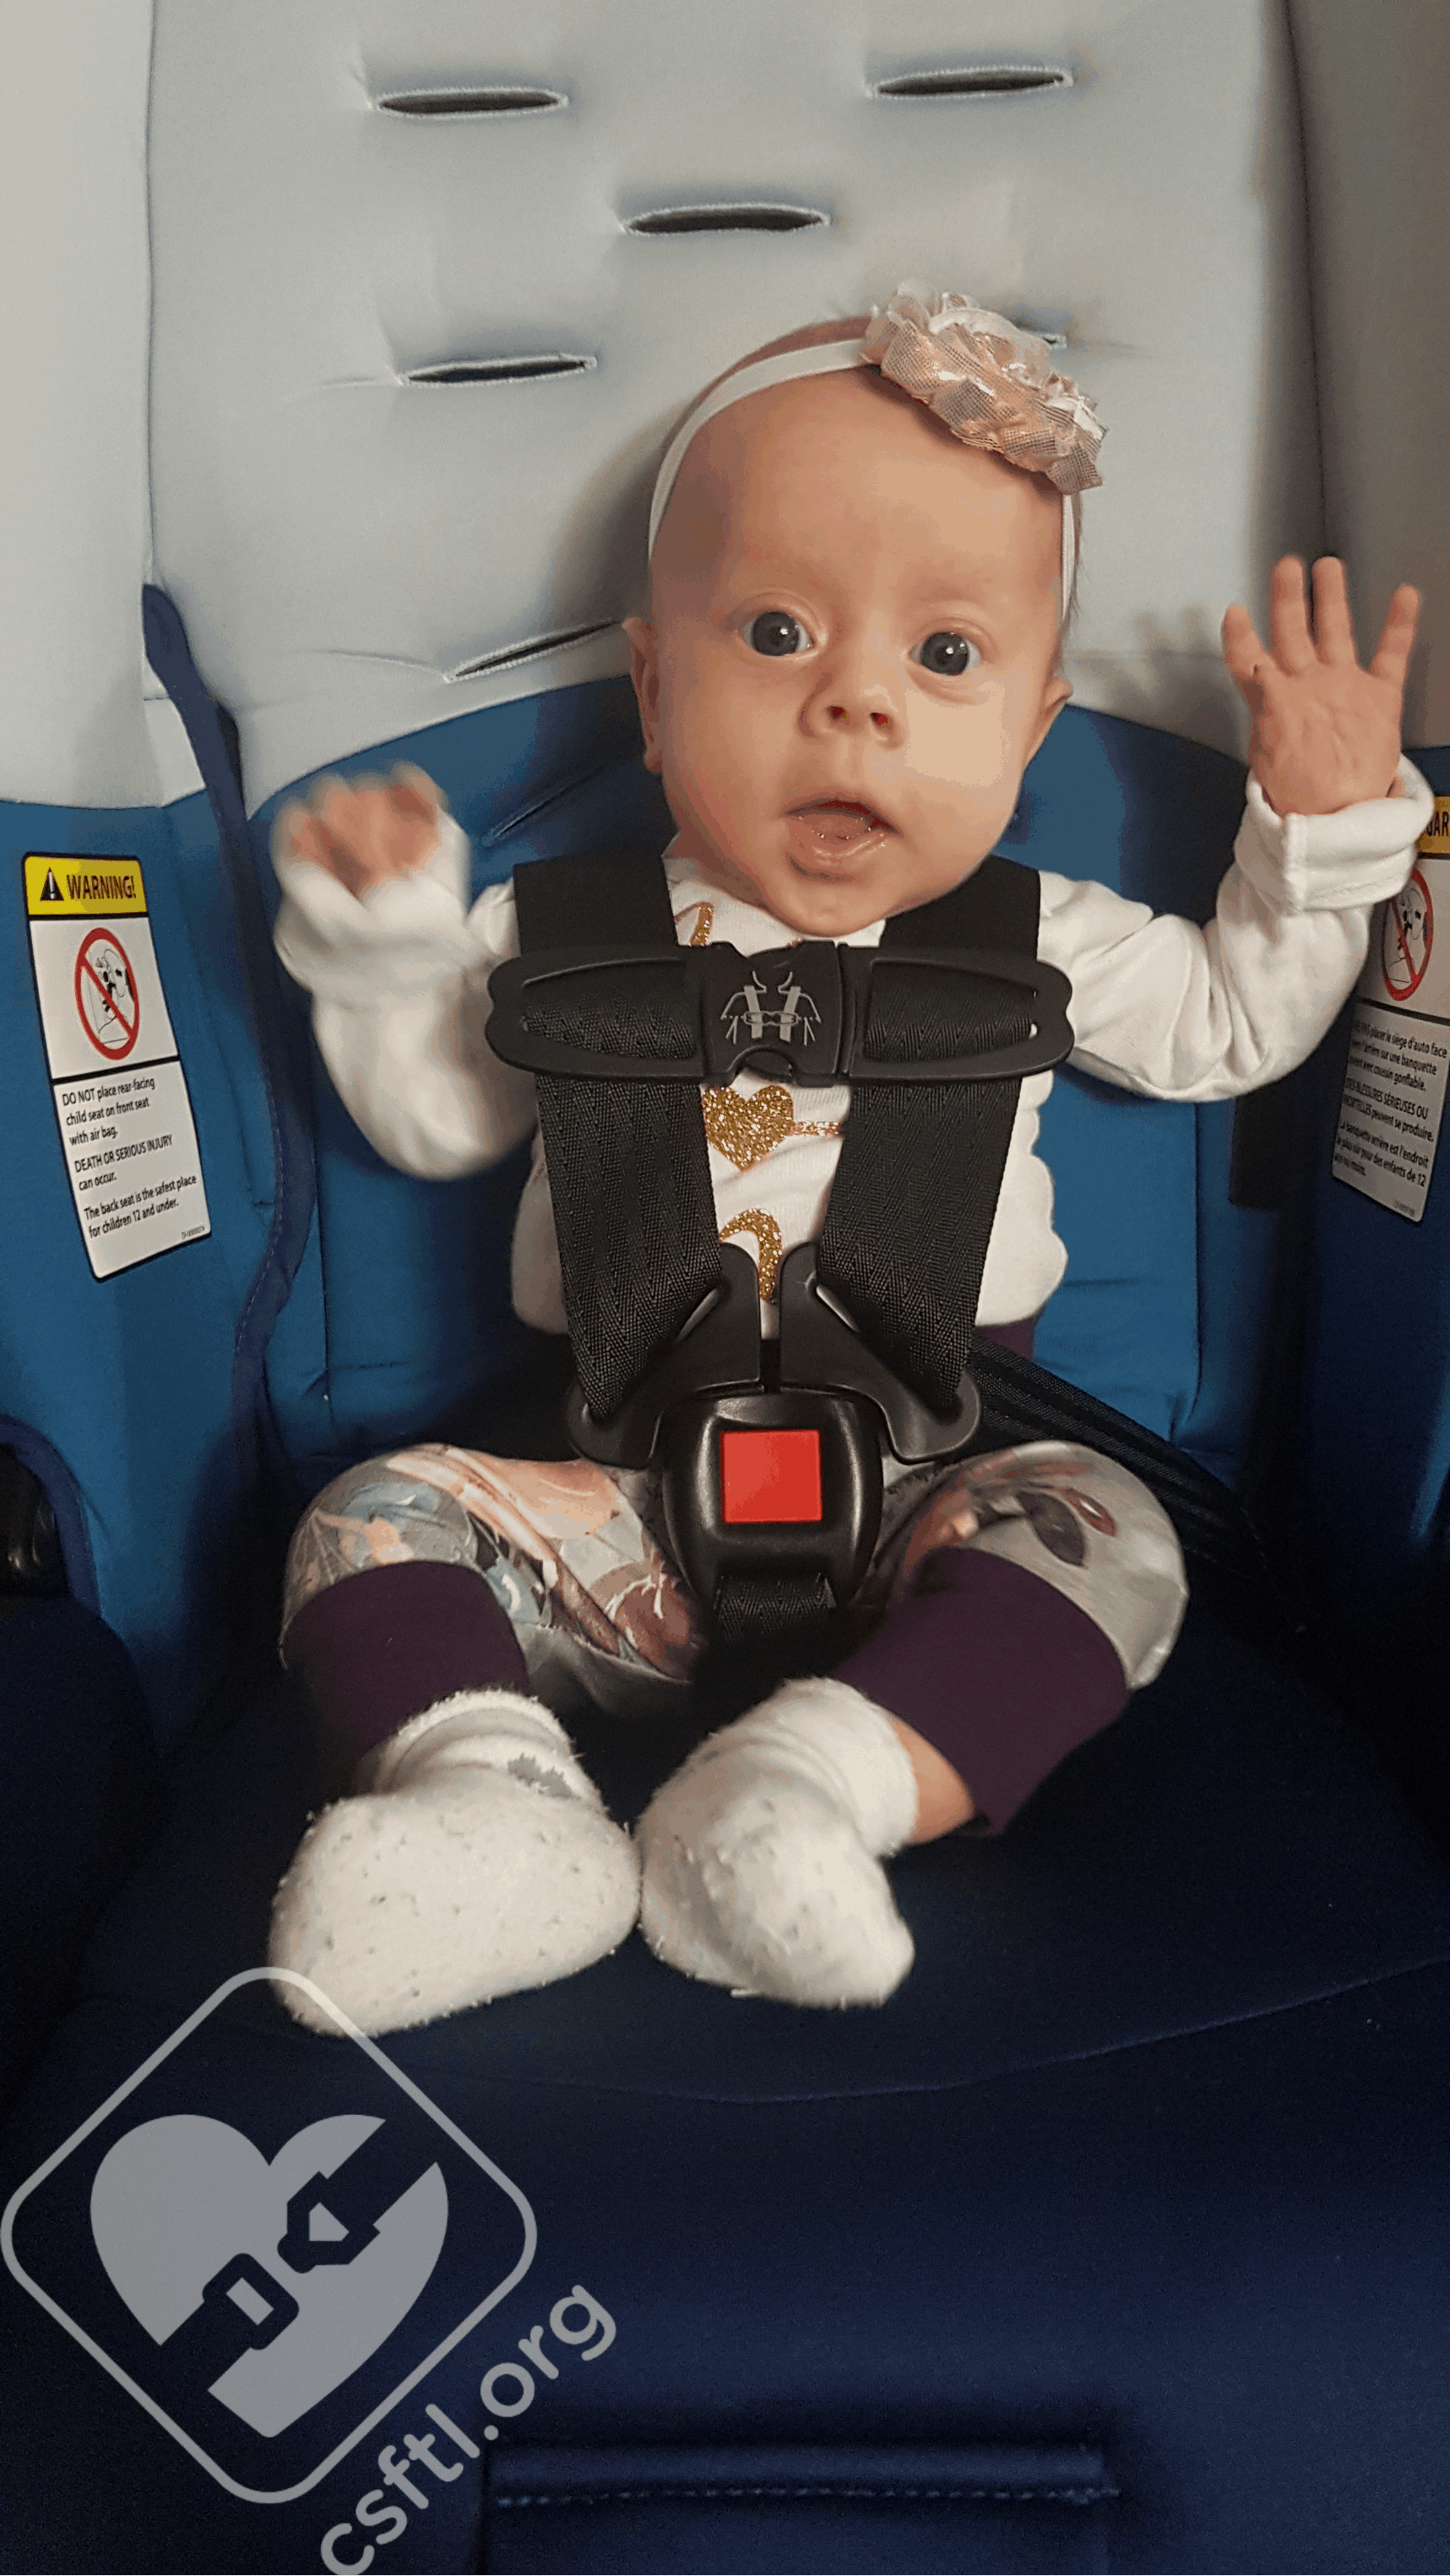
radian 3RX – 12 week old newborn
This newborn model came into the world a little earlier than planned. At 12 weeks old, she is the size of an average newborn (and the same stats as our previous newborn model) at 8 pounds and 20 inches long.
Here we see her in the radian 3RX without any additional padding, and she has a pretty good fit. The chest clip is a bit wide for her little body, but we are able to tighten the straps to JUST pass the pinch test. The harness is positioned just below her shoulders when in the lowest position. We’d need to ensure that the seat itself is able to be installed in the vehicle at an acceptable angle for a newborn, but the seat itself fits her well.
Four Years Old
radian 3RX – rear facing 4 year old
This model is newly 4 years old, 41 inches tall, and weighs 35 pounds. She recently started riding forward facing, but agreed to test out the radian 3RX rear facing for our review. She found the seat quite comfortable, and has lots of growing room.

radian 3RX – more than 1.5″ of shell above the head required rear facing
Diono requires 1.5 inches of shell above the child’s head when rear facing in the radian 3R/3RX/3RXT, and this book is a touch over 1.5 inches thick. As you can see, our model, who wears a size 4-5 shirt, has lots of growing room rear facing, and is well under the stated rear facing height and weight limits. While we don’t advocate that four year olds must ride rear facing, it would be possible for this model to ride rear facing in the radian 3RX for another year.
Installation: Forward Facing
Adjustable Bottom
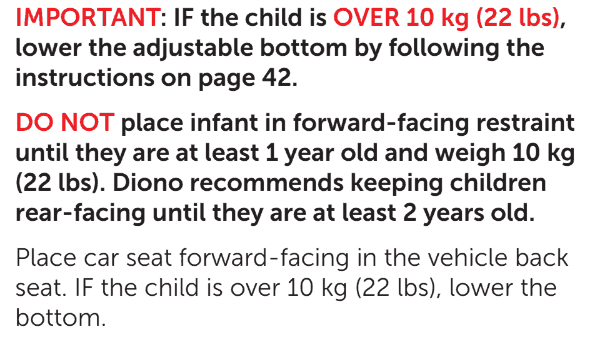
radian 3RX – adjustable bottom must be lowered forward facing
Lowered adjustable bottom on the radian 3RX
The beginning of the forward facing installation section of the radian 3RX manual has a few rules around forward facing installations. When the seat is installed forward facing, if the child is over 22 pounds, the adjustable bottom must be lowered. Since the radian 3RX has a 22 pound minimum weight limit for forward facing, this indicates that the adjustable bottom must always be lowered when installing the car seat forward facing.
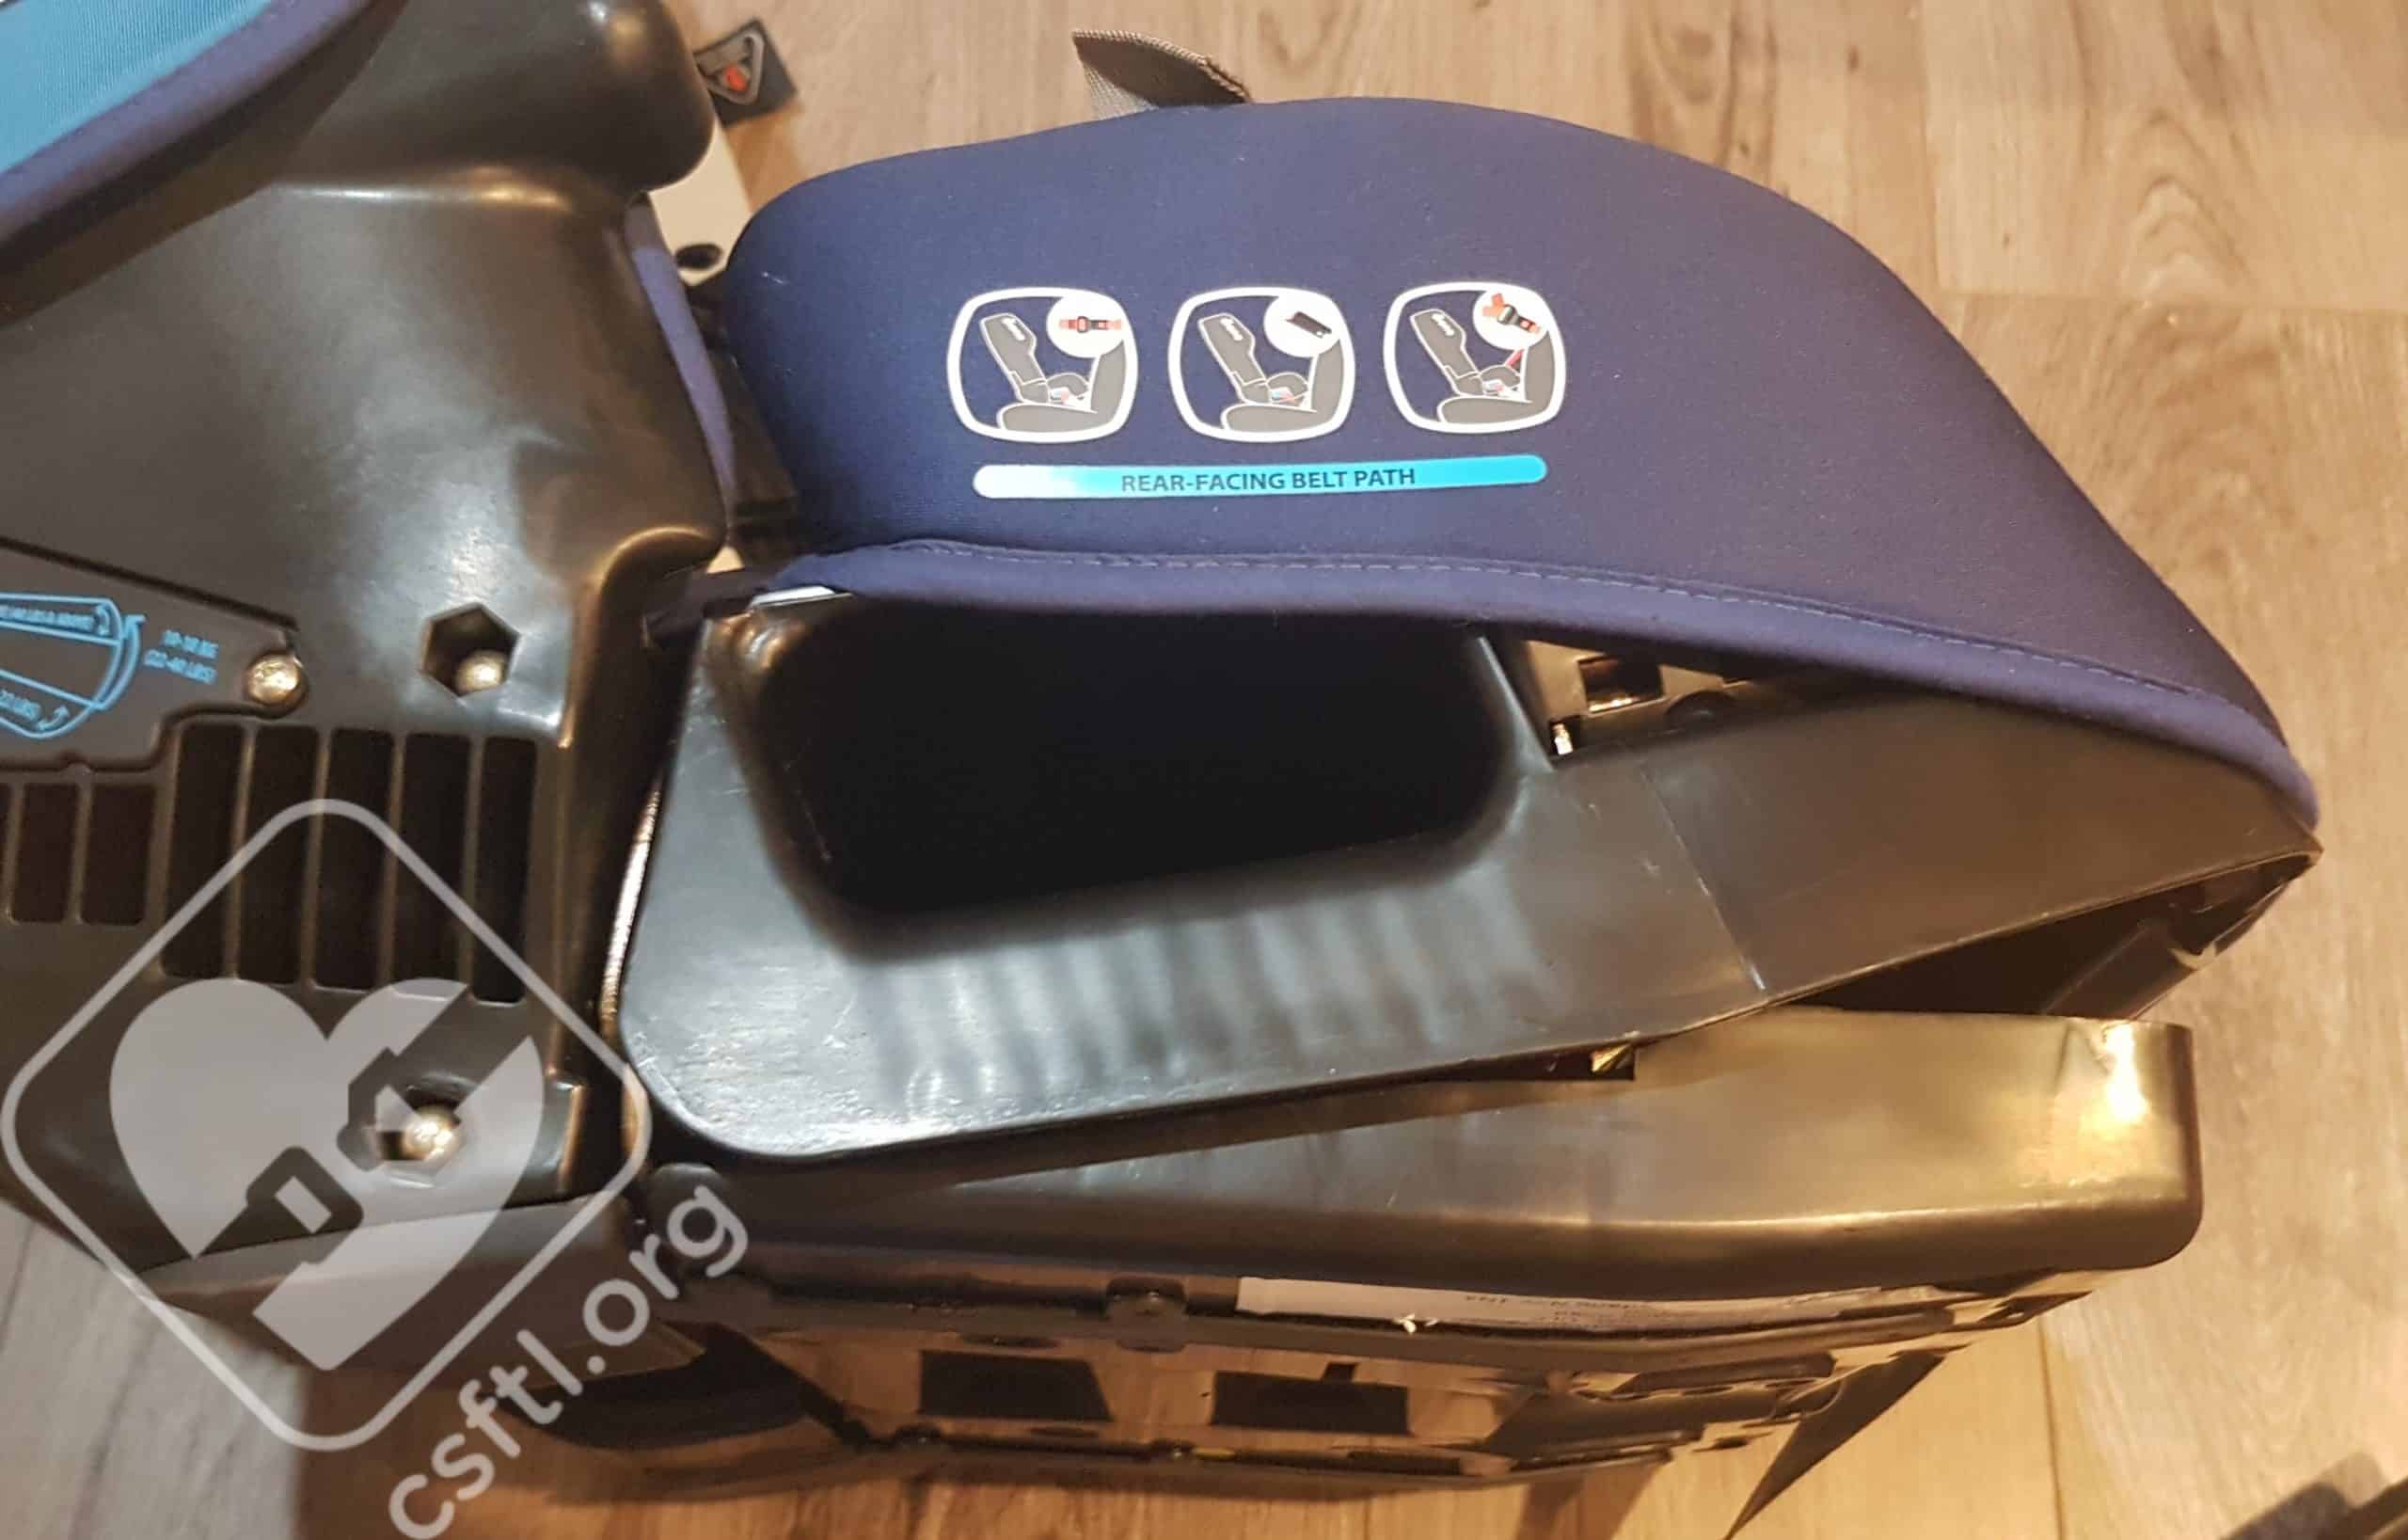
Stored adjustable bottom on the radian 3RX
The manual doesn’t mention the adjustable bottom anywhere in the booster section of the manual, but we confirmed with customer service that it must be lowered in booster mode as well.
Safe Stop

radian 3RX – Safe Stop installed
If the child using the radian 3RX weighs less than under 40 pounds, the Safe Stop must be installed before forward facing use. To install the Safe Stop:
- Locate the belt storage icon on the back of the seat and fold down the aplix flap on the back of the cover. Detach the Safe Stop and remove it for use.
- Unzip the cover on the back of the seat to access the harness straps. Remove the harness straps from metal splitter plate, thread both harness straps on to the metal hook of the Safe Stop (connect the left side first and then the right side).
- Thread the bottom of the Safe Stop back on to the splitter plate and close the back cover of the seat, taking care to ensure the harness is clear from any obstructions.
radian 3RX – Safe Stop removed
The Safe Stop must be removed once the child weighs 40 pounds.
Vehicle Headrest
Although it is not mentioned in the manuals, the Diono multimode seats require a vehicle headrest when installed forward facing if the vehicle seat is not flush with the child restraint. The vehicle headrest is not required when the vehicle seat back IS flush with the child restraint forward facing.
We reached out to Diono’s customer service and were advised that a vehicle headrest is not required at any time with the radian 3RX. Since this differs from what Diono has officially stated in the past, if you have any questions about whether your installation requires the presence of a vehicle headrest or not, we recommend contacting Diono’s customer service directly with pictures of your installation for personalized advice.
Forward Facing Belt Path
radian 3RX – covered back of the seat
While we appreciate that Diono made an attempt to modernize their multimode car seats by giving them a sleek look and covering the back of the seat, we are concerned that when installing the car seat forward facing, it is very possible for a caregiver to route the vehicle seat belt or LUAS webbing through the cover only. This would not be a safe installation.
The forward facing belt path of the radian 3RX is quite narrow and it would be easy for a caregiver to assume the path of least resistance is the correct path when installing the seat forward facing.
Note: the forward facing belt path DOES pass through the shell of the seat and the seat should NEVER be installed with the lower anchor webbing or vehicle seat belt only through the cover.
Installation with LUAS (Lower Anchors)
Radian 3RX forward facing with LUAS in a 2007 Honda Odyssey
To install the radian 3RX forward facing with LUAS, thread the LUAS webbing through the forward facing belt path (marked with a red label). Place the car seat forward facing on the vehicle seat and connect the LUAS to the vehicle’s lower anchors. Press down firmly on the car seat with one hand while pulling on the LUAS strap tail with the other until all slack is removed. Attach the top tether to the vehicle tether anchor and tighten. Once installed, check that the seat moves less than 1 inch at the belt path when checked side to side and front to back. Note: the Radian 3RX’s high, narrow belt path often means that a little extra pressure is required to complete a secure installation.
Diono does not list a lower anchor weight limit on their convertible seats and advertise that they can be installed with lower anchors up to their 65 pounds harness limit. Check your vehicle’s manual for the lower anchor weight limit for that vehicle.
Installation: Vehicle Seat Belt
Forward Facing radian 3RX in a 2001 Chrysler Cirrus
To install the radian 3RX forward facing with the vehicle seat belt, route the vehicle seat belt through the forward-facing belt path (marked with a red label) and buckle it. Determine how your vehicle seat belts lock, and engage the locking mechanism. Press down firmly in the center of the car seat and feed the vehicle seat belt back into the car until the slack has been removed.
Once installed check to ensure that the seat moves less than 1 inch at the belt path when checked side to side and front to back. If there’s still some movement, leave the seat belt buckled in, then attempt to remove that last bit of slack from the seat belt by pulling on the shoulder portion of the belt while pushing the seat toward the vehicle seat back.
Installation Challenges
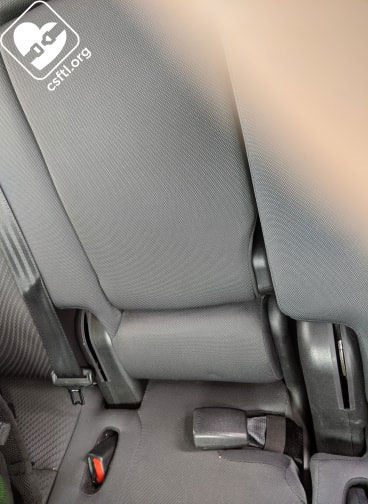
Vehicle seat belt that’s mounted forward of the seat bight
Because the radian 3RX features a high and narrow forward facing belt path, the seat may be difficult or impossible to install in vehicles with seat belts that are positioned forward of the seat bight. Always check that the seat moves less than 1 inch at the belt path when checked with the force of a handshake side to side and front to back.
Fit to Vehicle – Forward Facing
2007 Honda Odyssey

radian 3RX – 3 across in the 3rd row a 2007 Odyssey
Up until now, a 3 across installation in the third row of this van has not been possible. Believe me, we’ve tried. A lot. When installing 3 car seats or booster seats across was necessary, the narrowness of the radian 3RX made that possible! That’s the great news about this seat.
Here we see a Graco Turbobooster TakeAlong high back booster, Graco RightGuide seat belt trainer, and radian 3RX in the third row of the Odyssey. Buckling the booster riders was difficult and required adult help, and the passenger in the middle seat is clearly VERY impressed at having to ride in close proximity to his sisters, but having a narrow harnessed seat for this setup was necessary, and the radian 3RX did the job.
The installation in the Odyssey’s third row with seat belt was quite straightforward thanks to the aplix-covered slits in the Diono’s cover.
Dodge Caravan
The third row centre seat of the Dodge Caravan/Chrysler Town & Country/Volkswagen Routan is one of the more challenging seating positions for forward facing seats. That’s because the seat belt geometry is a bit odd and the seating position is quite narrow.
We ran into quite a bit of difficulty installing the radian 3RX in this seating position, and wouldn’t recommend a parent or caregiver attempts this installation. The challenges with installing in this location had this CPST-I sweating and swearing before finishing with an installation that is BARELY acceptably within the 1 inch of movement. We wouldn’t expect a caregiver to be able to recreate this installation.
Fit to Child – Forward Facing
The radian 3RX manual instructs that in forward facing mode the “harness straps MUST be at or just above the child’s shoulders. Top of child’s ears must below top of headrest. (If needed, adjust the headrest by positioning it accordingly by sliding it up or down.)”
There is no adjustable headrest on the radian 3RX or 3RX models (the radian 3RXT features movable head wings) so this statement in the manual is confusing.
Four Year Old
radian 3RX – forward facing 4 year old
Our 4 year model remains 41 inches tall and 35 pounds. She is using the top harness position and the outer crotch buckle position because she weighs more than 30 pounds. She has been riding in the radian 3RX forward facing for the past few weeks, and her only complaint is the harness pads, which are required when forward facing. Thankfully she is easygoing and hasn’t (yet) tried to pull them off mid-ride.
We can see that the top harness position is about 2 inches above her shoulders. This means that she should have at least another year in this seat forward facing. It’s pretty unlikely that this seat will be useable as a booster for her, since it’s unlikely that she’d hit the booster minimum weight of 50 pounds for another couple of years.
Six Years Old

radian 3RX – forward facing 6 year old
This model is newly 6 years old and 49 inches tall. When we started writing this review, she weighed 50 pounds fairly consistently, but a winter cold has affected her appetite, and she is currently weighing in at 48.5 pounds. She is using the top harness position and the outer crotch buckle position.
Diono radian 3RX outgrown forward facing by torso height
In this closeup picture, we can see that her shoulders are very much AT the top harness position of the radian 3RX. She will outgrow this seat very soon by torso height while well under the stated harness limits, and unfortunately currently is too light to use the booster mode. This model need either a combination seat with a higher harness height, or a dedicated booster with a 40 pound minimum weight.
Converting to Booster Mode
Before we explain how to convert this seat from harness mode to booster mode, it’s worth noting that actually using the radian 3RX in booster mode has a pretty limited lifespan. The child must weigh at least 50 pounds and be short enough that their shoulders are below the fixed-position belt guide. This translates to a short child who is on the heavier side for their height.
Converting the Diono radian 3RX to booster mode
To remove the harness:
- Unzip the back of the seat cover to access the harness. Remove the harness from the splitter plate.
- Pull the harness straps out from the back of the seat. Remove the harness pads, chest clip, and buckle tongues.
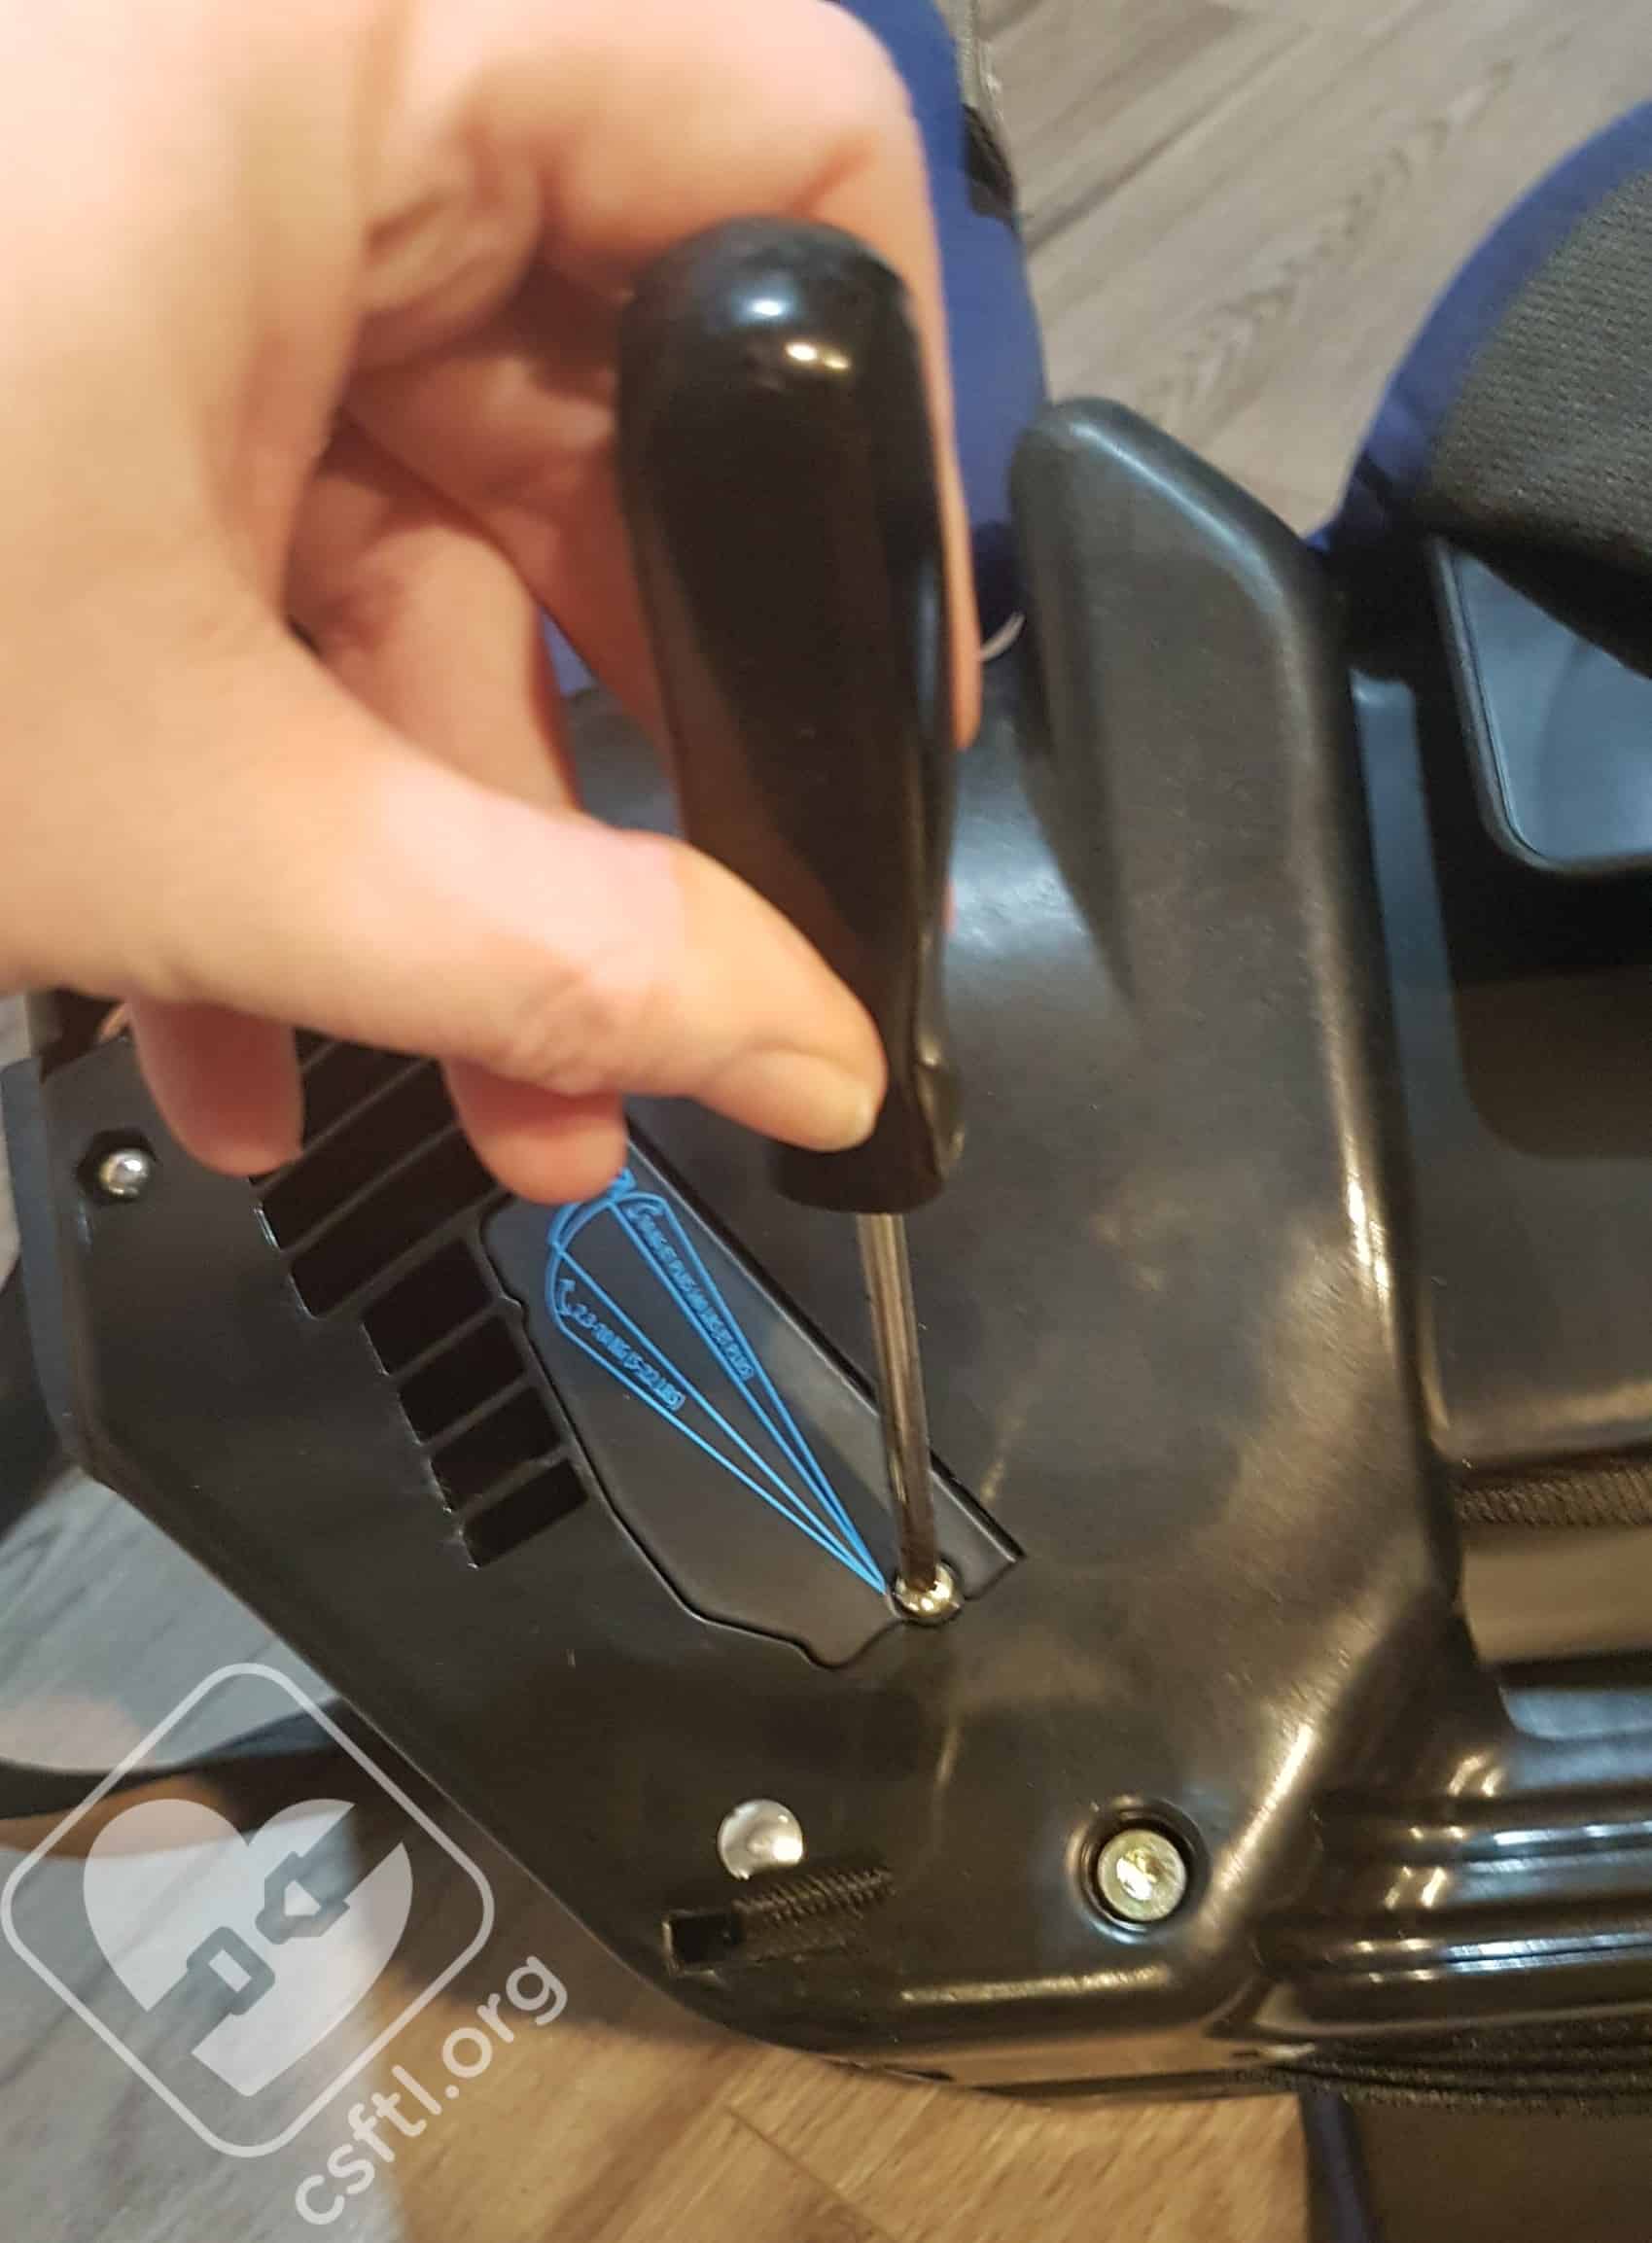
- Using a Phillips head screwdriver, remove the screws from the red panels on the outside of the seat. Remove the access panel to allow access to removal of the harness straps from the seat. Note: there are no red panels on the radian 3RX. The panels are now black, and we have shown where they are located in the photo to the left.
- Remove the crotch buckle from the seat as the final step. Note: this step is not in the manual but we reached out to Diono’s customer service who confirmed that the crotch buckle should be removed
- Store the harness and accessories in a safe place in case the seat is ever converted back to harness mode
Fit to Child – Booster Mode
The radian 3RX manual has very specific instructions for booster mode:
WARNING: Make sure vehicle seat belt has properly retracted before use
To use the seat in booster mode:
- Have the child sit in the seat with his/her back flat against the back of the booster seat
- Thread vehicle’s shoulder belt through the booster belt guide and over seat
- Buckle the vehicle seat belt. Be sure the shoulder belt lies across your child’s shoulders, between the neck and edge of the shoulder. Be sure the lap portion of the vehicle seat belt goes under the side nubs and the belt lies low across your child’s hips
The manual also states that in booster mode the “Child MUST be secured using ONLY the vehicle Lap and Shoulder Belt. Child MUST weigh at least 22.7 kg (50 lbs), with shoulders positioned at the 4th slot and remain in this position for the entire ride. (If needed, adjust the headrest by positioning it accordingly by sliding it up or down.)”
Again, there is no adjustable headrest on the radian 3RX or 3RX models.
We reached out to Diono’s customer service regarding the requirement that the child’s shoulders must be positioned at the 4th slot. Their reply was that to use the radian 3RX’s booster mode “the child must reach both the weight and height limit… [and] the child must be 50lbs and has outgrown the top harness slot”. The radian 3RX has five harness slot, not four, so this contradicts the instructions in the manual.
Note: both of our booster mode models do NOT fit this seat in booster mode properly. Normally, we make every effort to avoid showing misuse but it’s very rare to find a model who fits this seat in booster mode so we’re showing a model who’s ready to ride in the seat, but under the weight limit and a model who’s within the stated height and weight limits, but too tall to use the seat in this mode.
Six Years Old

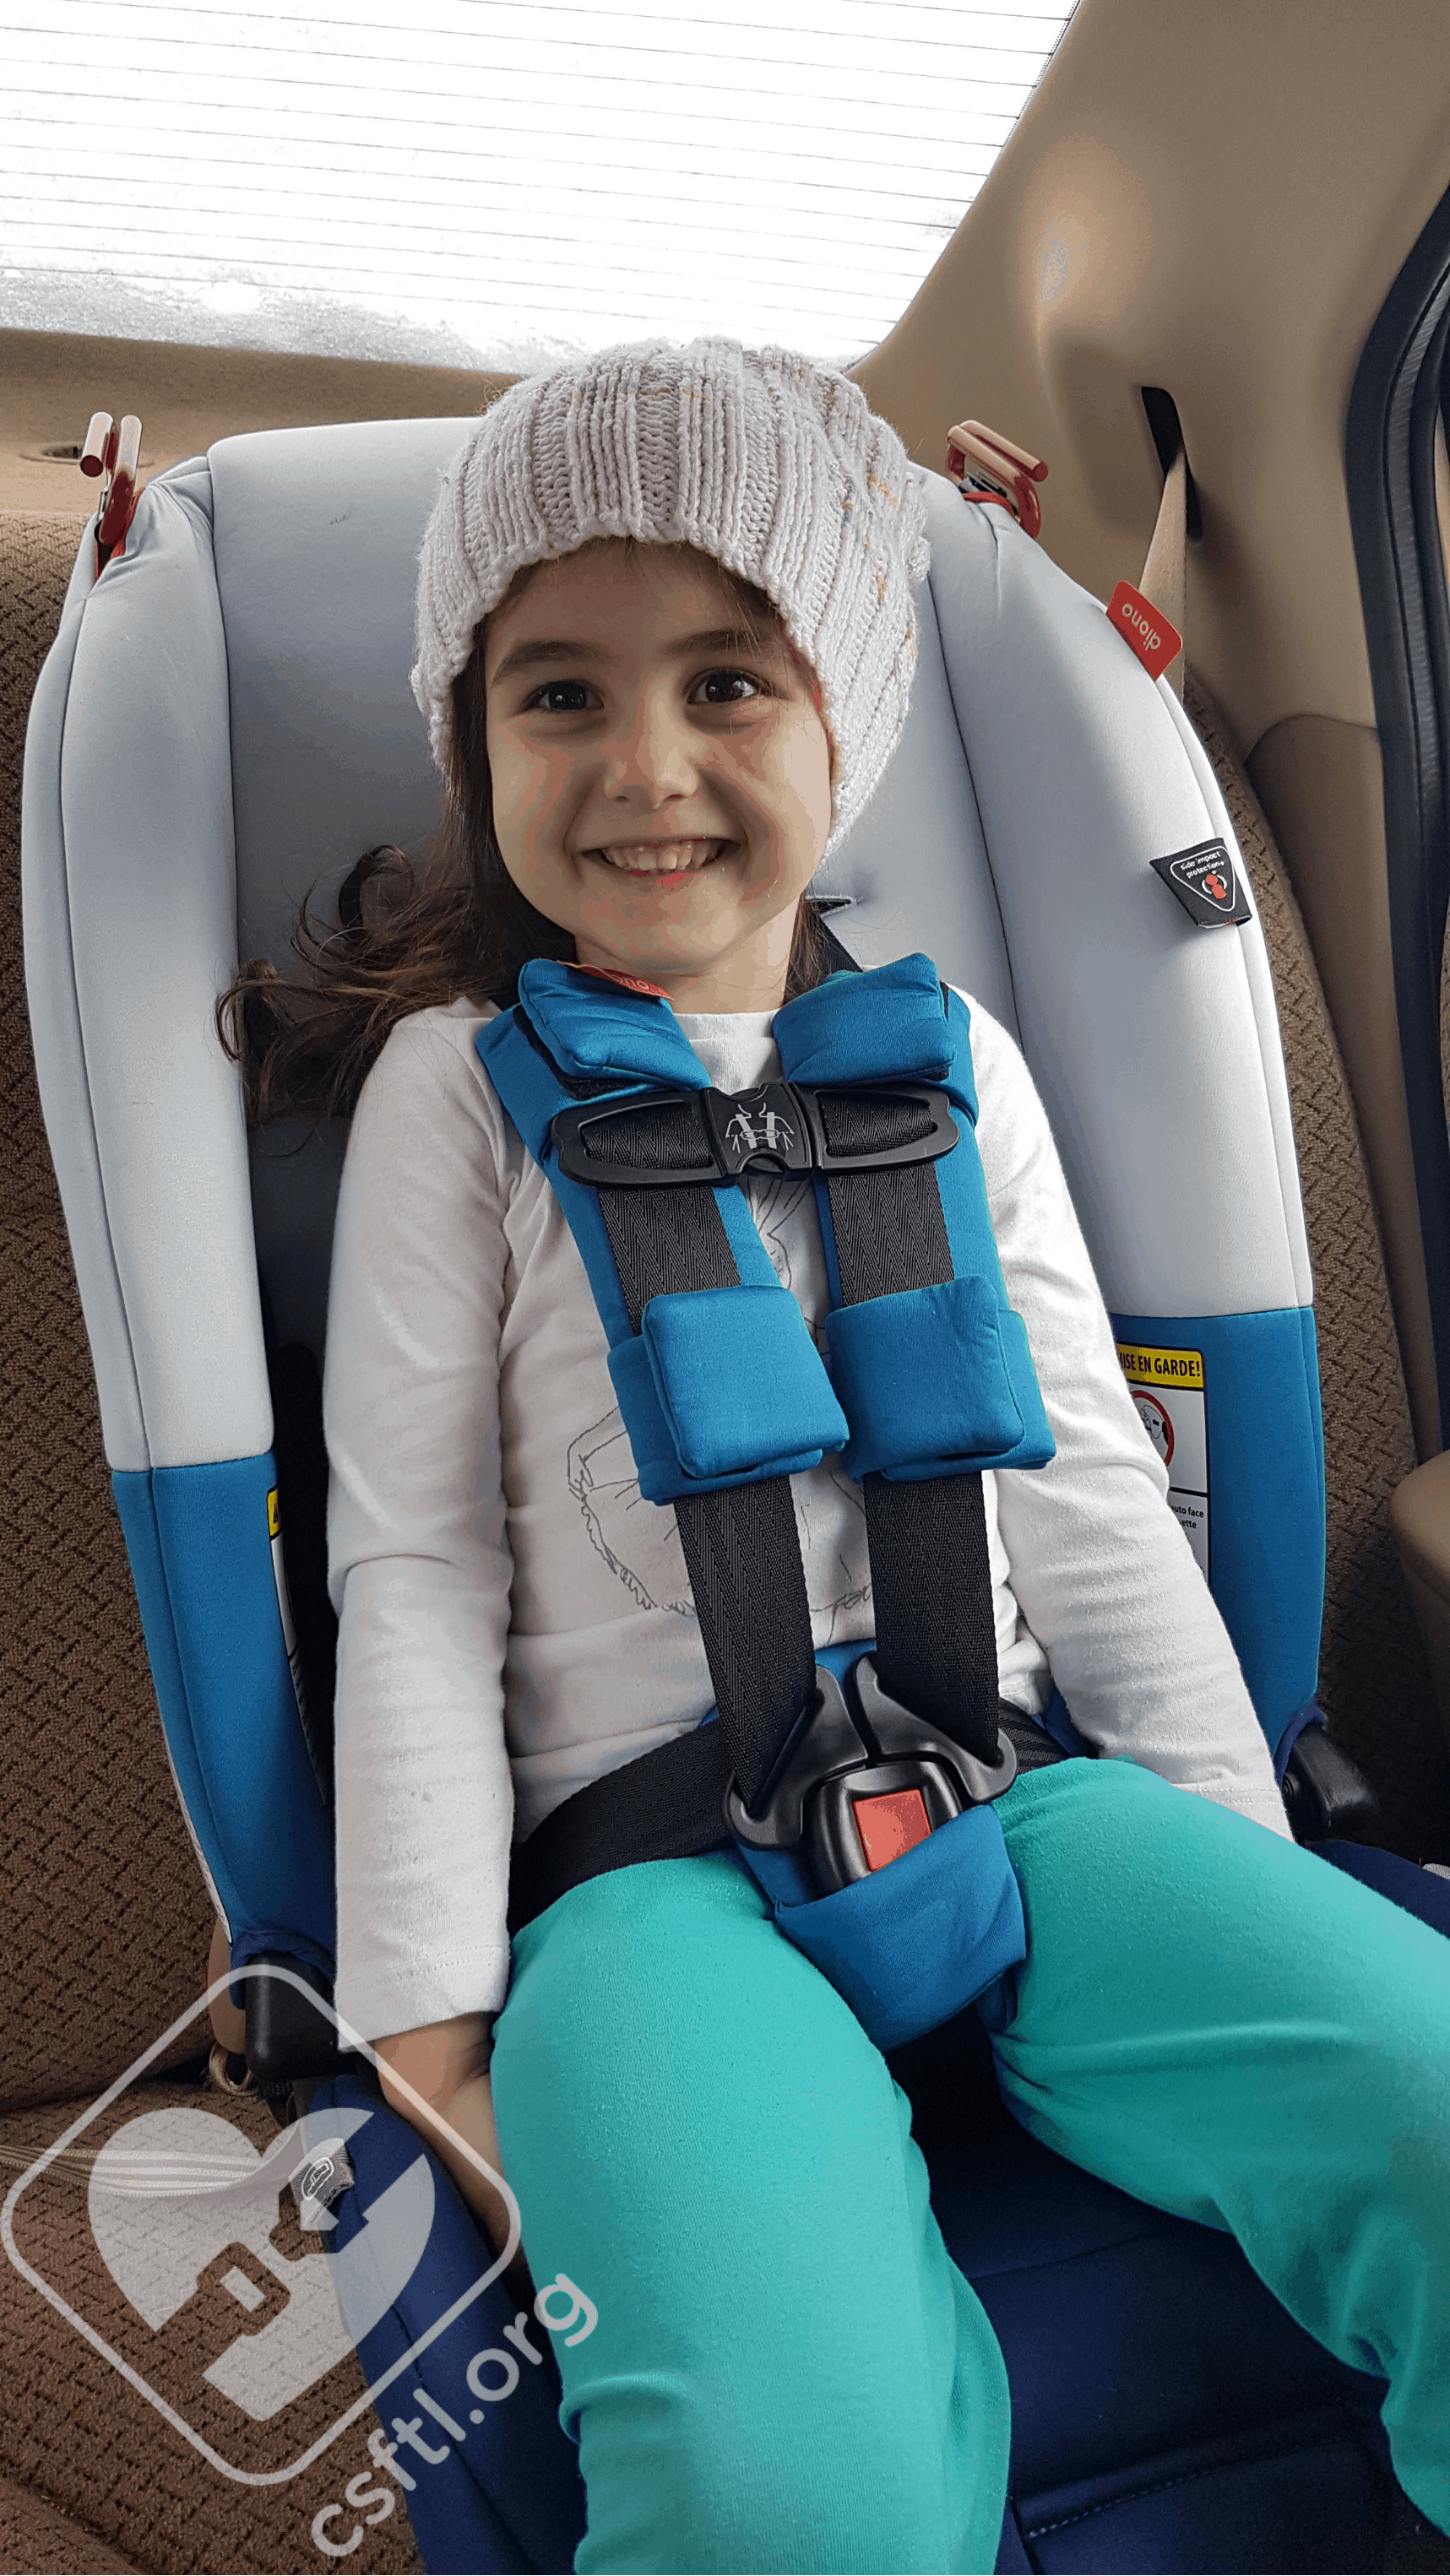
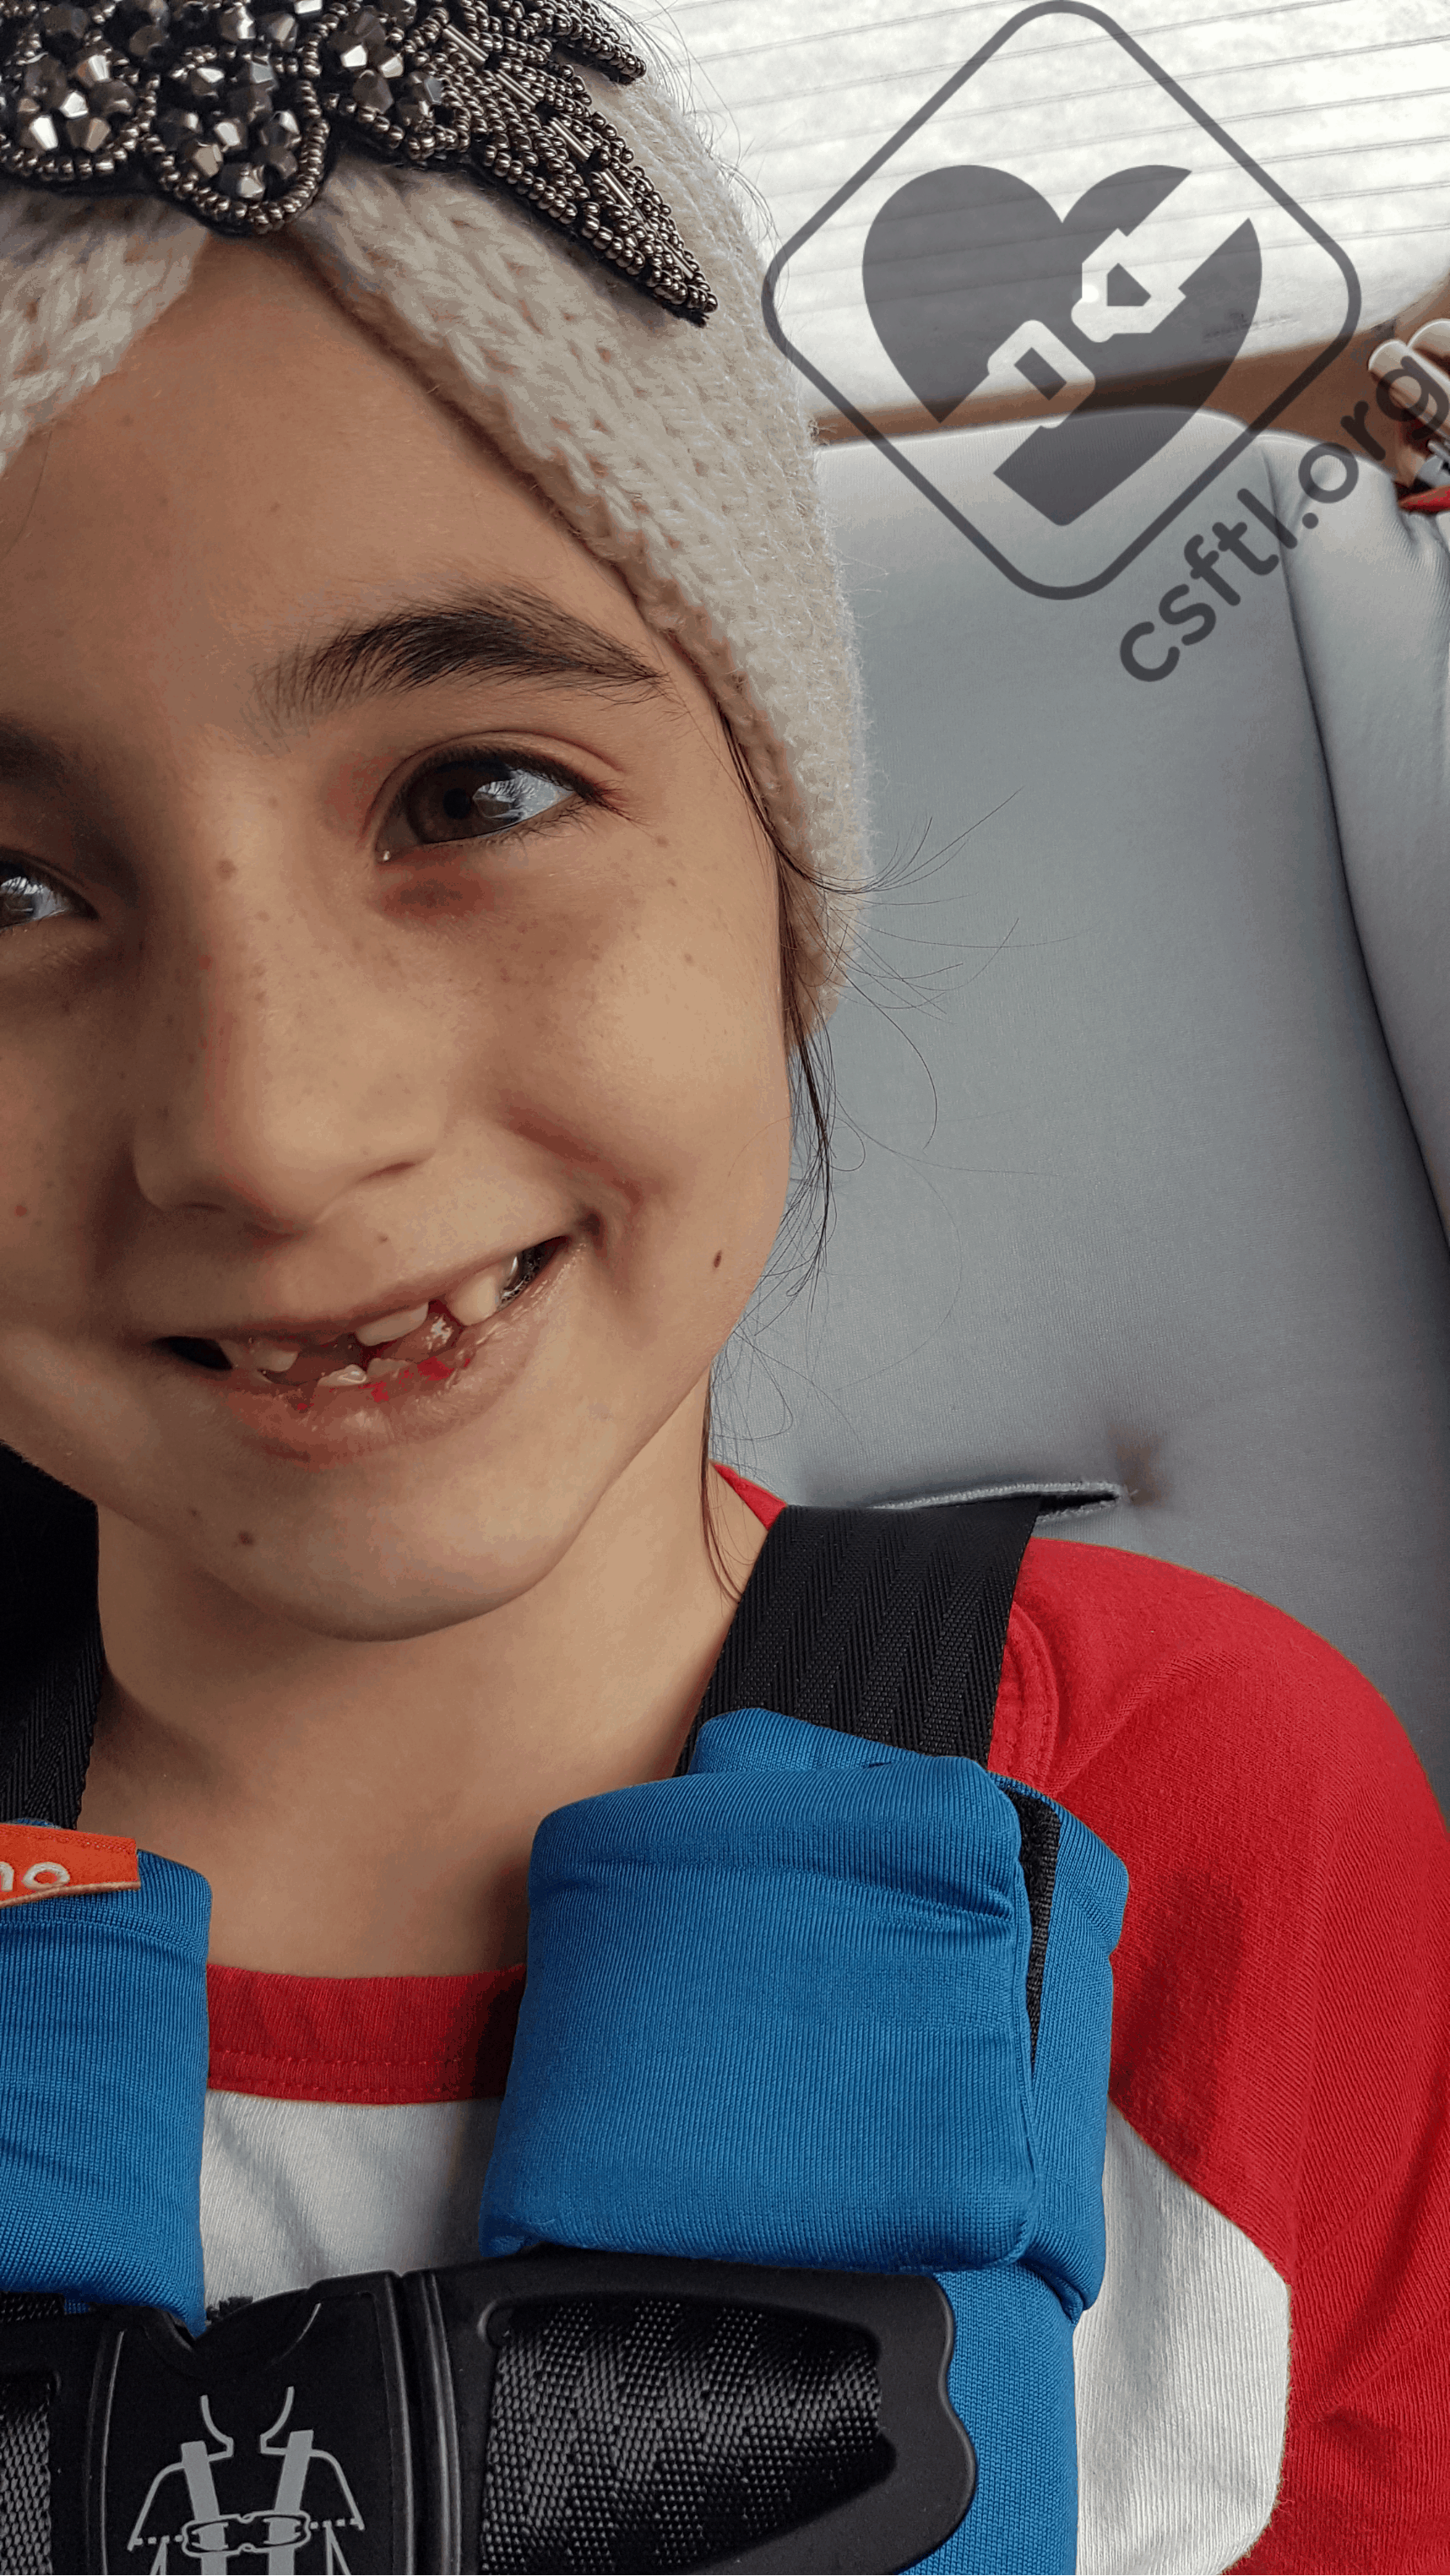
radian 3RX – 6 year old in booster mode
Our 6 year old model remains 49 inches tall and, unfortunately, weighs 48.5 pounds. Because she is right at the harness limit and hopefully after a few good meals will meet the 50 pound booster weight minimum, we tried her out in booster mode to check the vehicle seat belt fit in booster mode on her. She was unable to buckle herself into the 3RX in booster mode because the lap belt guide is very tight and she found it too difficult to shove both the lap and shoulder portions under the side nubs (yes, that is what they are called in the manual).
radian 3RX – belt retraction issues in this vehicle
As we can see, the lap belt fits her fairly well. It’s low on her hips, touching her thighs. The shoulder belt, however, is positioned on her neck and is not in a safe or comfortable position for her. We also found that there was a significant retraction issue with the 3RX in this vehicle (2001 Chrysler Cirrus). When our model leaned forward, the vehicle seat belt did not retract through the shoulder belt guide at all when she sat back up.
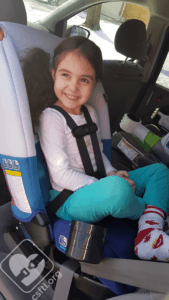
Eight Years Old
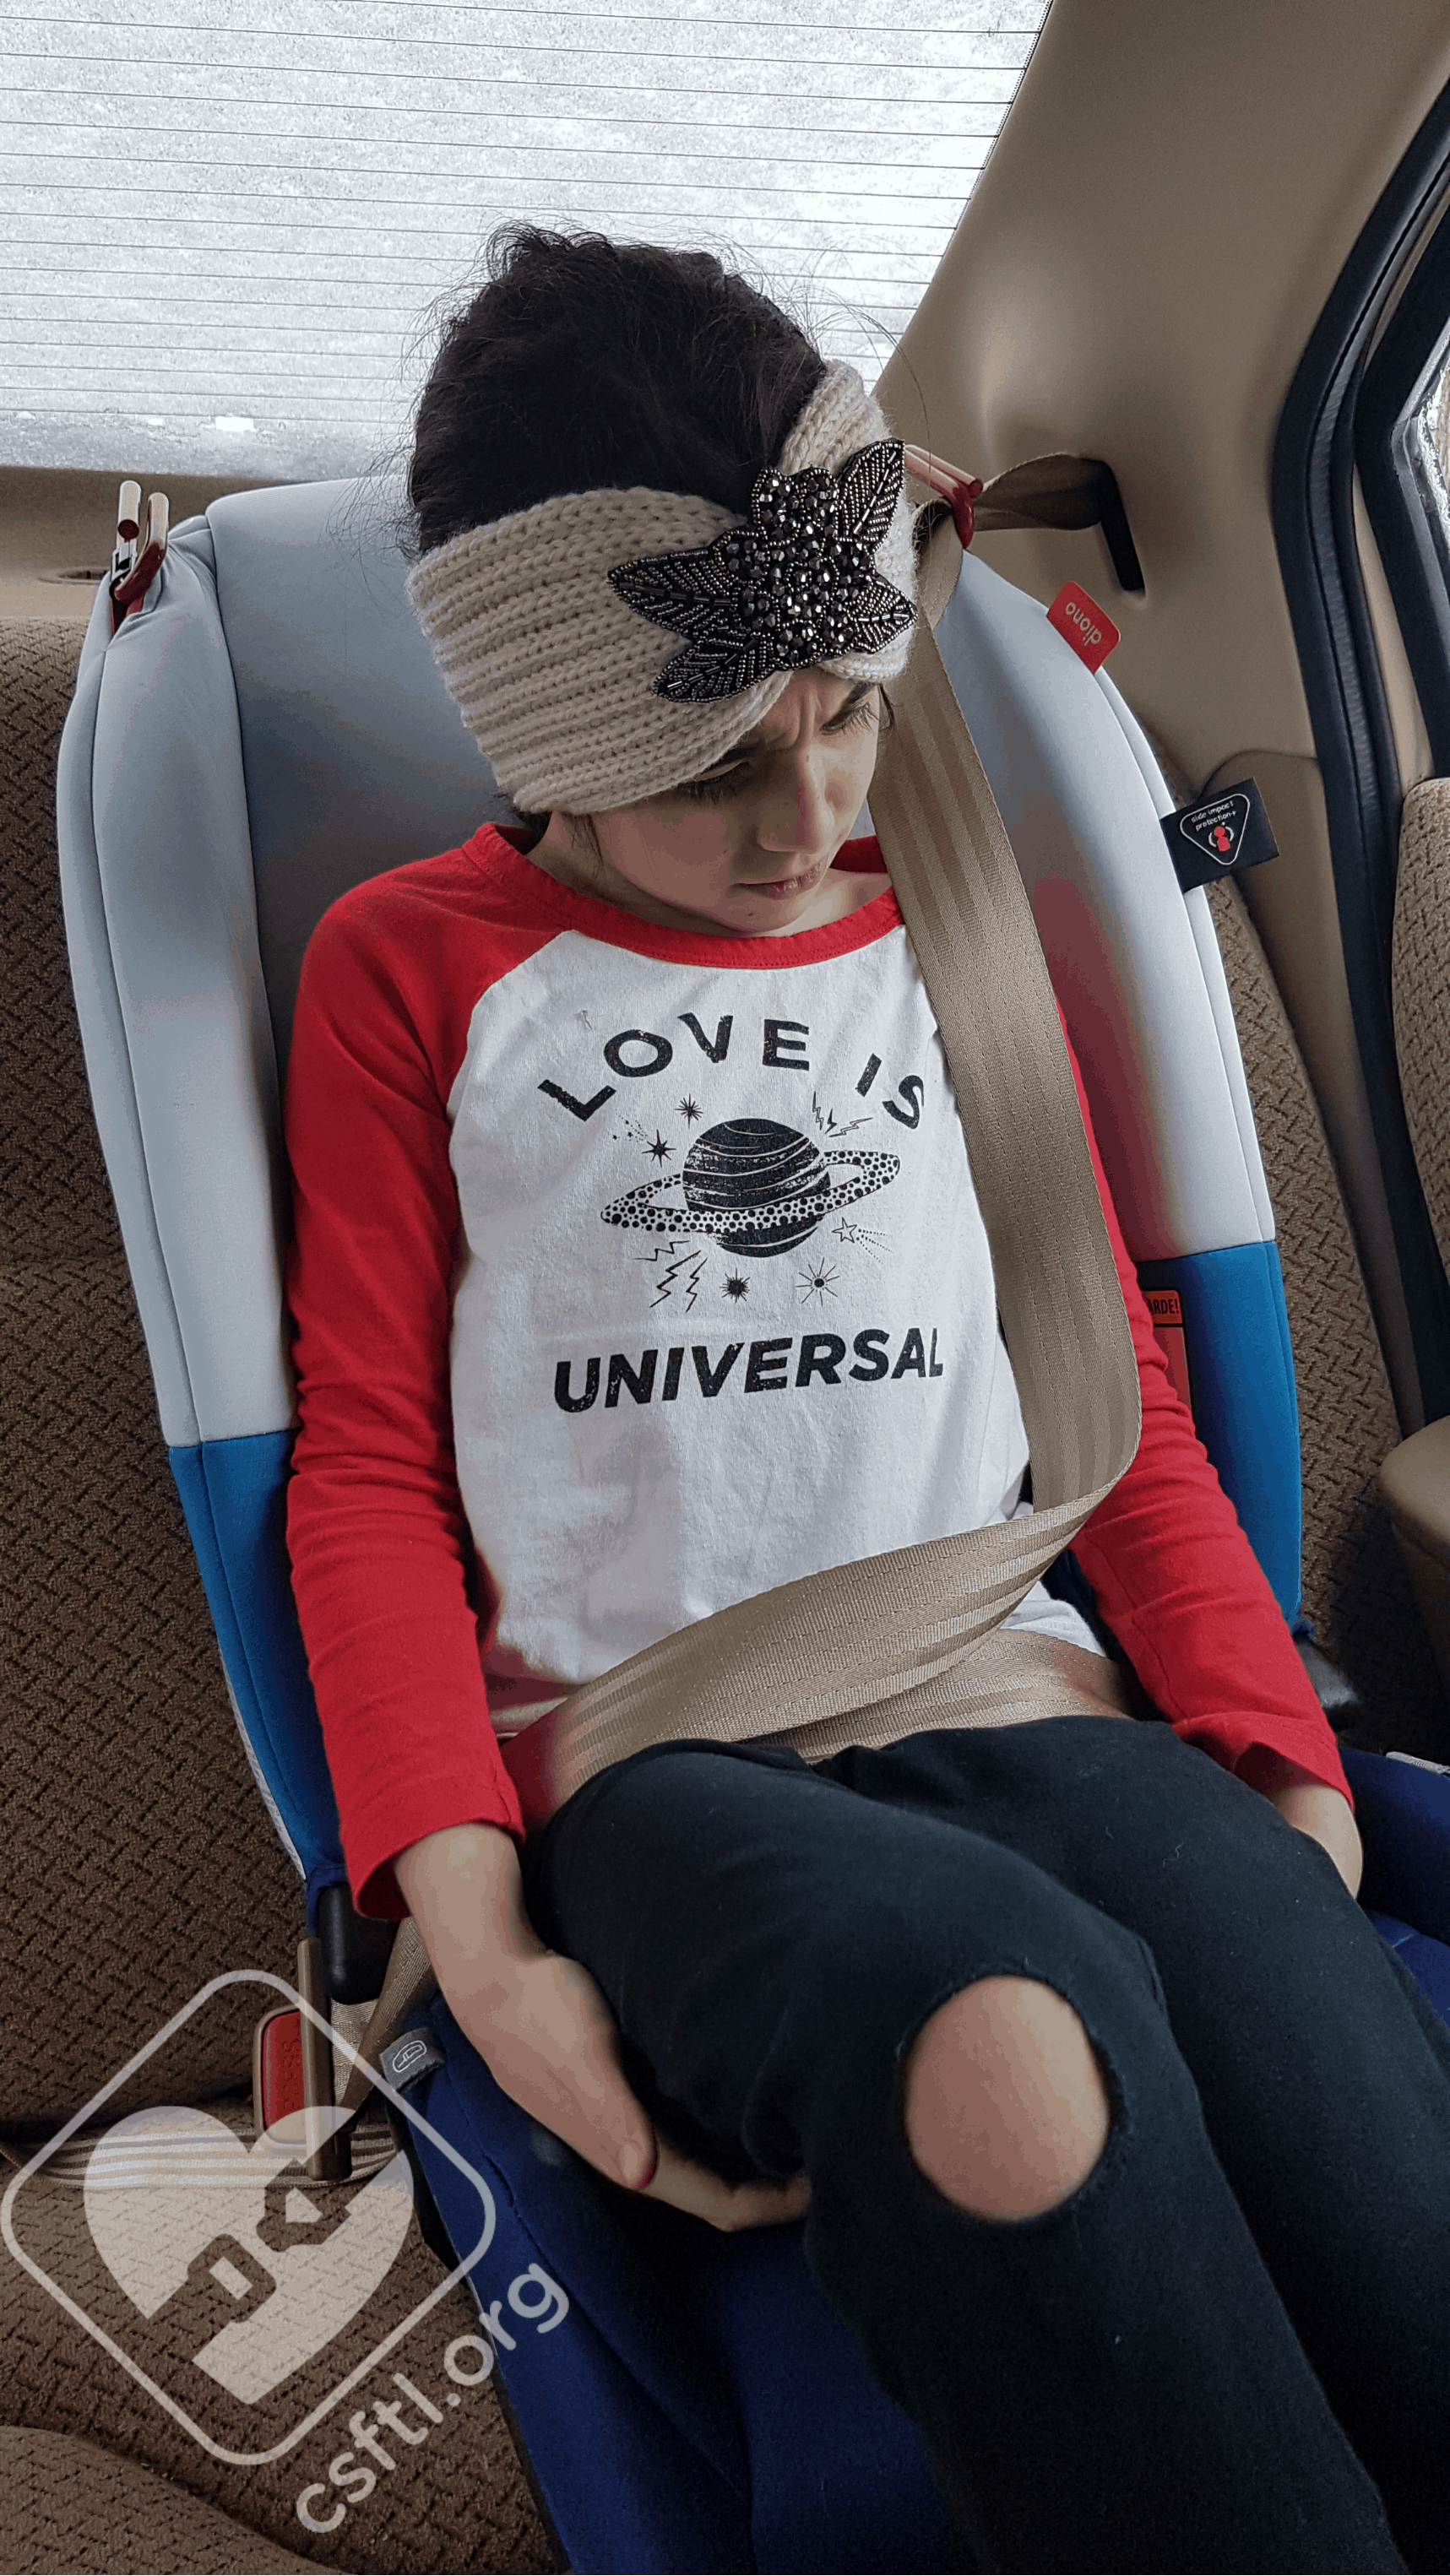
radian 3RX – 8 year old in booster mode
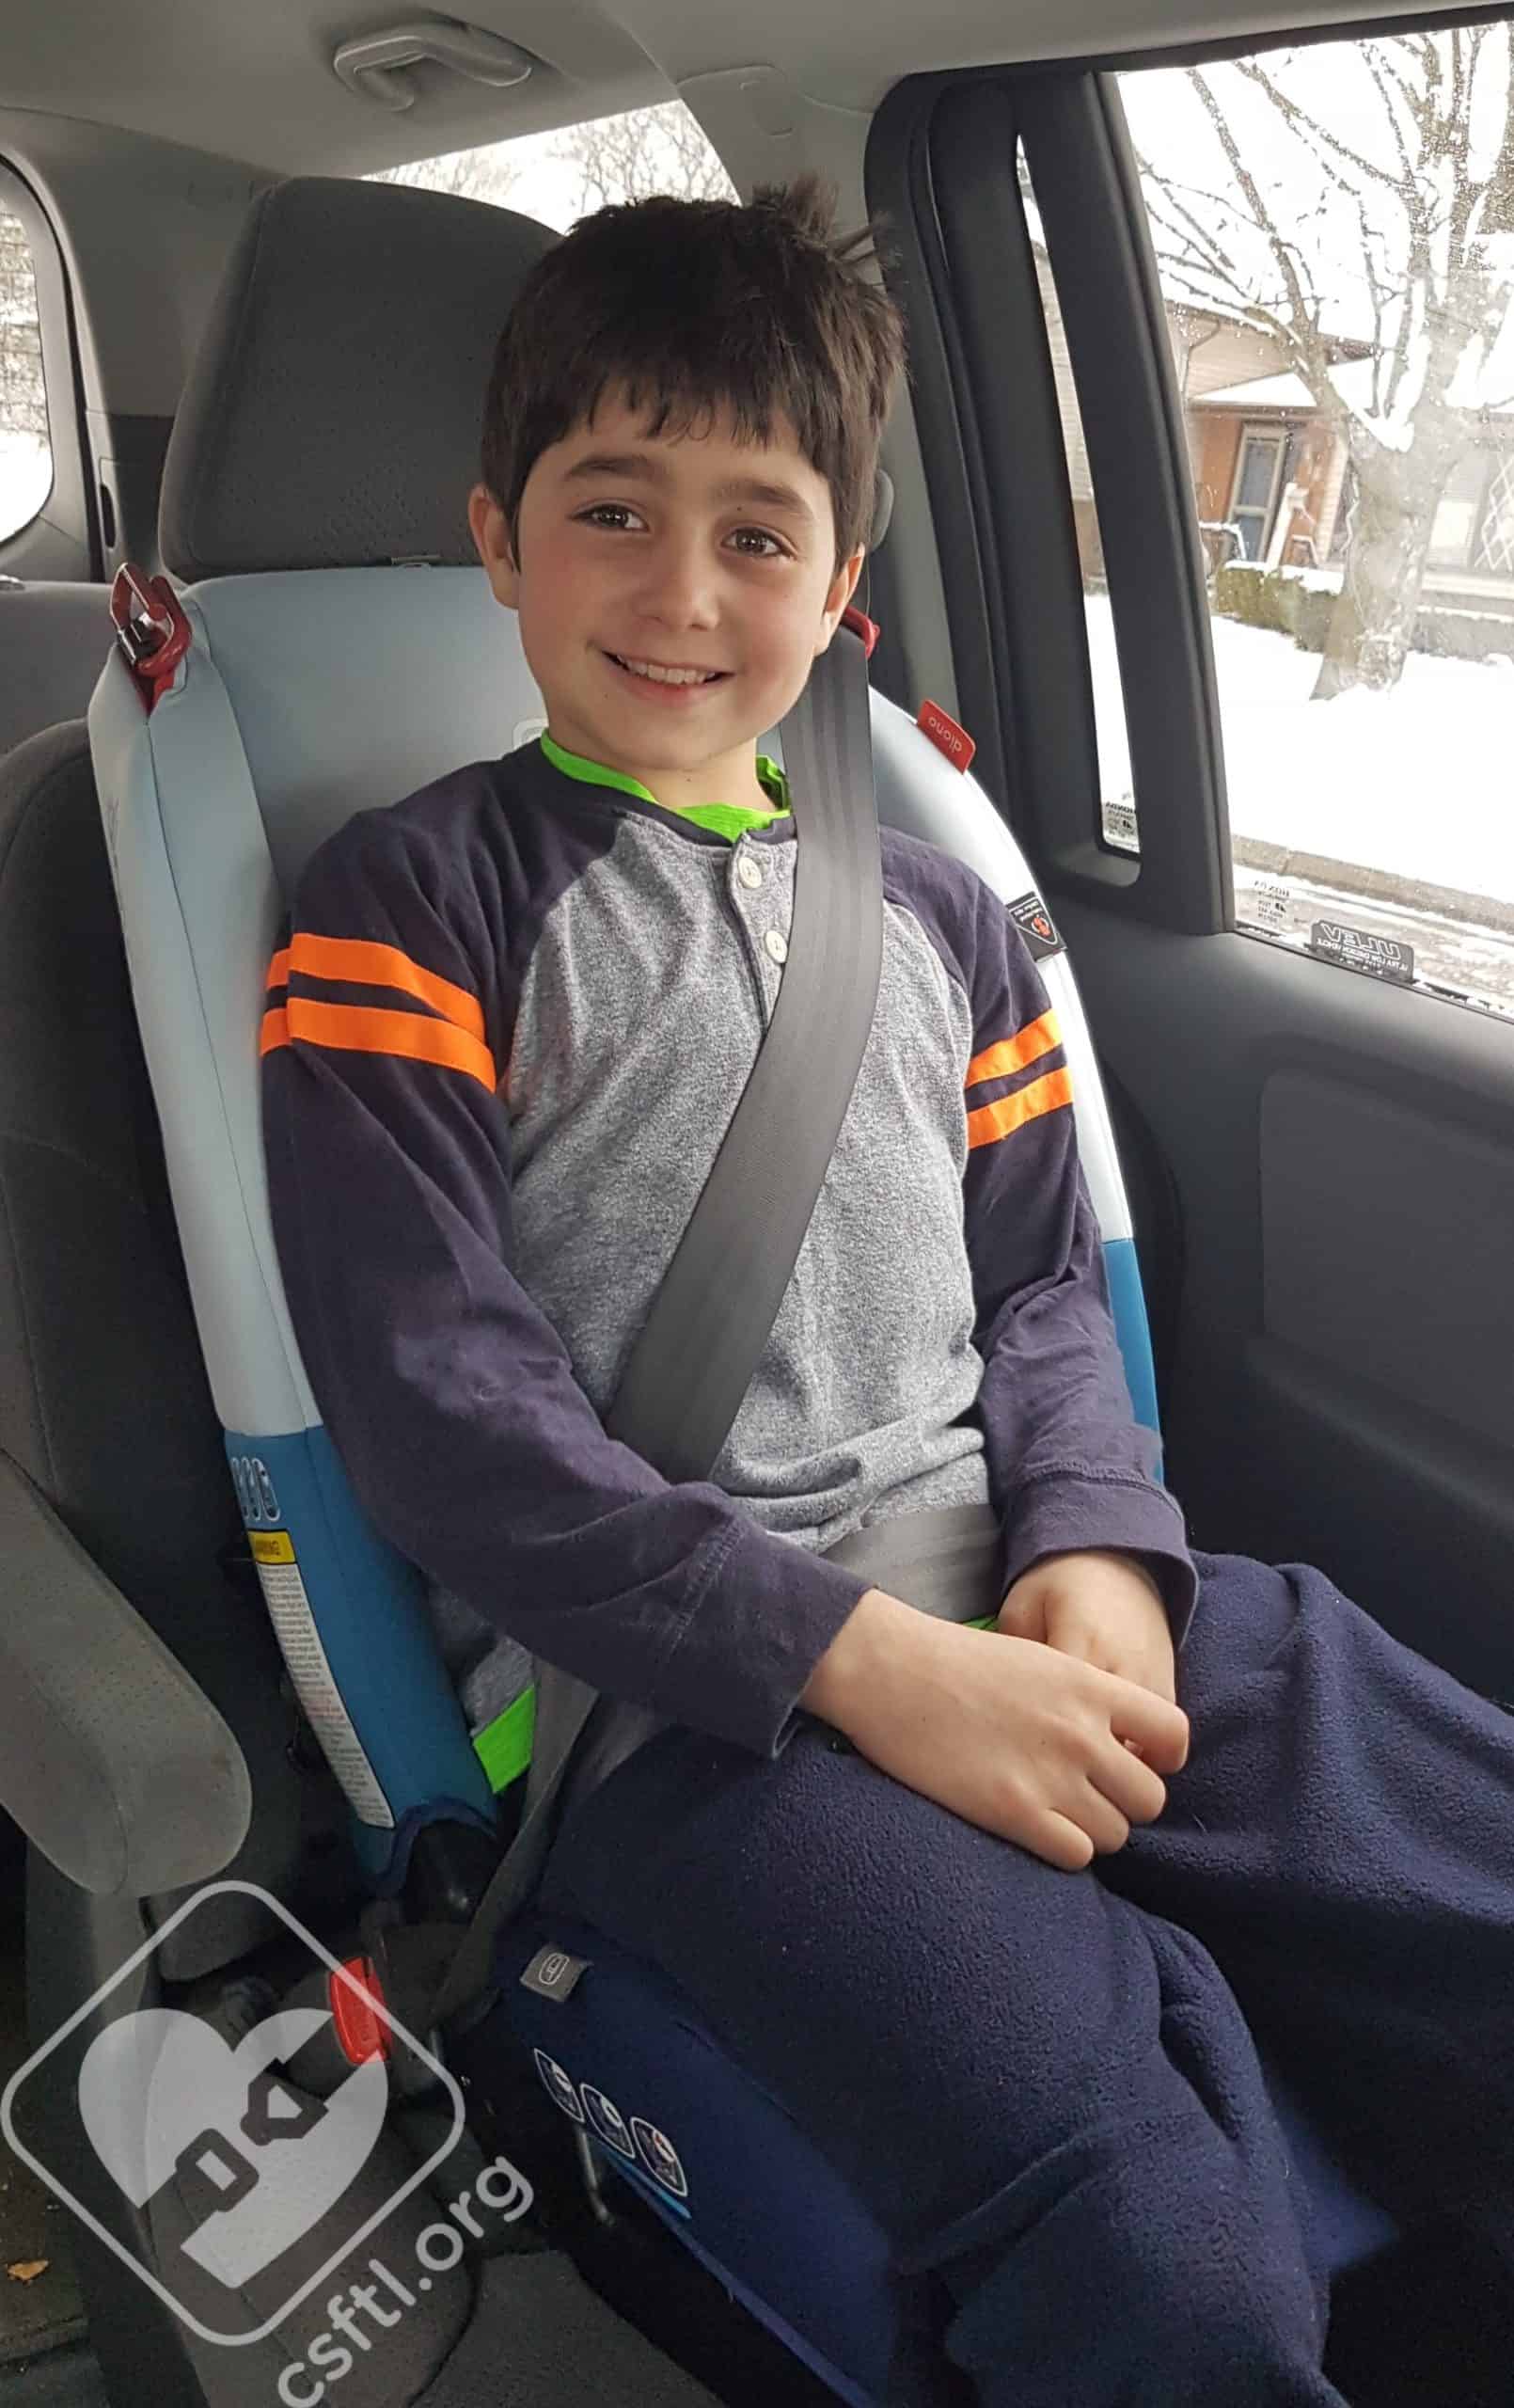
Our 8 year old model is 53 inches tall and weighs 68 pounds. He is well within the radian 3RX’s stated booster limits of 57 inches and 120 pounds.
While the vehicle seat belt fit on our model is great, he unfortunately has outgrown the radian 3RX by torso height a long time ago. His ears are well over the back of the seat, which means he is not achieving a safe fit in this seat. He is looking quite squished and expressed multiple times that he was not comfortable in this seat. Based on this model, we have a very hard time picturing a taller and heavier child fitting in this seat safely or comfortably in booster mode.
We reached out to Diono’s customer service, who indicated that when using the radian 3RX in booster mode, the child’s ears do not need to be contained within the seat, and “what’s important in booster mode is for the vehicle seat belt to keep your child properly secured, as this is what keeps your child safe in booster mode.” We recommend that all passengers have support to the tops of theirs ears by either their child restraint or the vehicle seatback/headrest, so even though Diono approves booster riders not having whiplash support in their multimode seats, we wouldn’t recommend it.
Important Information: Where to Find
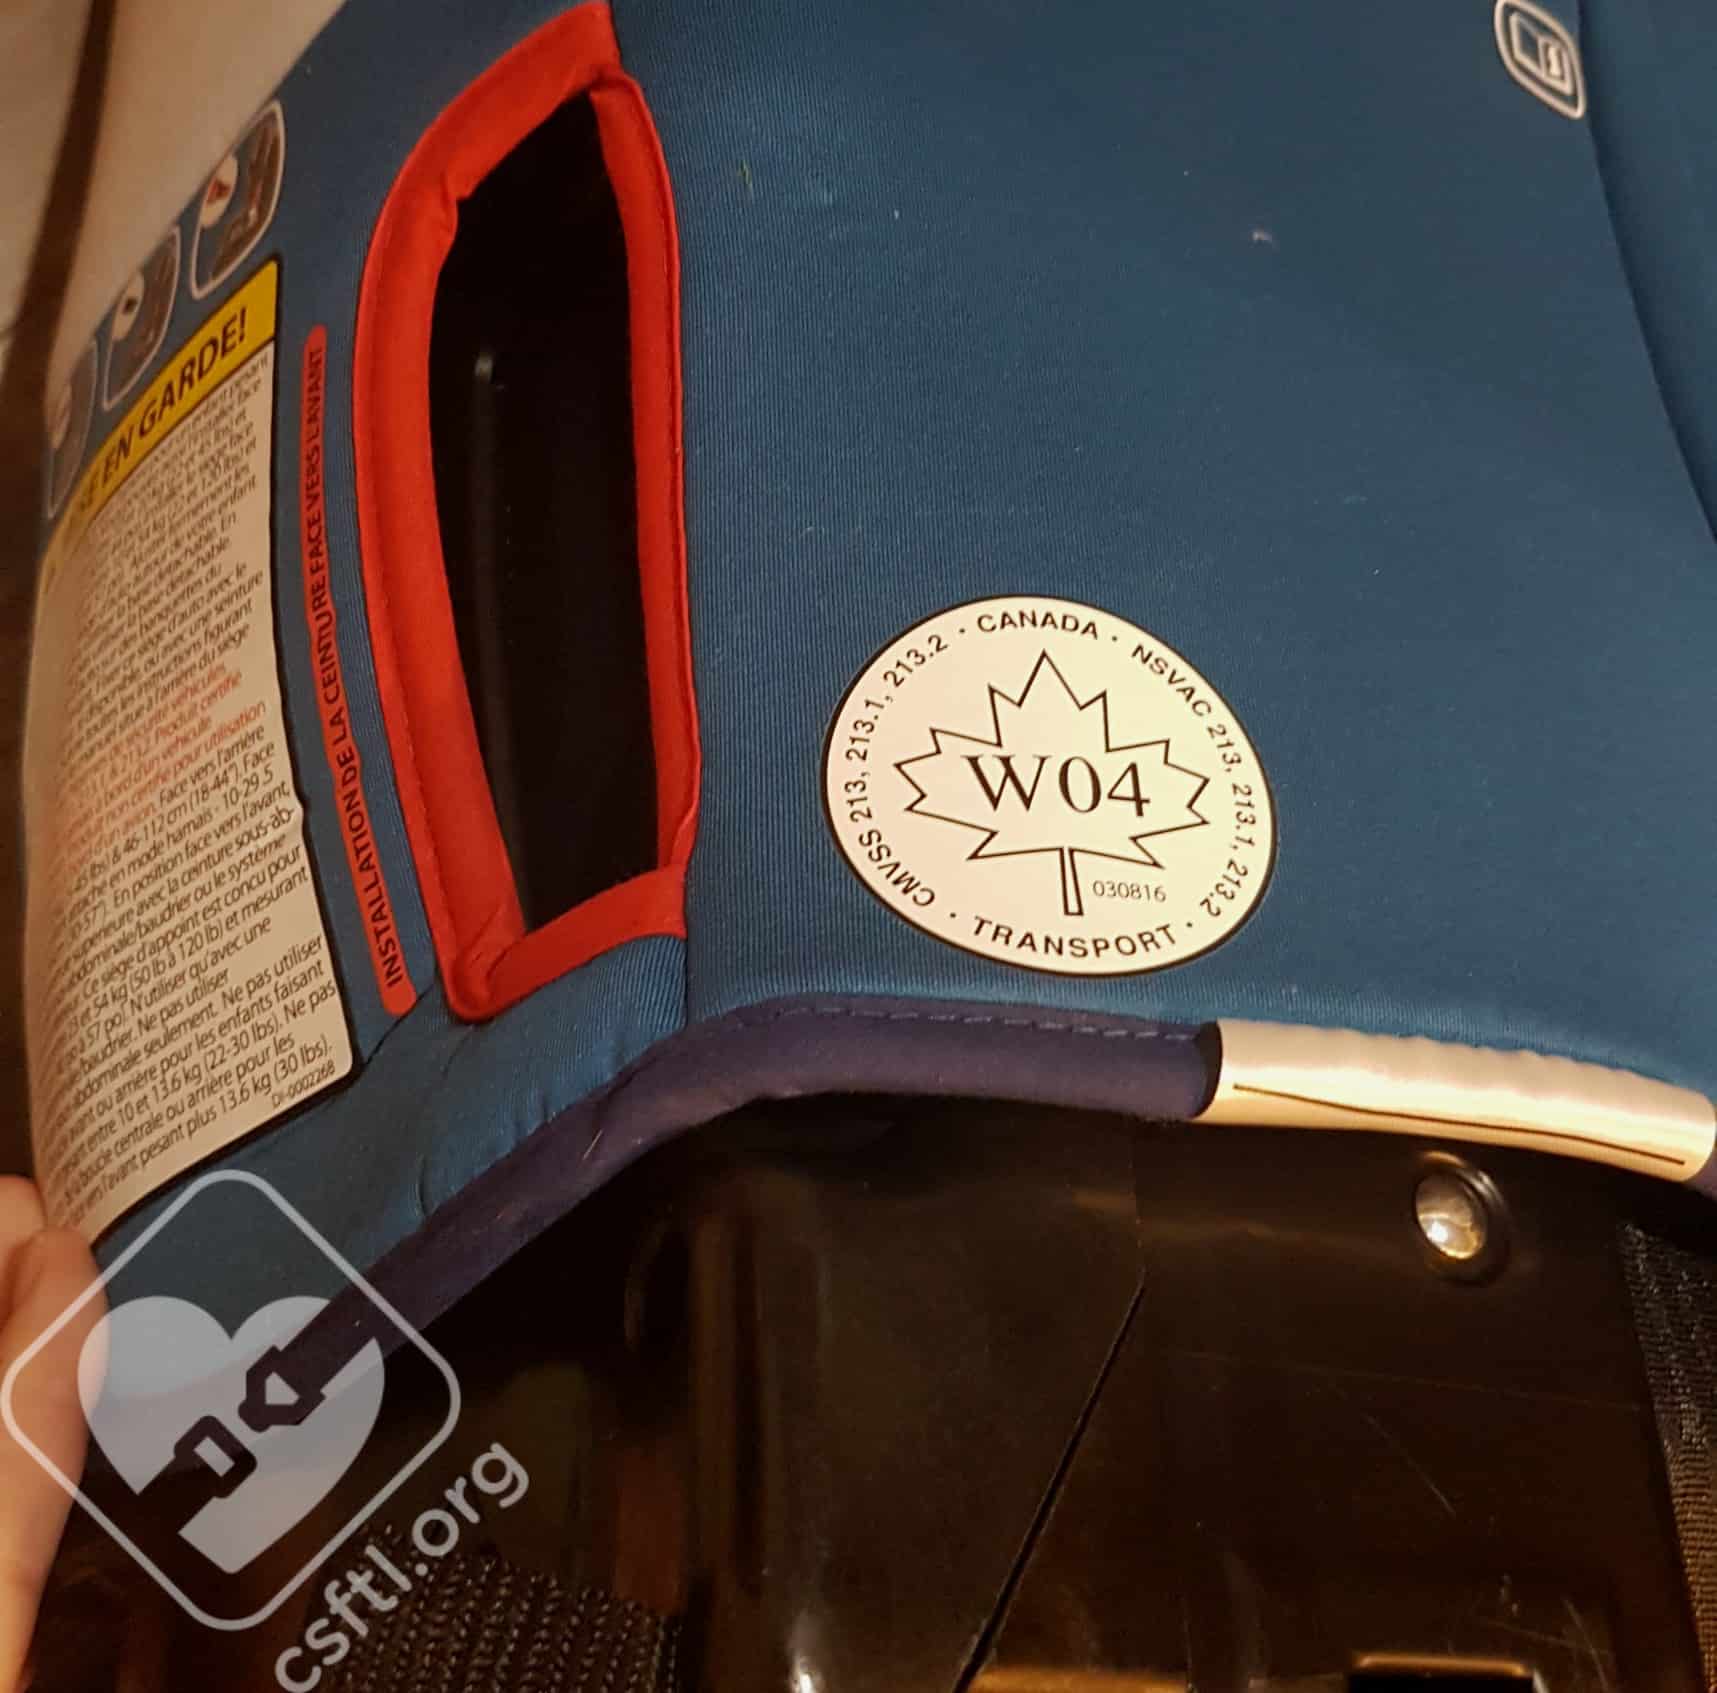
Diono radian 3RX National Safety Mark
National Safety Mark: located on the back cover of the seat
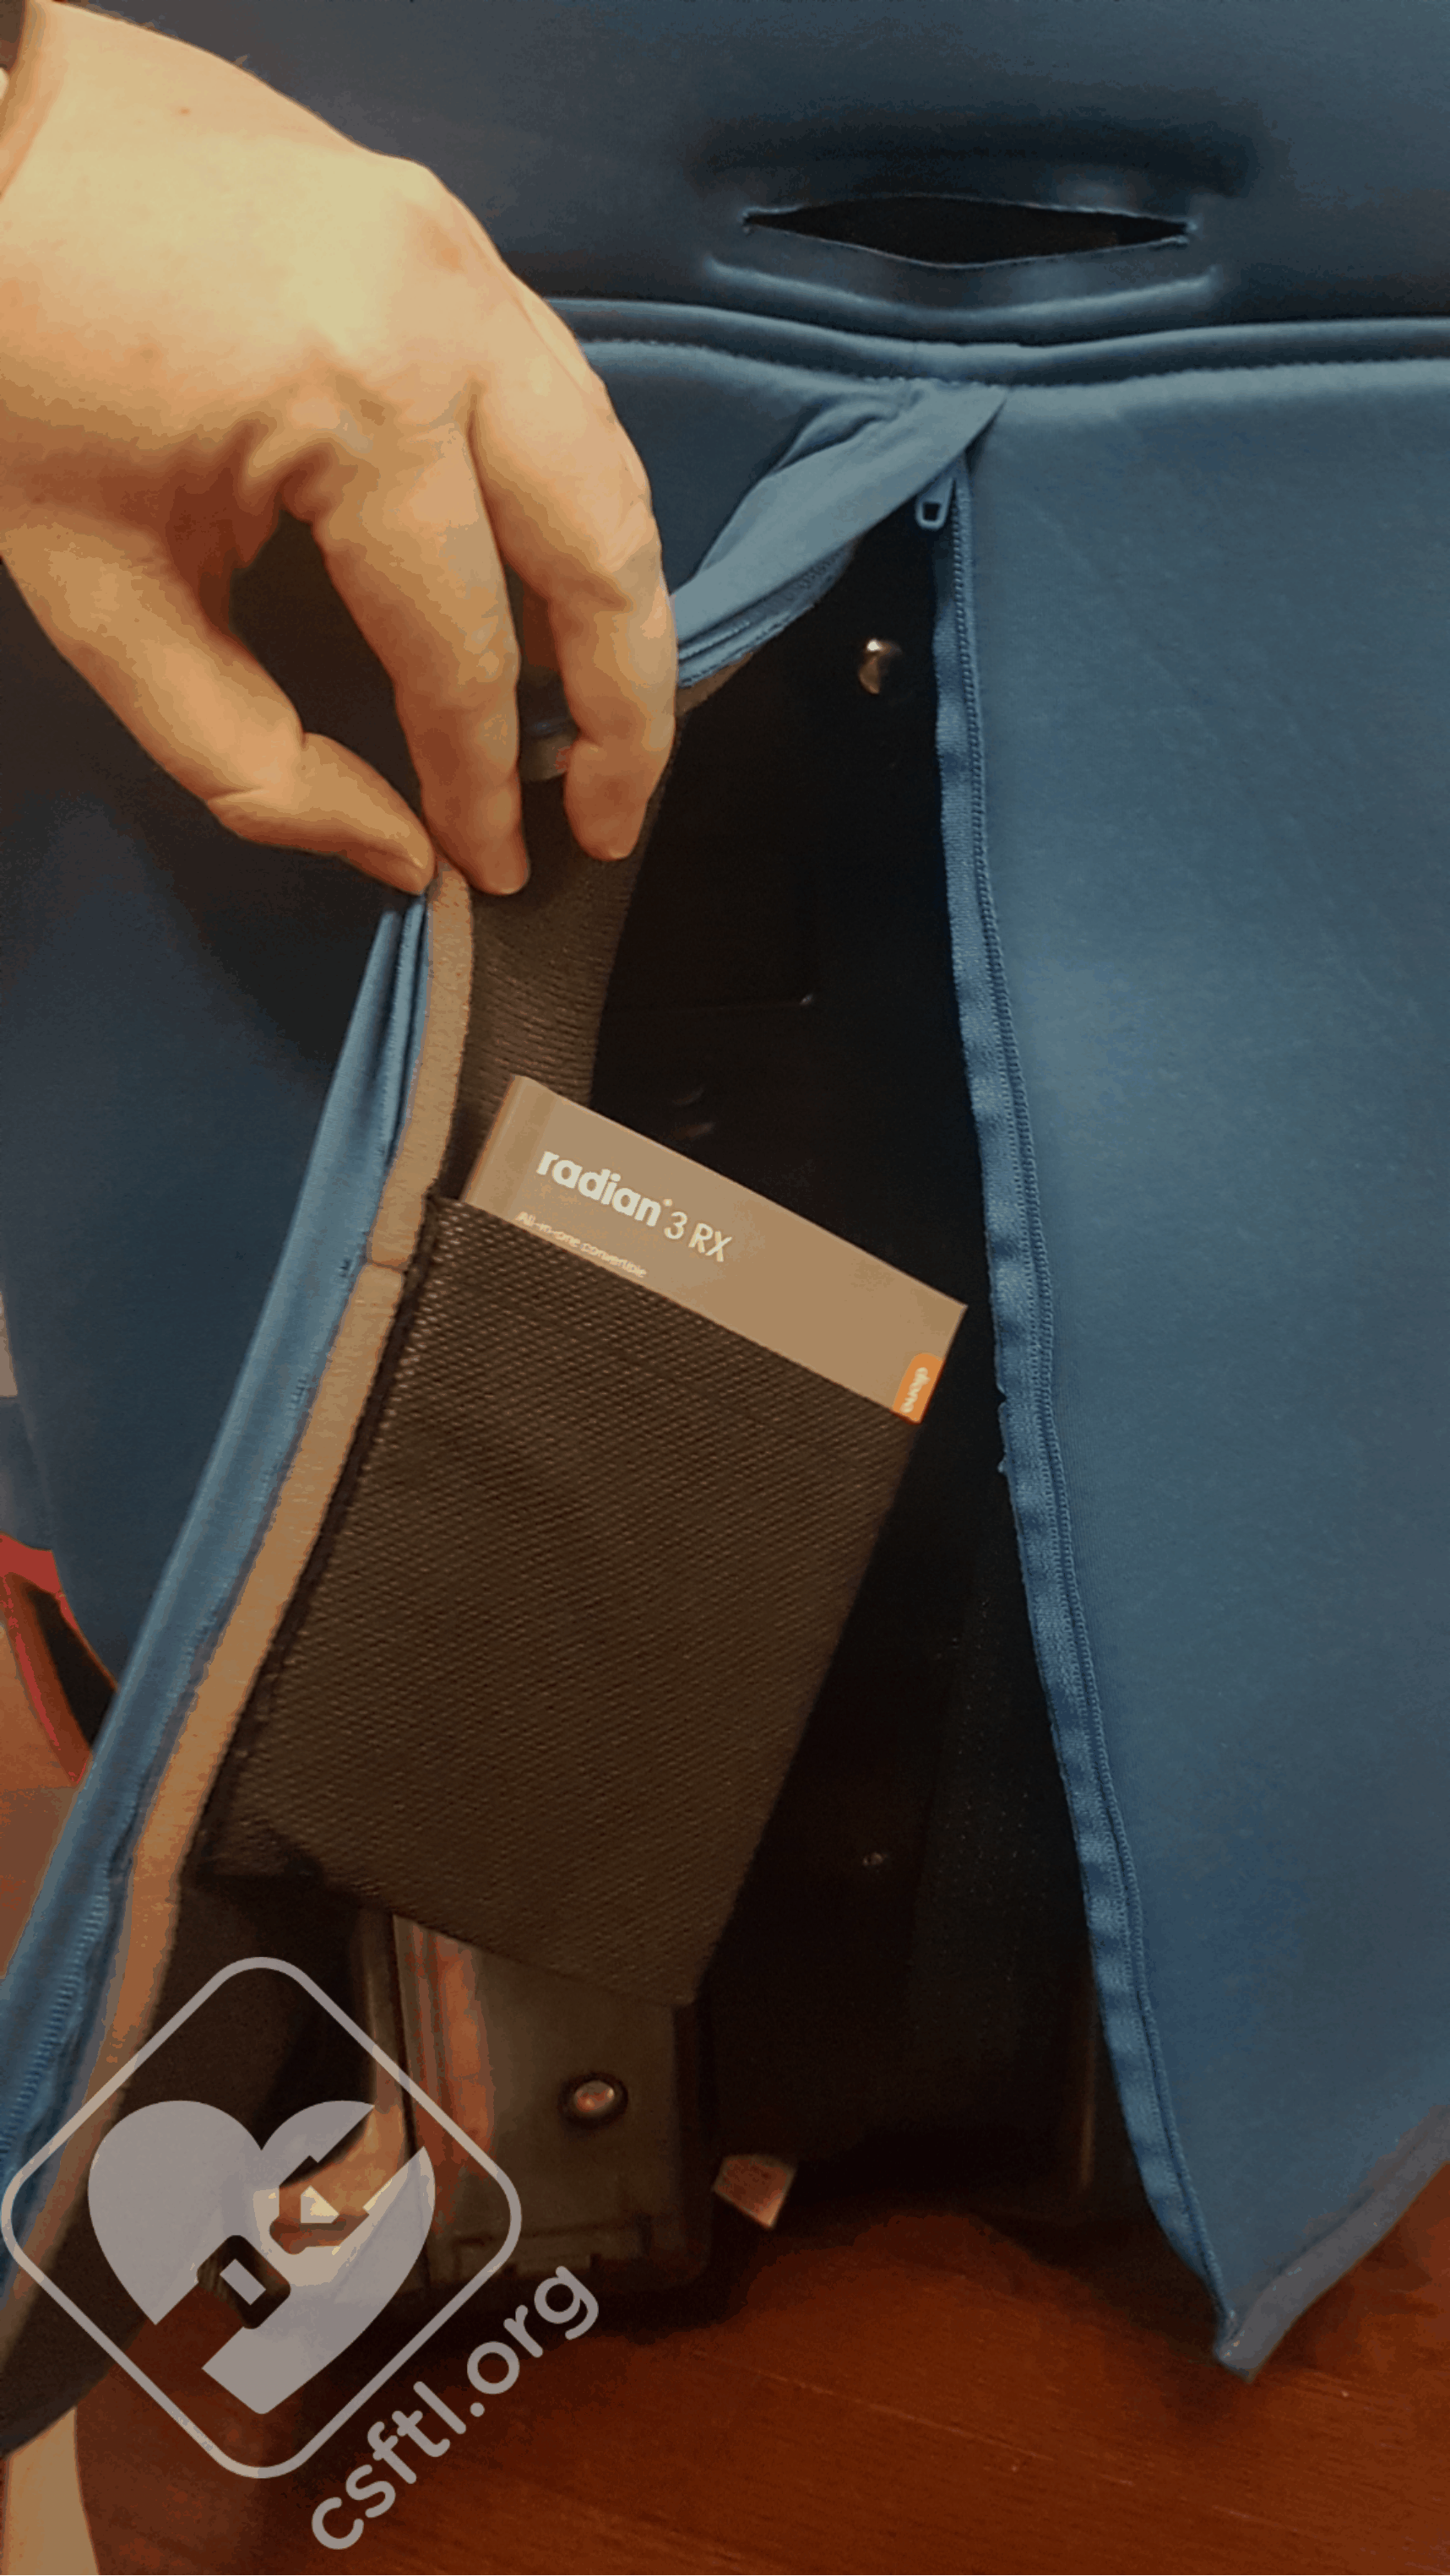
Radian 3RX manual storage
Manual Storage: unzip the cover at the back of the seat to find a handy manual storage pocket
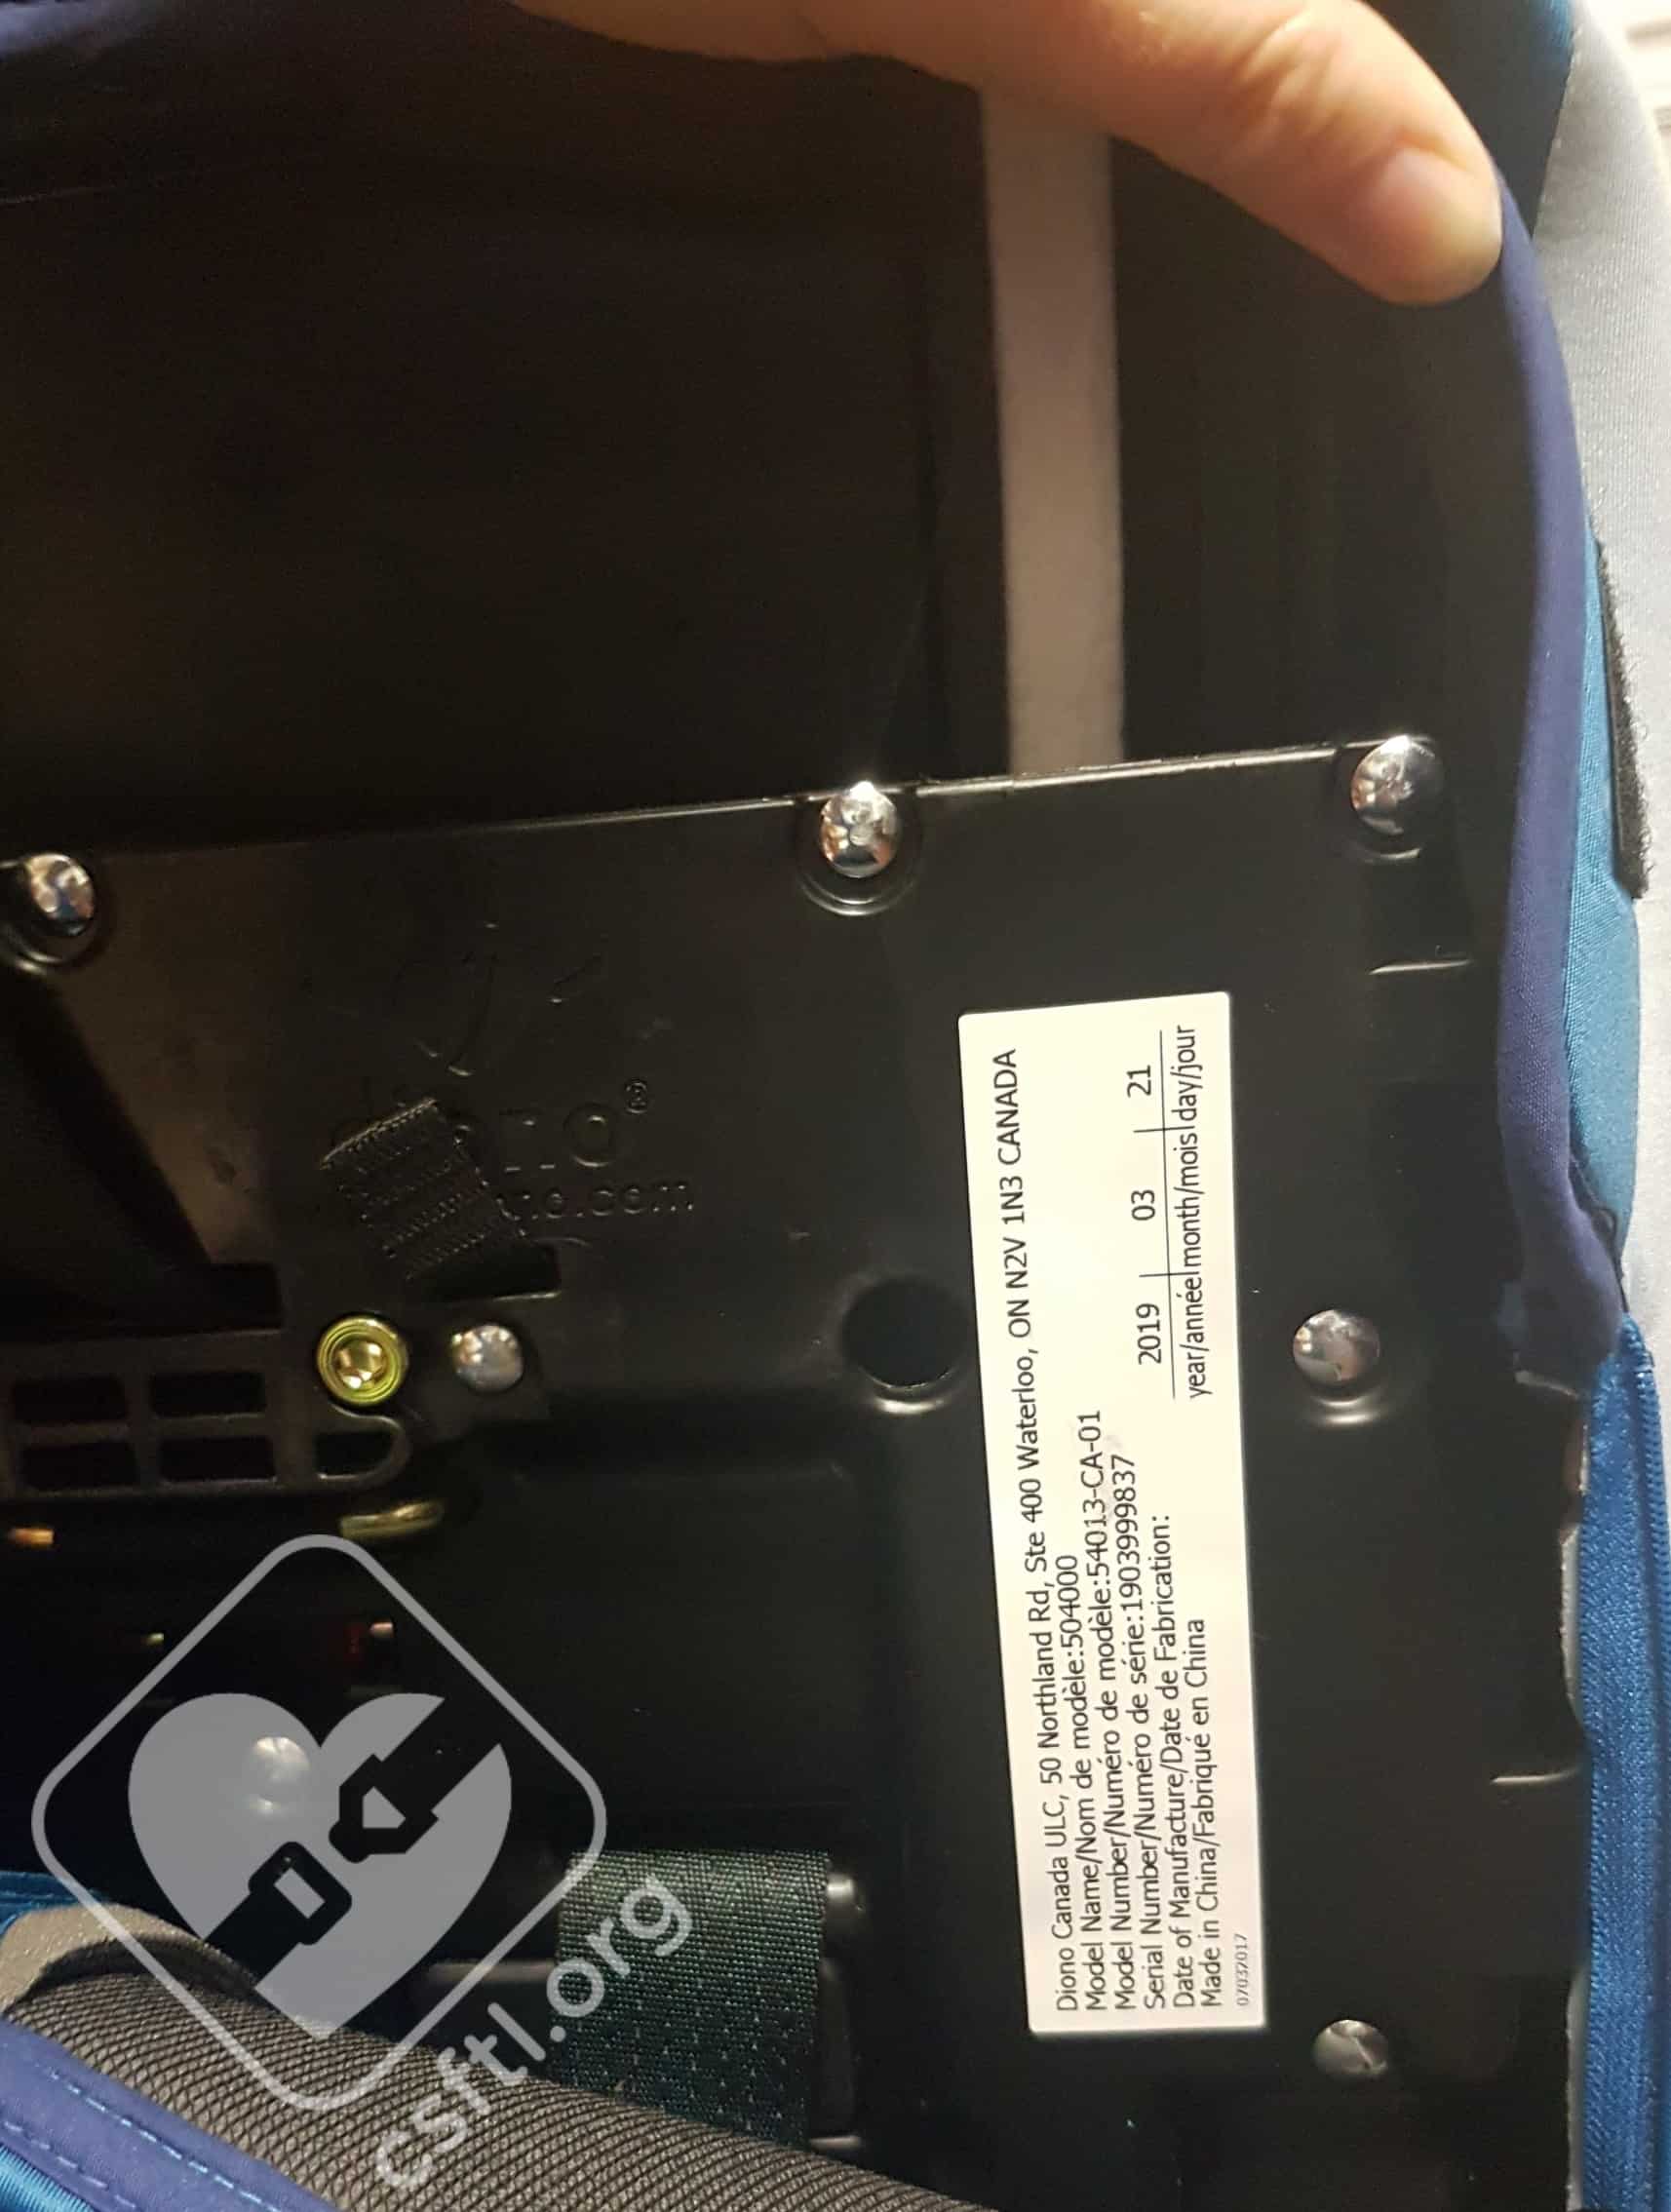
Diono radian 3RX date of manufacture label
Date of Manufacture Label: also located at the back of the seat, under the zipped up cover
Overall Thoughts
When this seat was first released almost 15 years ago, it provided a narrow option that was great for 3 car seats or booster seats across the vehicle seat scenarios. That’s still true today. Unfortunately, some of the changes to the seat have resulted in a more limited usability for this well-marketed multimode seat.
- The new recline lines mean that there is no guarantee the seat will fit rear facing in any vehicle, and caregivers may find themselves with a seat that cannot be safely installed in their vehicle at the required weight-based reclines and have no way to fix that issue. We also were unable to find a vehicle that accommodated the 5-22 pound rear facing recline range.
- The 16.25 inch top harness position is fairly low for a convertible/multimode seat, and children who are tall or who carry their height in their torsos may find themselves outgrowing the seat forward facing before they are ready for a booster seat.
- The 50 pound booster minimum weight means that many of the children who have outgrown the harness by torso height will be too light to be able to use the seat in booster mode.
- The booster mode has no adjustability, so it will either work for the child or it won’t. We have a very hard time seeing a child anywhere near 57 inches or 120 pounds fitting in the seat.
For a family who flies often, the Diono radian 3RX might be a seat to consider, as it folds flat and fits down narrow airplane aisles fairly easily, which makes it a viable option for airplane travel with younger children.
Overall, this seat may work well in specific 3 across scenarios or for smaller children, but all of the rules and restrictions make this seat fairly difficult to use properly. We worry that caregivers will gloss over the instructions and miss important details because there are so many of them. This is a child restraint with many quirks. For some families, that may be fine, but for others we’d likely suggest looking elsewhere. A properly used car seat will protect a child extraordinarily well in a collision – and a complicated car seat makes that a lofty goal for even the most seasoned technicians and caregivers.