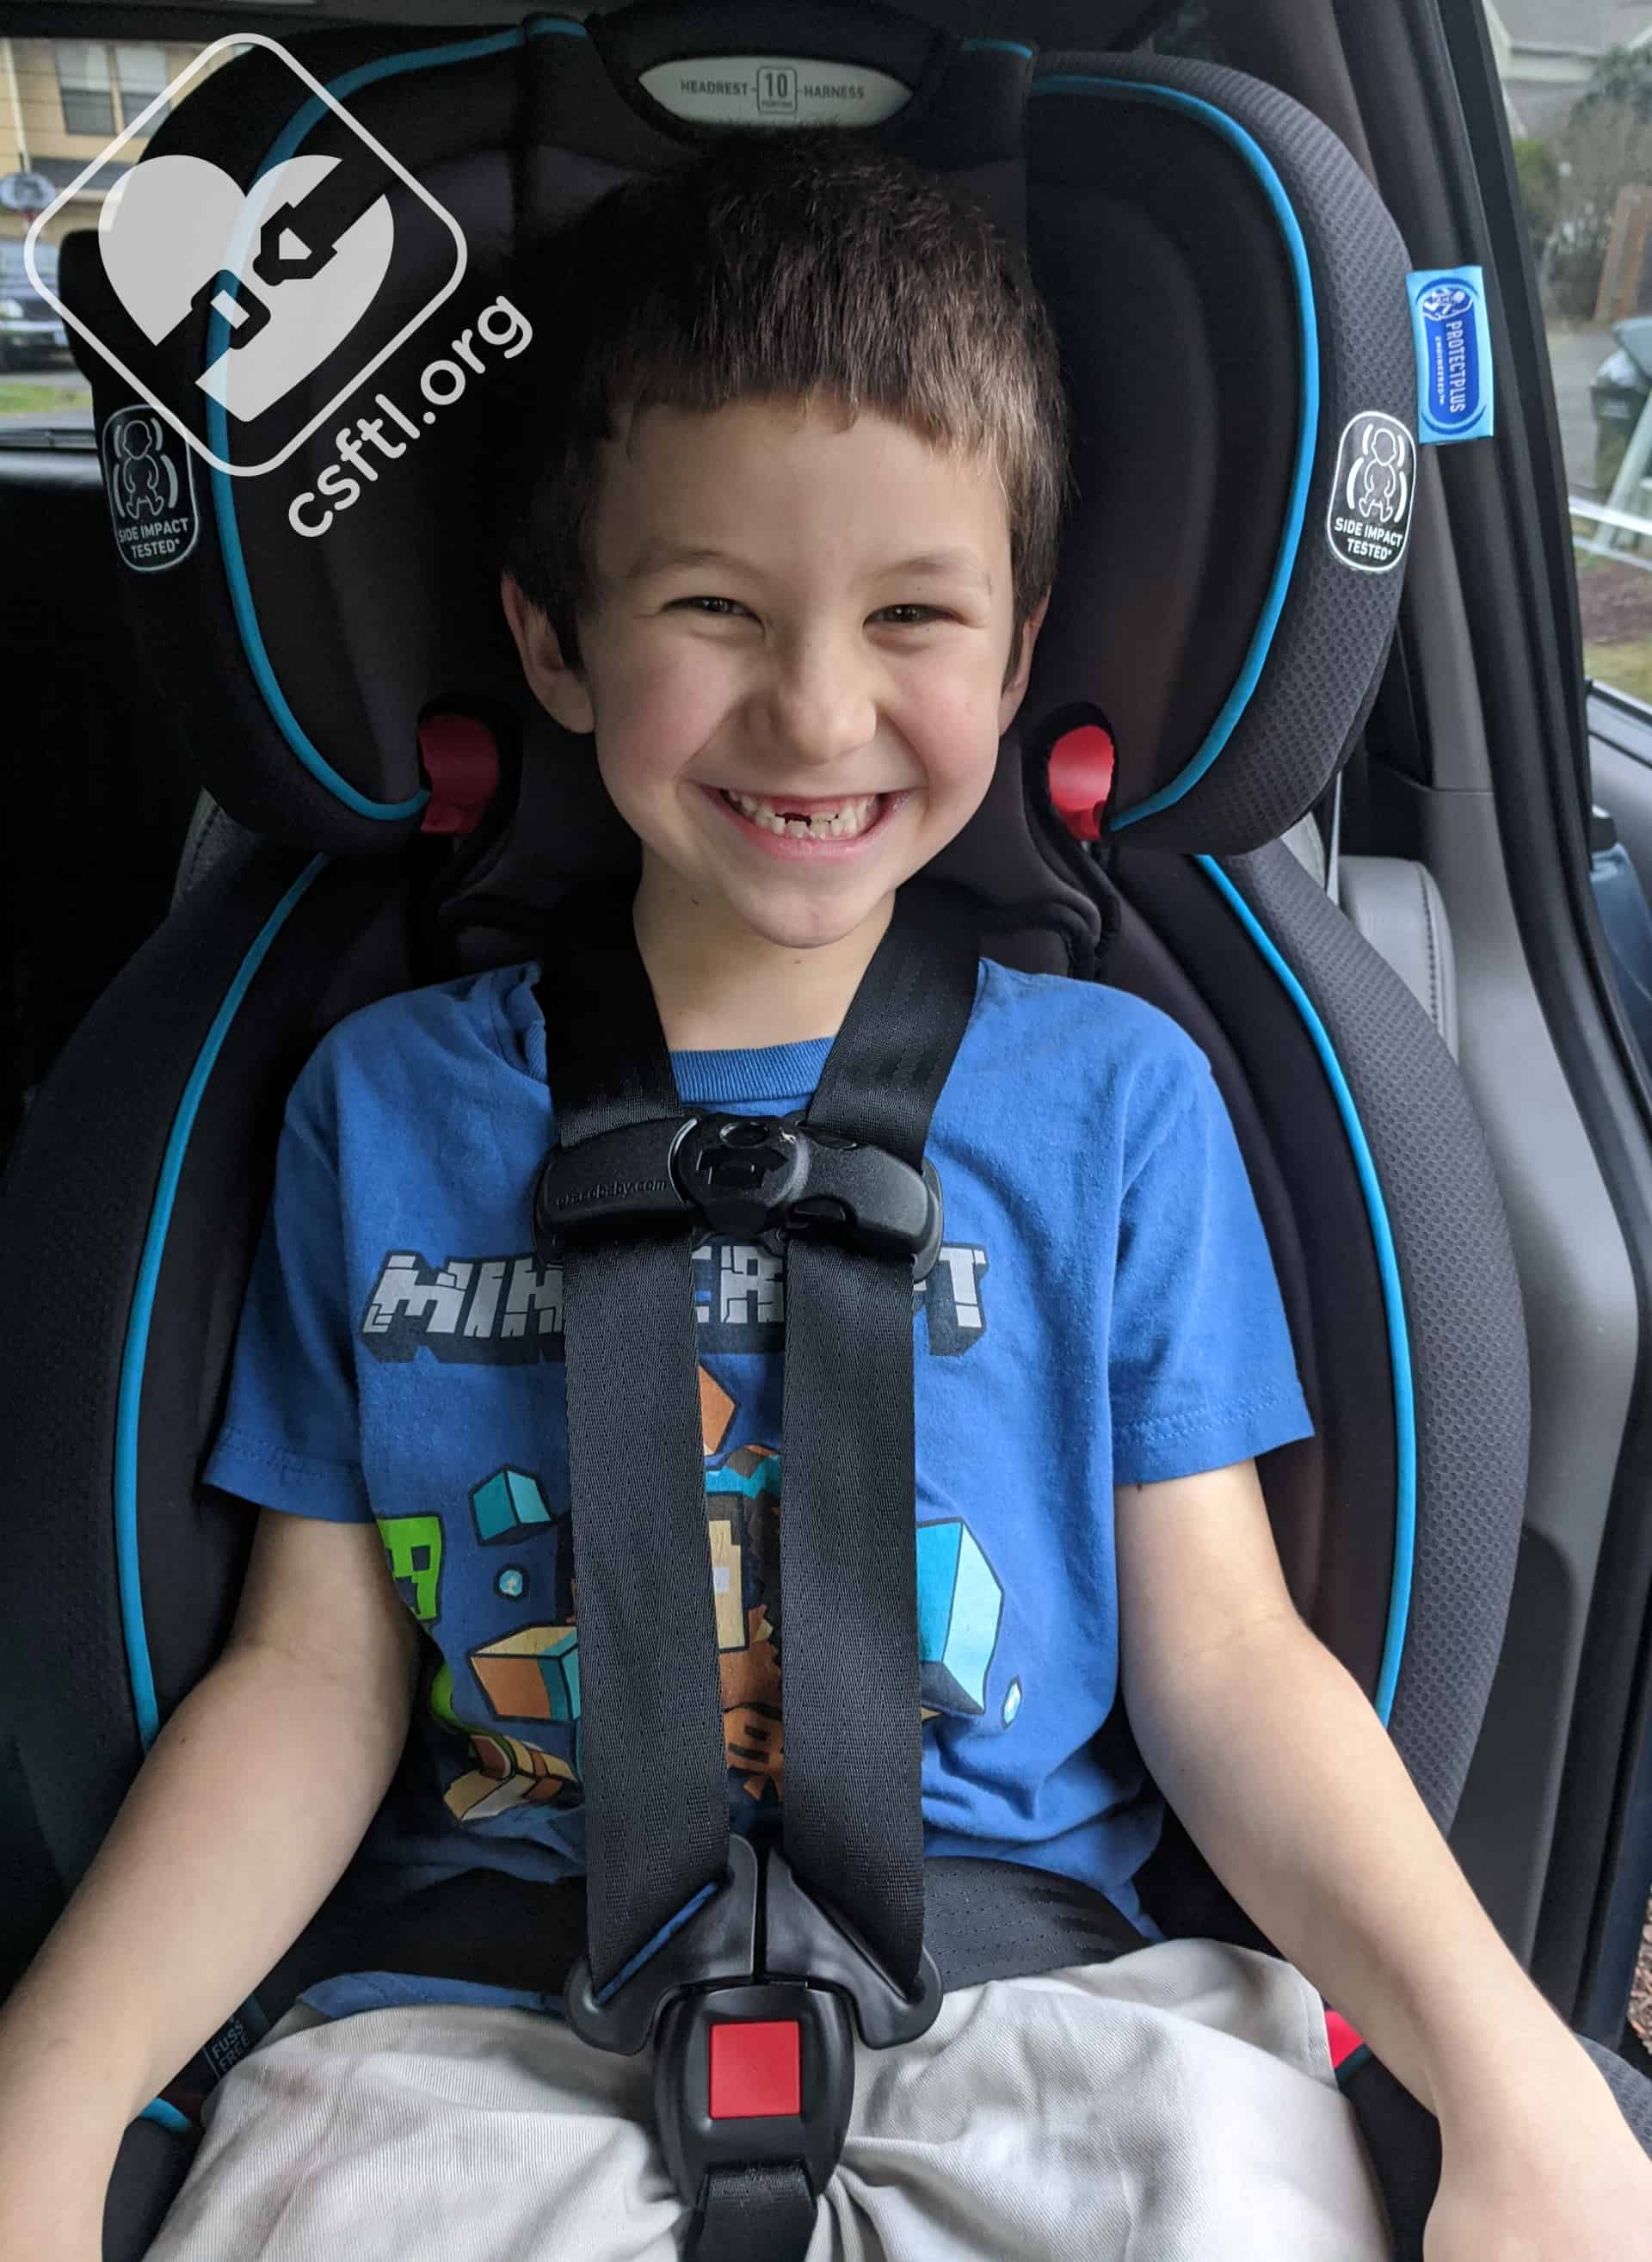
Graco TrioGrow LX
Graco’s product line to date includes a vast range of car seats and booster seats. This well-known manufacturer has a way of seamlessly combining their features into new twists on their existing seats. This time, Graco created a multimode car seat that’s similar to a couple of seats we know well (the Milestone/SlimFit) but includes a truly fabulous feature — the SnugLock installation system! This easy-to-use system was first introduced on their line of rear facing only car seats and is expanding throughout the product line. The TrioGrow SnugLock LX is the first time we’ve seen this feature on a multimode car seat and we’re pretty excited to tell you about it.
The Graco TrioGrow SnugLock LX has 3 modes (rear facing, forward facing, and highback booster) and features the SnugLock lockoff mechanism that has made the SnugLock SnugRide and SnugLock Nautilus car seats some of the easiest seats on the market to install.
CSFTL Quick Stats
- Rear facing weight range: 5-40 pounds
- Rear facing height range: Until the child’s head is 1 inch below the adjuster handle on the headrest when fully extended
- Forward facing weight range: 22-65 pounds
- Forward facing height range: Less than 49 inches tall
- High back booster weight range: 40-100 pounds
- High back booster height range: 43-57 inches tall
- CSFTL recommends that children be at least 5 years old before moving to a booster seat.
- Lower anchor weight limit: 45 pounds
Measurements
- Crotch buckle positions: 4 and 6 inches from the back of the seat pan
- Lowest harness position: 6 inches (with insert), 7 inches (without insert)
- Highest harness position: 17 inches
- Highest booster belt guide position: 18 inches
- Width at widest point: 19 inches (just under 19 inches at the cup holders, just over 19 inches at the sidewings)
- Seat weight: 19 pounds
- Expiration: 10 years
- Replacement after any crash
Out of the Box

Graco TrioGrow LX cupholder assembly required
Opening up a brand new seat can be a bit daunting, especially if you’re new to the world of car seats. The TrioGrow SnugLock LX shipped in a bag, with a bit of foam tucked into the box. Other car seats may ship with more or less padding, but they are all nicely protected by the cardboard box.
The manuals (Graco provides English and Spanish manuals separately), and registration tag are attached to the harness. The optional rear facing infant inserts ship on the seat. There’s one crucial assembly step before this seat can be used: adding the cupholders.
Some Installation Required — CUPHOLDERS ARE REQUIRED
The TrioGrow SnugLock LX manual states very clearly that the cup holders are required for use in any mode. Don’t mix them up – they are labeled L (left) and R (right). It takes and take a bit of “oomph” to securely attach them to the seat. While they ARE easy to clean (by wiping them out with a damp cloth), they are NOT meant to be removed.
Key Features
SnugLock
Until now, we’ve only seen the SnugLock installation on car seats that install in one direction only — the SnugRide SnugLock rear facing only family of car seats and the Nautilus SnugLock. The TrioGrow is the first time this easy-to-use installation method is available on a seat that can rear face AND forward face! Graco has accomplished this flexibility with a unique setup — the SnugLock arm extends out from the seat pan and twists around to align with the correct belt path. Since our #1 goal is for every car seat to be installed and used correctly, knowing that the TrioGrow includes this installation method gives us a lot of confidence that families will be able to install this car seat correctly.
Accessories

Graco TrioGrow LX rear facing body insert
The TrioGrow SnugLock LX includes a set of harness covers, head insert, and a body insert
Harness covers: The harness covers are optional at all times, with a note in the manual that you may need to remove them for smaller babies if they prevent the chest clip from being placed correctly.
Rear facing head insert and body insert: The head insert and body insert do not have weight limits or requirements, but can only be used rear facing. In addition, the head insert cannot be used if the body insert is not in use. Smaller infants may require the body insert in order for their shoulders to reach the lowest harness position. While many newborns have a torso around 7 inches, some newborns will need that extra boost. Sometimes adding a head insert can push a newborns’ head forward, so we were pleased to see that the body insert can be used without the head insert – especially for the newest newborns who have proportionally larger heads and limited head control.
LX Model Features
TrioGrow Rapid Remove and Inright LATCH
The TrioGrow SnugLock comes in a standard and also the LX version used in our review. The LX version includes a few upgrades, most notably their InRight LATCH and Rapid Remove cover. InRight LATCH is a push-button style lower anchor connector that’s easier to attach, and more importantly, far easier to disconnect than the standard j-hook style of lower anchor connectors.
The Rapid Remove cover comes in handy in a couple of scenarios: urgent cleaning issues and for a quick SnugLock installation. While my kids have been known to get pretty much any part of their car seat dirty, the Rapid Remove seat pad covers the places where the vast majority of interesting stains happen. The ability to remove and clean the seat pad separately (it’s machine washable!) is a great feature. The entire cover does, however, come off in a total of 6 pieces, so be sure not to lose any of them should you need to do a thorough cleaning!
The LX model also features some plusher soft goods, and fuss-free buckle pockets to help keep the straps out of the way when loading your child. While not necessary for all families, the LX “upgrades” do add some nice ease of use features that many families will appreciate.
Preparing for Installation
Vehicle Seat Belt
Lower Anchor Storage

Graco TrioGrow LX lower anchor storage
The lower anchors must be stored before installing the TrioGrow SnugLock LX with the vehicle seat belt. The lower anchors store on hooks that are mounted on the outside of the seat’s shell — they’re in between the rear and forward facing belt paths, and easily reachable from either belt path. When installing with the vehicle seat belt, the lower anchor webbing stores in the belt path that’s not in use, and the lower anchors should be attached to the hooks. The top tether has a similar hook near the top of the shell for storage when not in use.
Moving the Lower Anchor Webbing
The seat ships with the lower anchors in the rear facing belt path, so if you’re installing the seat rear facing, it should be all set up right out of the box! If you’re installing it forward facing with lower anchors, the first step will be moving the lower anchors to the forward facing belt path.
We found it quite helpful to remove most of the cover the first time we moved the lower anchor webbing. With a little practice, we found that we only need to remove the seat pad to gain enough access to the belt path to move the webbing.
The first step is to remove the lower anchors from their storage locations, and then pull them into the seat’s shell. The lower anchor webbing slides along under the metal bar that’s inside the belt path, then the connectors feed back outside of the new belt path. Routing the lower anchors correctly under the harness and at the proper side of the crotch buckle can be a bit confusing at first, but the manual has clear instructions and pictures.
Installation: Rear Facing
Recline Angle Indicator
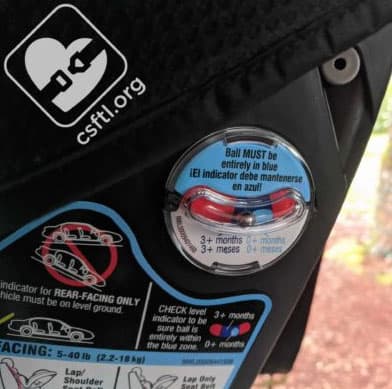
Graco TrioGrow recline angle indicator
The Graco TrioGrow LX has three rear facing recline positions. They’re labeled in blue on the base of the seat. There’s also a ball recline angle indicator on the outside of the seat, mounted at the child’s left shoulder.
When installing the seat rear facing, any of the three rear facing recline positions can be used as long as the ball in the recline indicator stays fully on the blue line. Like Graco’s many similar convertibles, changing the recline is relatively simple – push the button at the front of the seat, and make sure the arrow lines up with your chosen recline on the easy to see stickers on the sides of the base. For children who are under 3 months of age (including adjusted age for premature infants), the ball must be fully in the light blue.
After the child is 3 months old, it can be installed more upright with the indicator in the dark blue area. The light blue area has a bit of a range, but we recommend for newborns that it be at the most reclined edge of the light blue, so as to best support newborns while they have proportionally heavy heads and weak head control. If the seat is on setting 1 but still not reclined enough for the child, Graco does permit the use of a rolled towel or pool noodle to further recline the seat. A more upright installation will position the bubble towards the front of the vehicle — this would be appropriate for older infants and children who have strong head and torso control.
Installation: Lower Anchors — Moving the SnugLock Arm Between Belt Paths

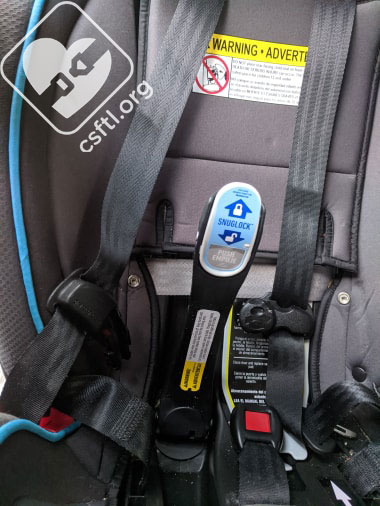
Graco TrioGrow LX SnugLock arm
The most unique and awesome thing about the TrioGrow LX is the SnugLock installation, which consists of a bar that’s inside the belt path. It’s basically, a very large and easy-to-use lockoff device that made installations a breeze.
To install the seat rear facing with the lower anchors, remove the seat pad and raise the headrest to the highest position. Raising the headrest provides a clear access to the belt path and in turn, makes the installation pretty simple!
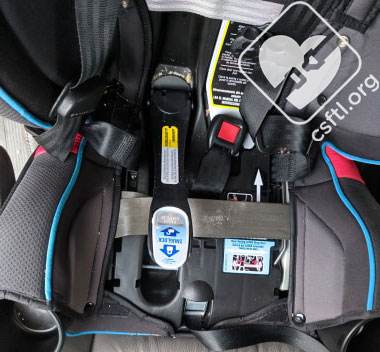
Graco TrioGrow SnugLock arm step 1
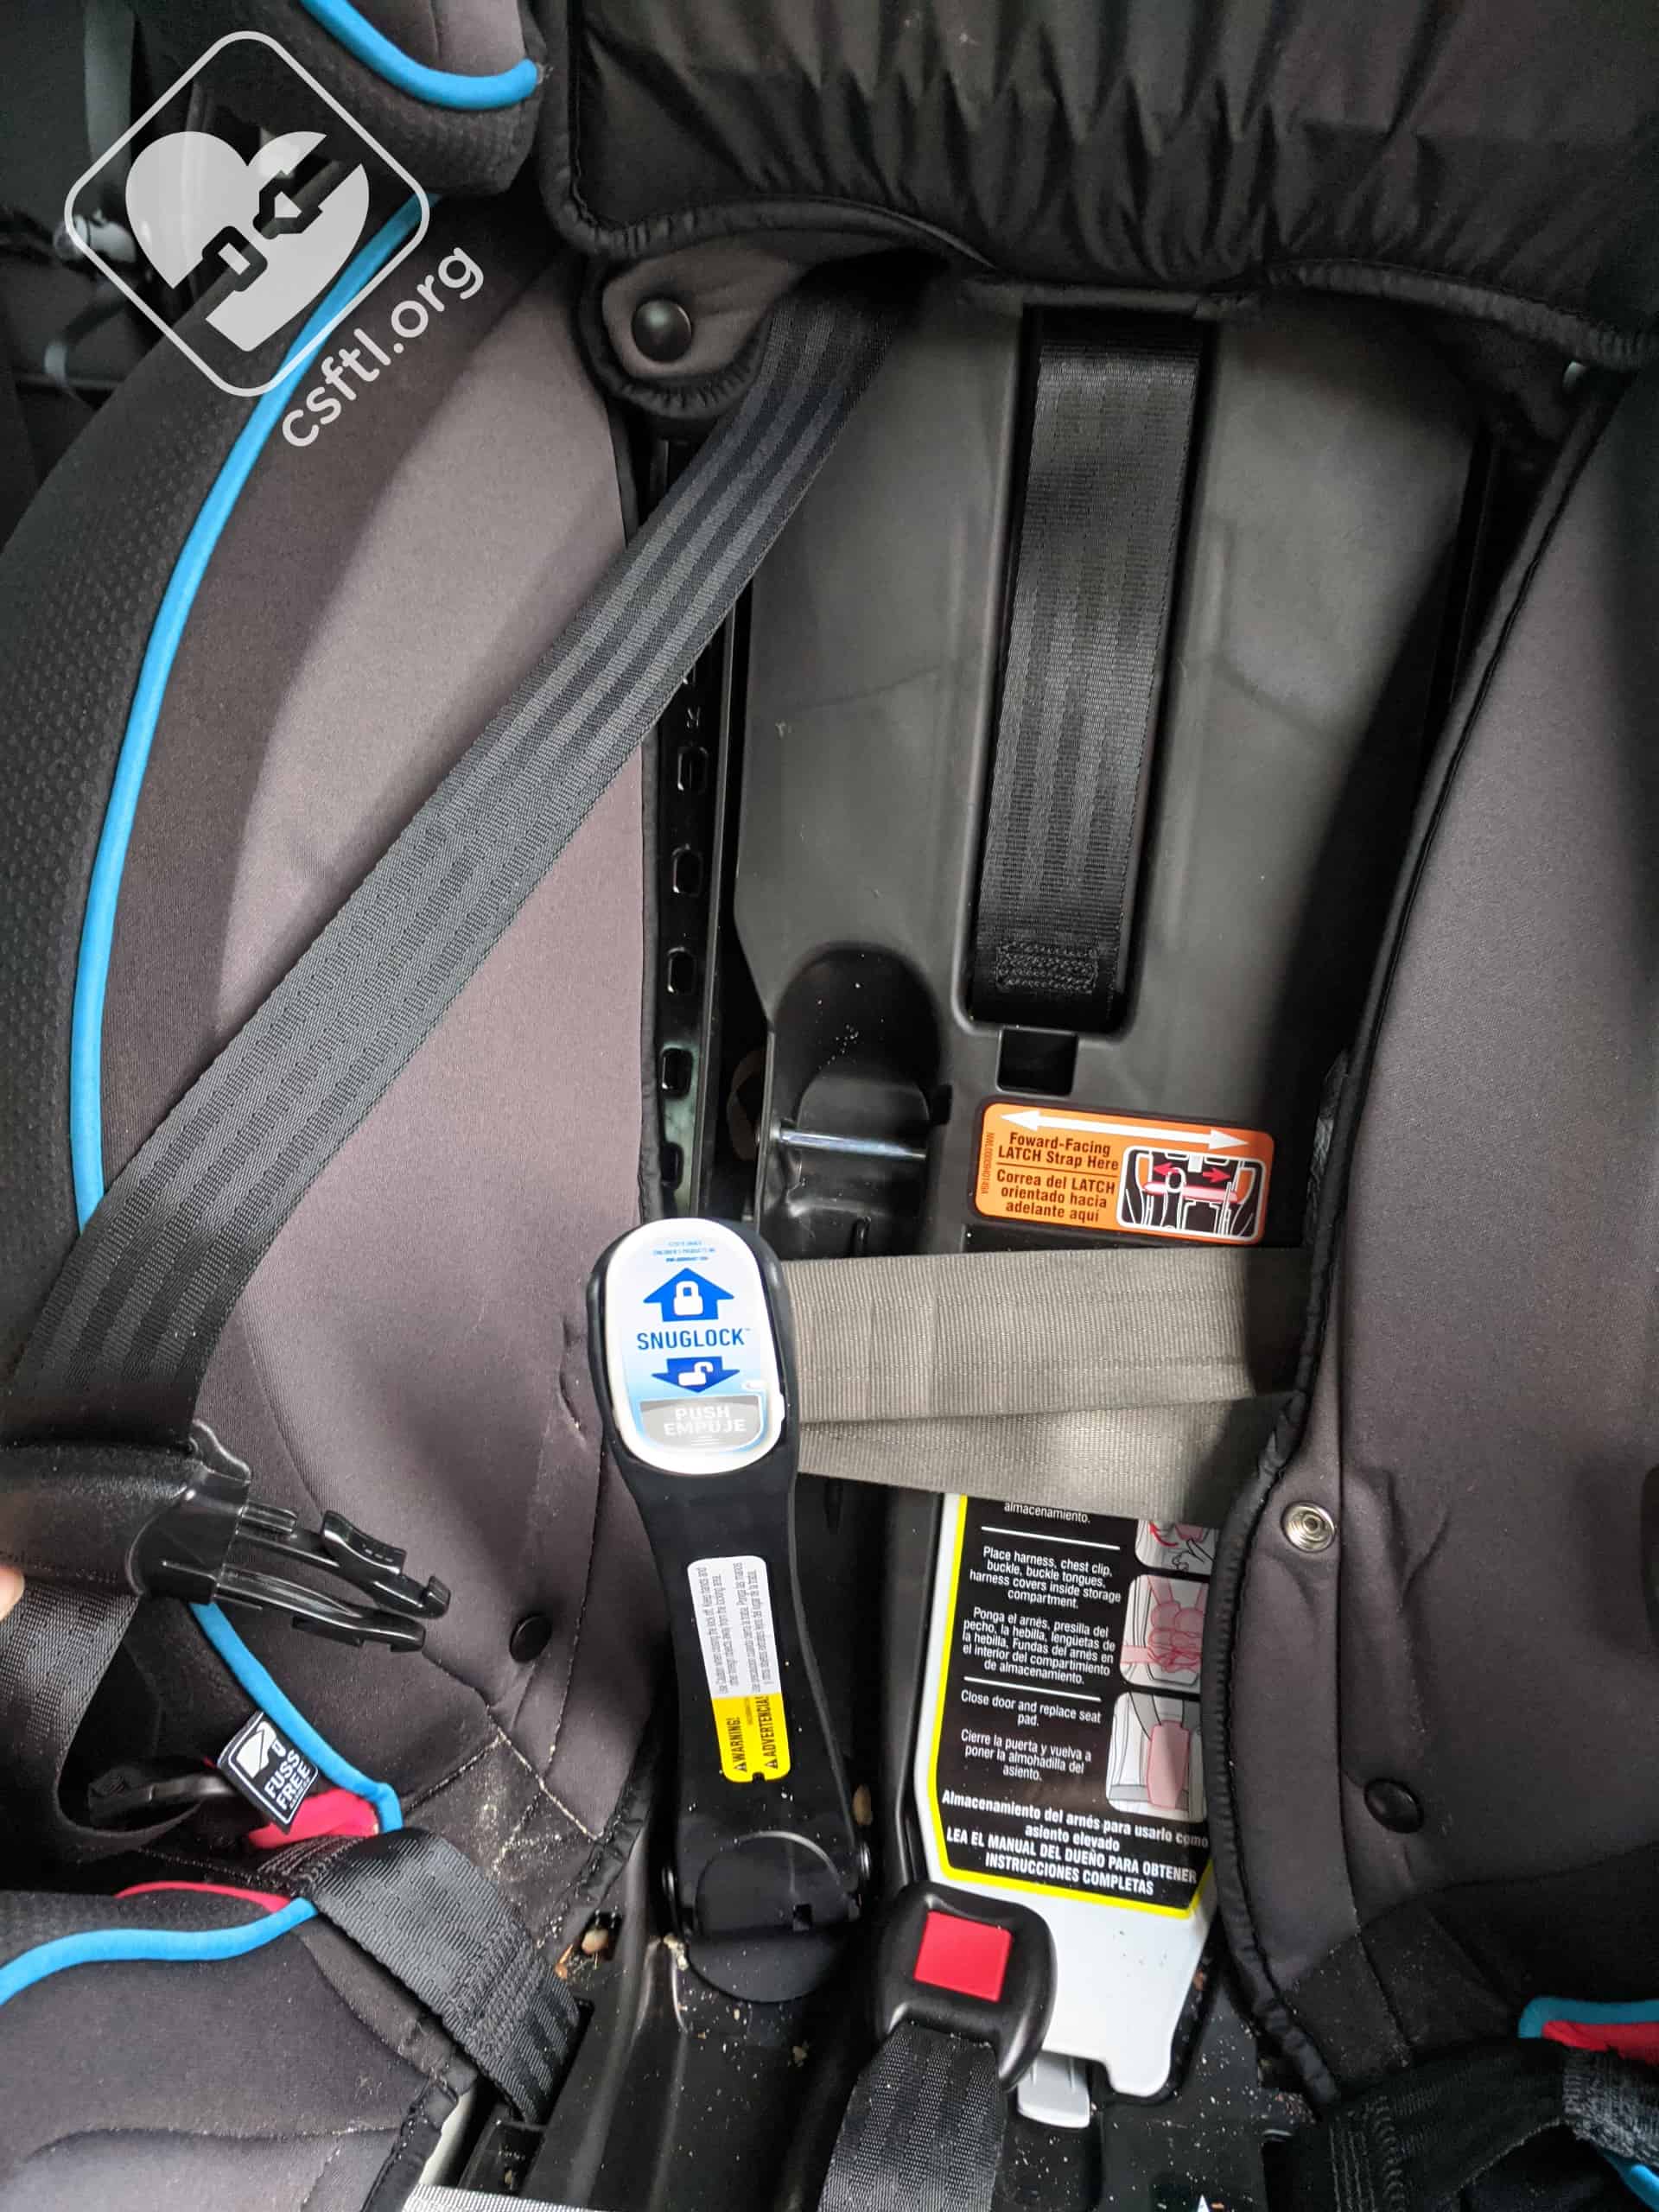
The SnugLock arm raises from the inside of the belt path. It must be turned toward the correct belt path — that’s labelled on the arm itself . Rotating it between the belt paths wasn’t the most intuitive process the first time I tried it, but the manual included instructions that helped quite a bit and after the first time or two I no longer got caught on the harness straps. Having used a variety of other lockoff mechanisms, we appreciate the design of the Snuglock arm. On the arm is a little gray sticker saying “push” – push that and the Snuglock arm pops out easily. The length of the arm adds leverage when closing the lock off so that it takes surprisingly little force to close, which could be helpful for adults with limited arm strength or mobility.
Graco TrioGrow SnugLock arm step 2
The next step is to loosen the lower anchor webbing by pressing on the gray adjuster button. We found that it needs a bit of counter pressure at times. Route the lower anchor webbing through the rear facing belt path and on the correct side of the crotch buckle. Place the TrioGrow SnugLock LX on the vehicle seat with the harness facing the back of the vehicle, then adjust the recline angle to the correct position for your child.
Locate the lower anchors in your vehicle’s seat bight, then attach each lower anchor connector firmly to the anchor in the vehicle.
Note: the LX version of this seat has premium lower anchor connectors, so it cannot be installed in a center seat by “borrowing” lower anchors (though a vehicle seat belt installation is always an option!). After the lower anchors click onto the lower anchor connectors, give each one a tug to make sure they’re solidly attached.
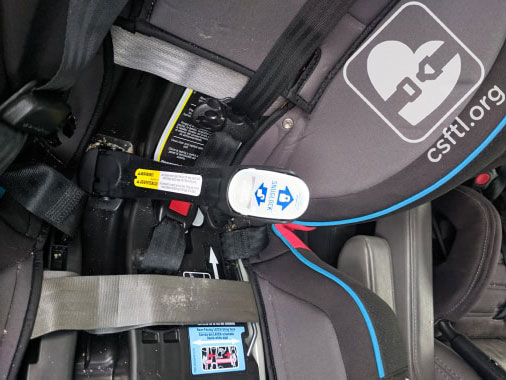
Graco TrioGrow SnugLock Arm
Next, pull the tail on the lower anchor webbing to remove the slack, making sure the SnugLock arm is popped up and the lower anchor strap is threaded underneath. Here’s the awesome part: close the SnugLock arm, and make sure it’s locked. Check for movement at the belt path, confirm that the recline angle is correct, and you’re done!
If the seat isn’t quite snug at this point, open the arm and apply counter pressure in the seat pan to remove just a bit more slack from the lower anchor webbing. Graco includes one of our favorite tips in the manual here – pull the webbing’s tail from the inside of the seat pan. The SnugLock arm does all the heavy lifting, which is great for those of us with not so much upper body strength, heavily pregnant, or awkwardly hauling our not-petite-selves into the third row of a car. Not that I’ve done that…all at once.
Vehicle Seat Belt

Graco TrioGrow LX rear facing with vehicle seat belt
The SnugLock arm also makes a vehicle seat belt install a snap. First, store the lower anchors in the opposite belt path. Then, just like with the lower anchor installation, expose the belt path and SnugLock arm, place the TrioGrow on your vehicle seat with the harness facing the back of the vehicle and adjust the recline angle.
Feed the vehicle seat belt through the rear facing belt path (larger seat belt buckles may require a little creativity with the angle because the belt path has a somewhat narrow opening – I pulled back the cover and figured out that my buckle needed to go almost sideways to fit through there!). Once you finagle the seat belt into the belt path, buckle and remove the slack from the lap portion of the belt. Finally, close the SnugLock arm, then check for less than 1″ movement at the belt path and confirm that the recline angle is correct.
Fit to Vehicle
Newborn Recline

Graco TrioGrow LX rear facing
When the seat is installed at an appropriate angle for a newborn, and the headrest was suitably lowered, the seat was pretty compact front to back. In the background you can see the Baby Jogger City View, which is very similar to the Graco Milestone, and it takes up about 2 inches more front to back space.
Most Upright Recline
Installations at the most upright recline is where this seat shines in terms of front to back space. Like the Extend2Fit and other compact car seats, the headrest raises mostly in the vertical plane, stealing very little front to back space as the headrest gets taller. It was several inches more compact than the Baby Jogger City View at this point. Graco allows the seat to be installed with the recline angle indicator in the dark blue range once children are at least 3 months old.
Tall Driver Check

Graco TrioGrow LX rear facing really upright
We found that the TrioGrow SnugLock LX fits behind a front vehicle seat with the front seat all the way back. With the seat in recline position 2 (the recline angle indicator was between the light and dark blue reclines), it also fit behind my driver’s seat when it was fully pushed back and a tidbit reclined. Now, I drive a minivan not a tiny car, but it would likely still fit well in smaller vehicles at the more upright recline and even allow taller drivers some comfort.
Fit to Child: Rear Facing
Newborn Doll
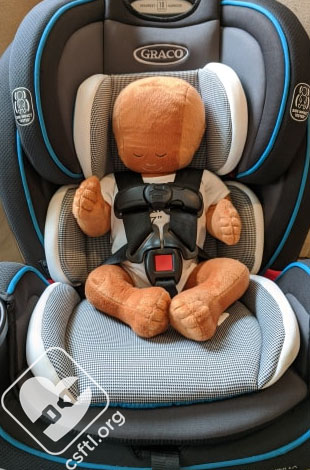
Graco TrioGrow LX newborn doll
While I was not able to get my hands on a real newborn, the seat fit our Huggable Images newborn doll quite well, both with and without the insert. Our doll weighs 7 pounds and is 17 inches long.

Graco TrioGrow LX newborn doll with crotch roll
Without the insert, I added a rolled towel between the doll’s legs to get a better fit. I did find that the harness was a little harder to tighten properly in this configuration.
10 Months Old

Graco TrioGrow LX rear facing 10 months old
This model is 10 months old, 28 inches tall, and weighs 20 pounds. He fits easily on the inner crotch buckle setting with no inserts, and has lots of room to grow. Depending on the type of diaper he’s wearing (cloth vs. disposable), I do have to check the headrest setting is just at or below his shoulders. The no-rethread harness makes that an easy adjustment. I have noticed that sometimes in a cloth diaper he gets pushed forward a bit and if I’m not careful as I adjust the harness he slumps. At his age, that is not a safety issue, but it could have been an issue when he did not have solid head and neck control.
2 Years Old

Graco TrioGrow LX 2 year old rear facing
Here we have the 2 year old big brother to our 9 month old model. At 36.5 inches and 26 pounds he, too, has a lot of room to grow in this seat rear facing and finds it very comfortable. Like younger brother, he sometimes is in a cloth diaper and sometimes disposable, but it’s easy to adjust the fit each time. He’s close to needing the outer crotch buckle slot since the inner slot is under his diaper but not quite under his body (yet).
4 Years Old

Graco TrioGrow LX 4 year old rear facing
This young lady is 4 years old, and is 42 inches tall, and weighs 37 pounds. She normally rides forward facing but will occasionally “borrow” little brothers’ rear facing seats when they’re not riding with her. She has 3 pounds to gain before this is outgrown rear facing and she fits easily. She can buckle herself in, and unbuckle herself thanks to her Unbuckleme tool. She does need the outer crotch buckle slot to fit properly, that makes switching between kiddos a little more challenging than just adjusting the headrest.
Installation: Forward Facing

Graco TrioGrow LX forward facing recline
Recline Angles
Some Graco convertible car seats share a common drawback: they require children who ride forward facing and who weigh less than 40 pounds to use a very reclined setting. The TrioGrow LX does not have this limitation. In fact, the TrioGrow SnugLock LX has the opposite rule: children who weigh over 40 pounds can NOT use the most reclined position 4, but must use recline 5 or 6.
This rule could be a drawback for bigger children who want or need a greater recline angle when forward facing. There is recline range rule for forward facing, just pick the right recline position for your child’s size and ensure that less than 20% of the base overhangs the vehicle seat. A gap at the back of the seat is normal and acceptable, but the car seat’s base does need to be flat on the vehicle seat. The vehicle headrest may interfere with a solid installation when the seat is more reclined. If this is the case in your car, check your vehicle manual to see if removing the vehicle headrest is allowed.
Lower Anchors

Graco TrioGrow LX forward facing with lower anchors
To install the Graco TrioGrow LX forward facing with the lower anchors, first ensure that the lower anchor webbing is in the forward facing belt path. If not, move the lower anchor webbing to the forward facing belt path following the instructions outlined in the car seat’s manual — we describe the process above as well. Make sure that the SnugLock arm is moved to the forward facing position, once again by removing the seat pad and raising the headrest all the way up.
Once the lower anchor webbing is in the forward facing belt path, place the car seat on the vehicle seat with the harness facing the front of the vehicle and drape the tether webbing over the back of the vehicle seat for easy access later. Adjust the recline angle until it is on the proper setting for the child’s weight, now is a good time to make sure the child is under the lower anchor weight limit!
Next, connect each lower anchor connector to the appropriate lower anchors for the seating position within the vehicle. Pull the tail to remove slack, but don’t worry about tightening it too much yet. Press the SnugLock arm to the locked position, and check for lateral movement at the belt path. Then, as is crucial with all forward facing harnessed seats, make sure to attach the top tether and pull it snug.
Vehicle Seat Belt
Graco TrioGrow LX open SnugLock arm
Installing the TrioGrow forward facing with the vehicle seat belt is very similar to installing with lower anchors. First, make sure that the lower anchors are stowed in the rear facing belt path, then place the car seat on the vehicle seat with the harness facing the front of the vehicle and drape the tether webbing over the back of the vehicle seat for easy access later. Adjust the recline angle until it is on the proper setting for the child’s weight.The belt path opening can be a bit tricky if your seat belt’s latchplate is on the larger side. We found that peeling the cover back helped to reveal the best angle for threading the seat belt and buckle through the opening.
Once the vehicle seat belt is threaded through the belt path, buckle the seat belt, remove the slack from the lap portion of the belt by pulling up on the seat belt while pressing down on the car seat. Swivel the SnugLock arm to the proper angle, then with the back portion of the cover flipped up, it’s easy to close the SnugLock arm into the locked position and lock the vehicle seat belt in place. Do not switch the vehicle’s seat belt to locking mode since the SnugLock arm has already locked the belt for you! Check for movement at the belt path, make sure the tether anchor is secure, then replace the seat pad, adjust the headrest, and it’s time for kiddo to go for a ride!
Fit to Vehicle
My minivan (2010 Honda Odyssey) is very car seat friendly, and I had very little issue installing the TrioGrow anywhere in any of the modes. Honda allows removing the headrest which is often easier for many forward facing car seats. In some seating positions the TrioGrow wouldn’t have needed it removed, in others it did make a difference. If your vehicle has fixed, protruding, or non-removable headrests, you would want to test the fit to see if the TrioGrow is compatible forward facing, even if your child is currently rear facing.
Fit to Child: Forward Facing
4 Years Old

Graco TrioGrow LX 4 years old
Here we see our 4 year old model again, this time she’s forward facing. She is still 42 inches and 37 pounds, well within the harness height and weight limits. She easily fits in the seat in this mode and has years left before she’ll outgrow it. She can use any of the recline settings, though she has a strong preference for being more upright. She is using the outer crotch buckle slot since her body is just over the inner slot.
7 Years Old

Graco TrioGrow LX 7 years old
This model is newly 7 years old, 49 inches tall, and weighs 52 pounds. Because he has hit 49 inches he can no longer use this seat in harness mode, but as you can see he just fits by torso height. If he were younger or otherwise not behaviorally ready for a booster at this point, he would need a new seat. Instead, I converted it to booster mode for him.
Installation: High Back Booster
Storing the Harness

Graco TrioGrow LX harness storage
A great feature of several Graco car seats, including the TrioGrow is that you can store, rather than remove, the harness when converting the seat from harness to booster mode. Why is that cool? On-seat harness storage means that when the seat is installed using the lower anchors, it’s possible (and pretty easy!) to use the seat for different children without uninstalling it between ridrers. For example, our 4 year old and 7 kiddos from above could both use the TrioGrow without too much trouble. This easy installation and adjustment could be useful for carpools, secondary vehicles, and families who transport a variety of children.
The harness storage on the TrioGrow is very similar to another Graco seat, the Milestone. The major difference is that in order to accommodate the SnugLock arm, the storage spot is slightly smaller and off-center. Unfortunately, this means that the crotch buckle has to be removed rather than flipped back. I’ll admit that I was a bit sad about this.
It took me a bit of finagling to get everything pulled, tightened, angled, and otherwise lined up to get it all to fit, but with practice, adjusting the seat to fit a different child wouldn’t take long at all. Make sure you put the crotch buckle in — that will help prevent it from being lost!
Within the Vehicle
The base of the Graco TrioGrow LX must be set to recline position 6 when used in booster mode. Lower anchors and the tether anchor can be used when the seat is in booster mode, but they aren’t required. Using the lower anchors helps in the event of a crash or sudden stop with an unoccupied booster, having it secured to the vehicle means that it won’t go flying. If using the lower anchors in booster mode isn’t an option, buckle the booster when it’s not in use.
Fit to Child: High Back Booster
7 Years Old

Graco TrioGrow LX 7 year old booster mode
Here we see our newly 7 year old model again, this time using booster mode as he’s outgrown the harness by height. At 49 inches and 52 pounds he’s well within the stated booster height and weight limits. The belt fit in this mode is excellent. He would likely have a year to grow before this seat is outgrown by torso height, since the red shoulder belt guide cannot dip below the shoulders.
The TrioGrow sits up higher on the vehicle’s seat compared to his everyday booster so he had a bit of trouble buckling himself in at first. He also made sure to inform me that it was not as comfortable as his normal seat. I believe his discomfort comes from a gap in the padding that is noticeable when the headrest is fully raised.

Graco TrioGrow LX padding gap
This padding gap is something we’ve seen on other Graco seats and it’s caused some challenges for some of our more sensitive reviewers — they’ve noticed it right away! We’d love to see an extra half inch of padding at the bottom of the headrest to close this gap.
Important Information: Where to Find
Graco TrioGrow
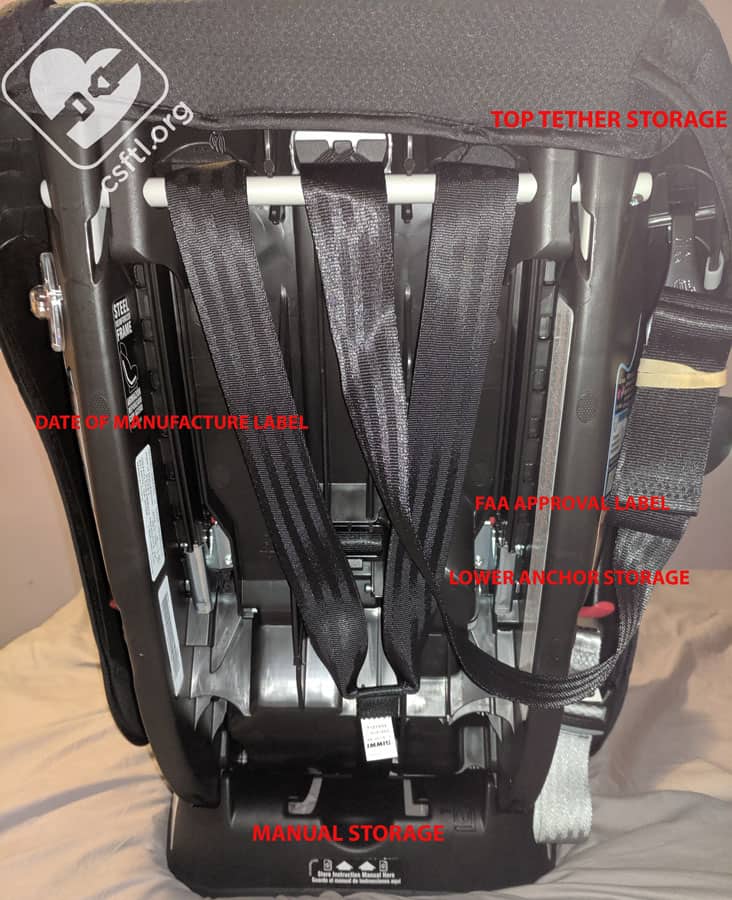
Date of Manufacture: The date of manufacture label is located on the back of the seat’s base, right next to the manual storage slot.
Expiration: The expiration date is listed in a small font stamped into the bottom of the seat. The TrioGrow has a 10 year lifespan.
FAA Approval: The FAA approval label is located on a white label on the inside of a pillar on the back of the seat. The TrioGrow LX is FAA approved for use on board aircraft when the harness is in use but the SnugLock installation must be bypassed for this type of installation. The manual contains full instructions on how to do this. Like all booster seats, the TrioGrow LX is not approved for use on board aircraft when used as a belt positioning booster due to the plane’s lap-only seat belt.

Graco TrioGrow LX lower anchor storage
Lower Anchor Storage: There is one set of lower anchor storage hooks, conveniently located on the outside of the shell in between the two belt paths.

Graco TrioGrow LX top tether storage
Top Tether Storage: The tether for the Graco TrioGrow LX stores on one of two small bars located at the top of the back of the seat, just above the red harness rollers.

Graco TrioGrow LX manual storage
Manual Storage: The owner’s manual stores in a slot on the back of the seat’s base, next to the date of manufacture label.
Overall Thoughts
The SnugLock installation serves a critical function — it makes installing this seat quite simple. Adding that feature to an already excellent car seat makes the TrioGrow a strong choice. The TrioGrow LX could easily last from birth (or at least infancy) until many children are somewhere around 8 years old. The Rapid Remove cover makes the LX version of this seat a solid option for families who want to install their children’s car seats without a lot of struggle.
Giveaway
Our friends at Graco are giving away a TrioGrow LX to one lucky reader from the United States. Read our terms and conditions, then enter below for your chance to win.
a Rafflecopter giveaway