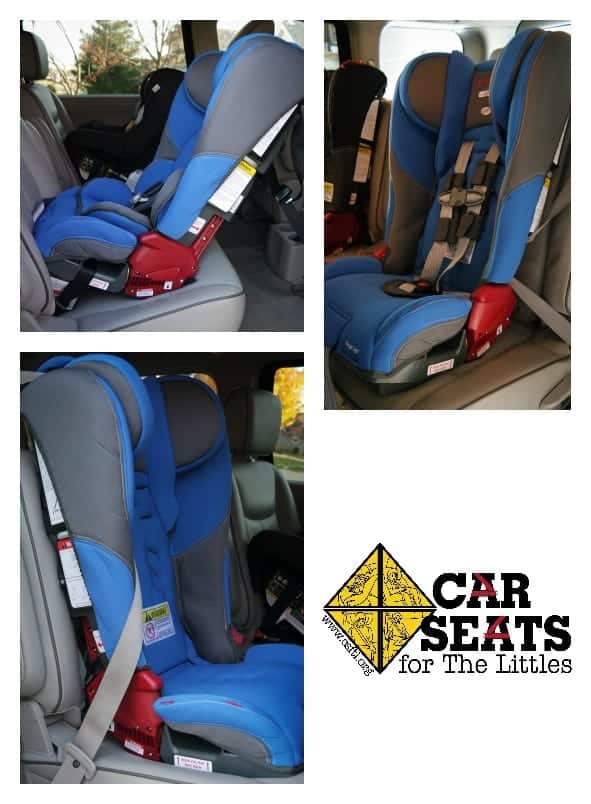
Since the first Diono Radians were introduced, Diono has developed a legacy of narrow convertible car seats that work well for some specific situations. Their newest entries into the market, the Olympia, Pacifica, and Rainier continue that trend while offering additional features that build on the well known Radian. This seat was subject to a recall in late 2017.
CSFTL Quick Stats
- Rear facing weight range: 5-50 pounds
- Rear facing height range: 44″ or less, or head 1.5″ from the top of the head to the top of the shell
- Forward facing weight range: 20-65 pounds (Note: versions of this seat manufactured prior to September 2017 had a different maximum weight limit. Seats made after September 2017 have a 65 pound weight limit.)
- Forward facing height range: 57″ or less
- High back booster weight range: 50-120 pounds
- High back booster height range: 40″ and taller, and child’s shoulders at or above 4th harness position
- Shell height: 24.5″
- Lowest harness position: 8″
- Highest harness position: 16.5″
- Highest booster guide position: 16.5″
- Expiration: 8 years (harness), 12 years (booster)
- Lower anchor weight limit: rear facing 35 pounds, forward facing 40 pounds
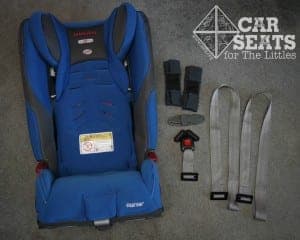
Features
- 3 position adjustable crotch strap: 4″, 6″, 8″
- 2 adjustable recline positions in forward facing position
- Push button lower anchor connectors
- Allows use of lower anchors in booster position
- SuperLATCH system
- Folds flat for travel and is FAA certified
- Rear-facing tether capability
Installation
The Rainier has several unique installation requirements.
Rear Facing
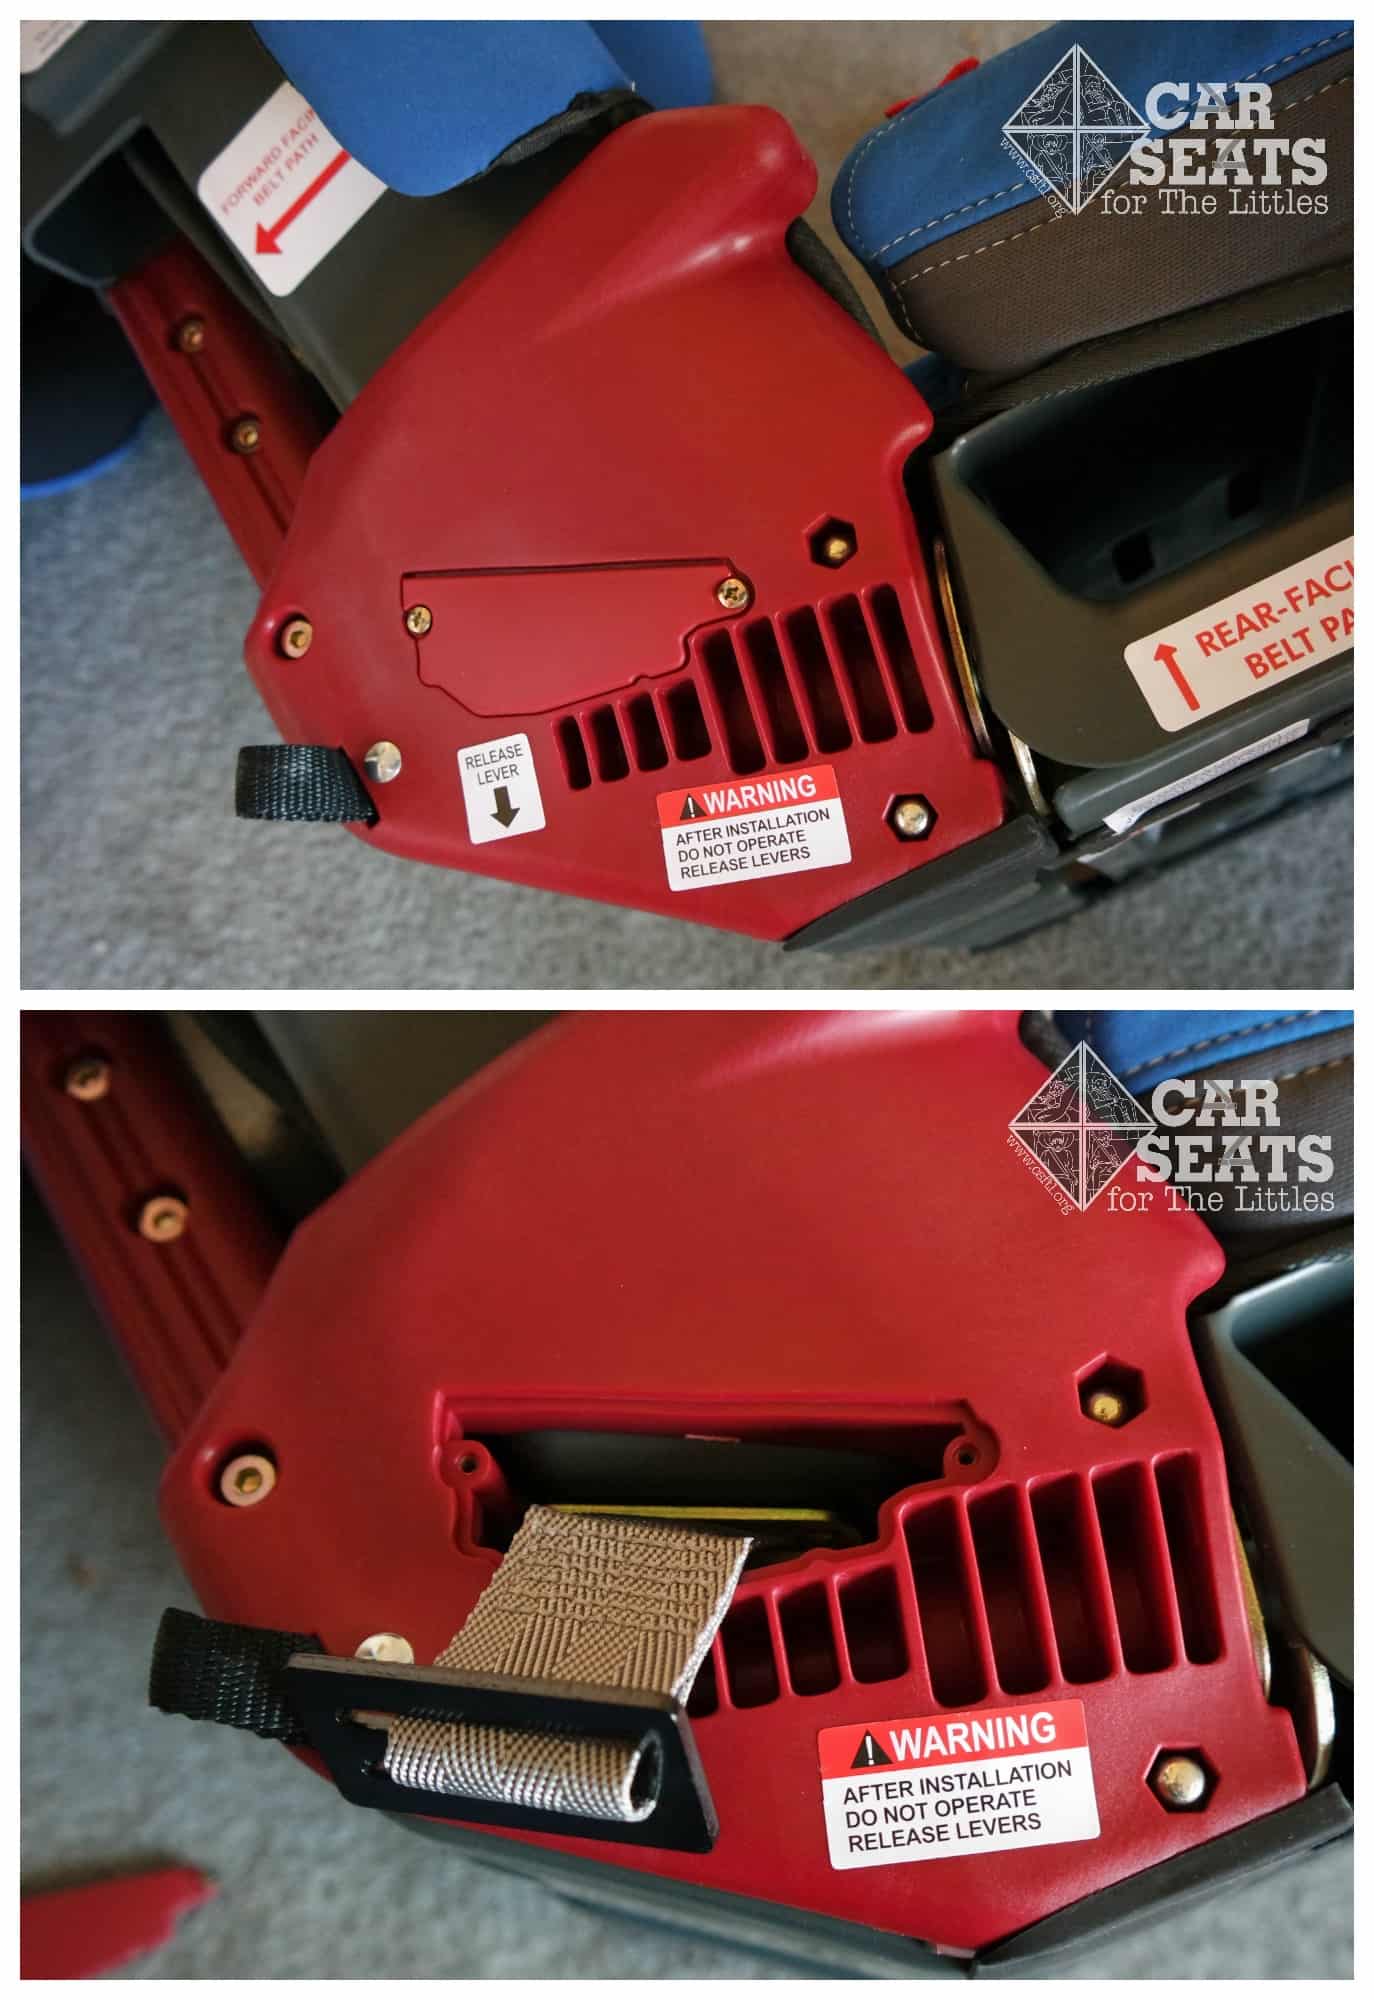
Detachable Boot
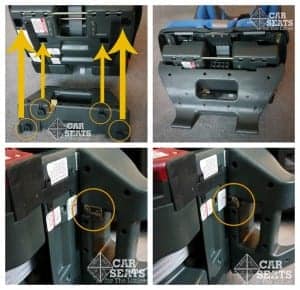
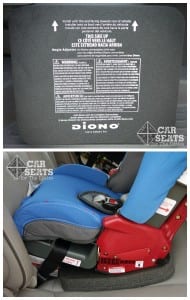
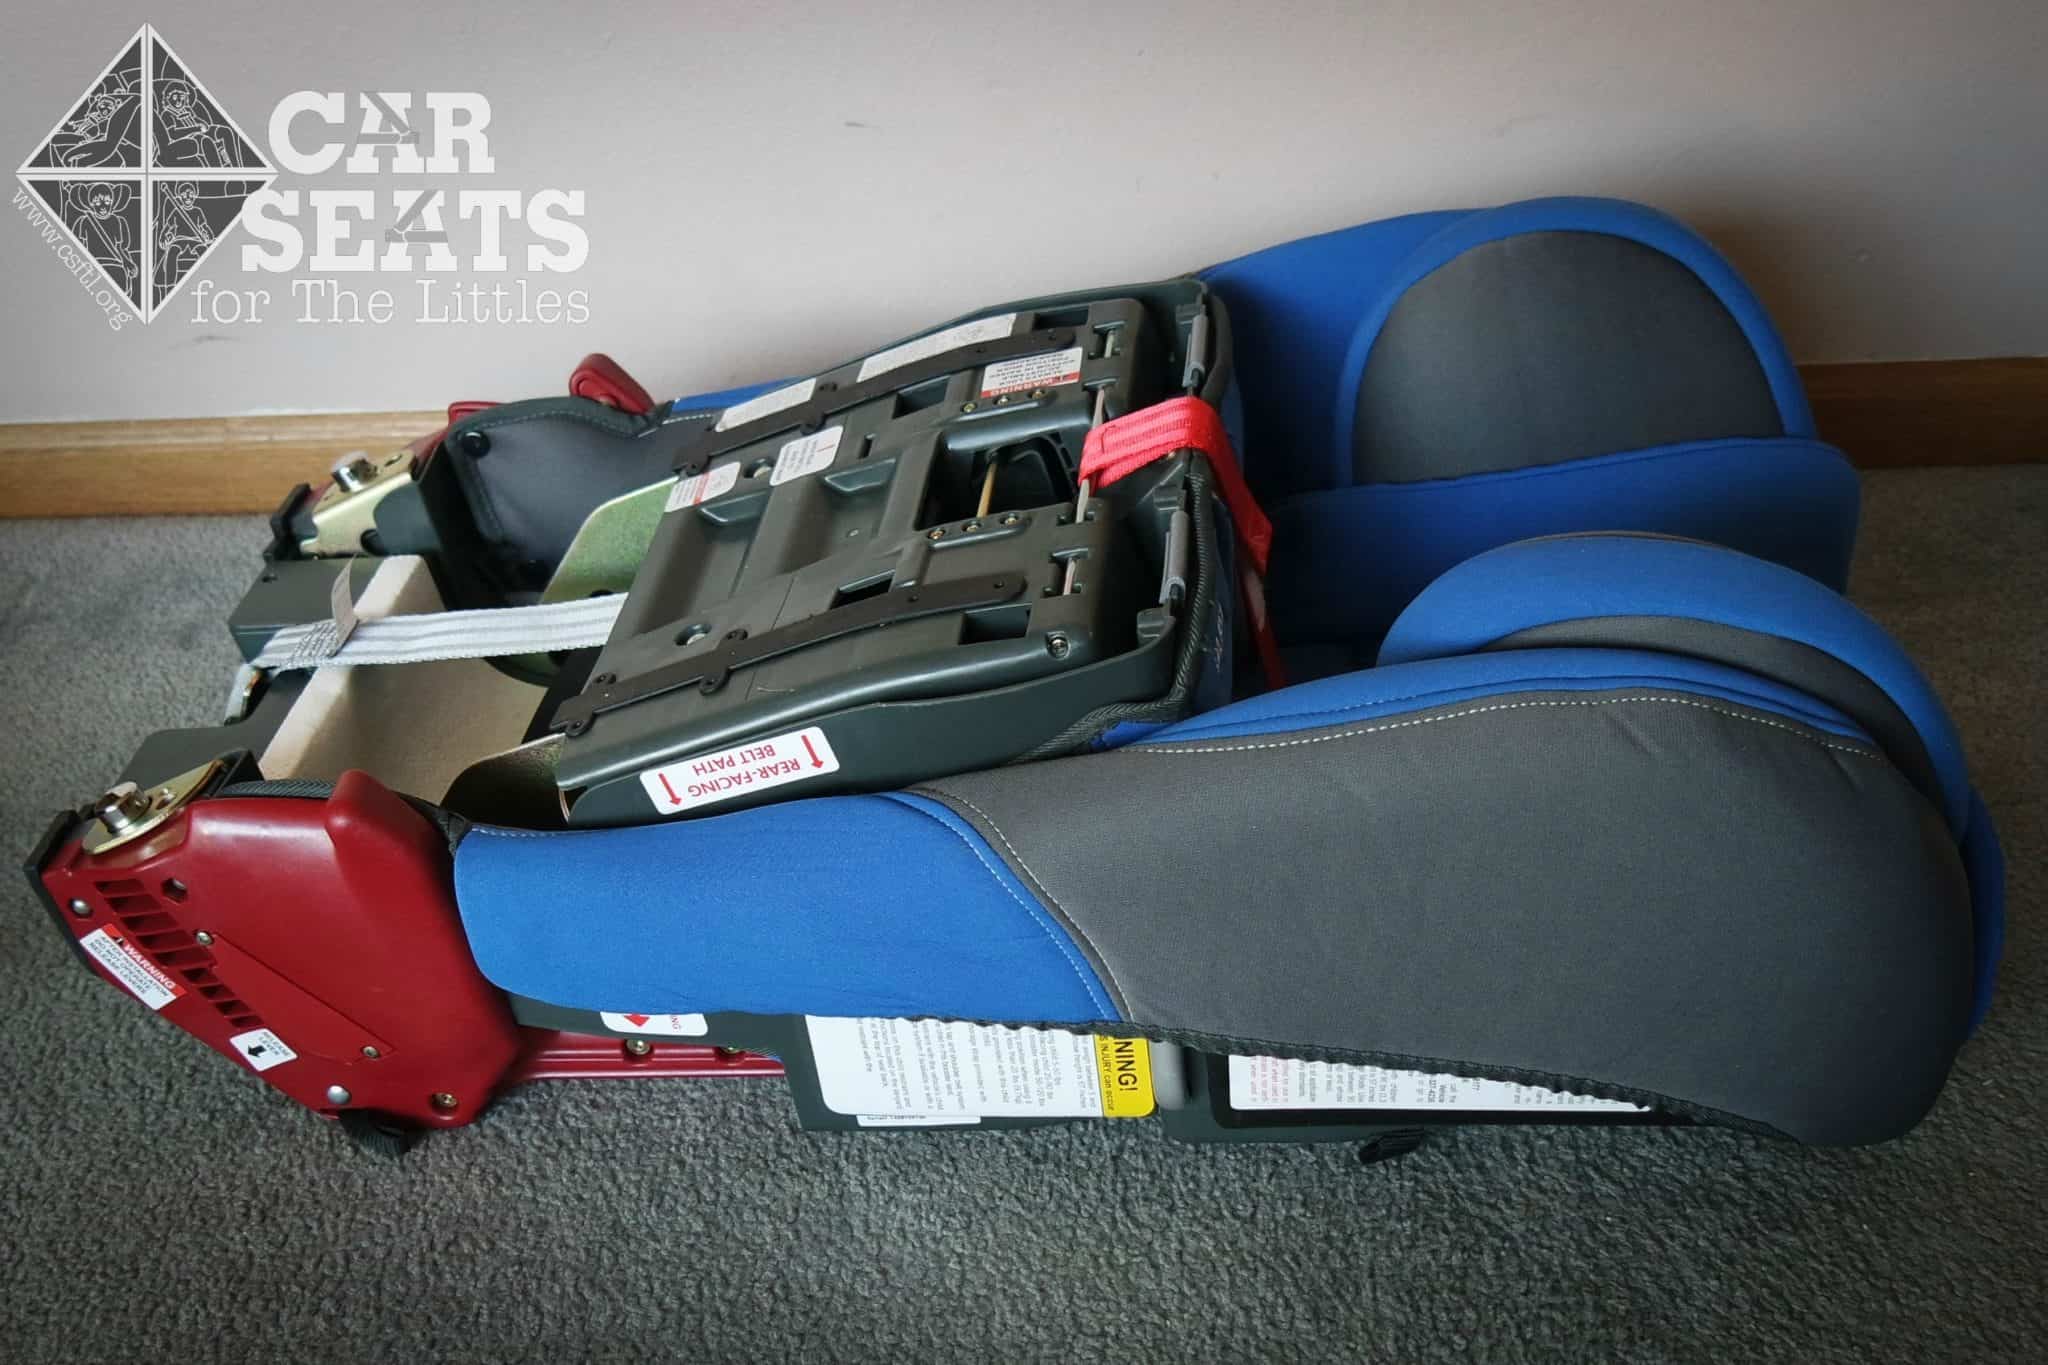
In rear facing position, the detachable boot is required for any install. To install this, start with making sure the built-in forward facing recline is pushed into the seat. The forward facing installation section will help you with this step.
To attach the boot, slide the posts into the hole, then push it towards the front of the seat where the child’s feet sit. This allows the seat to be reclined enough for rear facing. Once it is in place, the metal latch needs to be pushed in to lock it into place.
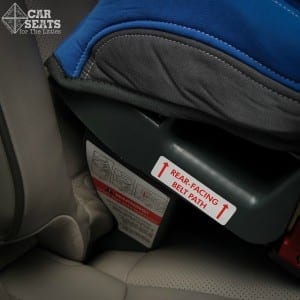
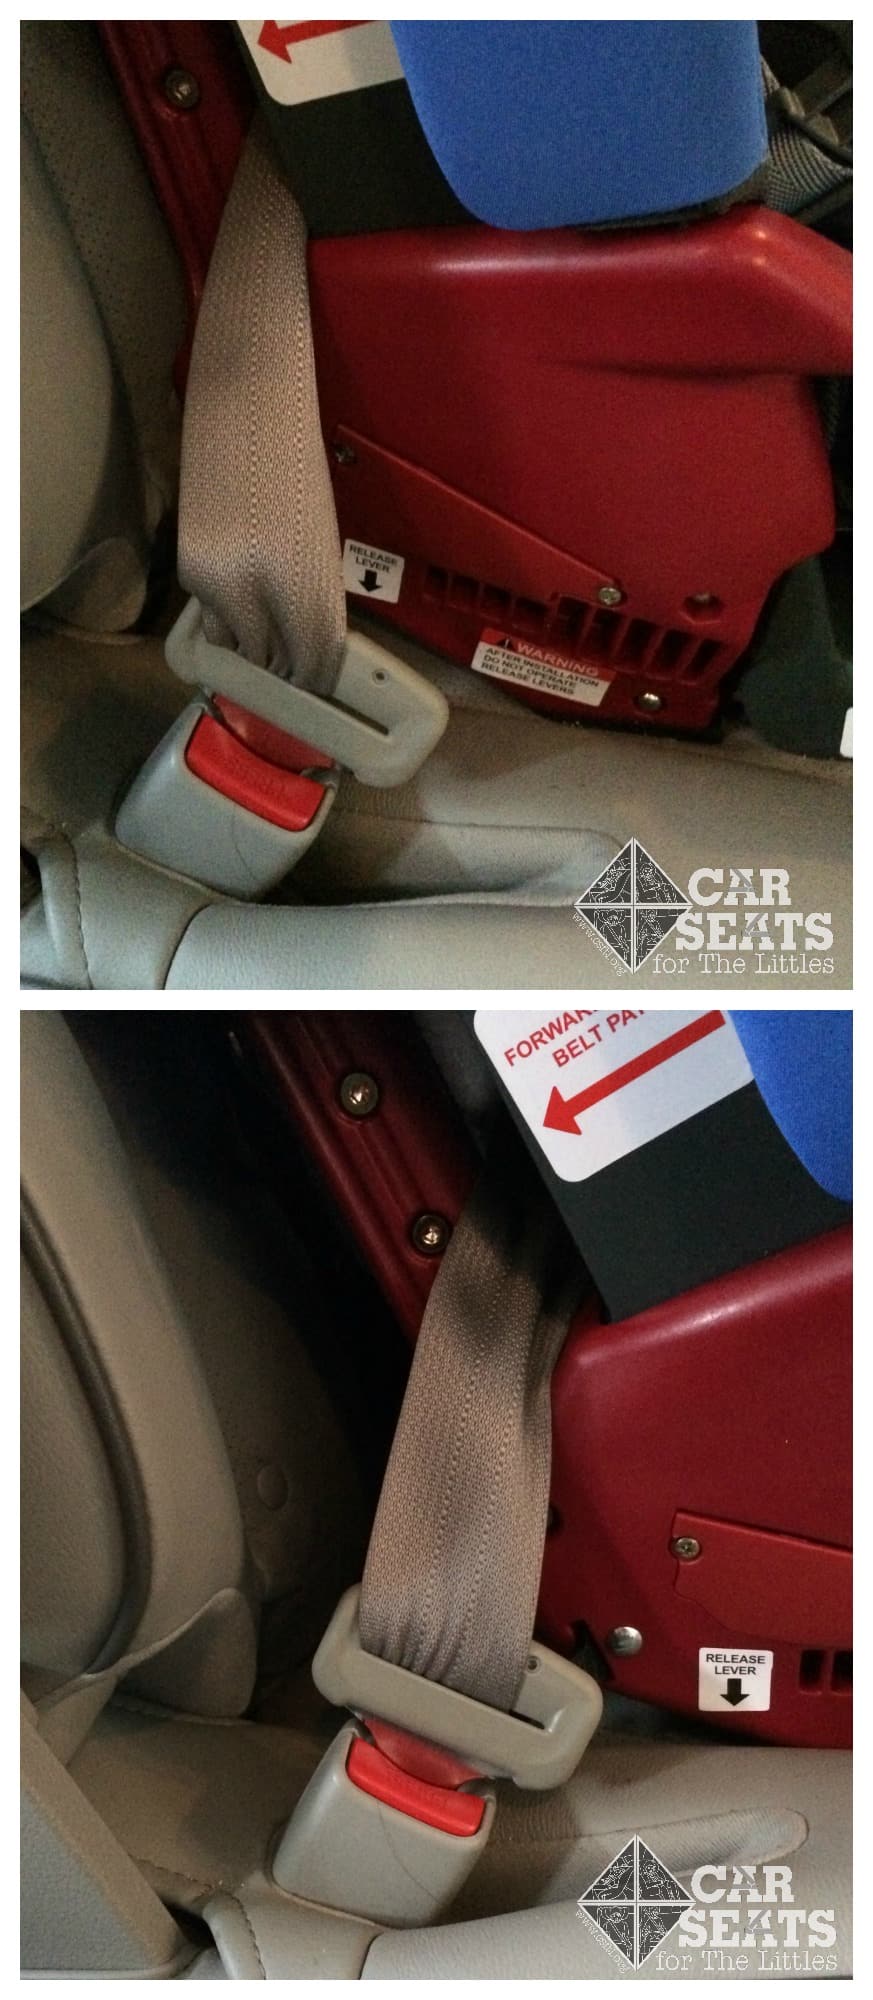
Then place the seat on the vehicle seat, sliding the feet of the base into the seat bight. Thread either the lower anchor strap or seat belt through the rear facing belt path and either buckle or attach the lower anchor connectors. If installing with lower anchors make sure the arrows point up on the connectors.
Angle Adjuster
Due to the base having only one recline level, Diono sells an angle adjuster to help make the seat more upright, if needed. It can only be used with children who can sit unassisted and have good head control.
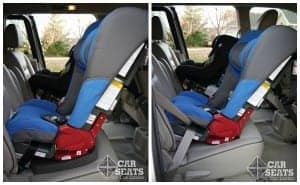 This can help with front to back space as the child gets older and allows the seat to be at a more upright recline. To install the angle adjuster, loosely install the car seat and then slide the adjuster between the car seat and vehicle seat bottom. It should rest against the back of the recline boot, but not under it. Then tighten using whichever install method you choose.
Appropriate Newborn Angle
Newborns have special requirements in the car. A too upright seated position may lead to oxygen desaturation (lessening of the oxygen supply in the blood), as a newborn has poor head control. Diono convertibles are unique in that their recline is extremely dependent to the slope of the vehicle seats on which they are installed.
Some very sloped vehicle seats may lead to a too upright position for your Diono convertible for a newborn. If your baby’s head is slumping forward and can’t be safely positioned with the included infant insert, you may need to either move your seat to another seat in the vehicle and try again, or consider a different seat option until baby has better head control and can sit up safely.
If your seat is too upright you can install putting your weight where the baby’s bum sits when tightening. If it’s too reclined, you can put your weight into where the baby’s feet sit when tightening. These techniques have limited effectiveness in Diono convertibles, but may be enough to solve the problem in your vehicle.
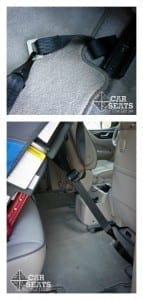
Rear Facing Tethering
Once the seat is installed, Diono allows the use of rear face tethering via tether connecting strap. This strap connects to an immovable part of the vehicle, usually consisting of a front seat rail. The tether is then attached to the D-ring on the strap. I’ve found the tether anchor can sometimes be difficult to attach to the d-ring. The tether should be tightened to the point where all the slack is pulled out.
Before performing this step, make sure to check your vehicle manual to find if there are any restrictions when attaching it to the front seat rail. Rear face tethering is optional, so if your vehicle doesn’t allow it, you can still properly install the seat without it.
Forward facing
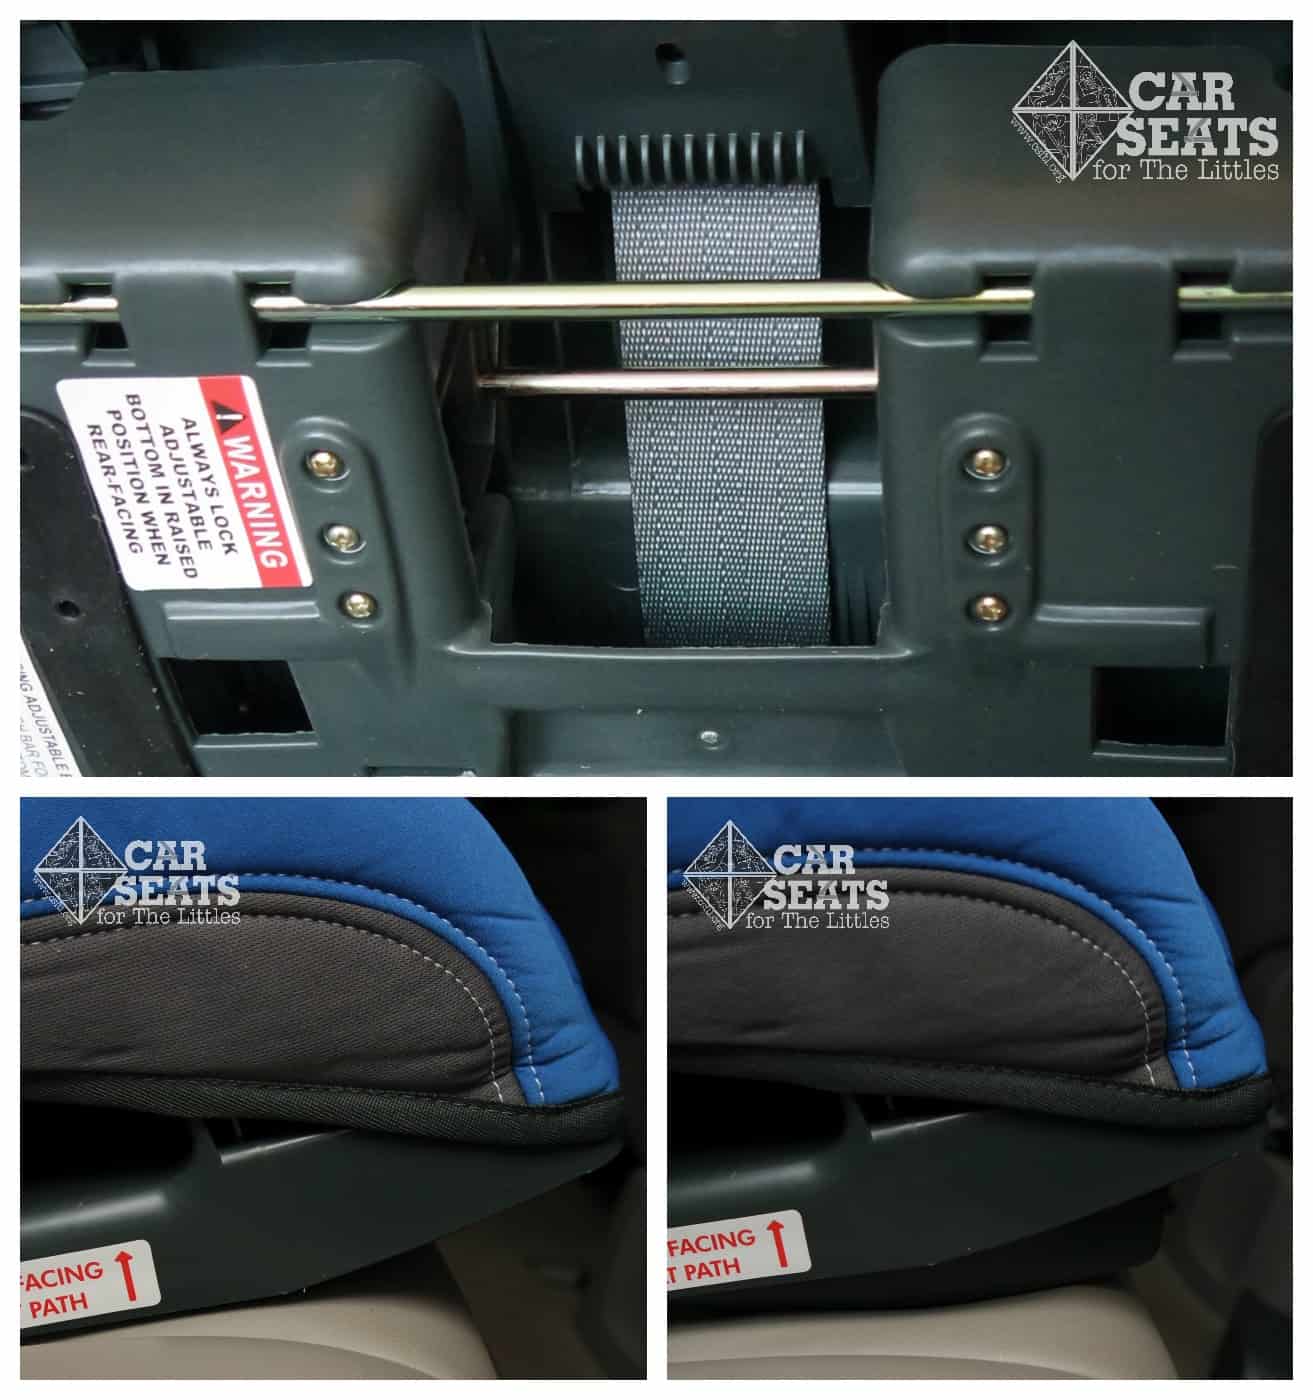
Forward facing recline
Diono requires the vehicle seat to be in its fully upright position when installing the Rainier forward facing. Included in the base is a forward facing recline foot to help to properly install on different types of vehicle seats. To engage the built-in recline squeeze the 2 metal bars together on the underside of the seat and pull out.
Effective 12/04/2014: Diono now requires the recline foot to be extended for all forward facing children over 25 pounds.
 SafeStop
The SafeStop is required for children under 40 pounds in the forward facing position. Do NOT use it rear facing. To install, detach the harness straps from the splitter plate, slip the loop on the SafeStop over the splitter plate, and attach the harness loops to the hook on the SafeStop. While you have the harness straps off, you will want to adjust the harness to the correct position. For forward facing, the harness needs to be at or above the child’s shoulders. Only the top 3 harness slots are allowed for forward facing use. If the child is over 65 pounds, the larger harness pads will need to be used. Please see the forward facing child fit section for more information on this.
Easy reach installation path
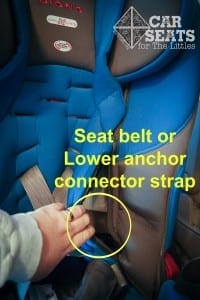
The Rainier incorporates a ‘trick’ that all Diono convertible seats have had. They provide a nice slit on each side of the cover for easy access to the seat belt or lower anchor connector strap. To tighten either the connector strap or belt, just reach through the cover and tighten.
I had an extremely difficult time installing the Rainier via seat belt in forward facing mode. My van (2012 Nissan Quest) has rigid belt stalks which can be cumbersome with some seat belt installs. The Rainier was no exception. I was able to get it nice and tight when it was pushed all the way back into the back of the vehicle seat, but every time I would pull the harness adjuster, it pulled the front of the car seat out and loosened the install. The belt was also very bunched in the latchplate. So I enlisted the help of some other Diono knowledgable techs and it was suggested I pull the built-in recline out and pull it away from the vehicle seat back a bit. Using this method I was able to get a good tight install without the tip forward, but I would still be concerned if an active child jumped into the seat quickly, it would push back into the vehicle seat back and become loose again. Overall, I just wasn’t pleased with the forward facing seat belt install in my van and would be afraid of misuse by an everyday parent with no Diono experience.
Booster
 Converting the seat to booster mode is a bit more labor intensive. Overall the installation in the vehicle will be the same as the forward facing LATCH installation. The Rainier allows you to install it with LATCH while being used as a booster as long as the lower anchor connectors don’t interfere with the seat belt. This allows the seat to not have to be buckled when unoccupied.
Before installing in the vehicle the harness needs to be removed. This is not an easy feat, unfortunately. I’ll walk you through step by step on how to do this. You will need a Phillips head screwdriver.
 Step 1
Buckle the harness and chest clip and remove the harness pads. Then disconnect the harness loops from the splitter plate on the back of the car seat. If the over 65 lb pads are being used, those will need to be removed at this time as well.
Step 2
Slide the harness straps through the front of the seat and slide the chest clip and buckle tongues off each strap. Keep in a safe place.
Step 3
Detach the buckle. Use the same method to remove this as you do to adjust the position for the child. You will either need to slide the plate through by sliding your hand into the rear facing belt path or folding the seat bottom up and sliding your hand through space that provides. The only part of the harness left on the seat at this point should be just the actual straps.
Step 4
Unscrew the 2 screws holding on the plastic piece on the side of the seat. Under this piece, you’ll find the plate where the harness is attached to the bottom of the seat.
Step 5
Maneuver the plate through the hole on both sides. They don’t leave much room for this step, so you may need to do some precise maneuvers.
Step 6
Using the harness plate attachment piece, pull the harness straps through the bottom of the seat to remove, then screw the plastic pieces back on to cover holes. I highly recommend keeping all the harness parts in a large bag to keep it all together.
To reattach the harness, follow these steps in reverse order. Making sure everything lies flat and untwisted once finished. Pulling the harness all the way back through can be a bit of a hassle. The seam where the harness plate is easily gets caught up on the hole to slide the harness through on the seat bottom.
As you can tell, this is not something you will want to do often and has potential for misuse due to not getting everything threaded back through correctly.
Child Fit
Support Inserts
It comes with both toddler and infant support cushions which helps with smaller child fit (can be used with any height or weight of child) as well as adjustable side bolsters for larger children. These adjust by pulling out on the bolsters. They feel sturdy but I am a bit concerned about how long they’ll hold up and not become damaged from kids getting in and out of the seat.
 Head wings & Low Profile Sides
 The low profile sides and adjustable head wings are nice features. The biggest downfall with them is that the headwings cannot be used until the child in on the 3rd harness slot. Before then, they need to be all the way up. Although not a safety issue for kids with head control and the ability to sit unassisted, there is still considerable head slump, which can become a comfort issue. The headwings can also be difficult to adjust as well.
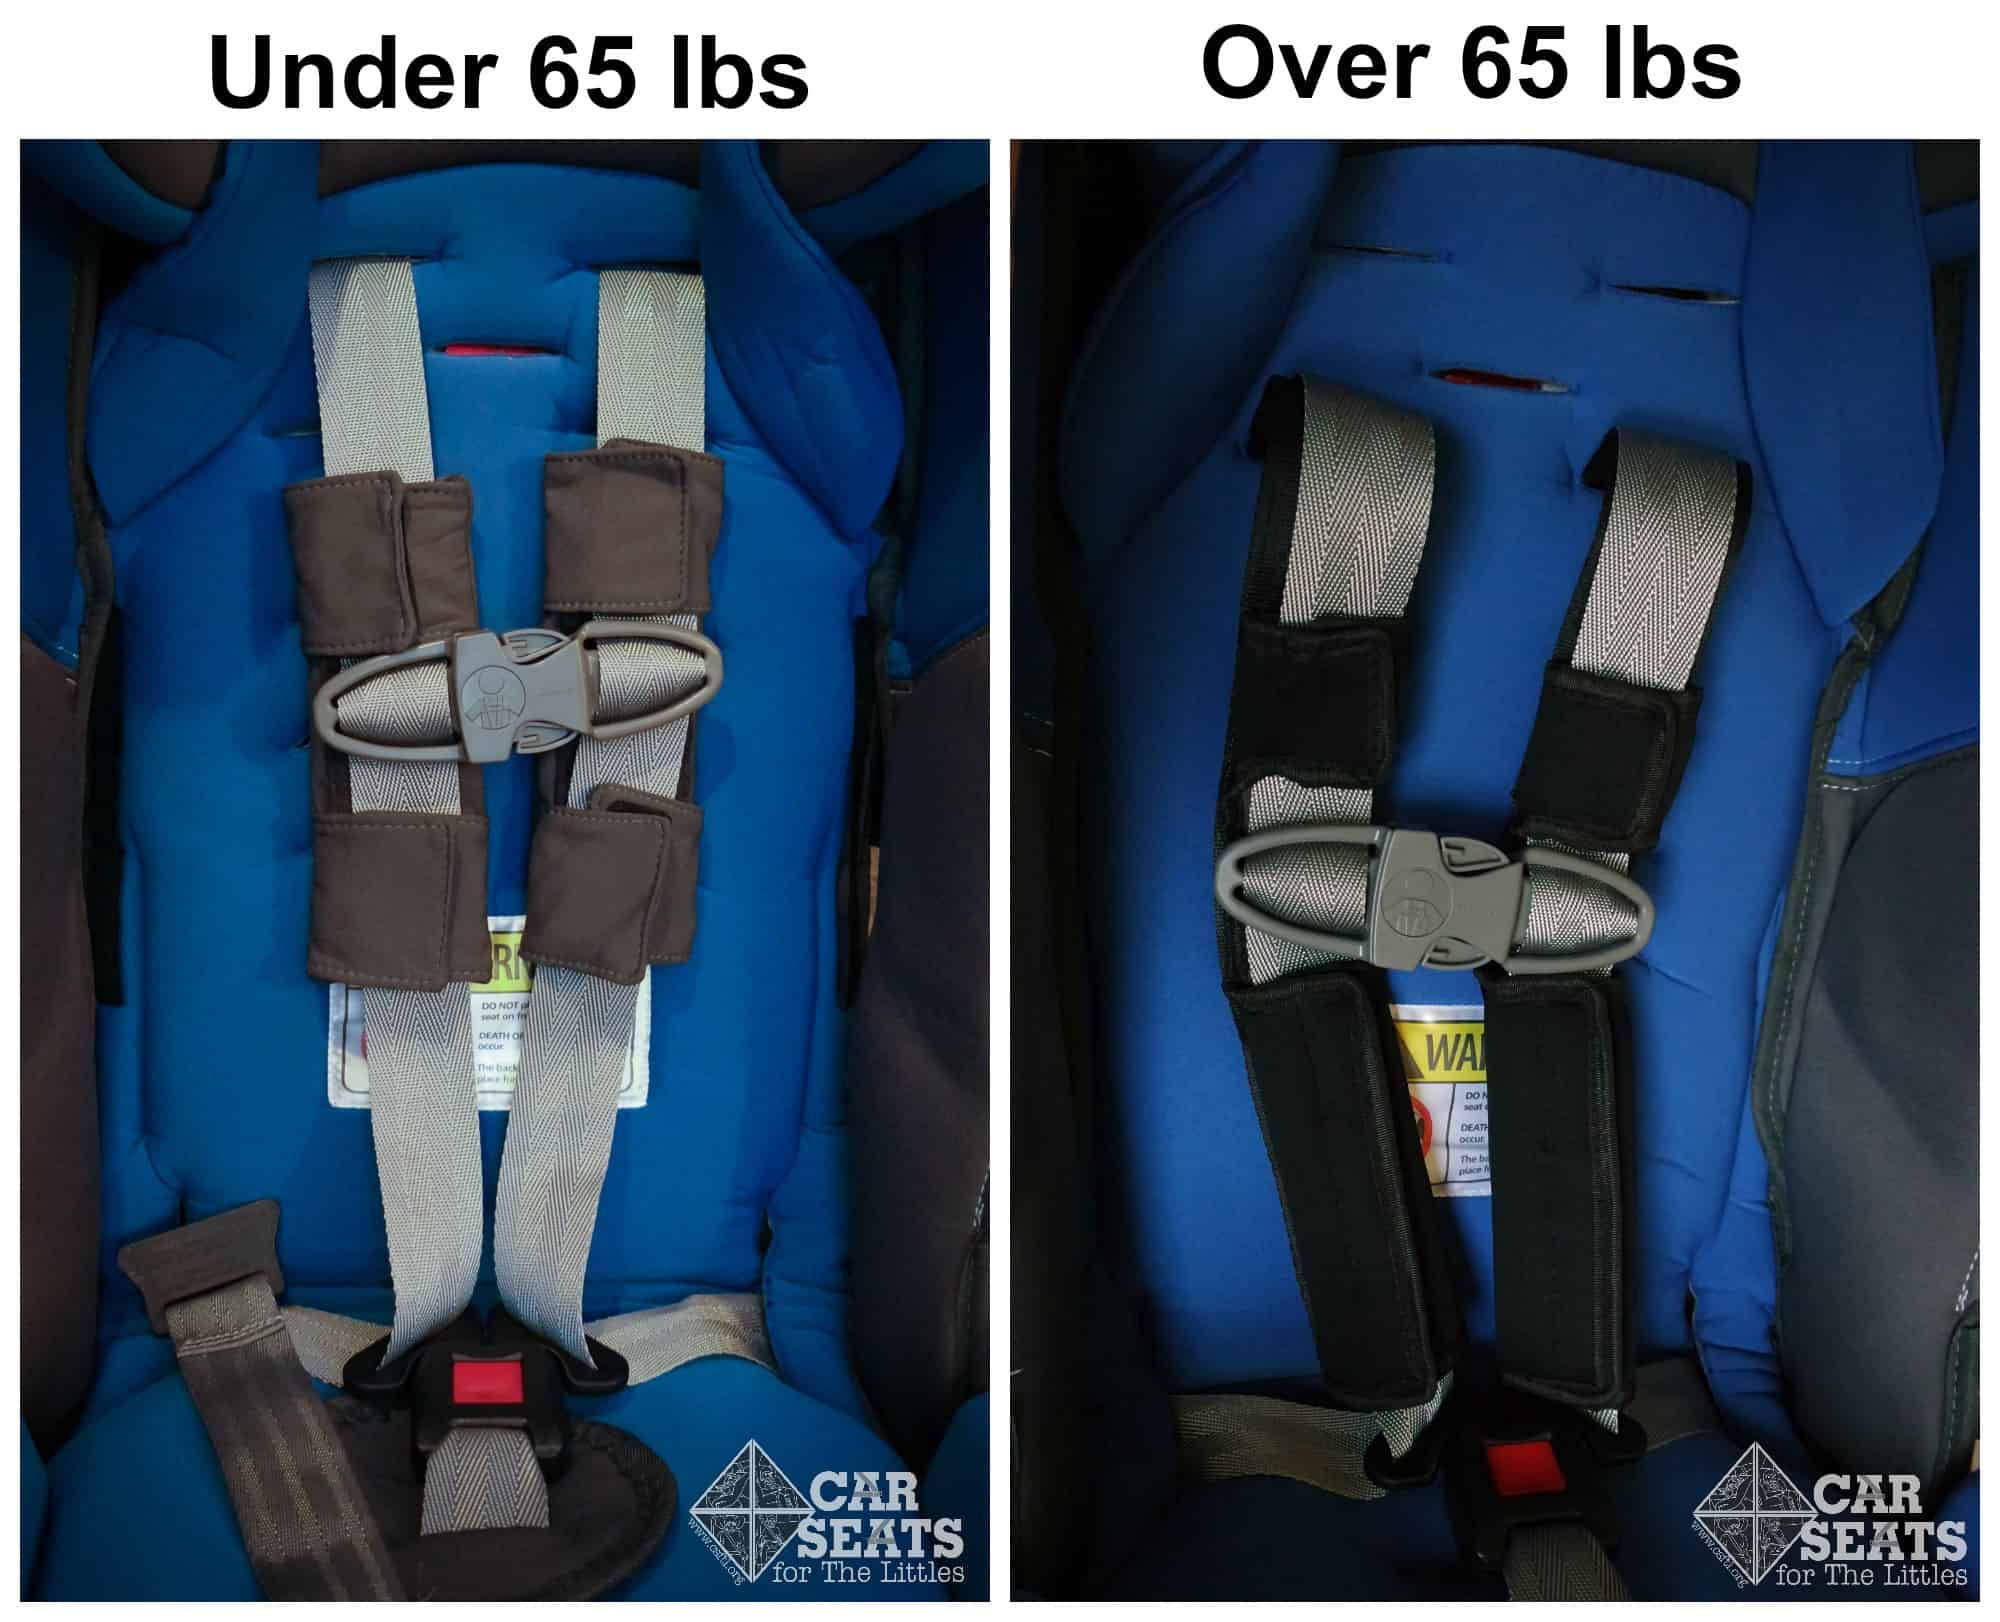
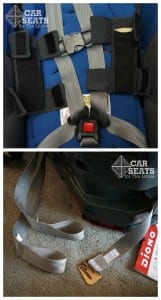
Harness Comfort Pads
The Rainier comes with 2 sets of harness comfort pads. The seat is always required to have one set of harness pads on at all times. The pads it ships with have attachment points both above and below the chest clip. These are to be used until 65 pounds. Once the child reaches 65 pounds, they need to be switched out with the larger pads. These pads have a grippy material on the back of them, along with being attached to a clip that slides into the harness slots at the back of the seat. These will most likely not be used by many children due to an overinflated harness weight limit in combination with the headwings, as will be discussed in the forward facing child fit section.
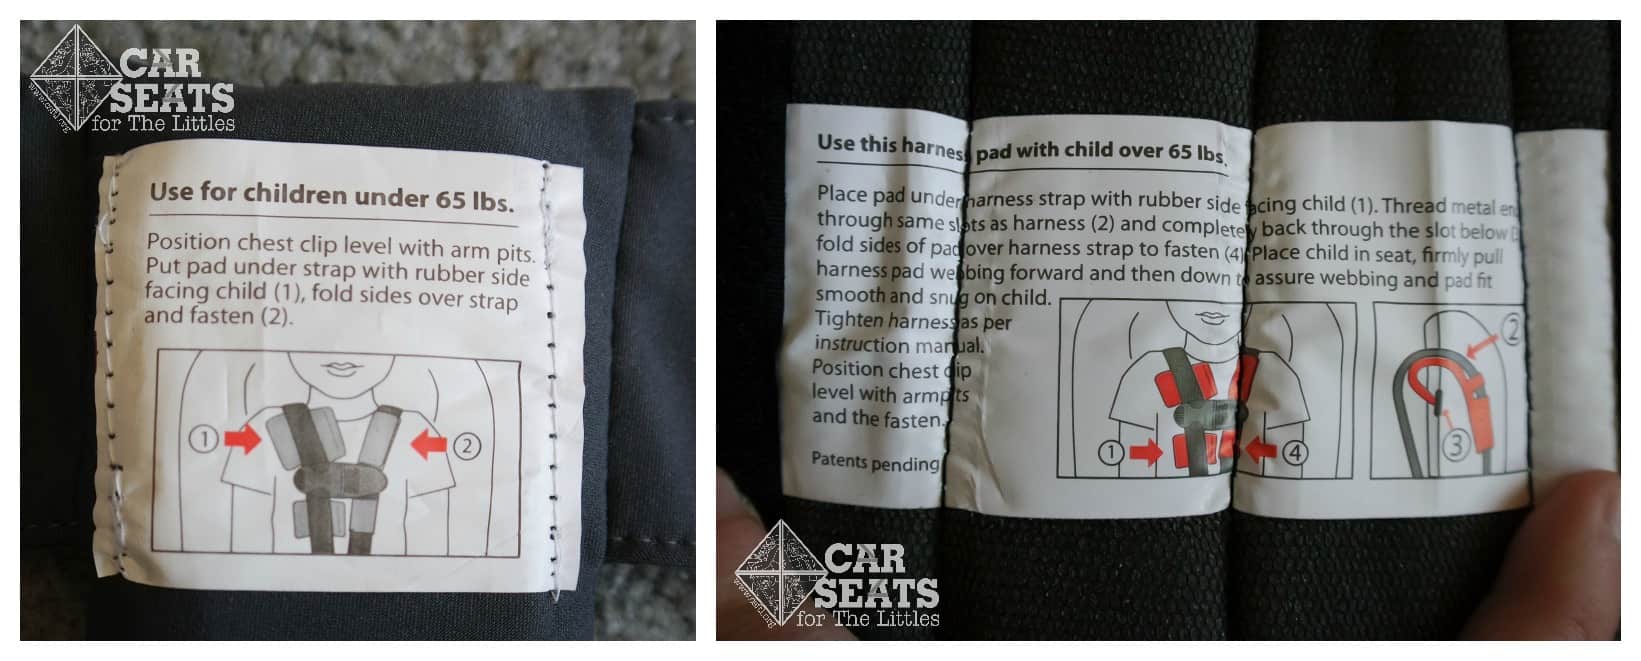
The instructions for use with both sets of pads are on a tag on the inside of each. The manual doesn’t say anything about the installation of the larger pads.
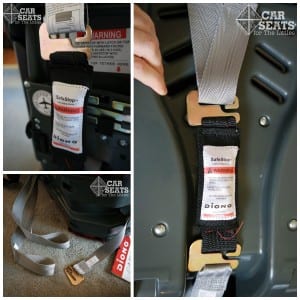
Harness Pads: March 2016
Diono inadvertently shipped the harness pads with the grippy side facing the harness. While the manuals does state the grippy side should face the child, this article, other reviews and Diono’s own stock images show the pads with grippy side inward. If your harness pads are used this way, you should turn them the other way round, so that the grippy material faces the seat’s occupant.
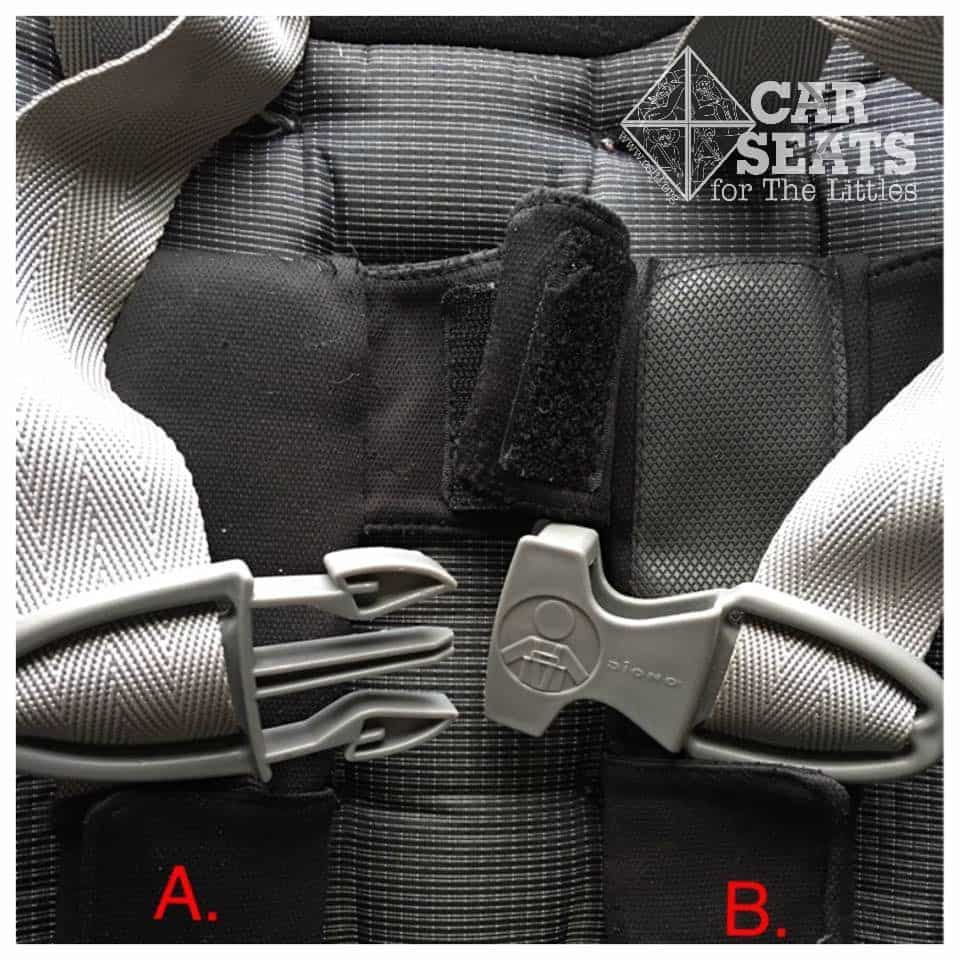
A: how the strap cover appears when properly used
B. how the strap cover was shipped
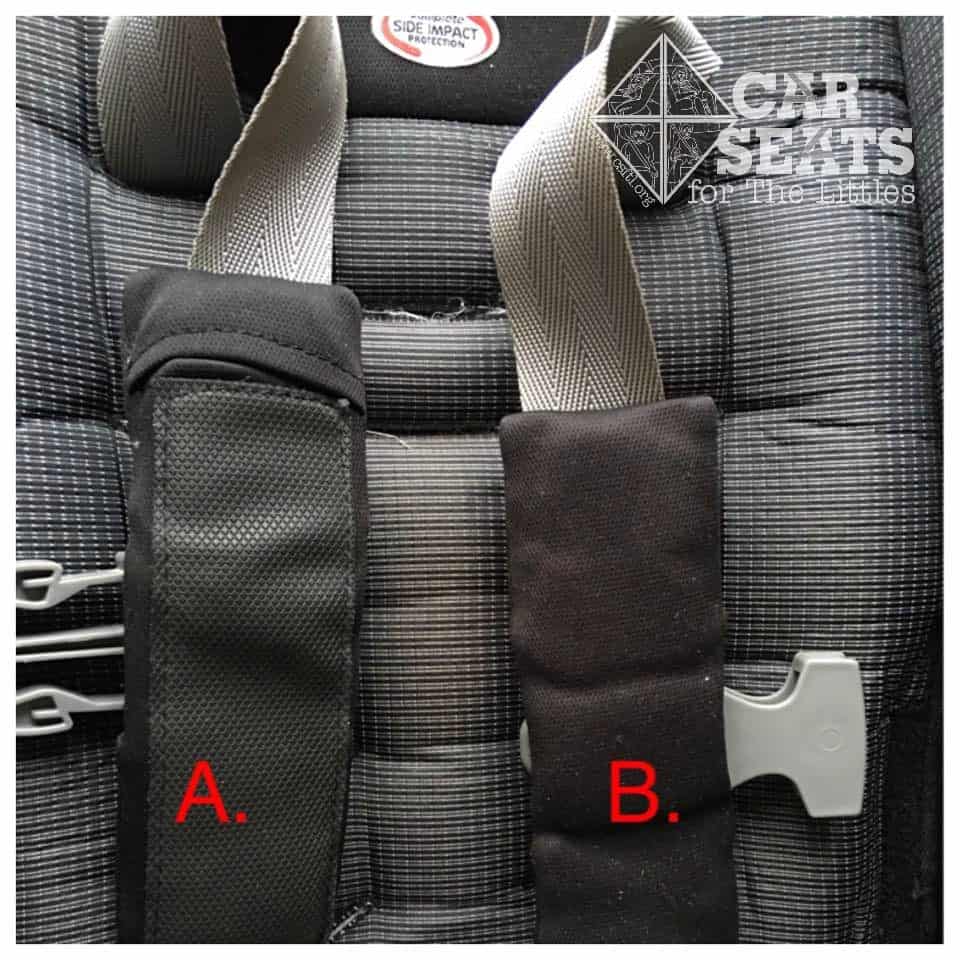
A: how the strap cover appears from the back when properly used B. How the strap cover was shipped
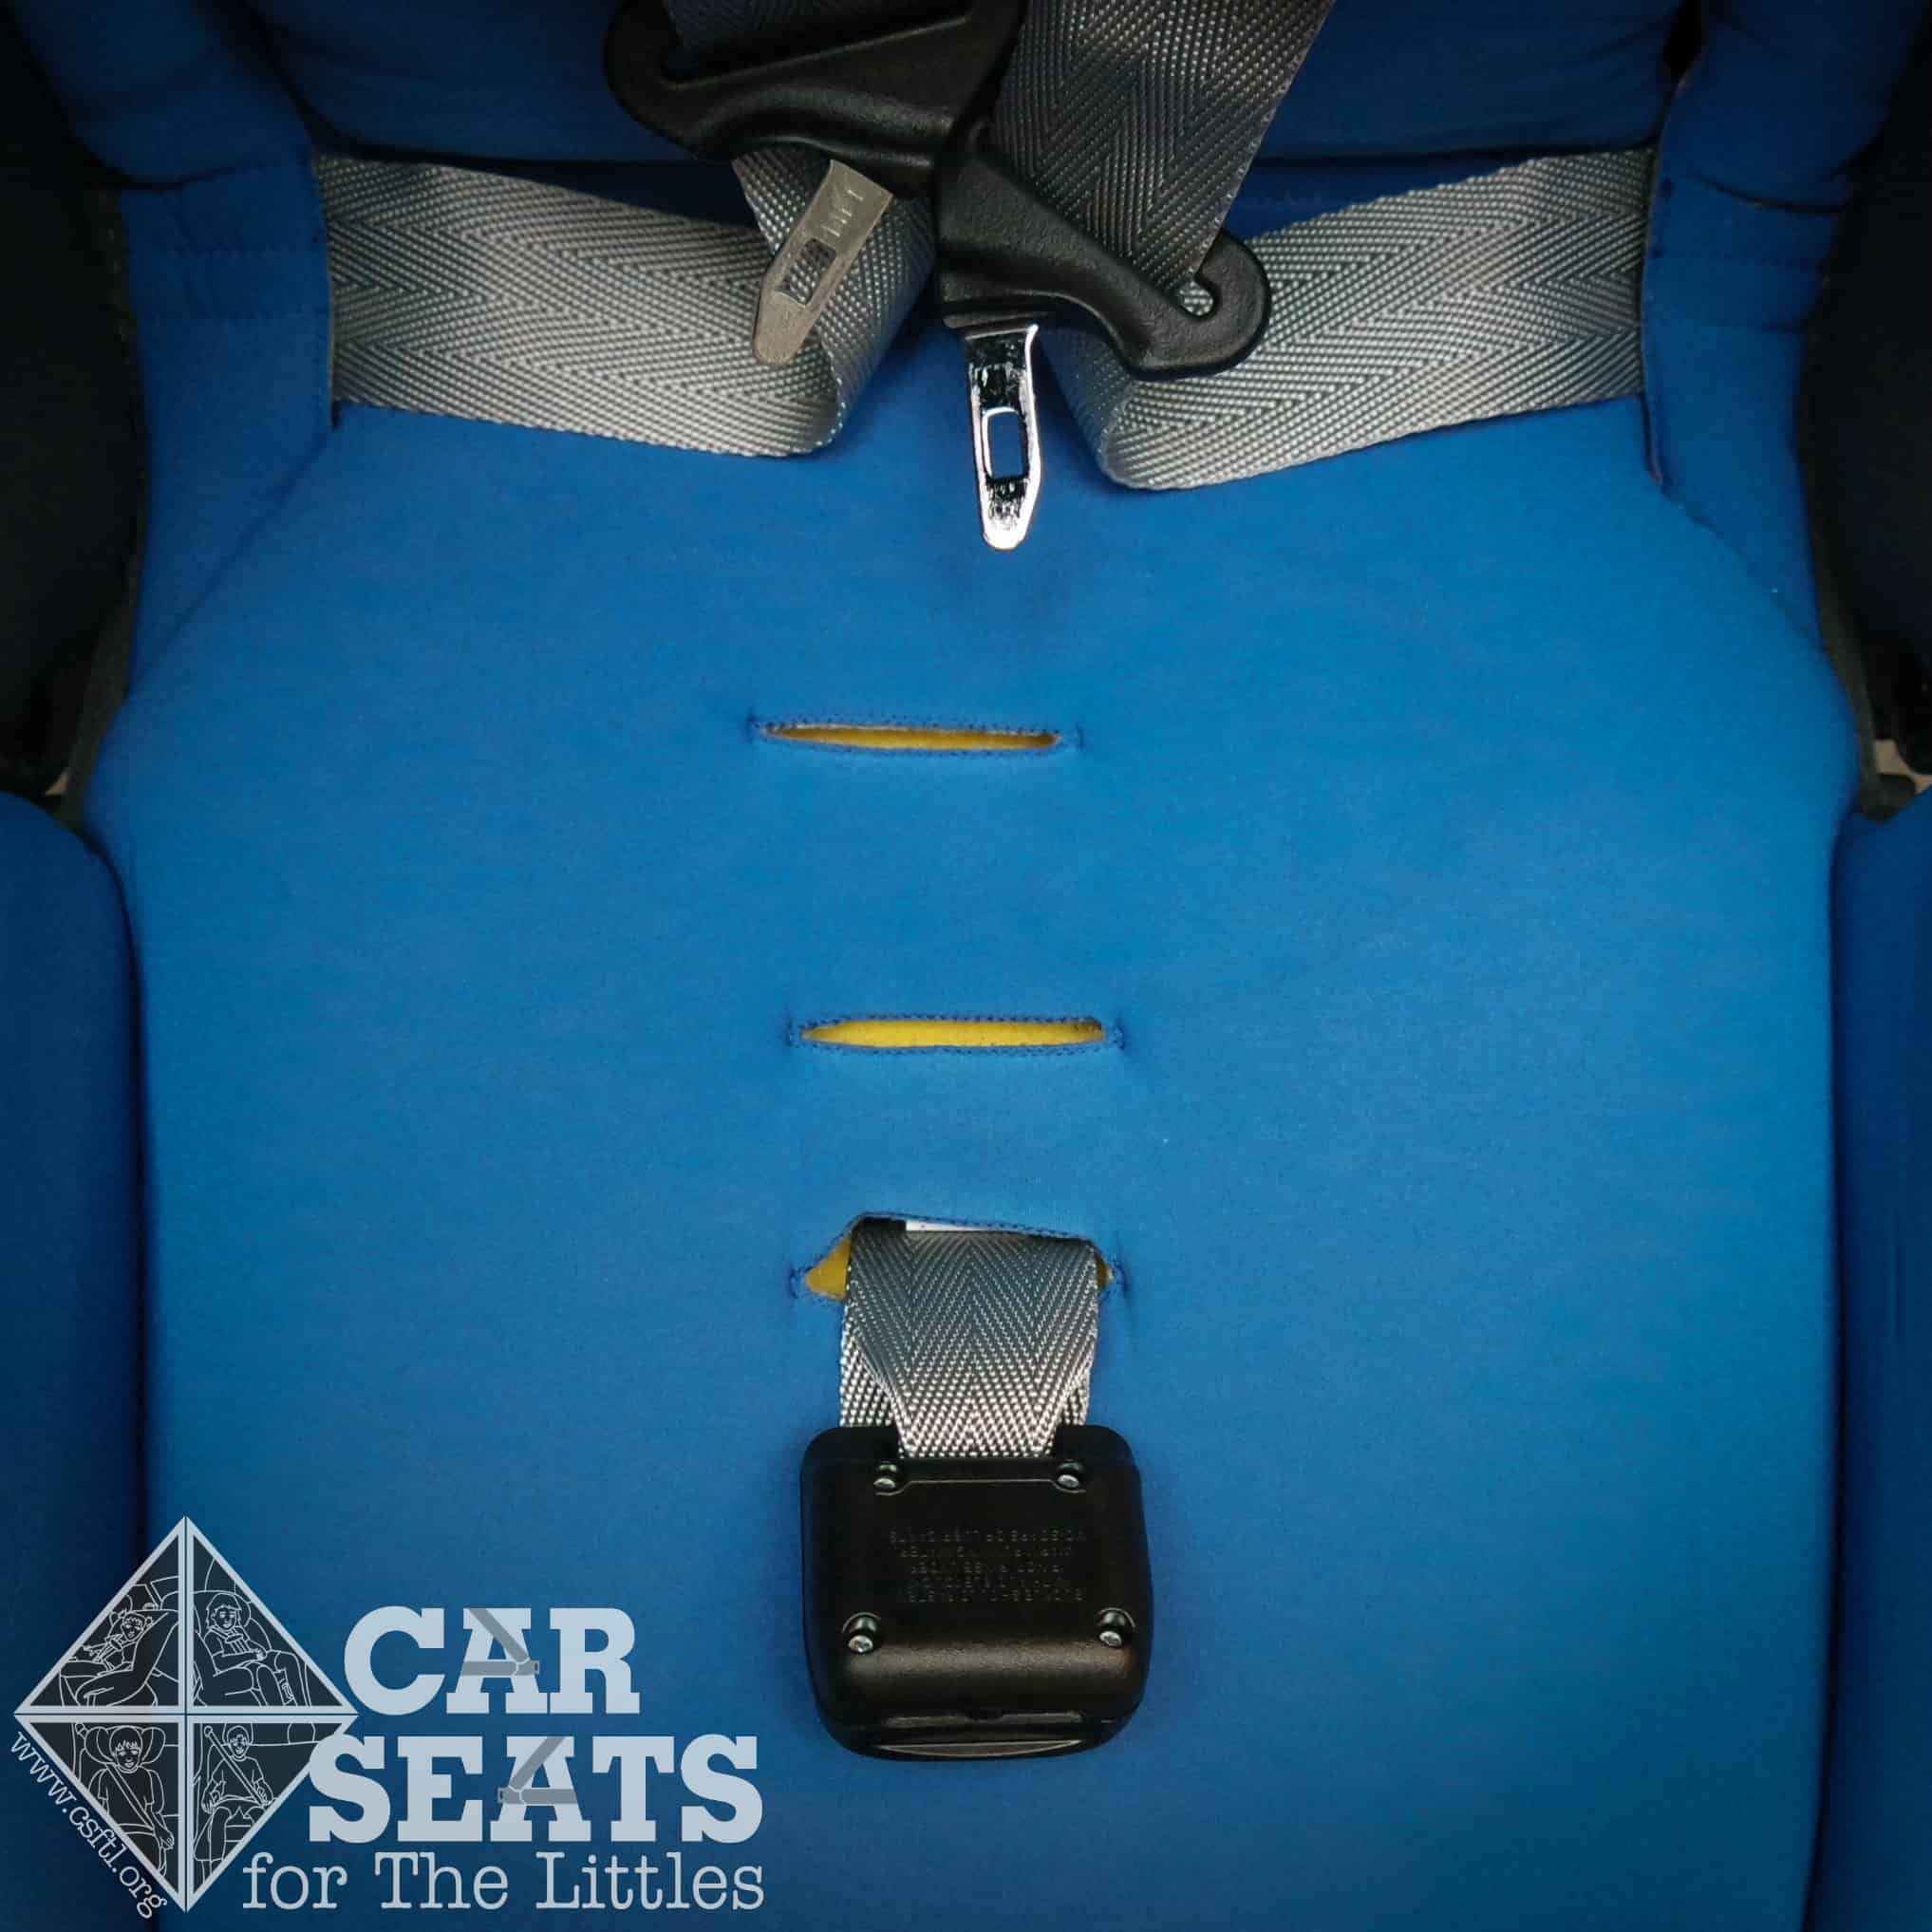
Crotch Buckle Positions
There are also 3 crotch buckle positions that can be used to help with child fit measuring 4″, 6″, and 8″. The outermost position must be used with children over 30 pounds. Changing the buckle position can be a bit difficult. With it being in the closed belt path you can either remove and adjust it by reaching into the side of the belt path or folding the bottom of the seat up and reaching through that area. Make sure you are threading it through the corresponding slot in the shell, comfort foam (under the cover), and the cover. I found that mine don’t match up well, so I really had to double-check to make sure its was in the correct position on all three.
Harness Tightener
The Rainier (like all Diono convertible seats) has a ratcheting harness tightener. This means that it pulls smoothly until it’s just about tight enough, then you use a tug, tug motion to get the last bit of slack out of the harness. I’ve found that I also need to pull from the back of the seat to get it nice and tight. This can be a misuse issue due to parents/caregivers believing the harness is tight since it won’t pull smoothly anymore, whereas it still needs a few tugs to get that last little bit tight.
Rear Facing
- Rear facing weight range: 5-50 pounds
- Rear facing height range: 44″ or less, or head 1.5″ from the top of the head to the top of the shell
- Lower anchor weight limit: rear facing 35 pounds
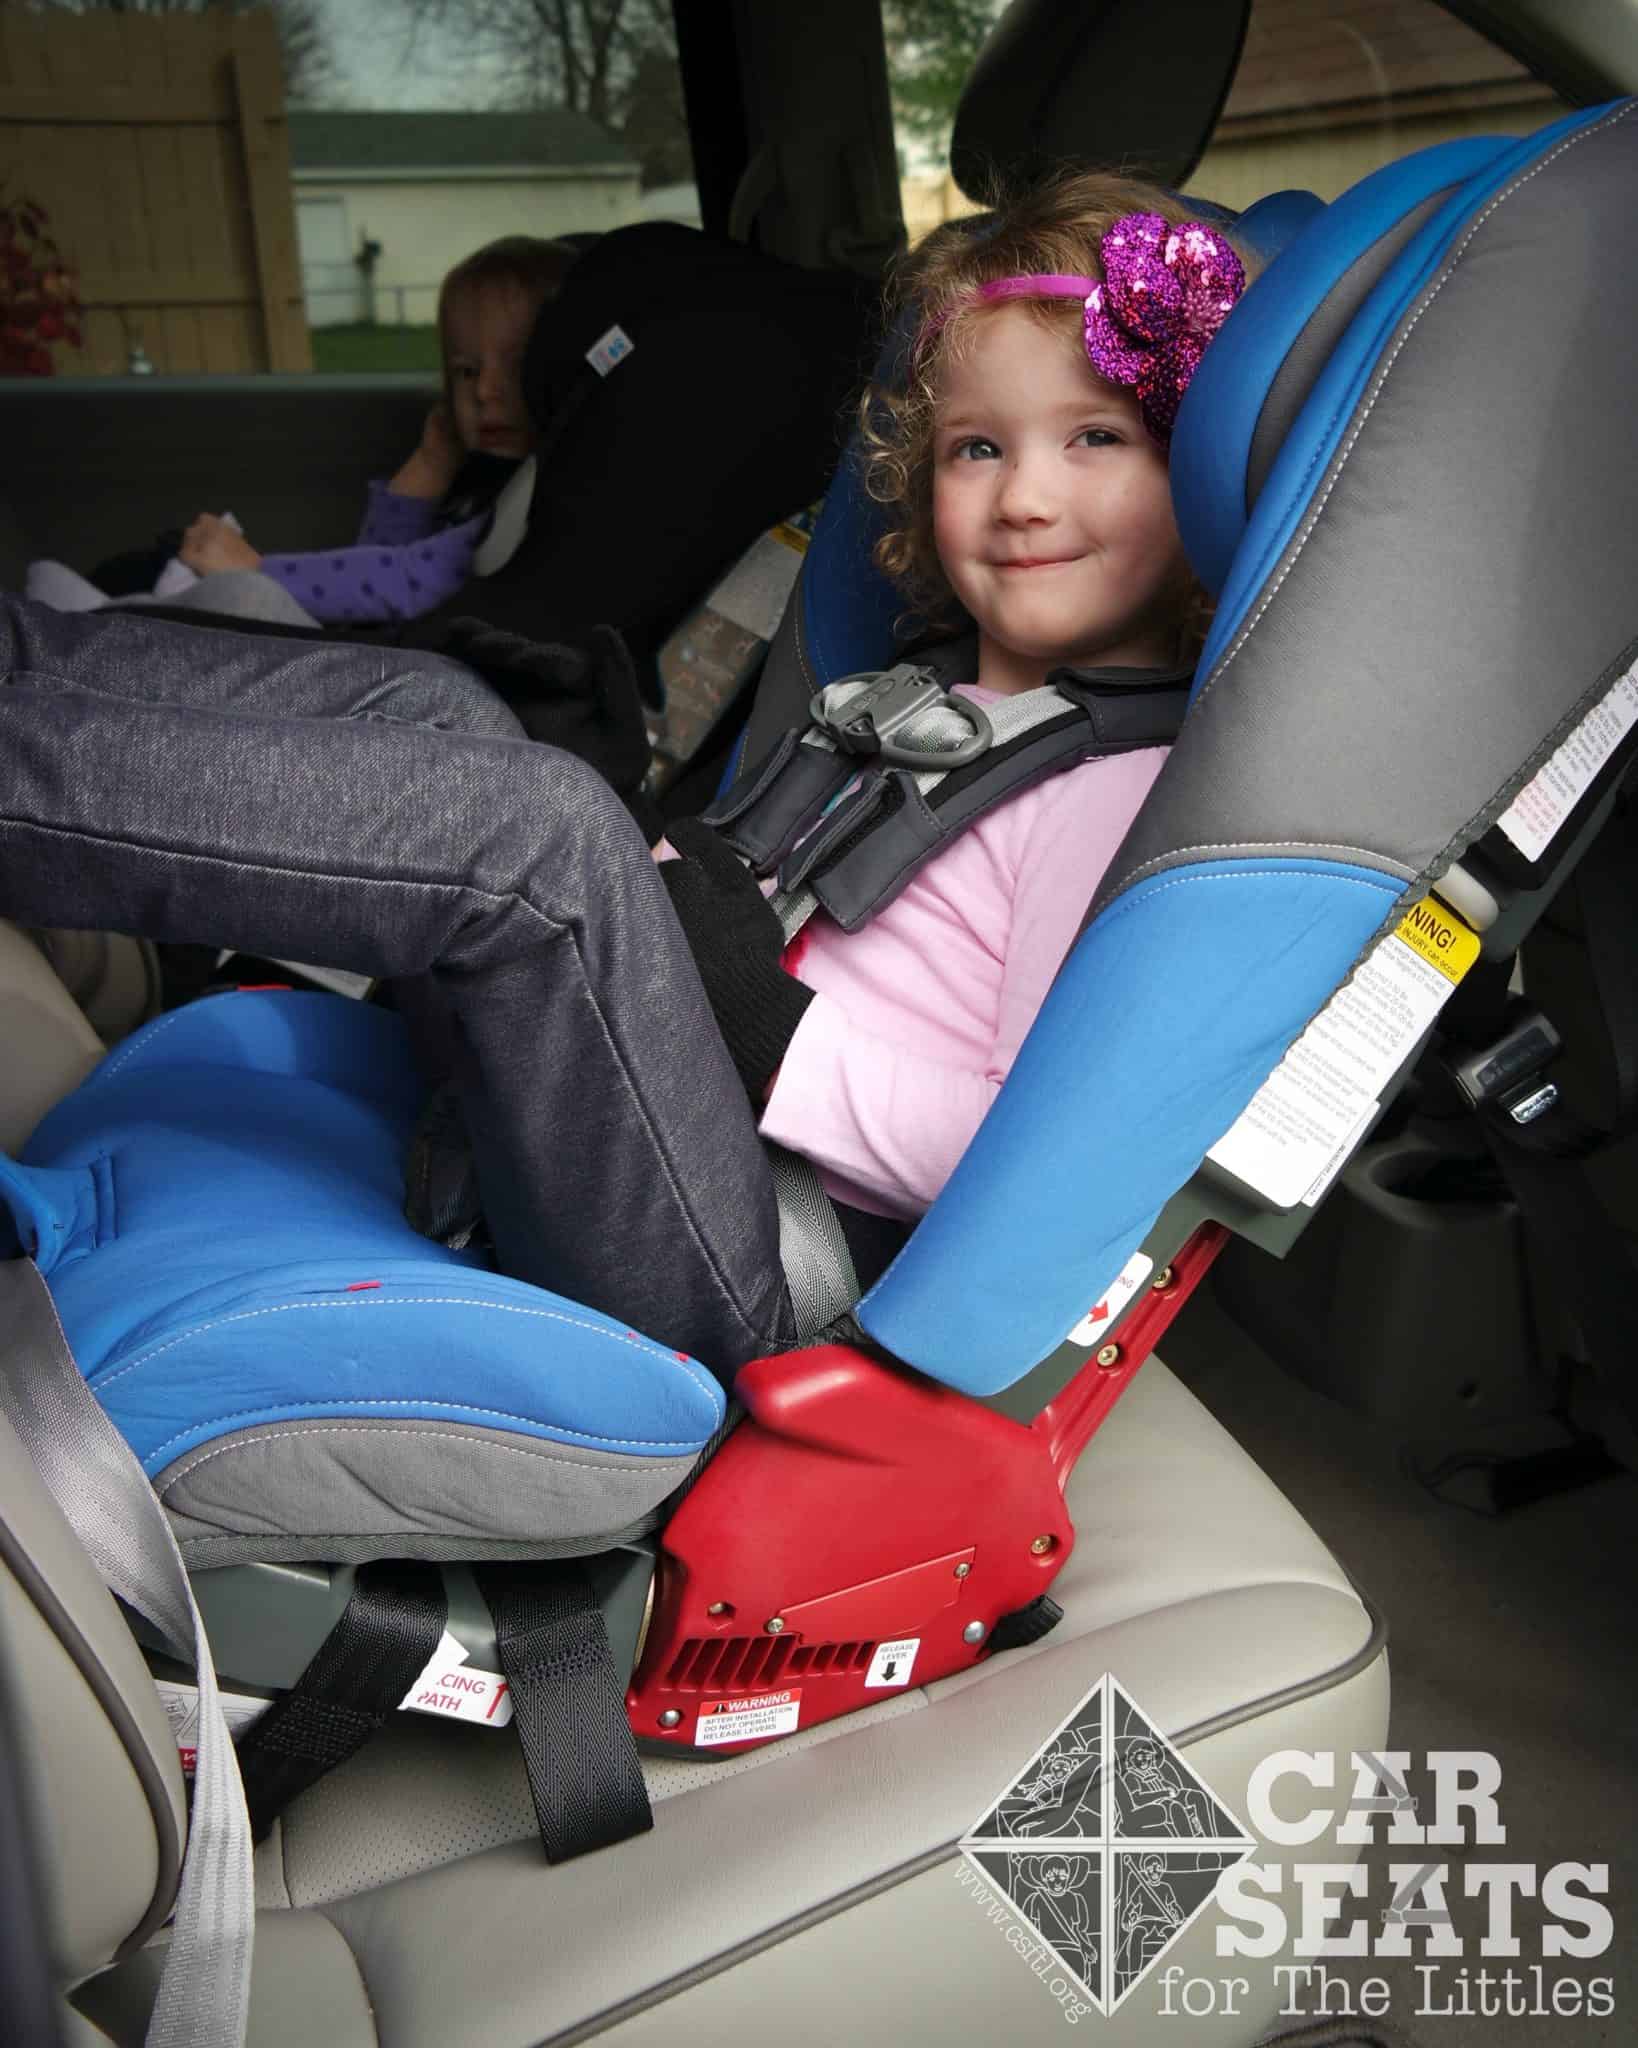
As stated before due to the Rainier’s taller shell and upper rear facing limits, this makes for a great extended rear facing car seat. With the low sides it makes it easy for children to climb into the seat by themselves, which we know most toddlers and preschoolers would like to do to show their independence.

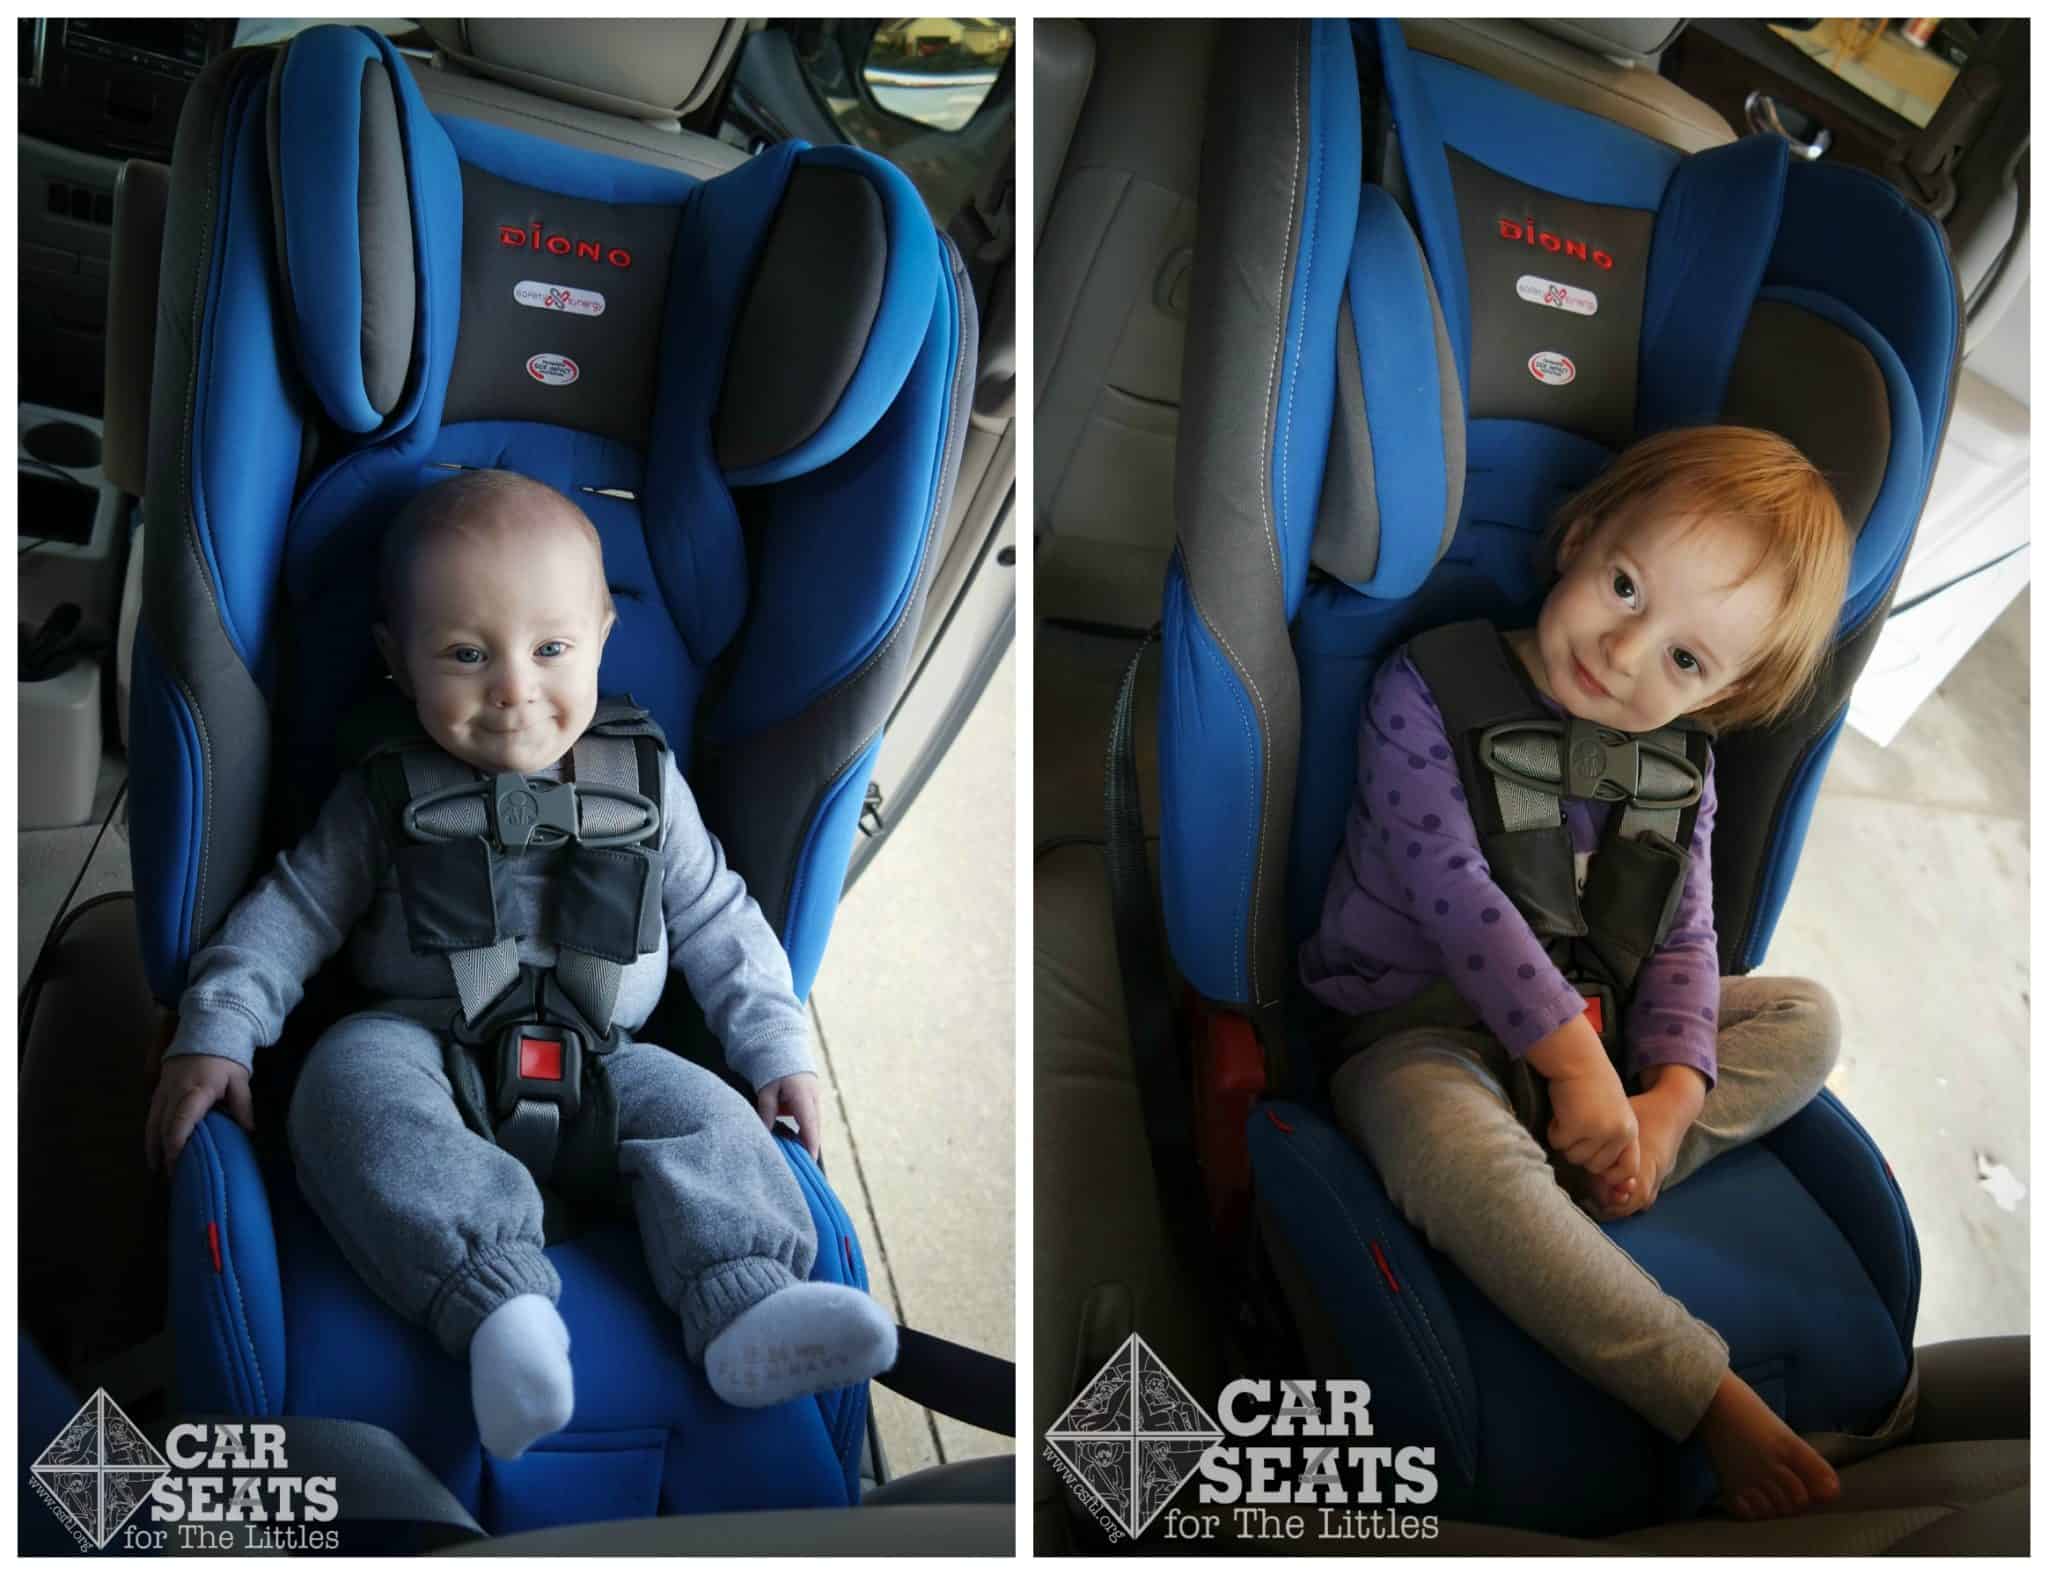
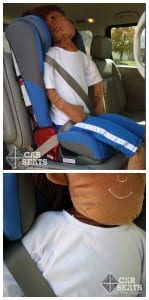
Huggable Images doll -newborn, 7pounds, 17″
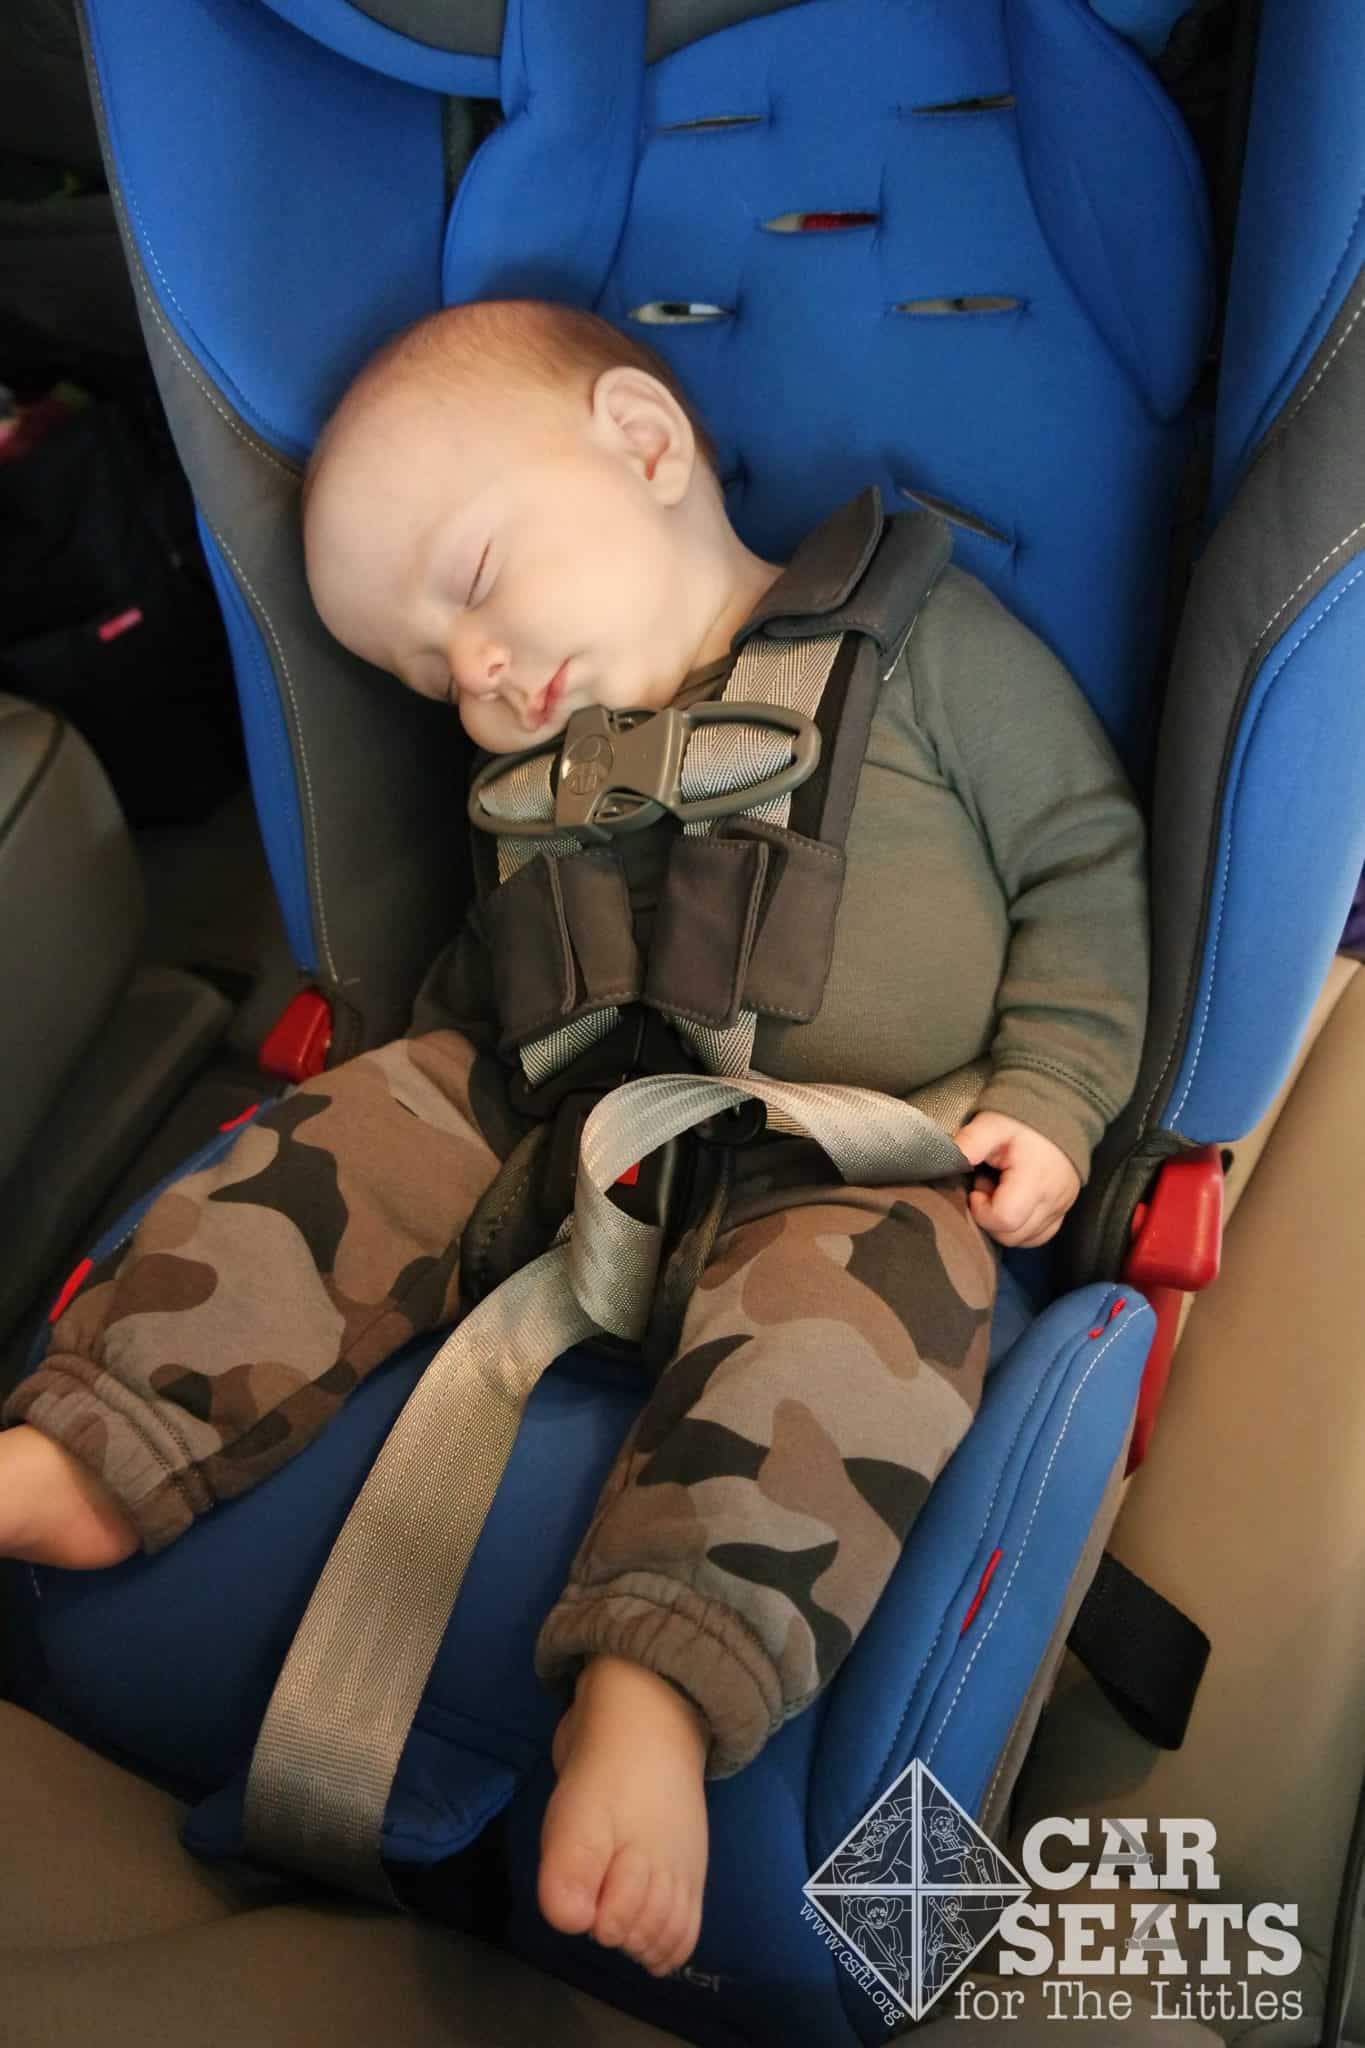
Our doll fits well with the newborn and toddler insert. The was right above the bottom harness slot. The harness was tightened to the end of its length with just barely passing the pinch test. I would be concerned with getting the harness tight enough for babies any smaller than her. The large chest clip in conjuncture with the large harness pads made tightening the harness a bit of a struggle with her. The extra padding in the harness pads also had me second guessing whether the harness was tight enough with her. Since she was only on the bottom harness slot, the headwings were in the highest position.
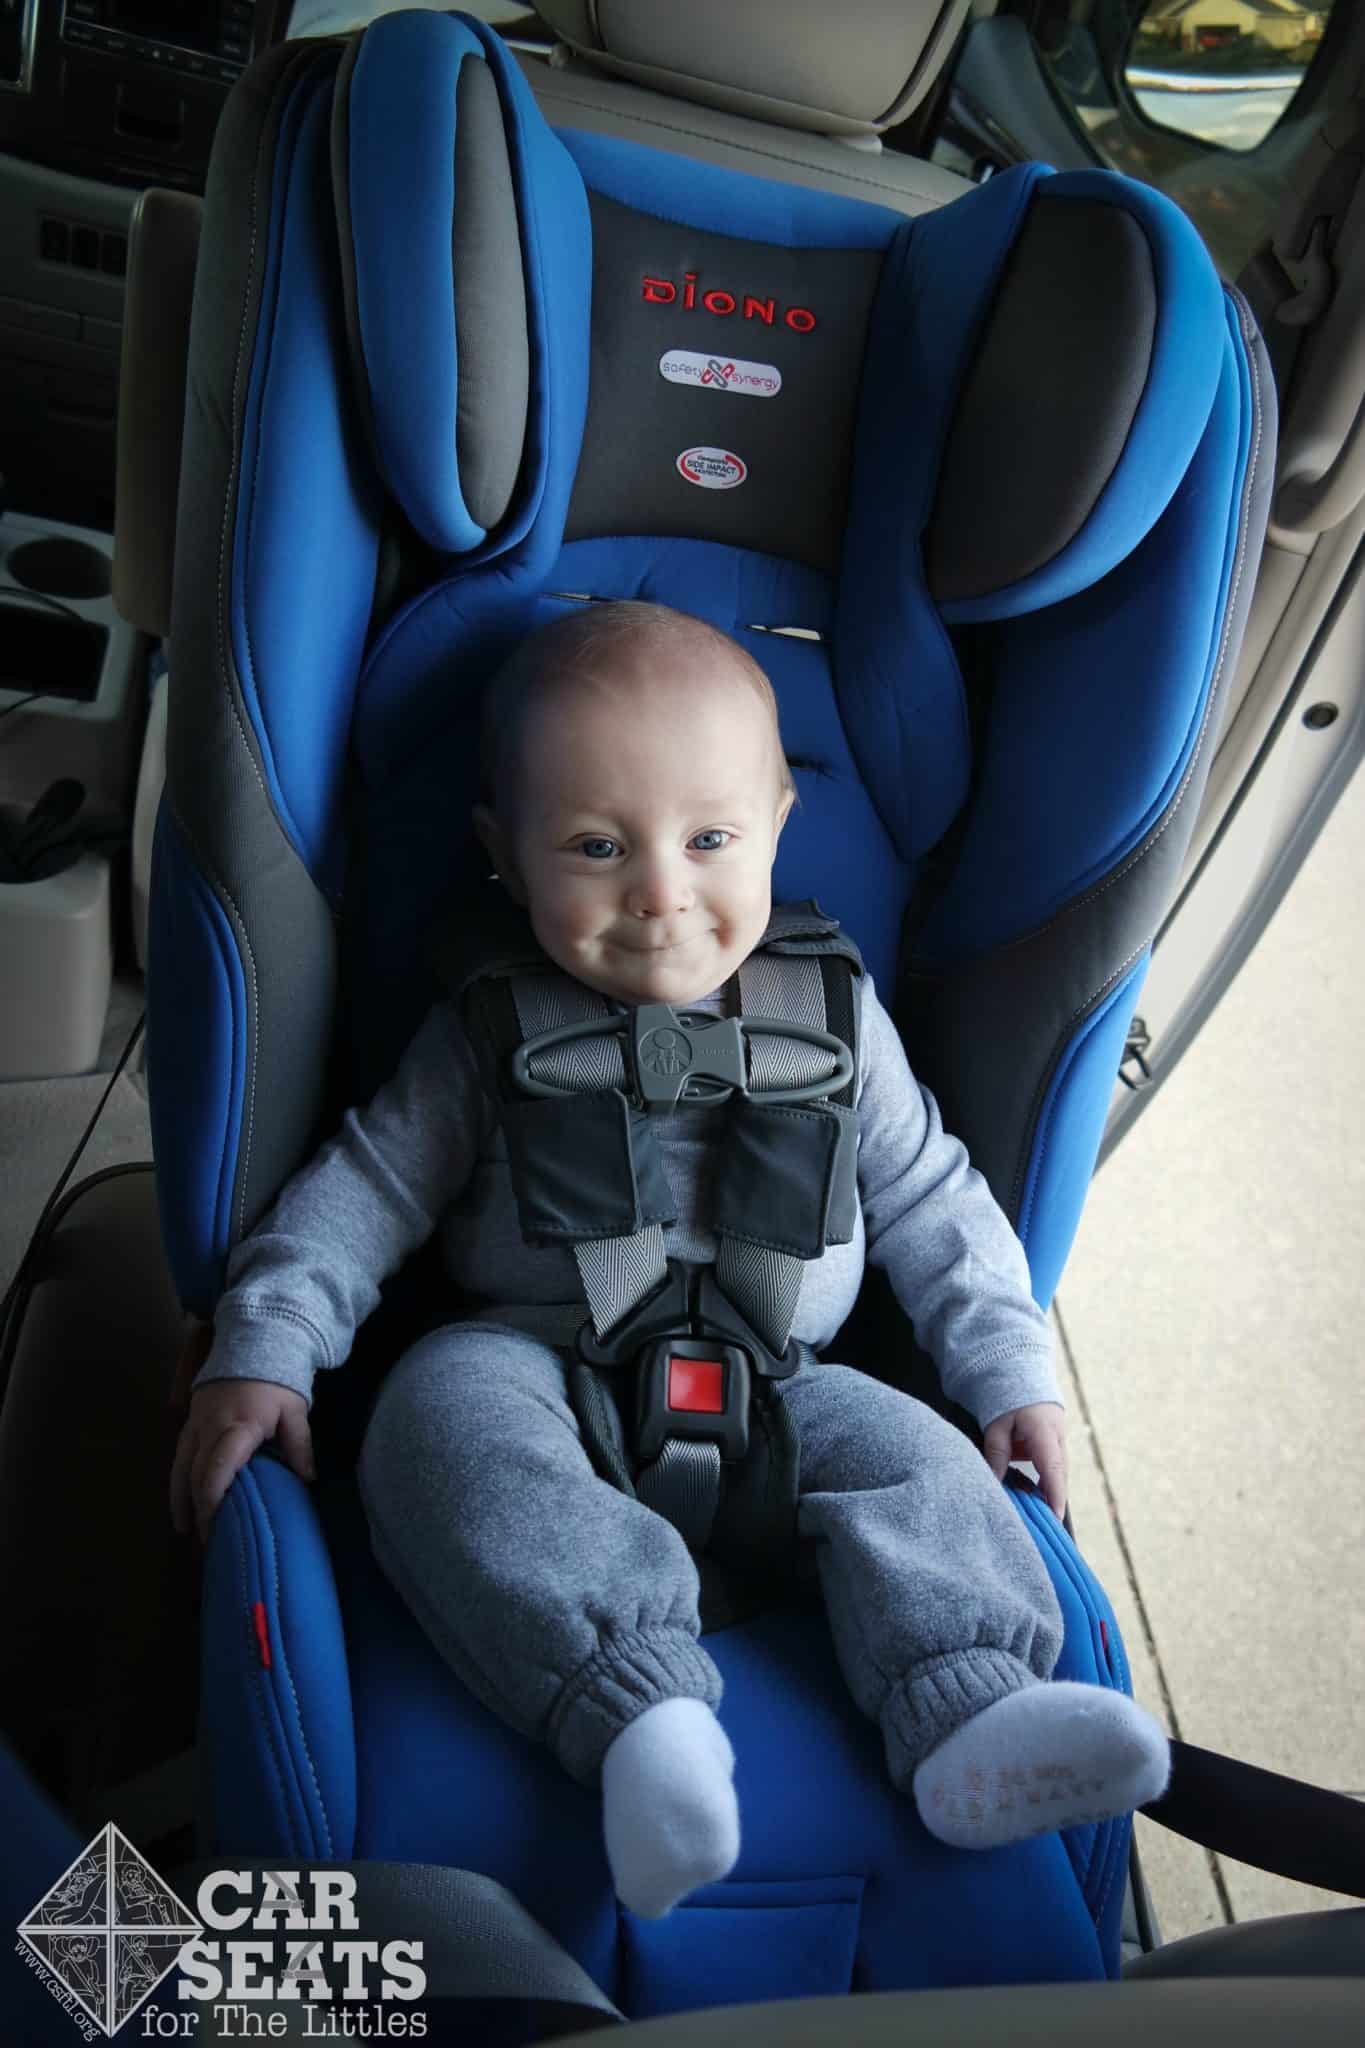
8 months, 20 pounds, 27″
This 8 month old model had a very good fit in the Rainier without the toddler and infant support. As with our Huggable Images doll, the large chest clip and large pads made me second guess fit as well as tightness. My other concern was the harness possibly sliding off her shoulders due to the wide distance between the harness straps. His shoulders were slightly above the 2nd harness position, so the headwings were left at their top position. He definitely had a head slump issue, as you can see in this photo. The infant head support would help with smaller children, but his head is too big to fit inside of the support. This side to side head slump isn’t an issue with older children with head control and can sit unassisted, but as a parent I don’t like to see this. Due to the lower profile and wider seat of the Rainier I also needed to make sure he was centered well in the seat before adjusting anything on every ride. Overall, he seemed comfortable and has fallen asleep several times in it with no complaints.
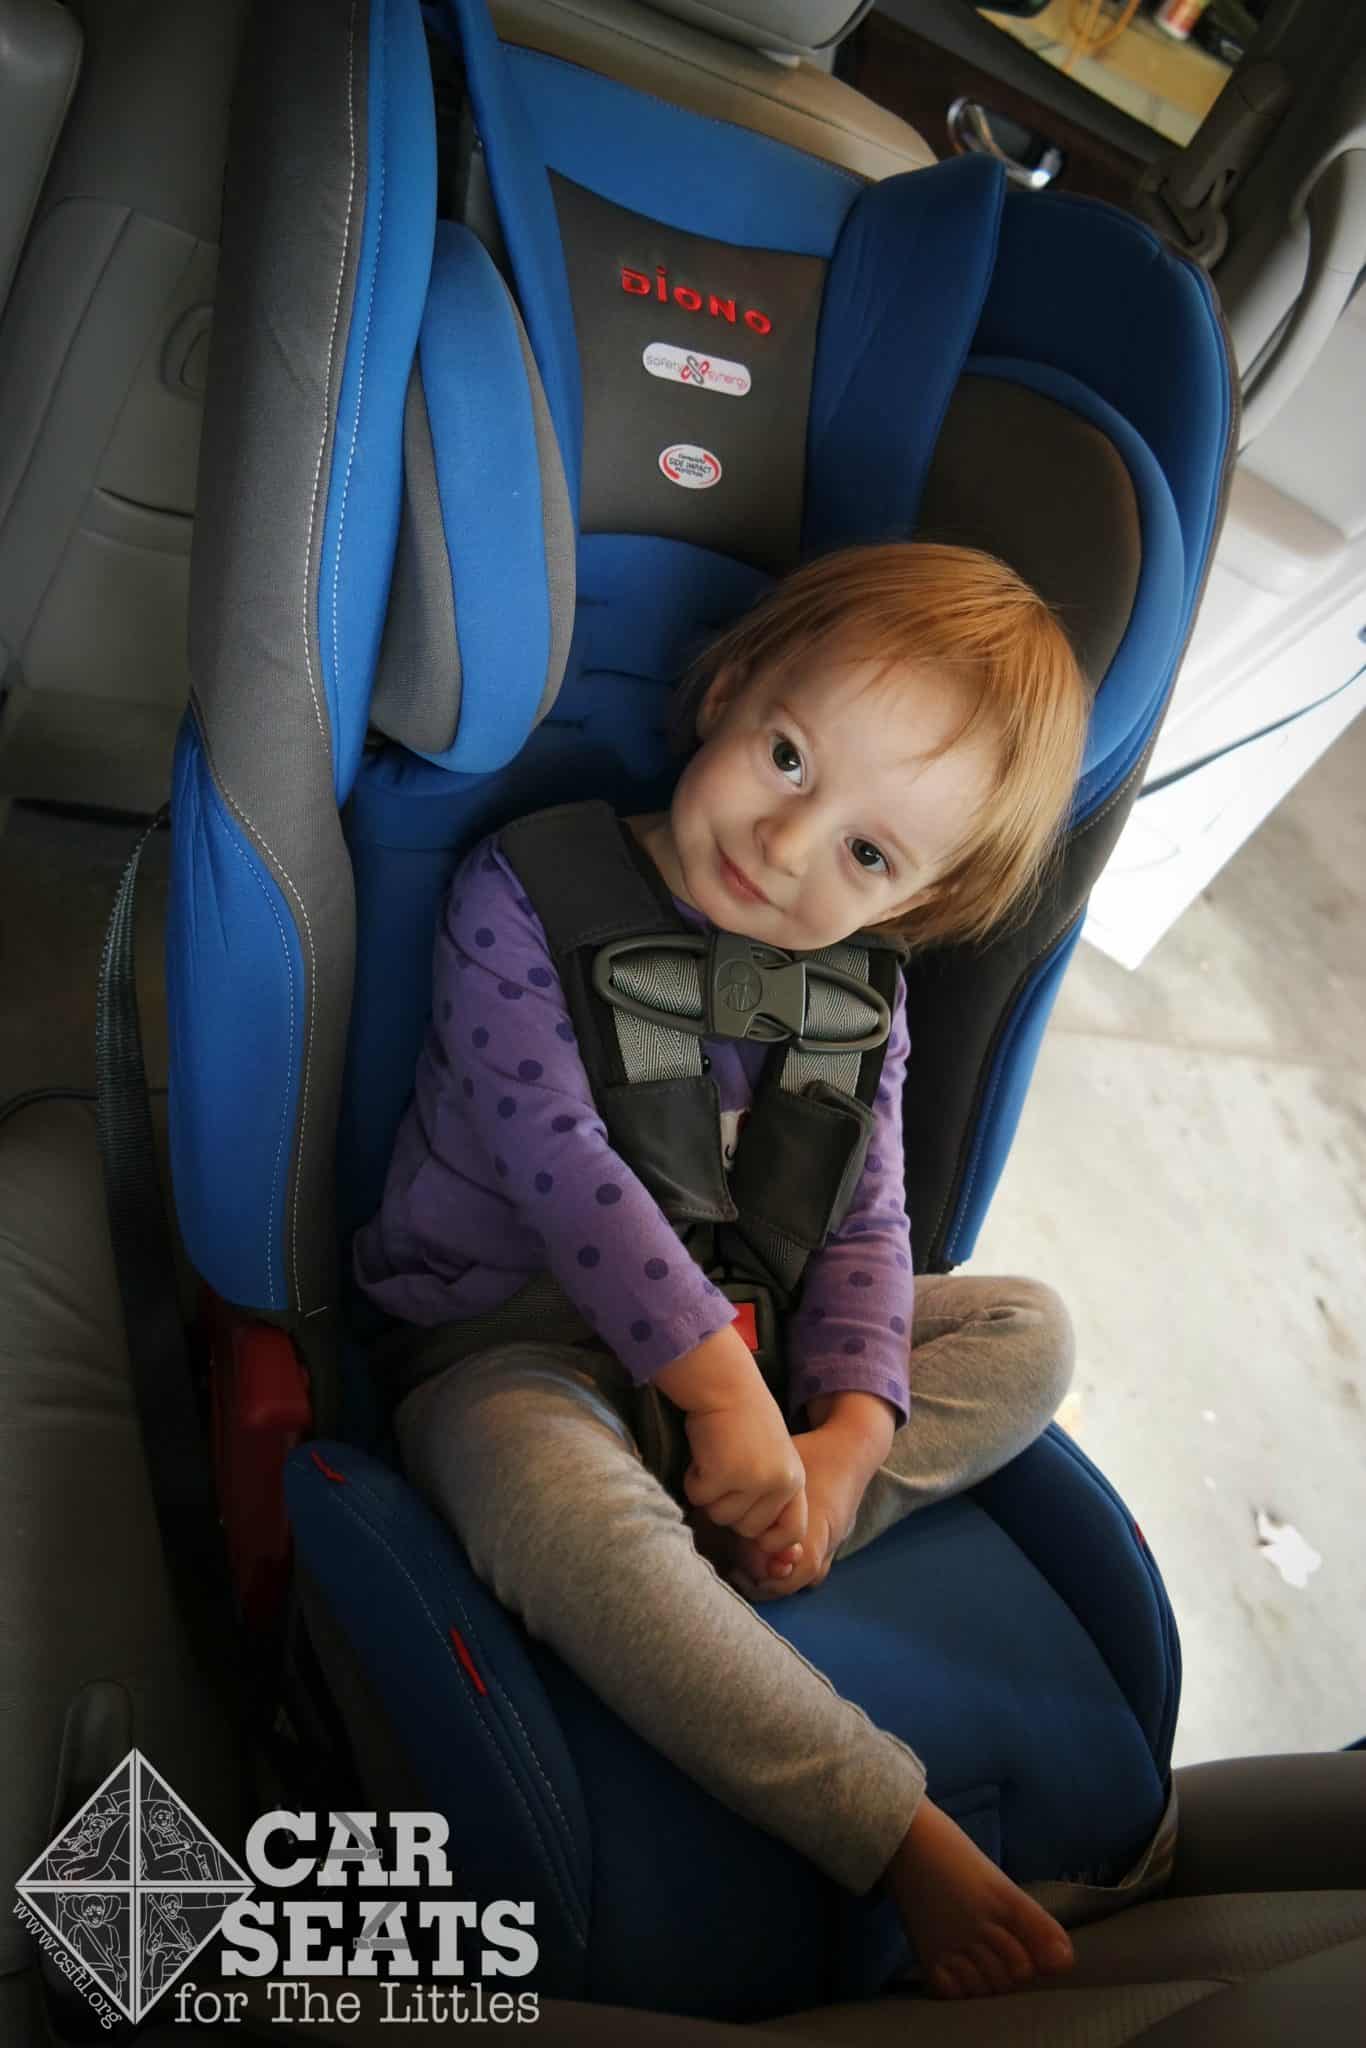
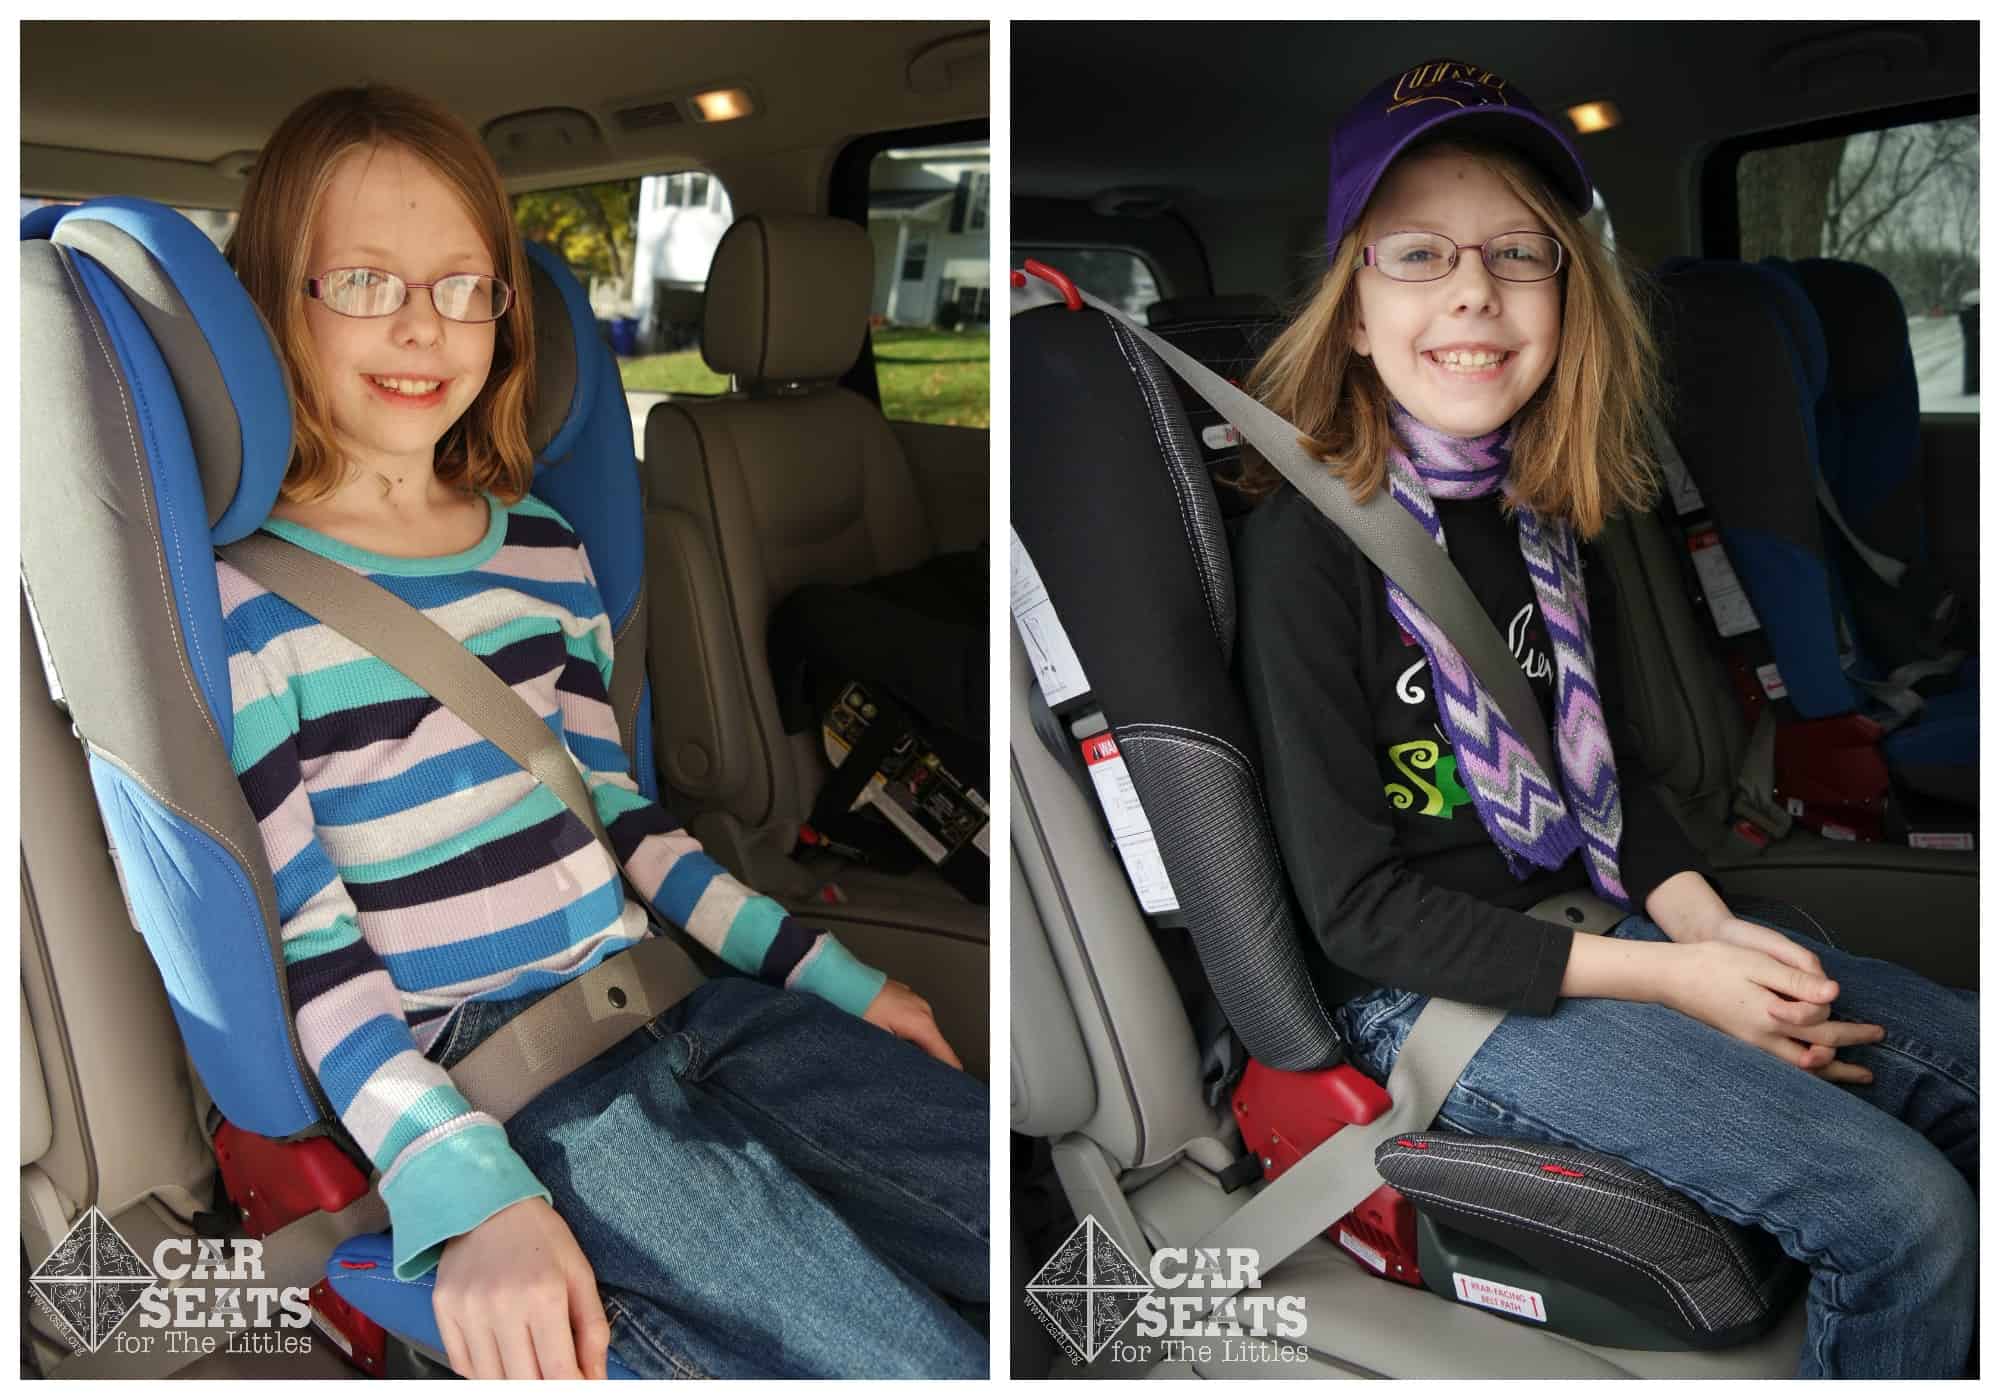
2.5 yrs, 23 pounds, 33″
Our two year old model also fit well in the Rainier sans inserts. She is right at the 3rd harness position so the headwings were adjusted down for her to the lowest position so that her head fit nicely between the headwings. I had the same issue with judging the tightness of the straps with her. She’s also so narrow that I worry about her being able to wiggle her shoulders out of the harness. The openness of the seat allowed for her to have much more leg room that other seats as well. She was able to throw her feet over the sides and put her feet in many different positions so she could sit comfortably. Remember lack of legroom does not equal a seat being outgrown rear facing or that she will be uncomfortable. It just means she has more options. She also seemed very comfortable with no complaints.
 4 yrs, 34 pounds, 39″
This kiddo has plenty of growing room in the Rainier still. She consistently asks to ride like her little sister does (rear facing), but she is too big for most seats. With this seat she would be able to ride rear facing for quite a bit longer. She is on the 3rd harness slot, so like Freya, the headwings have been adjusted down to the lowest position for her. The crotch buckle has been moved to the outer most position since she is over 30 pounds. The lower anchor limits for the Rainier is 35 pounds rear facing, so the seat can be installed with lower anchors for another pound before switching to a seat belt installation. She was really excited to be rear facing and was comfortable in this seat.
Forward Facing
- Forward facing weight range: 20-65 pounds. (Note: versions of this seat manufactured prior to September 2017 had a different maximum weight limit.)
- Forward facing height range: 57″ or less
- Lower anchor weight limit: forward facing 40 pounds
I actually had a hard time finding a child that fit forward facing in the Rainier. The combination of the tall shell height, tall maximum height limit rear facing, and the high maximum rear facing weight limit, most children can rear face until they fit the booster. One of my models would actually still fit rear facing, but is showing what he looks like forward facing in it.
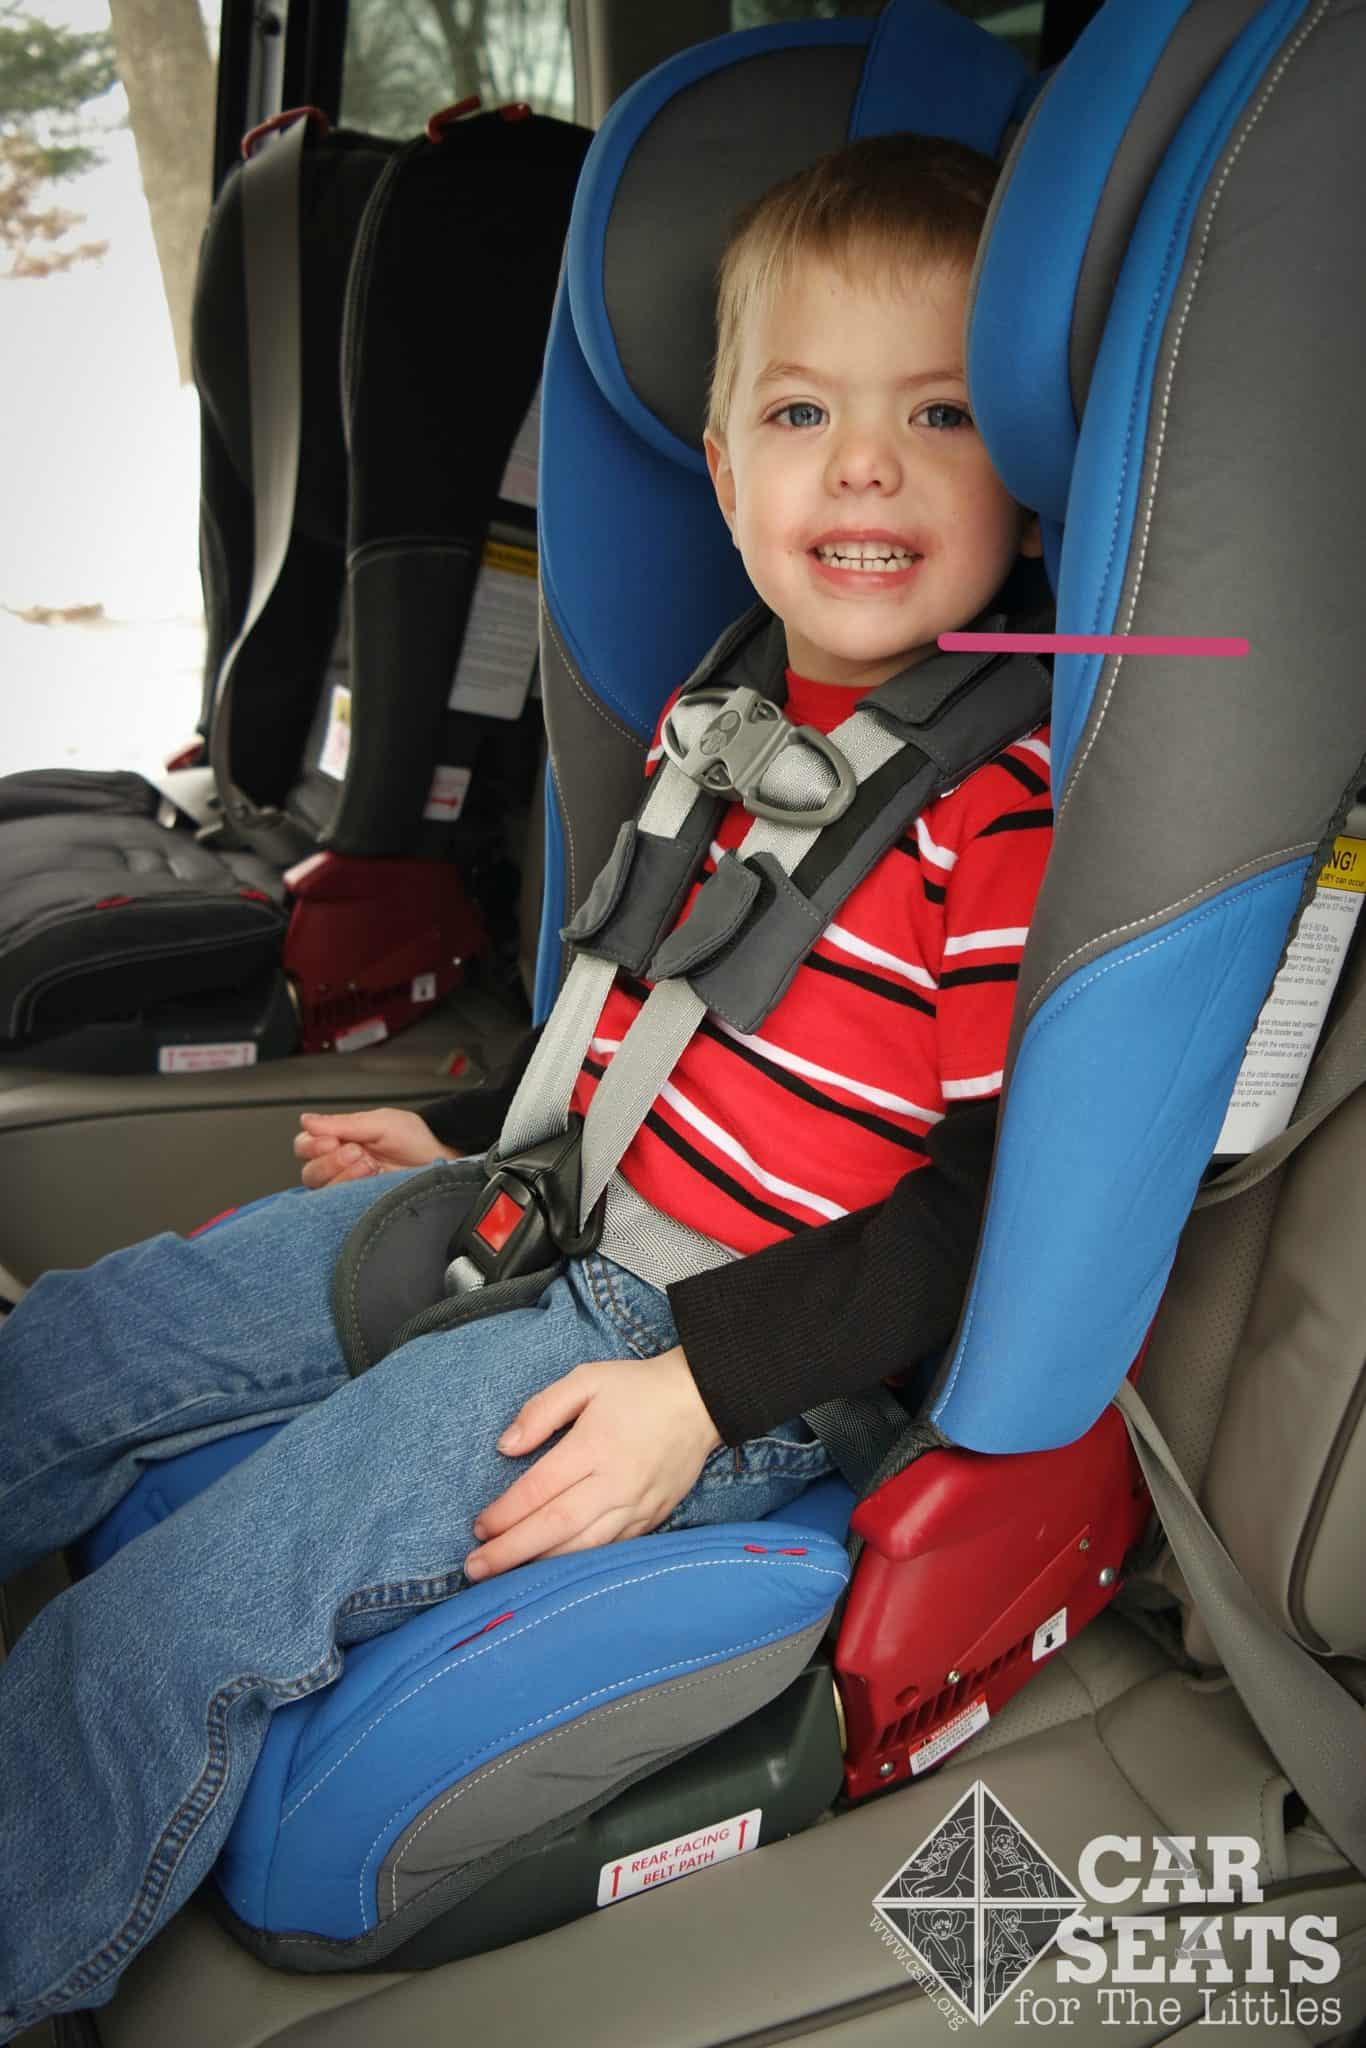
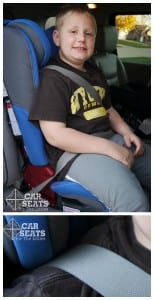
4 yrs, 40 pounds, 36″
*Disclaimer- the headwings are too high on him. The pink line on the photo shows where it should be. I had him harnessed in the seat and ready for the photo before realizing they weren’t adjusted correctly. The headwings are extremely difficult to adjust with a child in the seat.*
He fit well in the Rainier with plenty of growing room until he reaches 50pounds and is mature enough for booster use. Since he is 40 pounds, the SafeStop is not being used and the seat is installed via seat belt. His shoulders were just barely over the 2nd to top harness slot, so he is on the top harness slot in this photo.
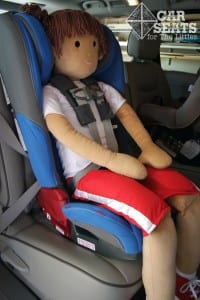
Huggable Images Doll – 6 yrs, 46 pounds, 48″
Our 6 year old doll is still too light to use the Rainier as a booster, but as you can tell, she is right at the limits of the harness. Diono allows the use of the harness with the child’s shoulders over the top harness slot, but the headwings pose a pratical impedence to this extended use. The child’s shoulders will bump into the bottom of the headwings before the max height of 57″ or restriction of ears at the top of the shell are reached. So she will technically reach the limit of the harness the same time as the booster, height wise, but may not even reach the minimum booster weight before outgrowing it. Her overall fit is good in the harness though.
Booster
- High back booster weight range: 50-120 pounds
- High back booster height range: 40″ and taller, and child’s shoulders at or above 4th harness position
Once the parent/caregiver has removed the harness and used LATCH to attach the car seat to the vehicle seat, the seat belt needs to be routed through the shoulder belt clip behind the headwings. This is no easy feat and can cause the belt to bind up in it.
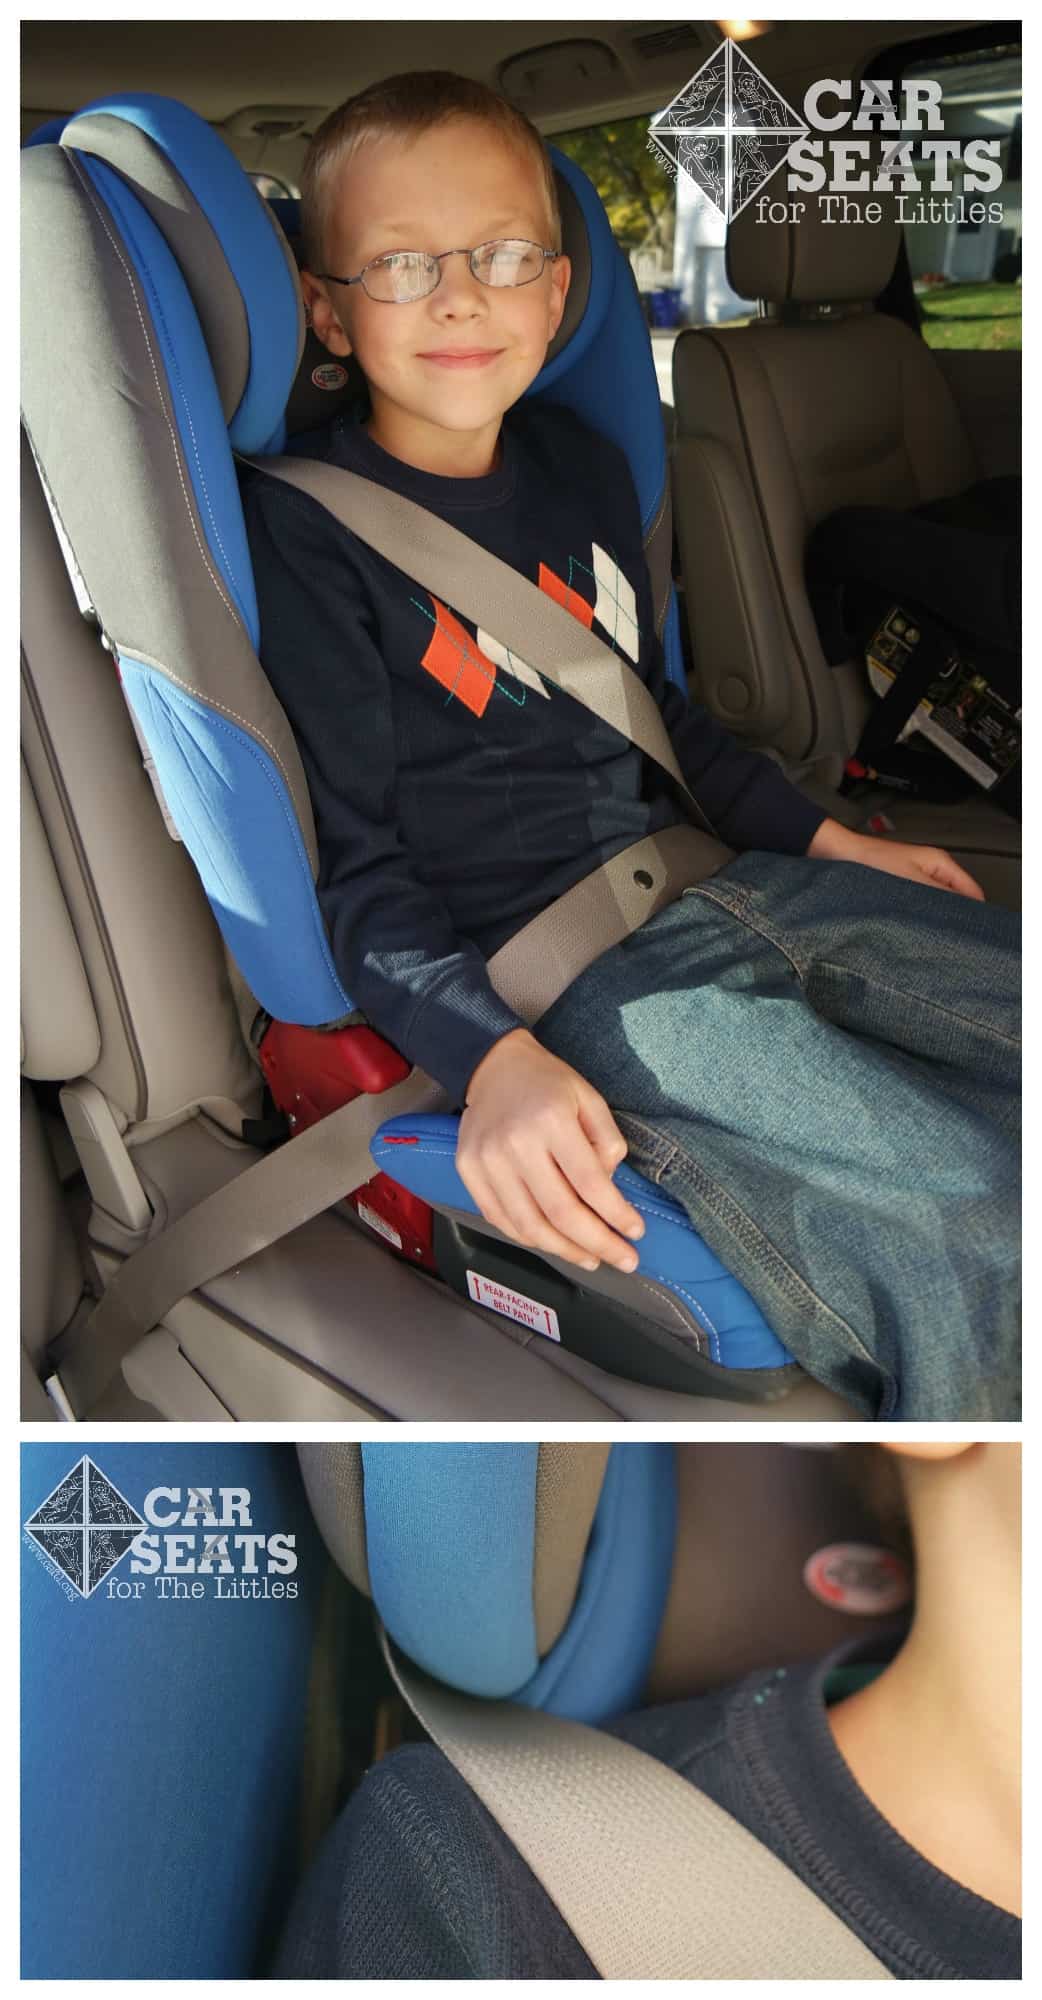
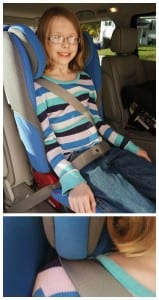
7 yrs, 57 pounds, 52″
This kiddo has the perfect fit for the Rainier in booster mode. His shoulder is below the headwings, yet above the top harness slot. The belt sits nicely across his upper thighs as well as squarely on his shoulder. He was comfortable with not much wiggle room.
9 yrs, 64 pounds, 55″
Although she is quite a way from outgrowing the stated limits in booster mode, she didn’t fit as well as our 7 year old model. The headwings pushed down on her shoulders causing her to have to keep from slouching down to get comfortable. The belt fit was great though, similar to our 7 year old model above. Legally, this kiddo is old enough to be in the adult belt only, but still doesn’t safely fit with no booster. So she would need another booster before moving on to adult belt alone.
9 yrs, 115 pounds, 52″
I was very interested to see how this 9 year old model would fit with being only 5 pounds away from the weight limit of the seat. He also has a taller torso than both of our other booster models, even though his overall height is shorter. He was extremely uncomfortable and had an unsafe fit. His shoulders were above the bottom of the headwings. The lap belt also kept slipping off the red belt guides at his hips. He is legally able to ride without a booster, but cannot safely do it. So he would also need another booster until he’s ready for the adult belt alone.
Huggable Images doll – 8 yrs, 80 pounds, 57″
Our very compressable doll is right at the top height limit of the Rainier in booster mode. As you can see, there’s no way that he would fit correctly at his height, even though he’s 40 pounds under the weight limit. This is also an unsafe fit. Even though he’s at the legal age and size to use the adult belt, he still doesn’t fit it properly. So he would also need a different booster before he’s ready to move up.
Important Information: Where to find

Date of Manufacture can be found on the side of the seat’s left hand side. It states the model and manufacture date.

Expiration is only listed in the Rainier instruction manual on page 7.
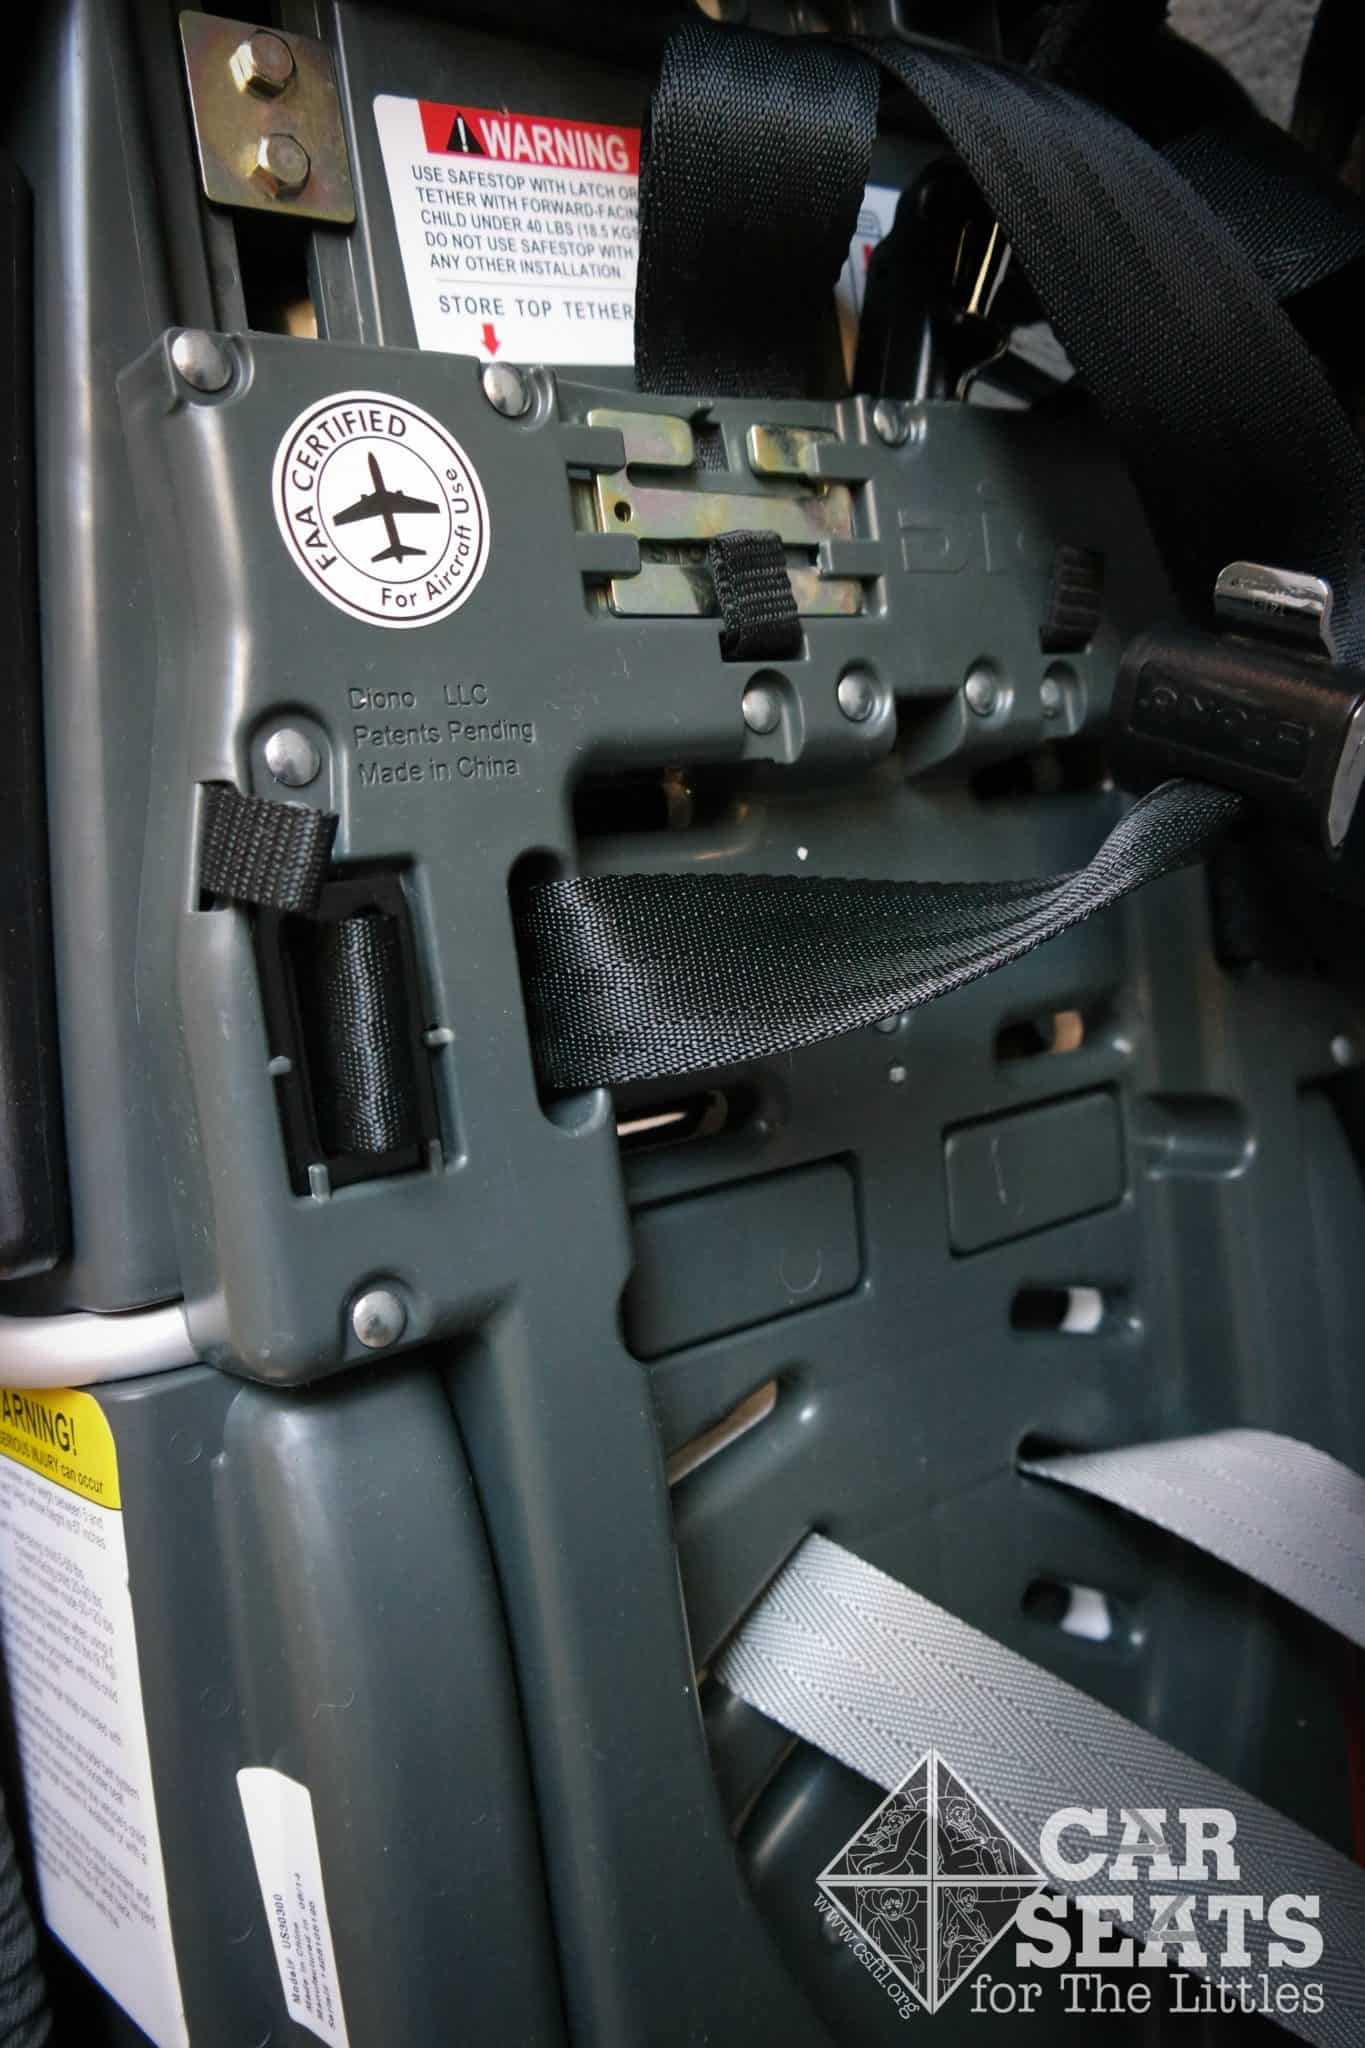
FAA approval label can be found on the back of the seat towards the top where the strap storage compartments are located.
Diono Convertible Seat Comparisons
Diono currently has 6 convertible car seats on the market each with very slight variations. Check out this chart to find out how each differs. Also check out the following real life comparisons of the Diono Radian RXT, Diono Rainier, and Diono Pacifica.
[komper pid=110,107,109,106,105,108 category=12 compareform=no]
Booster Fit: Diono Rainier vs. Diono Pacifica
The Diono Pacifica is part of their newest line up of convertible seats along with the Rainier. The Pacifica is the updated model of the Radian R120 and like the Rainier, adds 5 pounds to the rear facing weight limit and 10 pounds to the forward facing weight limit. As well as adding deeper and wider sides. The only difference between the Rainier and Pacifica is the headwings and how the seat belt is routed in booster mode. The Rainier’s booster guide is behind the headwings and the Pacifica’s is at the top of the shell. I wasn’t very pleased with the belt guide on the Rainier due to the extra effort it takes to get it threaded and it has to be threaded back up after releasing the buckle. I was thinking the Pacifica would have better booster fit due to the belt guide being less encumbered. So it surprised me that the 2014 IIHS booster ratings put the Rainier in the good bet category and the Pacifica in the not recommended category. I was able to get my hands on a Pacifica to test the difference and it was pretty surprising.
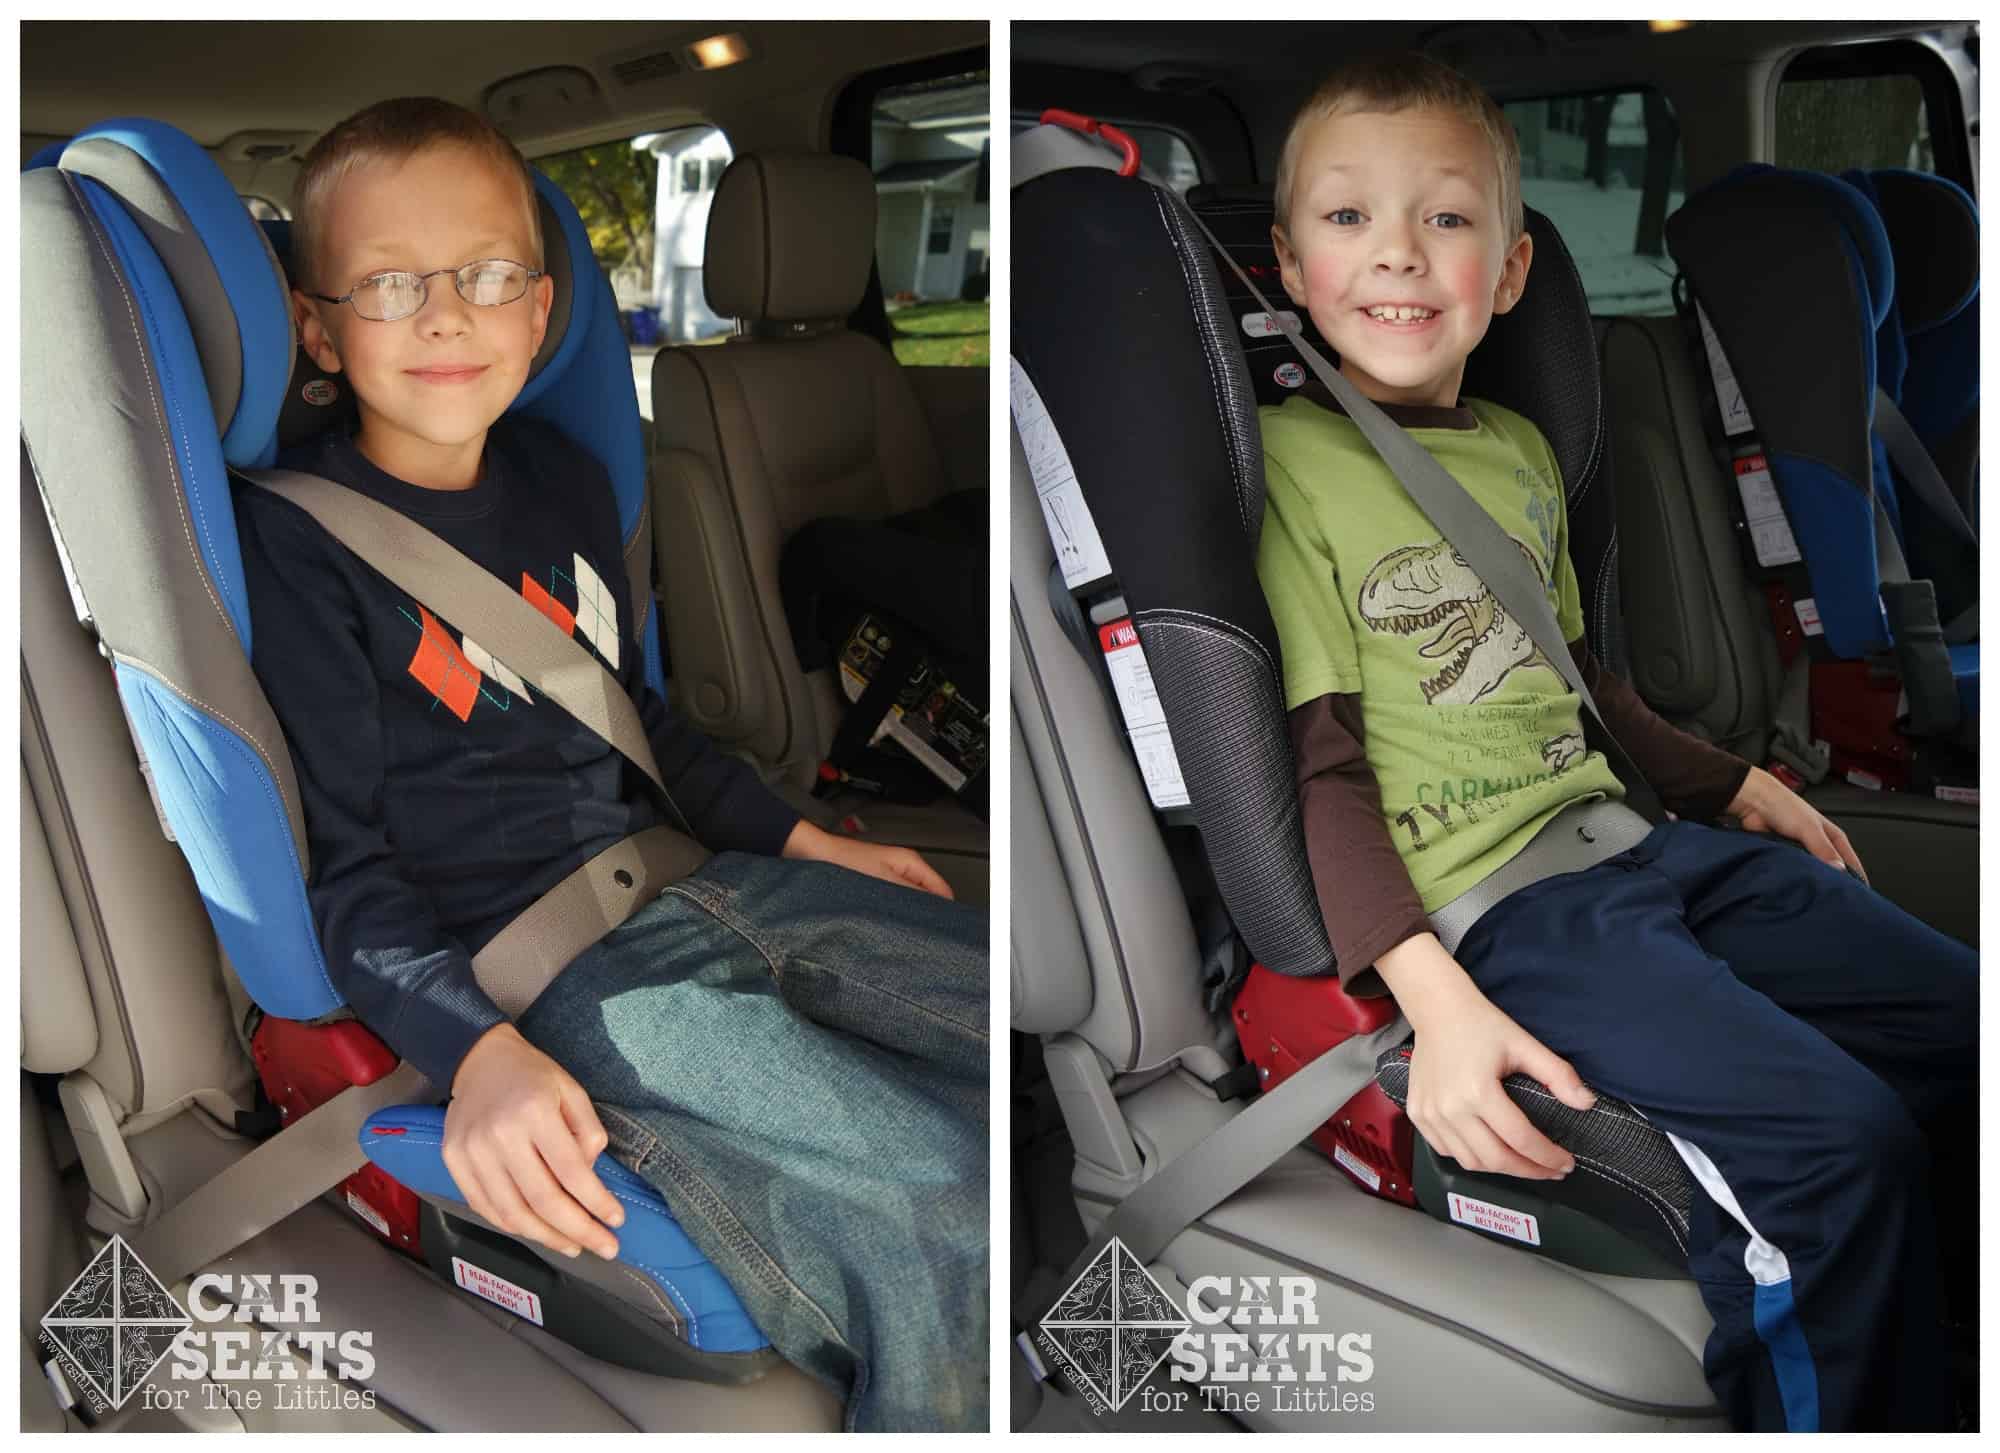
7 years old
As we saw earlier, our 7 year old model had perfect booster fit in the Rainier with the lap belt positioned over his upper thighs/hips and the shoulder belt centered on his shoulder. The Pacifica definitely had a worse fit with him. The lap belt was still positioned correctly, but the shoulder belt isn’t on his shoulder at all and it cuts into his chin/neck. Not a good fit at all.
9 years old
This 9 year old model was a bit squished under the headwings of the Rainier so I thought the lack of headwings would help on the Pacifica. She’s leaning forward a bit in the Pacifica and it still is pulled away from her shoulder and too high on her neck/chin.

9 yeard ols
Like our other 9 year old model, this kiddo has the issue with his shoulders being pushed down by the headwings. The Pacifica solved this problem, but his shoulders were still very tight inside the sides of the Pacifica. He also had the issue of the shoulder belt sitting too far forward. Because he is only 5 pounds away from the weight limit of the seat, this shows me that both the Rainier and Pacifica have a seemingly overinflated booster maximum weight limit.

Special Features for Travel
Diono makes the only convertible car seats on the market that can fold flat and be worn for easy transportation through an airport and used on a plane. At 30 pounds, it’s pretty heavy for use as a travel seat but it has some features that work well for travel.

Diono Radian, folded with Diono carry straps
Carry straps are available separately. Attach one strap for a single shoulder carry or 2 for a backpack style carry. The seat is FAA approved for harnessed use on aircraft. A seat belt extender is VERY helpful for rear facing installations on airplanes.
Overall Impressions
Pros
- Tall seat shell and high rear facing height maximum for a long-lasting rear facing seat
- High weight limits in all modes
- Narrow to fit small spaces
- Deep and low sided seat pan leaves lots of leg room
- Headwings for extra head support when sleeping
- Good booster fit for children within the lower limits of booster mode
Cons
- Over inflated limits – Most children will not be able to fit to the high weight limits, thus giving parents a false sense of longevity.
- Cumbersome to switch between modes, especially booster
- Although it has good booster fit, the booster is outgrown by height about the same time as the harness in forward facing mode.
- Ease of use – too many steps and directions to follow thus increasing the likelihood of misuse
- Booster won’t last until a child is ready to move to an adult belt.

Interested in a Diono Rainier for your little (or big) one? The Diono Rainier can be found on Amazon.com
Diono graciously provided the Rainier car seat used in this review. As always, the opinions are our own. Originally written by Angela Tastad. Edits maintained by CSFTL.